
Replace cam chains?


Replace cam chains?
Hey all.
My vq is torn apart. It had a nasty chain rattle. I bought a timing kit with sprockets chains guides tensioners.
Its obvious theres plastic in my oil pan from the guides being eaten.
Should i bother to replace the cam tensioners ? Then i must crack open the cam sprocket bolts... Just wondrring if its worth it. Dont bring your conjecture. Experience only.
I was going to replace the main chains guides tensioners anf the chain itself
Thanks

Senior Member
Joined: Jan 2011
Posts: 3,037
From: Central AR
Since we've seen VQ30DEs (that I know about) run close to if not over 400,000 miles before a guide or tensioner/guide failure cause the chain to jump and destroyed the engine. Personally, I think the upper tensioners will be good for at least another 100,000 miles or more.
I had the main tensioner replaced on my I30 at roughly 228,000 miles through the access door. It has about 265,000 now and still runs quietly. The previous owner didn't properly change the oil so this was an abused engine when I got it.
If you have the timing cover off, I would change the water pump while you have easy access. That is unless you have already changed it or it was recently replaced.
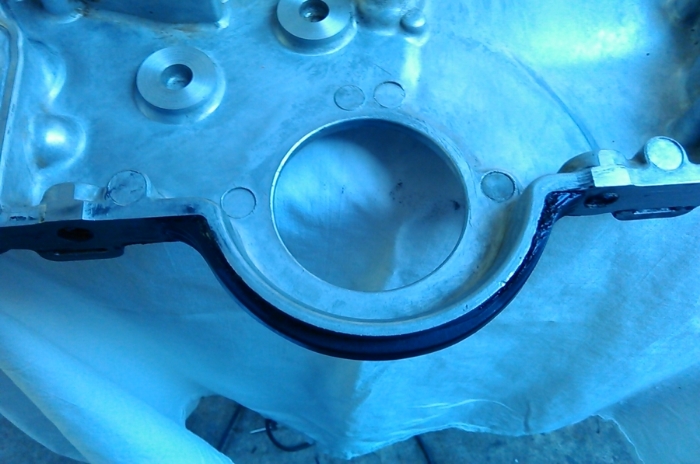
One trick that I did when I had my TC off to check out everything and to reseal the upper oil pan, was to re-torque the bolts that hold the rear timing cover to the block. Be careful not to over torque a bolt and snap it off. That worked out and the engine is dry as a bone. I read about people having problems with leaks behind the rear timing cover that are a pain to resolve. So I wanted to remove any slack between the rear TC and the block that occurred over the years without going into removing the chains and all that goes into pulling that operation.
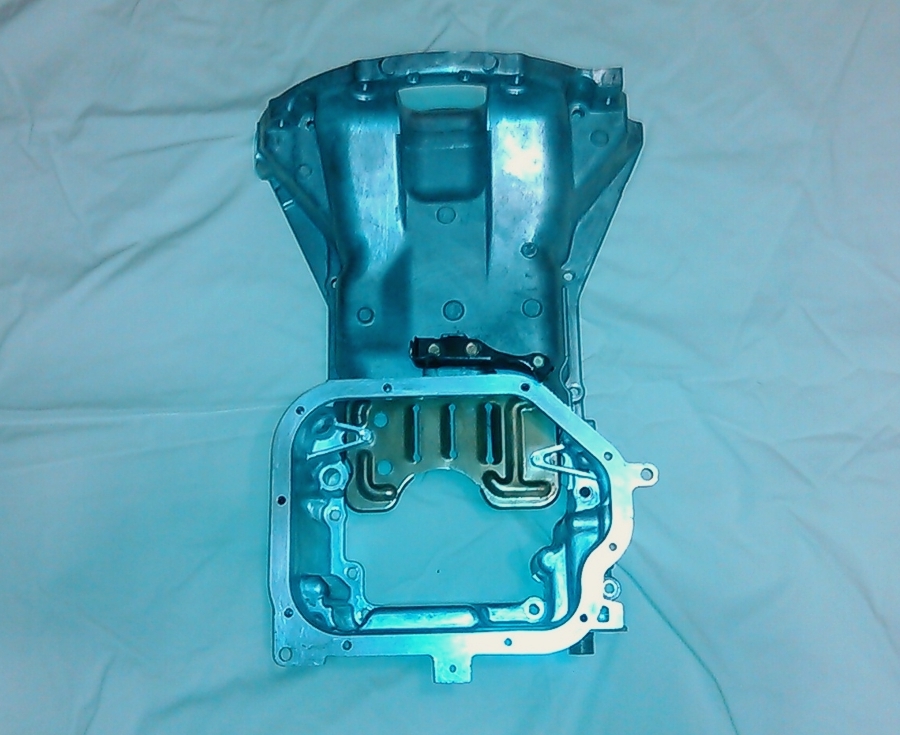
Have you pulled the upper oil pan to re-seal it and to replace the rear half moon gasket?
I could not get the front TC back into place without having the upper oil pan removed. I've read about a guy that replaced the front TC by having a helper press down on the TC while he bolted it into place after replacing the guides. The thing that makes reinstalling the TC without out having the upper oil pan off is the new half moon gasket is thicker than the old one. If you don't have the upper oil pan off already, you'll see what I'm referencing when you try to reinstall it.
I'll post some pictures of things that I learned along the way.
I had the main tensioner replaced on my I30 at roughly 228,000 miles through the access door. It has about 265,000 now and still runs quietly. The previous owner didn't properly change the oil so this was an abused engine when I got it.
If you have the timing cover off, I would change the water pump while you have easy access. That is unless you have already changed it or it was recently replaced.
One trick that I did when I had my TC off to check out everything and to reseal the upper oil pan, was to re-torque the bolts that hold the rear timing cover to the block. Be careful not to over torque a bolt and snap it off. That worked out and the engine is dry as a bone. I read about people having problems with leaks behind the rear timing cover that are a pain to resolve. So I wanted to remove any slack between the rear TC and the block that occurred over the years without going into removing the chains and all that goes into pulling that operation.
Have you pulled the upper oil pan to re-seal it and to replace the rear half moon gasket?
I could not get the front TC back into place without having the upper oil pan removed. I've read about a guy that replaced the front TC by having a helper press down on the TC while he bolted it into place after replacing the guides. The thing that makes reinstalling the TC without out having the upper oil pan off is the new half moon gasket is thicker than the old one. If you don't have the upper oil pan off already, you'll see what I'm referencing when you try to reinstall it.
I'll post some pictures of things that I learned along the way.
Senior Member
Joined: Jan 2011
Posts: 3,037
From: Central AR
When I reinstalled the upper oil pan without any help, I had trouble getting it to line up with one hand and while installing the bolts with the other hand. I learned on that one to take two or four of the long bolts that are used other places to set the position in the upper oil pan to use as guides to keep the position from slipping while I pushed it into position and installed the other bolts that were easy to access. Once I had the upper oil pan into position and a couple of bolts tightened so it was secure against the block, I removed the long bolts and placed them in the proper position.

I remember making a handle out of mechanics wire that I used to guide the TC into position during installation.


I remember making a handle out of mechanics wire that I used to guide the TC into position during installation.

Senior Member
Joined: Jan 2011
Posts: 3,037
From: Central AR
One change that I made during the TC project was the change the routing of the crankshaft position sensor and the oil pressure switch harness routing. I thank myself every time I do a filter change and avoid getting any oil on the wiring.
Without going into great detail about the routing change and the benefits that I receive from it, take a look at the following slideshow. There is an indented area behind the crankshaft pulley where the harness wire can be routed without it really being near the outer edge of the pulley. I will make this mod again on Max IV in coming months.
http://s286.photobucket.com/user/Rid..._Wiring?sort=9
Wow. I shall read all of this and respond a bit later as im still working. I have read your posts elsewhere on maxima.org! You really are a french chef of clean engines.
I replaced tensioner through access door. Not much of a difference. Thats when i started pulling everything and found plastic in the oil pan. I will post pictures. Its like grated cheese.
My AC bearing was making half of my metallic scraping noise. After diagnosing that i was able to hear a standard chain rattle. At first i thought it was DOA withthe myriad of noises it made.
Whew. I've got the timing cover cracked open. I did loosen all 20 bolts in reverse torque procedure order. After cracking by hand, I removed with my air ratchet. That was a breeze - one of the few easy steps so far. Now I realize the lower left ear of the timing cover is behind the power steering pulley. Do I loosen the tensioner to the PS pump all of the way? It's raining pretty hard, haven't gone back out to establish how to free timing cover from the PS pulley. My new Ingersol impact gun would not budge the crank bolt so I used the starter trick. That worked flawlessly. I also took a giant sheet of paper, drew the timing cover pattern, labeled all 20 bolt locations and one by one put the bolts in their place... I wasn't sure if there were different lengths.
The hardest points have been power steering pump bolt that goes through the body to the timing cover and alternator bolts. Other than that just generally time consuming. If I were to do this again I could definitely do it in one day [removal]. This is my second or third weekend passively working on it. Maybe 3-4 hours a session. Although I'm doing more than just the timing set.
So far everything has gone very well. I will spend some time to degrease everything that's accessible... it is in bad shape. After all the brakeleen I will switch to soap and water and a scour pad. Scrub scrub scrub. I'll search some of your posts on aluminum cleaning as well. Can't tell if the chain is stretched since it's an oil pressure based tensioner.. A guide has definitely been eaten through though. As to which one, i will find out shortly.
Then... brakes are shot, windshield cracked, no display on radio, one CV boot is torn, valve covers leak, has knock sensor code and evap code.
Photos will come tomorrow of the damage.
Senior Member
Joined: Jan 2011
Posts: 3,037
From: Central AR
I remember there was a bolt in the power steering pump area that also gave me a headache. I don't recall having a problem removing the PS pump pulley.
I see in the picture below the PS pump was mounted at the time I took this picture.
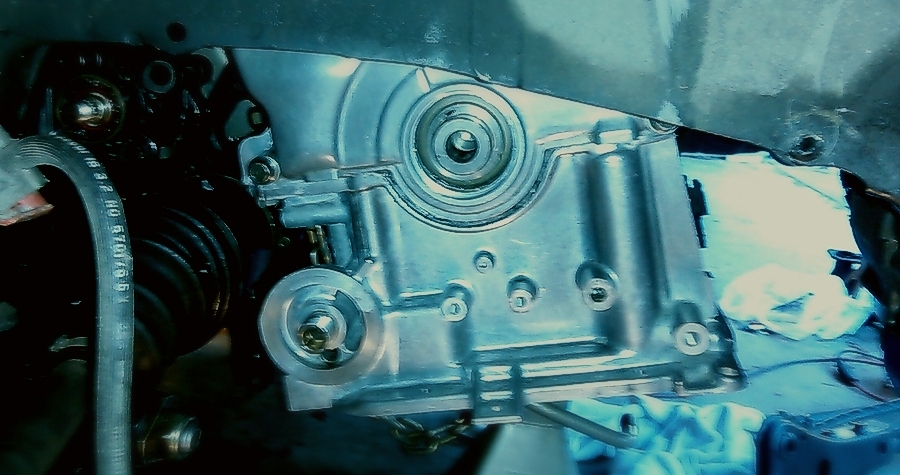
I called out the following 14mm bolt in the picture below as it must have given me problems at the time.

This back side of the TC picture shows all of the bolt holes.
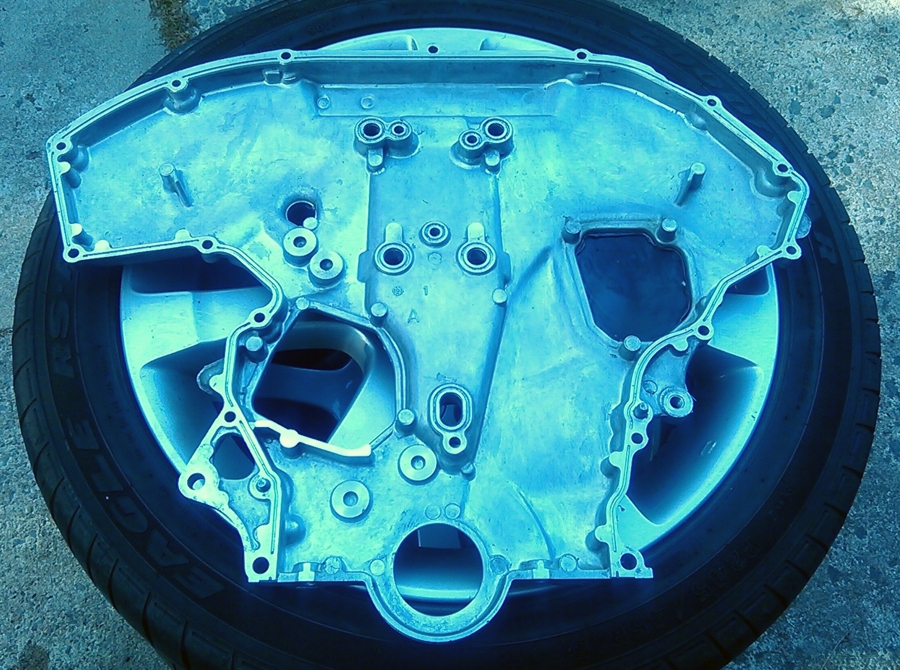
Here are two more pictures of bolts where I had a surprise when removing the TC.


I see in the picture below the PS pump was mounted at the time I took this picture.
I called out the following 14mm bolt in the picture below as it must have given me problems at the time.

This back side of the TC picture shows all of the bolt holes.

Here are two more pictures of bolts where I had a surprise when removing the TC.


Last edited by CS_AR; Oct 8, 2016 at 07:17 PM.
So clean! So that's it - I will remove PS pump pulley. I tried for a bit but I couldn't get it very well. I'll lower engine as much as I can and try again. Man... I'm preparing myself for also removing upper oil pan, crossmember, exhaust y pipe [was going to order the warpspeed y pipe anyway] and then intake manifold... This project is more of a project than I planned. Being my first Maxima, I don't know what to expect. So far, I really like the platform.
Senior Member
Joined: Jan 2011
Posts: 3,037
From: Central AR
When you get the TC off, it is a good practice to get everything lined up on top dead center (TDC) with the gold link, the crankshaft mark, and the dowel marks. The first time I took the TC off of Max III's first engine, I found the camshaft chain color links were opposite for each cam. It doesn't really make a difference if you find your camshaft chains links like the picture.
The FSM goes into detail about TDC alignment.
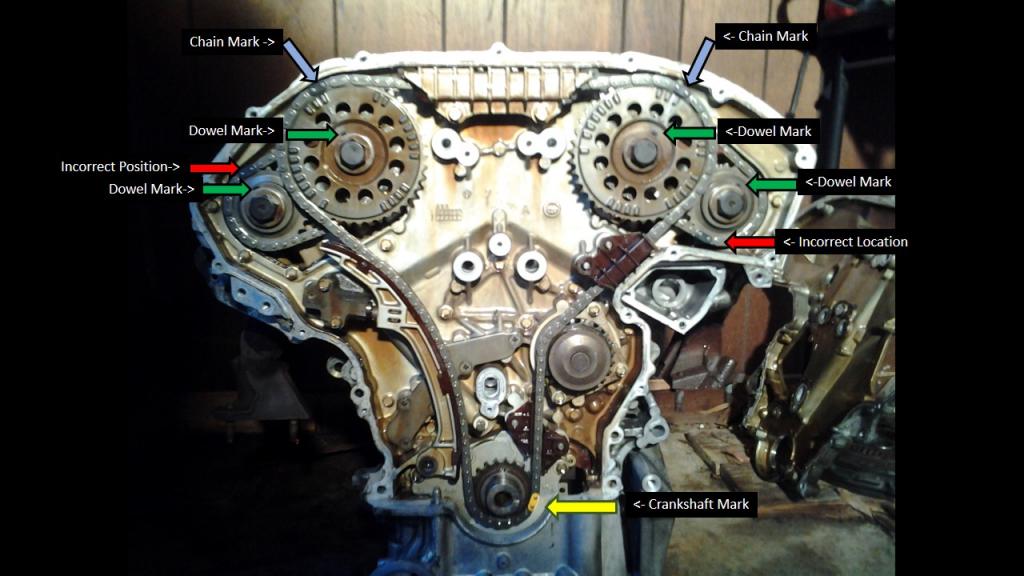
The main point is to get everything lined up on TDC before you start working with the guides or water pump. If something goes wrong and the chain jumps a notch, you know how everything should be lined up. I like to use my own markings once I've found TDC so it is easier to recover if the chain jumps a notch.
My first big car project was to replace the timing chain guides on a VH45DE. That was a great experience.
One thing I learned on that project was to zip tie the chains to keep it from slipping when replacing the guides. If you think you might have some chain slack while working with the tensioner, guides, or water pump, you use a big zip tie or some mechanics wire to pull out the slack so the chain won't jump.
Senior Member
Joined: Jan 2011
Posts: 3,037
From: Central AR
Here's write up on upper oil pan removal in the link below. I found it to be extremely helpful.
https://maxima.org/forums/4th-genera...n-removal.html
https://maxima.org/forums/4th-genera...n-removal.html
Senior Member
Joined: Jan 2011
Posts: 3,037
From: Central AR
Here's a link to a thread on installing a Warpspeed Y-pipe.
The Armstrong 1/2 drive universal joint and plenty of PB Blaster made all the difference on that job.
https://maxima.org/forums/4th-genera...oval-tips.html
The Armstrong 1/2 drive universal joint and plenty of PB Blaster made all the difference on that job.
https://maxima.org/forums/4th-genera...oval-tips.html
Thank you for all of your time. You have really been a huge help. I now know exactly what's going on with doing the VQ's timing chain job  This project has been paused until this coming weekend. My lady has broken her lower control arm, cv axle and some other components by hitting a curb over the weekend. I'll be chipping away at that repair in my nights after work this week.
This project has been paused until this coming weekend. My lady has broken her lower control arm, cv axle and some other components by hitting a curb over the weekend. I'll be chipping away at that repair in my nights after work this week.
Bump... Wow time flies. Haven't touched the Maxima in a month. I replaced all suspension components on the 2000 Ford Focus and it drives straight again Had to replace inner and outer tie rod, sway bar link, lower control arm, cv axle and wheel/tire. Had to cut fender to get the door to open again.
Maxima... I was able to loosen the tensioner for the power steering pump all the way, then remove the horizontal mounting bolt for it. It then came way out of the way and released the power steering pump. All guides have a track worn into them - not that deep, but the main guide didn't slip and nothing is physically broken. There was quite a bit of plastic in the oil pan. I'm not fully convinced this repair will eliminate my noise - but maybe the timing system is more sensitive than I think.. Will assemble tomorrow. I'm not looking forward to getting the power steering pump back on
Had to replace inner and outer tie rod, sway bar link, lower control arm, cv axle and wheel/tire. Had to cut fender to get the door to open again.Maxima... I was able to loosen the tensioner for the power steering pump all the way, then remove the horizontal mounting bolt for it. It then came way out of the way and released the power steering pump. All guides have a track worn into them - not that deep, but the main guide didn't slip and nothing is physically broken. There was quite a bit of plastic in the oil pan. I'm not fully convinced this repair will eliminate my noise - but maybe the timing system is more sensitive than I think.. Will assemble tomorrow. I'm not looking forward to getting the power steering pump back on
Conclusion: Replaced main timing chain, main chain guides and the tensioner. Of course it involved lower oil pan gasket and main seal replacement. It is absolutely quiet now. I did waterpump while I was there, of course. I didn't see any obvious failure, but there was about a 1/32" groove in all guides. I cleaned sludge mountain while I was in there.
I walked the timing cover onto the upper oil pan. I used RTV in a can with trigger and it laid down a bead - made it very easy. I had to reposition about 3-4 times before I got the half moon seal in. I doubt it is absolutely square. I am prepared to do upper oil pan. We will see how bad/if it leaks (I'm betting it will). I will focus on eliminating my other issues before I go back to this leak.
Sidenote, I tried to start the car 24 hours after letting timing cover sit and dry... Didn't install AC, alternator or PS pump. It wouldn't start. I was freaked. Realized the alternator runs ignition system, so I just plugged it in. Started car from my '80s jump box from Sears (love this thing) and it was quiet. Beautiful, even. I can hear lifter clatter, but that will be another day. I was happy the repair worked. I have never worked on a VQ before.
With good compression and oil pressure, this clean Maxima was a great deal. I bought it non-running for $250 because the idler pulley came off. After starting it up, I found it actually had a bad timing chain slap. The body is in fantastic condition, but the interior has two panels that will need replacement. The steering needs addressed along with a brake overhaul. I'm sure many other things as well.
The new chain sorted out my rough idle. I have learned a lot about the VQ engine from this project, and I am happy to become a Maxima enthusiast. After I resolve an evap, egr and knock code, I will go to emissions and finally license this thing It has been sitting in the yard since August.
I walked the timing cover onto the upper oil pan. I used RTV in a can with trigger and it laid down a bead - made it very easy. I had to reposition about 3-4 times before I got the half moon seal in. I doubt it is absolutely square. I am prepared to do upper oil pan. We will see how bad/if it leaks (I'm betting it will). I will focus on eliminating my other issues before I go back to this leak.
Sidenote, I tried to start the car 24 hours after letting timing cover sit and dry... Didn't install AC, alternator or PS pump. It wouldn't start. I was freaked. Realized the alternator runs ignition system, so I just plugged it in. Started car from my '80s jump box from Sears (love this thing) and it was quiet. Beautiful, even. I can hear lifter clatter, but that will be another day. I was happy the repair worked. I have never worked on a VQ before.
With good compression and oil pressure, this clean Maxima was a great deal. I bought it non-running for $250 because the idler pulley came off. After starting it up, I found it actually had a bad timing chain slap. The body is in fantastic condition, but the interior has two panels that will need replacement. The steering needs addressed along with a brake overhaul. I'm sure many other things as well.
The new chain sorted out my rough idle. I have learned a lot about the VQ engine from this project, and I am happy to become a Maxima enthusiast. After I resolve an evap, egr and knock code, I will go to emissions and finally license this thing
It has been sitting in the yard since August.

Thread
Thread Starter
Forum
Replies
Last Post
dcam0326
5th Generation Maxima (2000-2003)
14
Oct 1, 2016 06:01 AM