When you click on links to various merchants on this site and make a purchase, this can result in this site earning a commission. Affiliate programs and affiliations include, but are not limited to, the eBay Partner Network.
The FSM talks about "clinching" the inner tie rod lock plate in ST-21. Here is a screenshot:
Inner tie rod lock plate diagram
How does one do this without any room or the ability to see the groove?
I can't see the slot once the tie rod has been installed - you can't tell where the slot is anymore.
Also, what tool is used for clinching? There is very little clearance in that space. I don't think I could even strike a nail through it - barely room to fit a hand.
The long flat head screw driver can pry off the lock nut it takes a couple of attempts but once it's off it's a green light. It always works for me. If your doing the inner rod get a special inner tool rod remover from autozone.
Last edited by vqmaxman; Feb 25, 2017 at 11:49 PM.
The long flat head screw driver can pry off the lock nut it takes a couple of attempts but once it's off it's a green light. It always works for me. If your doing the inner rod get a special inner tool rod remover from autozone.
Thanks! I already got the tie rod off. I'm trying to install a new inner and I don't know how to "lock" (or clinch) the new lock plate in place.
Thanks! I already got the tie rod off. I'm trying to install a new inner and I don't know how to "lock" (or cinch) the new lock plate in place.
It's easy just push it in on the new inner rod just as it shows on the pic of the tsm. With one hands on 9 o'clock and the other 4 o'clock position and push it on the grooves on the rods.
It's easy just push it in on the new inner rod just as it shows on the pic of the tsm. With one hands on 9 o'clock and the other 4 o'clock position and push it on the grooves on the rods.
Have you done it before by chance? Hoping for some insights.
There isn't enough room to get a pair of pliers in. It's too far recessed to get a screwdriver in at an angle less than about 65 degrees. I can't actually see the location of the grooves once the lock plate has been put into position. I can't reach the top groove from any location other than dead on. The bottom groove *might* be accessible but the frame seems to get in the way.
Use a flat head screwdriver to place in the groove then tap with a hammer to make the groove on the thread. Viola!!!!! Locked and go to next project
Thanks Les!
How does one use a flat head screwdriver to get the lock plate in? I have to attach the lock plate to the tie rod, torque the tie rod down, then clinch it.
Just tried using a finishing nail and a hammer but I can't fit the hammer in when my hand is holding the nail in place.
If I just pulled out the steering rack from the car then nothing would be in the way.
I'm getting the feeling you and I are the only ones that get bending the exposed tabs over the inner tie rod square edges, insures it won't loosen up.
Have any friends with 4 year old boys that are strong? Probably the only ones that could get their hands in there and get it right using a stubby screwdriver. Or maybe you can get it started with an offset flat screwdriver and needlenose vice grips?
I'll be doing mine in a couple of days, so if you figure it out, please post it here! Thanks!
[QUOTE=Shrout1;9141007]Have you done it before by chance? Hoping for some insights.
There isn't enough room to get a pair of pliers in. It's too far recessed to get a screwdriver in at an angle less than about 65 degrees. I can't actually see the location of the grooves once the lock plate has been put into position. I can't reach the top groove from any location other than dead on. The bottom groove *might* be accessible but the frame seems to get in the way.
I'm pulling my hair out.[/QUOTe
I have done this yes, many times and I work on cars for a living. It's easy just lube up the rod and the plate wack it on their it will fit.
Are you using MOOG replacements? It looks to me like the MOOG uses a different approach with a big crush type washer on the end. I've been running MOOG tie rod ends on 3 different Nissan vehicles that all use the same approach for 7 years without issue. I don't remember any issues. I do remember the MOOG locking washer seemed to have a more substantial design compared to the old OEM.
Ok.. Now I see why the MOOG Problem Solver line is different and most likely the reason I've haven't had a problem. It's all in the lock washer design.
Here's a MOOG Problem Solver inner tie rod. The Problem Solver line uses a different style lock washer that actually works like a crush washer for easy installation.
Here's a basic MOOG inner tie rod. I see the difference in the locking washer design.
Here's another brand of inner tie rod.
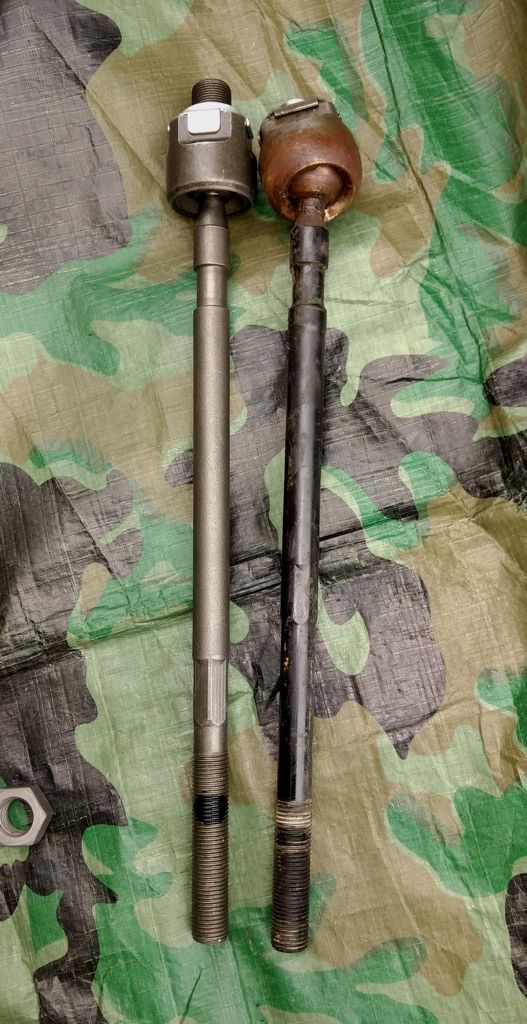
Comparing old the new inner tie rods. The inner tie rod end tool fits right over the washer ears that lay flat against the end body.
So when I tighten up the inner rod end with the tool, I am turning both the locking washer and the end while crushing the flange as the threads are torqued into the rack.
Since these are the only type of inner tie rods that I have ever used, I thought all replacements work this way.
As we can see, that is not the case and there is a difference between products.
OK attached are pictures that correspond to what's up.
One picture is the driver's side rack with the notch.
The other picture is the *old* inner tie rod with the old locking plate. Same design, somehow Nissan clinched at at the factory. With a robot. Before the car was put together. Or perhaps they have a team of leprechauns with *teeeny-tiny* hands that can reach into magical places and apply hundreds of pounds of pressure.
I'm ranting.
The other picture is the new tie rod attached to the rack on the passenger's side.
Put blue loctite on it and got it as tight as possible with my crow's foot tool. Tight as possible does not equal torque spec as the aftermarket tie rods don't fit the crows feet correctly. Clinching seems essential to me since I torqued it somewhere between 40-55 ft/lb but definitely not the 70 that is spec.
Ok.. Now I see why the MOOG Problem Solver line is different and most likely the reason I've haven't had a problem. It's all in the lock washer design.
Glad you posted! This is exactly the problem. The boot was torn and the only kit I could find on Rock Auto was a Beck & Arnley that had all the bits & pieces.
Ok so Steve at Nissan of Waldorf said the exact same thing as was posted above: blue loctite will do it.
That's a tech at the dealer so I should be good!
Not thrilled that it isn't clinched... but I really don't know how one would ever get enough force to crush the edges of that plate. So I'm going with it as it is. So far as I know Steve hasn't killed anyone yet.
If I know you was in waldorf or close by, I would have stop by, button up that clinch, then go about my merry way. Can't go wrong with the loctite
Yeah sadly Waldorf is an hour north of me :P So until I have wheels again the car won't be leaving the garage. That was definitely a thought though!
I'm going to leave the lock plate off the other tie rod so that I can fully torque it down. The blue loctite will take care of it and I should be just fine.
Are you using MOOG replacements? It looks to me like the MOOG uses a different approach with a big crush type washer on the end. I've been running MOOG tie rod ends on 3 different Nissan vehicles that all use the same approach for 7 years without issue. I don't remember any issues. I do remember the MOOG locking washer seemed to have a more substantial design compared to the old OEM.
Comparison pictures in my next post.
And why I'm tracking you in the snow. Following your footprints is so much easier than blazing my own! LOL
Problem Solver Inners and Outers and Beck/Arnley Bellows! No nylon ties until after the alignment!
Thank you for running faster than me and documenting the "Easy" button tricks!
I got the moog outers - quite lovely - have the grease fitment, jam nut, castle nut, cotter pin and all. Also I picked up some metal locking zip ties from Advance Auto and some fuel injector clamps for the front / back of the boots. I'll let you know how it goes...
I got the Beck/Arnley Bellows 103-2680 delivered for $12.99 each from AutoAnything.
Autoplicity had both the Moog ES3438 Outers and Moog EV352 Inners @ $22.07 and $21.95 each with shipping for $12.21. Delivered total $100.25
Hopefully, with the Moog Inners, I won't need locktite. Same as CS_AR.
I have enough headaches. LOL
Congrats to you for getting it done! Finally! Peace of Mind!
I'll keep those vendors in mind in the future! Had a heck of a time finding parts and those guys didn't seem to show up in Google.
Good luck doing anything behind the end of the inner tie rod. If you figure out a way I'll be interested to hear! Almost need a slide hammer or something... If I lived closer I'd come lend a hand lol.
And I'm still trying to get the axles done... Almost have the driver's side in all the way, it's being super stubborn. Maybe I can wrap it up this weekend! We'll see!
Moog new ITR's need a 1 3/16" Crowsfoot ITR Tool fitting for 95 - 99 Maximas. Moog ITR part number: EV352. So if you rent a tool and use MOOG replacement ITR's, make sure it has this size.
1. When working on the passenger side, turn the steering wheel all the way to the left. It pushes the rack rod further out to the outside of the car. Obviously, when working on the driver's side, turn the wheel all the way to the right. Set back to straight when (re)installing the boots/bellows.
2. If using the flat locking washer, screw drivers are quite frustrating to bend the tabs forward back over the flat edges, try using Channel Locks instead. If using the MOOG type washer clip, try taping a screw or something not too big, but big enough to indent on one of the jaws on the Channel Locks and place that where you need to indent the clip onto the notched steering rack rod. If possible, do both top and bottom notches. When I called MOOG, the tech said they also suggest Loctite Blue if you can't clinch the washer clip. Torque to 65 pounds before Loctite kicks in or you clinch/bend the washer clips.
I hope this helps some first timers! I've seen a lot of vague "How To's" that leave first timers unsure exactly what this entails. Hopefully, this will add a little more clarity.


 LOL
LOL