
Do OEM SE Front Springs have a top/bottom?


Thread Starter
Senior Member
Joined: May 2012
Posts: 1,621
From: Long Island
Do OEM SE Front Springs have a top/bottom?
I know the rear pair do. The differences at each end are apparent for the rears. The fronts have very slight differences. So, does it matter?
I bought a used set from CS_AR because other than the strut itself, I want everything else OEM. I'm tired of noise. So I have everything new, including 4 Koni STR-T (orange) Struts.
I took the used springs and cleaned them with Brillo and they cleaned up nicely. Then I went over them again with 0000 Steel Wool wet with Mineral Spirits to smooth them even more.
Then I clear coated them KBS DiamondFinish Gloss. PITA to work with but when you do it right, what a nice and tough clear gloss finish. I tried the spray first. Outcome was sub par, so I steel wooled them again with KBS #1 Thinner. Then I used the brush on version thinned 10%. Gave me a little too much texture, but went on thick. If I ever brush anything else again with this clear coat, I'm thinning it 20% for better work-ability and extended time. Let it cure 5 days.
Then I added tough, heavy walled (1/8" thick), heat shrink for insulators rather than using all the junk they sell out there.
Since the springs came from CS_AR, I knew I had to try to get close to what he'd do. I'm hoping this will cover me! LOL
Thread Starter
Senior Member
Joined: May 2012
Posts: 1,621
From: Long Island
And I polished and waxed the springs, to keep road junk from sticking too.
The one on the right was the first one I put the shrink tubing on. Made for high impact, so it's not going anywhere and will keep these quiet. NICE!
The one on the right was the first one I put the shrink tubing on. Made for high impact, so it's not going anywhere and will keep these quiet. NICE!

It definitely looks like nice work.
I don't know if there is an up or don for the springs. Maybe if you try setting the spring in the seat, maybe you can tell/see if it is a good fit. As for the insulator, I think you probably used more than is necessary. All you really need is something between the spring and the seat.
I don't know if there is an up or don for the springs. Maybe if you try setting the spring in the seat, maybe you can tell/see if it is a good fit. As for the insulator, I think you probably used more than is necessary. All you really need is something between the spring and the seat.
Thread Starter
Senior Member
Joined: May 2012
Posts: 1,621
From: Long Island
Thanks Guys!
Yeah Dennis, I know it's overkill. But I like it like that! A little too much is just enough. I'm tired of 100K miles of noisy suspension from GR2's to Monroe Quick Struts to Moog Problem Solver Strut assemblies and the likes of inferior parts.
At this point, the rattling and banging has me insane and I can't even think of doing anything else on the car. And it needs a lot with 206K.
Overkill is better than Postal! Besides, you never know what might pop into my head that can improve my quality of life when I can hear myself think again! (or Not) LOL
Time to assemble the fronts. Pictures at 11.
Yeah Dennis, I know it's overkill. But I like it like that! A little too much is just enough. I'm tired of 100K miles of noisy suspension from GR2's to Monroe Quick Struts to Moog Problem Solver Strut assemblies and the likes of inferior parts.
At this point, the rattling and banging has me insane and I can't even think of doing anything else on the car. And it needs a lot with 206K.
Overkill is better than Postal!
Besides, you never know what might pop into my head that can improve my quality of life when I can hear myself think again! (or Not) LOLTime to assemble the fronts. Pictures at 11.
Thread Starter
Senior Member
Joined: May 2012
Posts: 1,621
From: Long Island
I used the best stuff I could find (CFW 1100) that seems to be an upgrade of the usual. http://www.dsgcanusa.com/literature/...s/DATA_CFW.pdf
Came out great on the front springs, but the tighter radius of the rear coils look like they will be a problem and wrinkle on the inside shortest lengths. Super stiff and fights when trying to push it around the spring coil. Hot water and dish detergent and 4 hands got it done. Then a lot of time with the heat gun. But if I get quiet for a long time, definitely worth it.
I might have to use a different version. Stuff is cost prohibitive. But when I found a 25' roll for a dollar a foot shipped, It was a gift from the Universe! No Brainer.
Thread Starter
Senior Member
Joined: May 2012
Posts: 1,621
From: Long Island
So to keep moving forward to a nice, tight and quiet ride, I decided to take the strut gaskets to where no man has gone before. (4th Gen anyway)
I bought a sheet/roll of 1/8" neoprene rubber gasket making material to act more as a sound deadening gasket than the usual paper installed (or worse, nothing that some think is fine). These will be installed when the new strut assemblies I put together, go in. I made 4 Neoprene gaskets for the front. Two for my install and two for CS_AR to try in his 98 Maxima with the newly rebuilt front end to see if he thinks it quiets it up even more than all he did, now that he's used to what's in there now. I can't see how these can't help! And also my completed front strut assemblies going in tomorrow. Then we can compare notes for maybe another upgrade for those seeking quiet suspension.
Backs will be next after I figure out which heat shrink tubing I can use on the tighter radius rear springs.
Some people call it OCD...... LOL
I like it right! So does Craig!

Senior Member
Joined: Jan 2011
Posts: 3,037
From: Central AR
So to keep moving forward to a nice, tight and quiet ride, I decided to take the strut gaskets to where no man has gone before. (4th Gen anyway)
I bought a sheet/roll of 1/8" neoprene rubber gasket making material to act more as a sound deadening gasket than the usual paper installed (or worse, nothing that some think is fine). These will be installed when the new strut assemblies I put together, go in. I made 4 Neoprene gaskets for the front. Two for my install and two for CS_AR to try in his 98 Maxima with the newly rebuilt front end to see if he thinks it quiets it up even more than all he did, now that he's used to what's in there now. I can't see how these can't help! And also my completed front strut assemblies going in tomorrow. Then we can compare notes for maybe another upgrade for those seeking quiet suspension.
Backs will be next after I figure out which heat shrink tubing I can use on the tighter radius rear springs.
Some people call it OCD...... LOL
I like it right! So does Craig!
I bought a sheet/roll of 1/8" neoprene rubber gasket making material to act more as a sound deadening gasket than the usual paper installed (or worse, nothing that some think is fine). These will be installed when the new strut assemblies I put together, go in. I made 4 Neoprene gaskets for the front. Two for my install and two for CS_AR to try in his 98 Maxima with the newly rebuilt front end to see if he thinks it quiets it up even more than all he did, now that he's used to what's in there now. I can't see how these can't help! And also my completed front strut assemblies going in tomorrow. Then we can compare notes for maybe another upgrade for those seeking quiet suspension.
Backs will be next after I figure out which heat shrink tubing I can use on the tighter radius rear springs.
Some people call it OCD...... LOL
I like it right! So does Craig!
Congratulations!


Thread Starter
Senior Member
Joined: May 2012
Posts: 1,621
From: Long Island
Thanks Craig and Dennis! Dennis, we have to invite you to our parties! All virtual via the internet though and not much different than this. In fact, it is this. LOL Nothing to be green about. As soon as diminishing returns brings us to reality anyway.
And thanks to you Hectic as well! Since the rear springs had an obvious orientation with the taper at the bottom and the differentiating dot at that end, I did the same with the front springs! Thank you for validating my twisted thinking! LOL
So, I changed up the heat shrink tubing to be used as spring insulators for the rear springs.
I ordered DSG-Canusa CFW 0750. Hopefully, it will be easier to corkscrew around the tighter radius rear springs 2X. Might wind up being good for the front springs as well. Cheaper that the CFW 1100 too!
I will update when it arrives and gets installed on the rear springs.
And thanks to you Hectic as well! Since the rear springs had an obvious orientation with the taper at the bottom and the differentiating dot at that end, I did the same with the front springs! Thank you for validating my twisted thinking!
LOLSo, I changed up the heat shrink tubing to be used as spring insulators for the rear springs.
I ordered DSG-Canusa CFW 0750. Hopefully, it will be easier to corkscrew around the tighter radius rear springs 2X. Might wind up being good for the front springs as well. Cheaper that the CFW 1100 too!
I will update when it arrives and gets installed on the rear springs.
Last edited by KP11520; Jul 20, 2017 at 09:57 AM.
Senior Member
Joined: Jan 2011
Posts: 3,037
From: Central AR
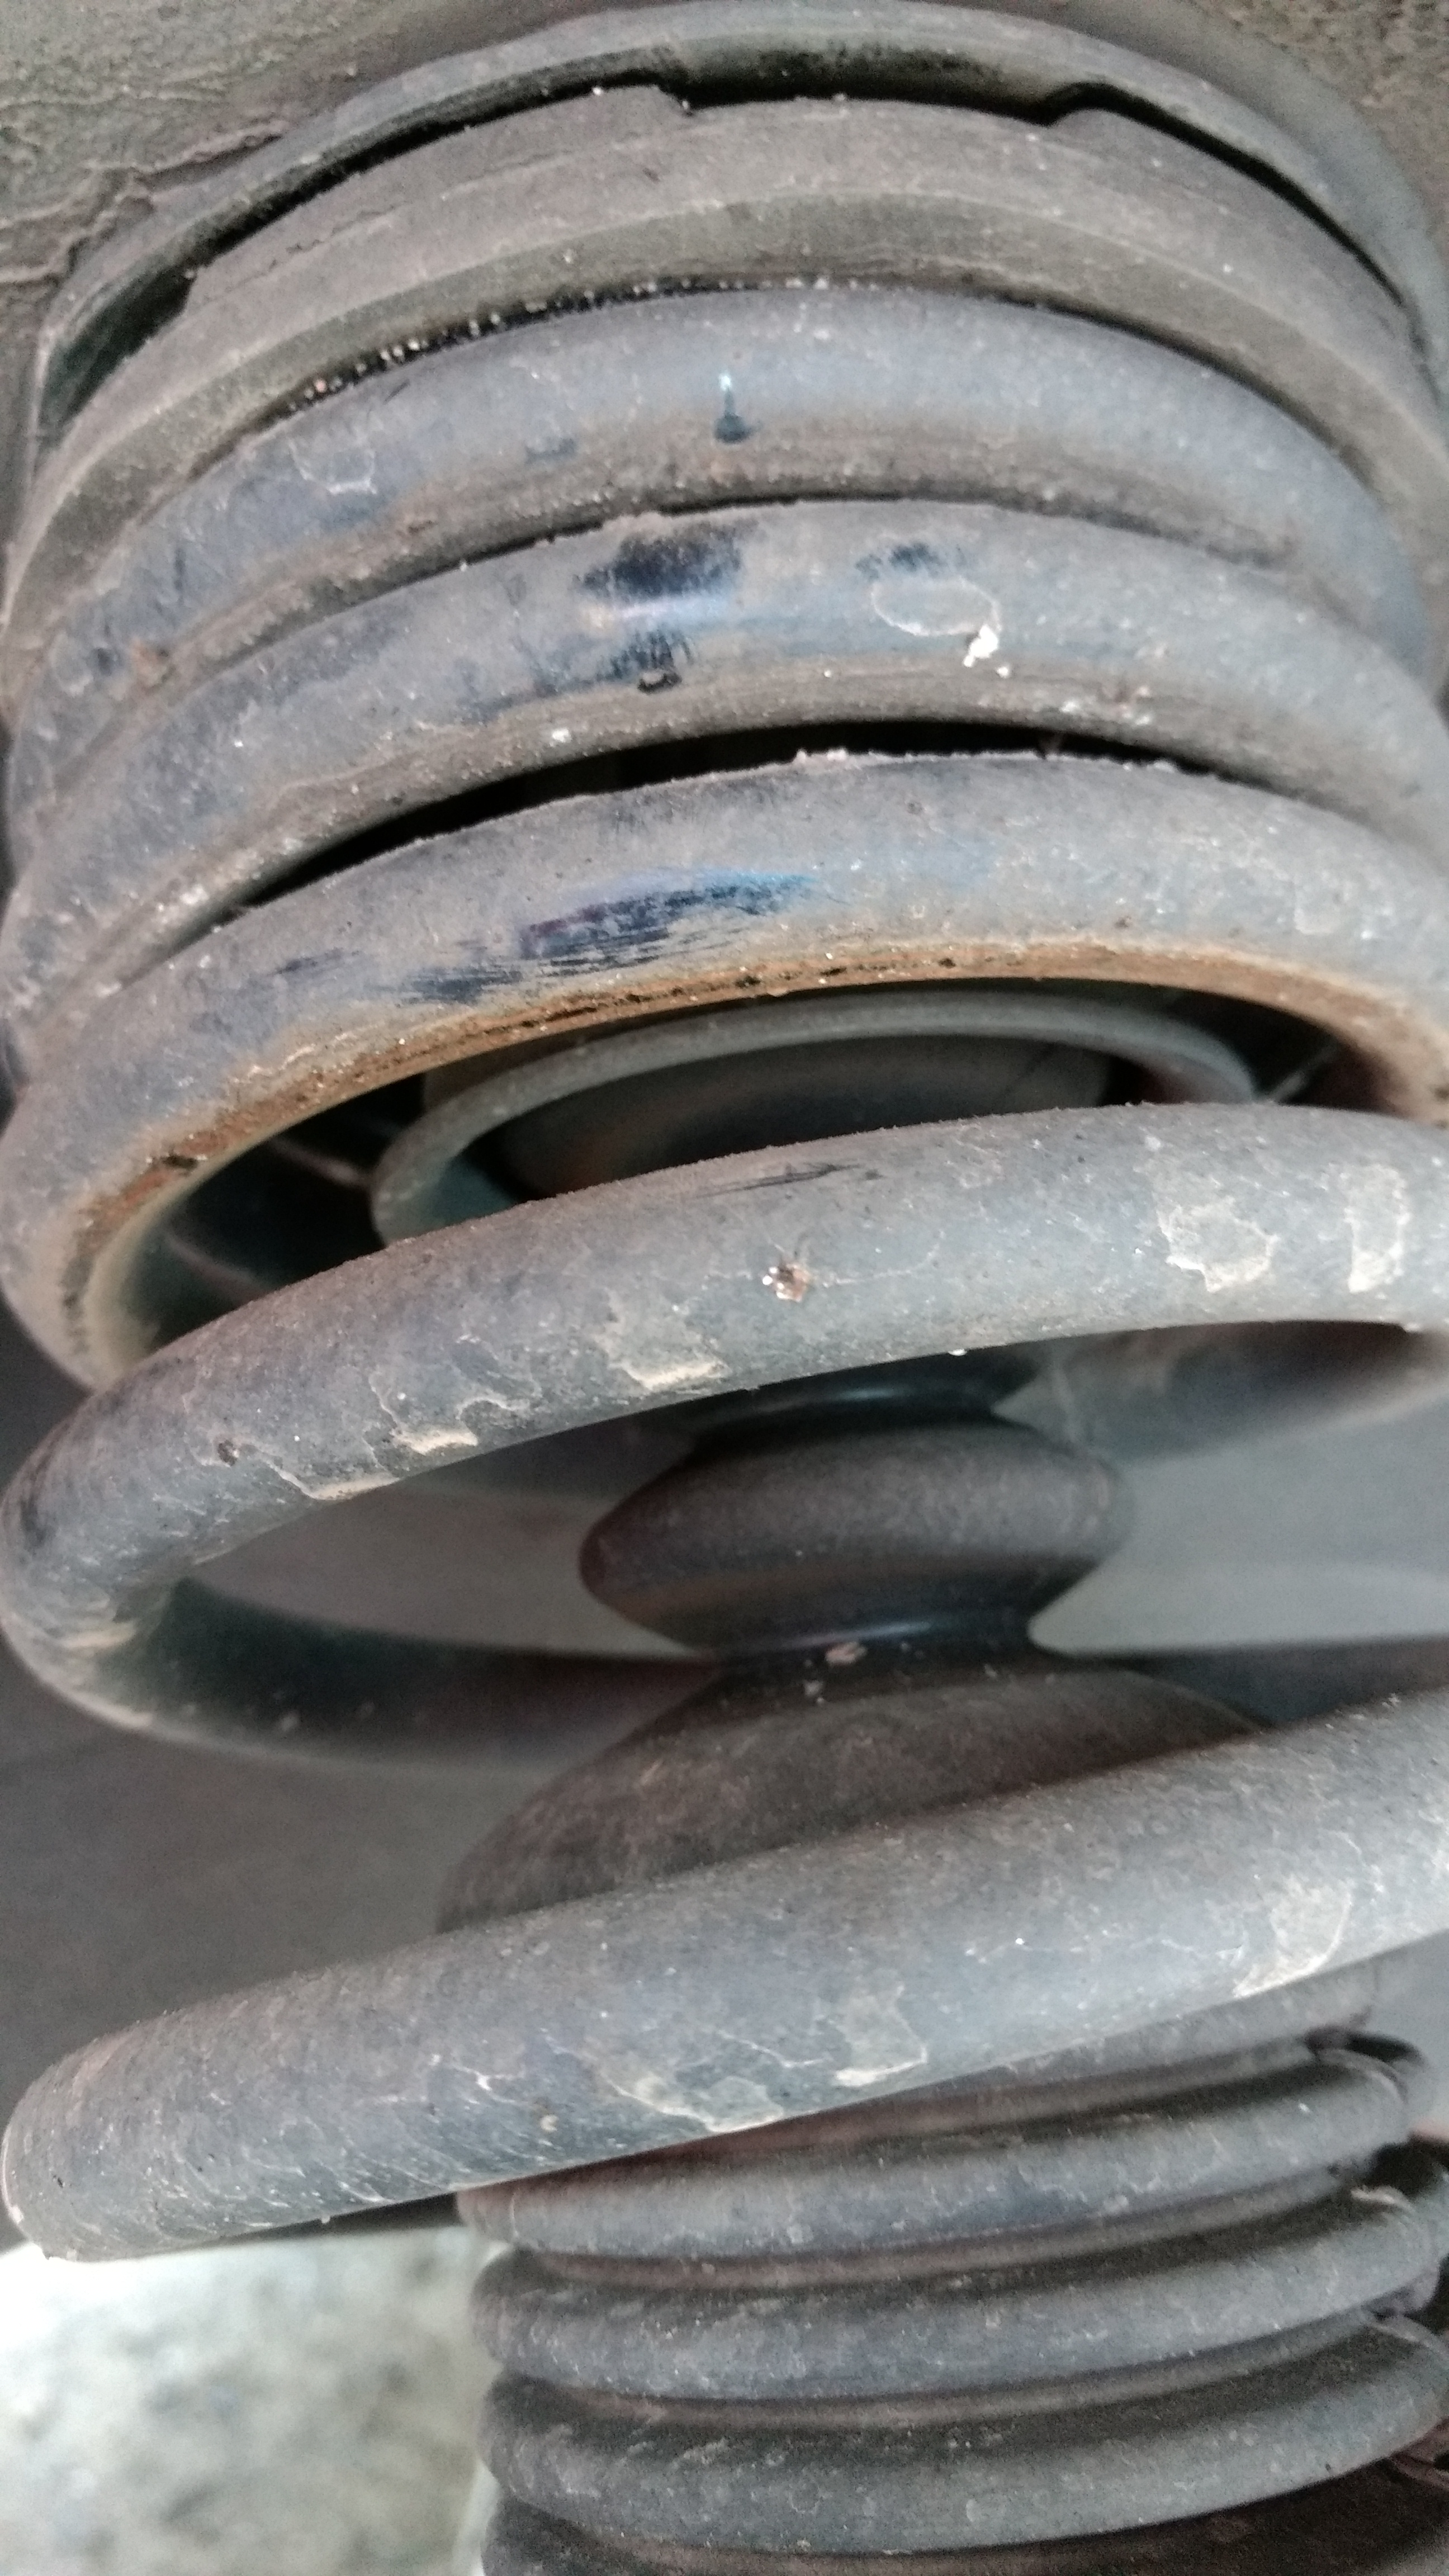
Tonight I had one of the rear wheels on the 99 model removed to get a slow leak fixed.
Once in a while I hear a squeaking noise from the rear suspension. When I installed the H & R springs over 3 years ago, I did not know about insulating the "dead springs".
So I've found some dead spring rub that seems to be the source of noises in the picture below. You can see the rusty area where the springs have been rubbing when compressed.

Thread Starter
Senior Member
Joined: May 2012
Posts: 1,621
From: Long Island
Those dirty springs. You have springs around the collar! LOL You need Wisk around the collar.
Craig, can you post a picture of the bottom of that assembly too. I want to see how many dead coils are at the bottom.
Craig, can you post a picture of the bottom of that assembly too. I want to see how many dead coils are at the bottom.
Senior Member
Joined: Jan 2011
Posts: 3,037
From: Central AR
I only photographed the problem area on the 99 model springs.
Here's a picture of the 98 (the quiet one) model's struts, H & R with insulated dead springs and the lowers.
Note that dead springs come with lowering springs.

Thread Starter
Senior Member
Joined: May 2012
Posts: 1,621
From: Long Island
So the smaller diameter heat shrink tubing arrived. (DSG-Canusa CFW 0750) A seller on Amazon has 4 foot pieces for under $13 each. I bought two for my rear springs. 24" for each top and bottom. This is easier to work with than the bigger diameter version and is also cheaper and this stuff is the way to insulate your spring ends to stop noise bar none. Despite the work. Over an hour each end of the spring when you get the knack. You need some "Good Grips clamps for wood (usually), cardboard to protect the table top or workbench. Table or workbench. Heat Gun that gets close to 1K degrees and some waterbased lube. (Yes JvG, the stuff. LOL) Clamp the bottom coils of the spring to the table so it won't move, lube up the top coils (as far around as you plan to cover), heat the tubing with hot water and empty, them more lube in the tubimg and slam it on and keep going until it's fed all the way on. Muscle it around with both hands. Take the spring to the sink and rinse out the lube and let the water drain out. Coax the heat shrink to conform and lay nice working in from the end with your heat gun on high. Repeat other end.
Hope this helps yous guys that like to go over the top!
Hope this helps yous guys that like to go over the top!
Thread Starter
Senior Member
Joined: May 2012
Posts: 1,621
From: Long Island
YUMMMMMMMM.