
POLISH OUT YOUR VALVE COVER & OTHER LINES


im doing the intake manifold i used a air grinder with a stone wheel and i got all the rough stuff off and then i used 50 grid and then 60 and then 100 and when i finish the 100 next would be wet 400 600 800 1000 1500 and polish its going to take forever

Originally Posted by naplesmaxima
im doing the intake manifold i used a air grinder with a stone wheel and i got all the rough stuff off and then i used 50 grid and then 60 and then 100 and when i finish the 100 next would be wet 400 600 800 1000 1500 and polish its going to take forever
for my VC, first i washed it a few times with dish soap to degrease it a little bit. then the first overall sanding i did seemed to get most of the gritty and rough surface off. it's already much smoother to the touch and a bit shinier. i'm sure it'll look great after a few more hours. (or more)

i'm doing the VC now and then picking up an upper IM over Thanksgiving. hopefully i can have them both done by the end of winter and install them then and have a b itchin bay!

Originally Posted by Jar
Not trying to sound lazy here but after you do this is there a way to make it last longer than a couple weeks, like some kind of clear coat or protectant that could be sprayed on or rubbed on??


I just removed my front valve cover. Should I remove the circular rubber spark plug gaskets or leave them in while sanding and polishing? Only reason I ask is I don't want to damage them putting them in and out.

Originally Posted by VQuick
I just removed my front valve cover. Should I remove the circular rubber spark plug gaskets or leave them in while sanding and polishing? Only reason I ask is I don't want to damage them putting them in and out.
Originally Posted by naplesmaxima aka Tommyali the scammer!
omg this is more work that i thought i've been doing it for 6 hours now and im no where close to being done

BUMP, excellent thread/write up...Will be starting probably this Wednesday when I pick up aspare plentum from junk yard for 8 bucks, so I'll be working on it this winter so its perfectly mirror like for summer or perhaps way before


FWIW, this thread is probably stored in your "subscribed threads".....
well I was painting my rear caliper and got bored waiting between coats so I started polishing my oem intake. this is the result after about 1hour of work and stoping with 400 grit sandpaper it's the highest I had around, I plan to finish the whole thing for practice cause I plan to do my mevi and front valve cover soon. if anyone wants this intake when I am done it will be for sell cheap. it will be awhile before it's done but I am very happy to see what I can do in just 1 hour

Last edited by t6378tp; Jan 17, 2008 at 11:37 PM.

well since I never planned to install this on my car and was only doing this to kill time I am done for now cause I have a mevi to polish.
but if I get bored again I may polish it somemore but not right now

but if I get bored again I may polish it somemore but not right now

Senior Member
Joined: Apr 2005
Posts: 552
From: New City, NY
Wow, real nice so far, how many hours of work is that? I've been planning on doing valve cover, timing chain cover, manifold and the little parts like radiator pieces. Just never seemed to work out well. I tried using strictly mag polish but it isnt coarse enough at first.
a question with the timing chain cover. To polish it and sand it, do you have to take off or do you do it while its still on the engine? as well as for painting. how do you get so much of it painted without getting paint everywhere else?
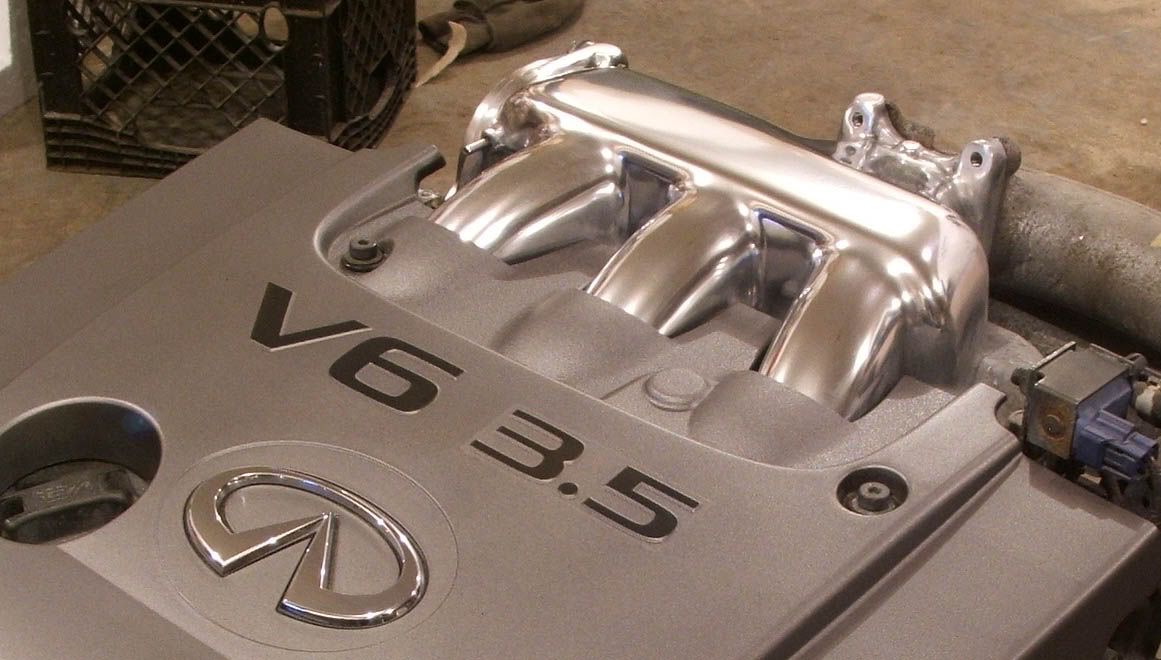
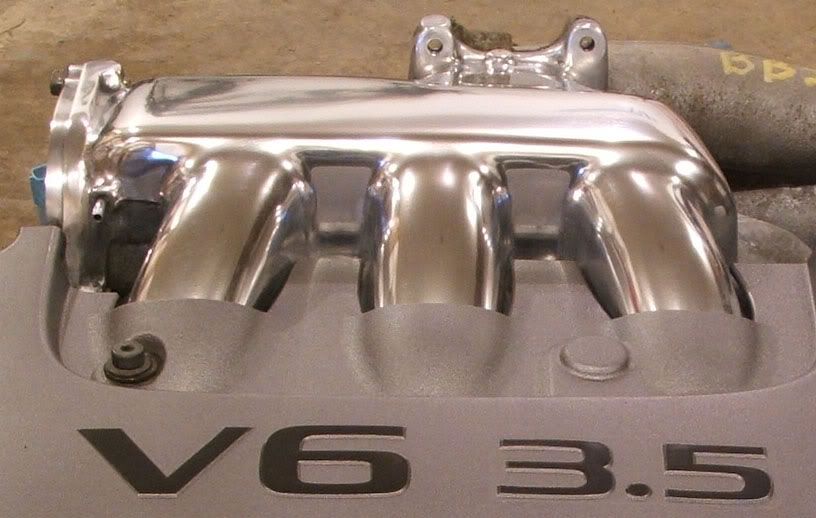
I just finished my intake manifold and looks just like above. My valve covers are both done but now everything else on the engine looks so out of place
I just finished my intake manifold and looks just like above. My valve covers are both done but now everything else on the engine looks so out of place
Wow, real nice so far, how many hours of work is that? I've been planning on doing valve cover, timing chain cover, manifold and the little parts like radiator pieces. Just never seemed to work out well. I tried using strictly mag polish but it isnt coarse enough at first.
Senior Member
Joined: Apr 2005
Posts: 552
From: New City, NY
Just curious, did you use any power sanding tools, like those flap drums or anything. And what grit sequence did you use? 220, 400, 600, 800? I was thiking of using a dremel or power drill with sanding drums for the 120, first sanding, then go by hand after that on my valve cover.
Joined: Oct 2005
Posts: 4,572
From: Middleboro/Carver, Ma
^^That's the way to do it.
Also, the sandblaster discs plus attachment for grinder are very useful.
Having a heavy duty 7/8" polisher (AKA a $200 buffer) helps out alot......
I'll edit this post with notrmal pics of the 3.5 I just did shortly, but the sig should do for now. My av and sig are teh hawtness..........
Also, the sandblaster discs plus attachment for grinder are very useful.
Having a heavy duty 7/8" polisher (AKA a $200 buffer) helps out alot......
I'll edit this post with notrmal pics of the 3.5 I just did shortly, but the sig should do for now. My av and sig are teh hawtness..........

Just curious, did you use any power sanding tools, like those flap drums or anything. And what grit sequence did you use? 220, 400, 600, 800? I was thiking of using a dremel or power drill with sanding drums for the 120, first sanding, then go by hand after that on my valve cover.
This is all I had sitting around the house, I did not use 400, 600 and 800 grit yet.
^^That's the way to do it.
Also, the sandblaster discs plus attachment for grinder are very useful.
Having a heavy duty 7/8" polisher (AKA a $200 buffer) helps out alot......
I'll edit this post with notrmal pics of the 3.5 I just did shortly, but the sig should do for now. My av and sig are teh hawtness..........
Also, the sandblaster discs plus attachment for grinder are very useful.
Having a heavy duty 7/8" polisher (AKA a $200 buffer) helps out alot......
I'll edit this post with notrmal pics of the 3.5 I just did shortly, but the sig should do for now. My av and sig are teh hawtness..........
well someone has taken this off my hands so I will not be bringing this to a mirror finish like Kev's
well I got bored today and spent about 2hours on my valve cover. this is with 240 grit sandpaper, I'll be hitting up the store for some 400 and 600grit soon. got to get that mirror finish like Kev


Hmm I may think about doing this sometime soon. Used to polishing things out now lol. But not sure if it will affect the heating / cooling of the manifold. Is it bad at all to do this?
Just wanted to make sure, because I read somewhere that it holds heat in more so when it's polished.
Just wanted to make sure, because I read somewhere that it holds heat in more so when it's polished.


so like I said before 1 step at a time this was only after 1-2hours of sanding

intake manifold is not polished, valve cover... that is a different story..
and i will agree, it is a step by step process to get it where you want it to look...
