
safcII/vafcII


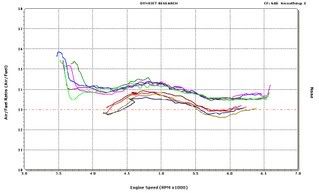
i have a 5th gen but mine was high 11:1/low 12:1 after 5k rpms. that prompted my vafc2 purchase/install. if its too lean, over 13.5/14:1 then i would buy one and if it was below high 12:1 then i would buy one as well. my headers are what caused my richness as before it was almost 13:1 across the board.

 numbers.
Judging from your times, you shouldn't be disappointed.
But now I'm talking out of my exit because different days are different days and same goes for the conditions.
I ran on 2 different days, but each were nearly identical conditions and things were different, heat soak who knows.
But now I'm talking out of my exit because different days are different days and same goes for the conditions.
I ran on 2 different days, but each were nearly identical conditions and things were different, heat soak
who knows.

 me too


I am not too concerned with wagering on the output from Hoopers car but I do have some questions if an safc or vafc is better for our 3.5l cars? I have been asking around to some orgers trying to figure out if 5.5 gens should get an safc, for just modifying the fuel curve, or should we get the vafc so we could presumeably control the vias or the vtc's? I would think we would use the vafc for controlling the vtc's much like the hondas but I believe I have heard people using this to control the vias? Anyone?
My current car a 02 GLE is setup with an unorthodox udp, hotshots and a mandrel cat back, and ported stock intake. I am positive I could partially benefit from just the ability to modify the stock fuel curve with just the safcII for my >40% tps situations. But would the stock crossover points of either or both the vias and vtc's be optimized with the abilities the vafc offers?
I am not so much power hungry as I am wanting to optimize the A/F ratio to improve fuel economy and also just make the engine run as efficiently as possible. The increased power is nice too, don't get me wrong!
Any direction or first hand knowledge would be appreciated. I am asking specifically information regarding stock transition of the VIAS rpm and VTC rpm switchover points? Also what these switchover points should be optimally be with the minor bolt ons, I,H,CB? Any links to past threads regarding this subject would be great.
Thanks.
Originally Posted by AllGo
I am not too concerned with wagering on the output from Hoopers car but I do have some questions if an safc or vafc is better for our 3.5l cars? I have been asking around to some orgers trying to figure out if 5.5 gens should get an safc, for just modifying the fuel curve, or should we get the vafc so we could presumeably control the vias or the vtc's? I would think we would use the vafc for controlling the vtc's much like the hondas but I believe I have heard people using this to control the vias? Anyone?
I think the differences/advantages you are talking about are that the older model safcI has 8 user defined points of adjustment whereas the safcII has 12points of a/f adjustment at 200rpm increments. I didn't specify due to that assumption but I would only really consider between the safcII and the vafcII. Therefore the vafcII 12points at 100rpm increments is not really that much of advantage over the safcII.
My main question is related to whether the vafc would be the best unit due to its ability to control the vias or vtc's switchover points. I still have not heard anyone speak on this important topic.
To answer this question someone with similar mods would have had to dyno to discover that the stock switchover points were or were not optimal once intake, headers and catback were installed. In this example the vafcII ability would clearly be the winner. But if the stock rpm switchovers for the vias and vtc's are fine as they are then I would just assume get the safcII.
Any knowledgeable input would be appreciated.


Originally Posted by AllGo
I think the differences/advantages you are talking about are that the older model safcI has 8 user defined points of adjustment whereas the safcII has 12points of a/f adjustment at 200rpm increments. I didn't specify due to that assumption but I would only really consider between the safcII and the vafcII. Therefore the vafcII 12points at 100rpm increments is not really that much of advantage over the safcII.
http://forums.maxima.org/showpost.ph...5&postcount=12
Originally Posted by AllGo
My main question is related to whether the vafc would be the best unit due to its ability to control the vias or vtc's switchover points. I still have not heard anyone speak on this important topic.
Originally Posted by Deckdout2
I have the VAFC II installed but have not yet been able to tune. I should learn more about this controller during tuning and will report back.
Originally Posted by Puppetmaster
Any tips for installation? Mine has been sitting in a drawer for months...
take some breaks inbetween...you don't wanna rush things cuz counting those PIN locations is a pain...and if you rush it, you might end up wiring the wrong wire...so take your time
Originally Posted by steven88
I saw it being done by 1fstmax....all I have to say is, it will start to become uncomfortable real quick...you must work on your knees and unless your a small guy, the space is very tight...other than that, the wiring isn't too hard...a newbie should be able to solder everything up in like 1hr...1fstmax did everything in bout 30 minutes...
take some breaks inbetween...you don't wanna rush things cuz counting those PIN locations is a pain...and if you rush it, you might end up wiring the wrong wire...so take your time
take some breaks inbetween...you don't wanna rush things cuz counting those PIN locations is a pain...and if you rush it, you might end up wiring the wrong wire...so take your time
Originally Posted by Puppetmaster
Any tips for installation? Mine has been sitting in a drawer for months...
I actually used Jime's Diagram from his site, and can give you the colors to use from the harness of the VAFC side.
- Cut the electrical tape around the wires of the ecu back as far as you can. You will be cutting the wire, so leave enough on the harness side in case you ever need to go back to stock.
- When soldiering put a little on the VAFC wire, and ECU wire first. While attempting to soldier the two together, it will make it easier to connect the wires quickly.
- Have a little soldier on the gun, hold VAFC wire to the hanging precut ECU wire,while holding gun with other hand, touch points and it will mend both wires.
- Remember to slip heat shrink on the ECU Harness side before soldiering and after cutting. A lighter works best to melt this.
- Do Power and Ground First, turn on car to test Power to the unit. Setup your initial settings here. RTFM

- Move on to the tach wire, then stop and turn on car to test this out.
- Continue down the line until you are done with all wires, testing each by turning on the car to make sure everything works as you are going along.
My parameters are all set to Zero until I tune. I'll get pics of my mounting location and what I did with the wires.
Let me know if you need any more help, Joel.
Awesome info...
I assume that these are copper wires just like the wires prior to the O2 sensor harnesses up in the engine bay. I had to extend my primary O2 harness for the rear bank and did so by cutting and stripping, twisting the ends together, and soldered them by holding the soldering iron below the twisted joint and melting the solder from above onto the joint (Tilley's advice). Any opinions as to why that may or may not work? It seems easier than your method.
Good idea.... that's the kind of tip I was looking for...
And yeah, I have your email, so I'll be in touch. Thanks.
Originally Posted by Deckdout2
- When soldiering put a little on the VAFC wire, and ECU wire first. While attempting to soldier the two together, it will make it easier to connect the wires quickly.
- Have a little soldier on the gun, hold VAFC wire to the hanging precut ECU wire,while holding gun with other hand, touch points and it will mend both wires.
- Have a little soldier on the gun, hold VAFC wire to the hanging precut ECU wire,while holding gun with other hand, touch points and it will mend both wires.
Originally Posted by Deckdout2
- Do Power and Ground First, turn on car to test Power to the unit. Setup your initial settings here. RTFM
- Move on to the tach wire, then stop and turn on car to test this out.
- Continue down the line until you are done with all wires, testing each by turning on the car to make sure everything works as you are going along.
- Move on to the tach wire, then stop and turn on car to test this out.
- Continue down the line until you are done with all wires, testing each by turning on the car to make sure everything works as you are going along.
And yeah, I have your email, so I'll be in touch. Thanks.
Originally Posted by Puppetmaster
Awesome info...
I assume that these are copper wires just like the wires prior to the O2 sensor harnesses up in the engine bay. I had to extend my primary O2 harness for the rear bank and did so by cutting and stripping, twisting the ends together, and soldered them by holding the soldering iron below the twisted joint and melting the solder from above onto the joint (Tilley's advice). Any opinions as to why that may or may not work? It seems easier than your method.
I assume that these are copper wires just like the wires prior to the O2 sensor harnesses up in the engine bay. I had to extend my primary O2 harness for the rear bank and did so by cutting and stripping, twisting the ends together, and soldered them by holding the soldering iron below the twisted joint and melting the solder from above onto the joint (Tilley's advice). Any opinions as to why that may or may not work? It seems easier than your method.
You have to also think about the room you have to work with. Being under the car using the twisting method will be a breeze compared to being scrunched up on the passenger floorboard. Oh and I almost forgot, you will probably want to soldier using my method, so the heat shrink will have room to slide over the mend. With the biatch of a time manuvering through the jumble of wires, you probably won't have a choice. You will also find that after you cut the ECU wires, with it being so tight, you won't have much slack to do twisties unless you soldier in extensions which is a waste of time until you get to the MAF wire.
Cover your floor with some paper or something also.
I didn't feel like waiting so I'm outside at 1:30am. Here are some pics of my mounting. Since the wires aren't long enough and I didn't feel like extending them to the sunglass holder, which I use almost everyday, here is where I decided to place it.
I carefully dremeled out a slot on the top of the vents is why you can't see any creases in the dash where the wire goes into it. Dremeled a little and tested, if I needed more room I took out a little more material. It fits snug and perfect. I also ran the wire via the center of both vents to have a cleaner install. The plug as tiny as it is, was a pain to finally feed through the small opening.


I carefully dremeled out a slot on the top of the vents is why you can't see any creases in the dash where the wire goes into it. Dremeled a little and tested, if I needed more room I took out a little more material. It fits snug and perfect. I also ran the wire via the center of both vents to have a cleaner install. The plug as tiny as it is, was a pain to finally feed through the small opening.


