Replacing Alternator


 11-20-2009, 08:18 AM
#42
Newbie - Just Registered

Join Date: Nov 2009
Posts: 4
New bolts
Don't know if I'm the only one, but I've called the dealer about the newer bolts for the idler tensioner and they haven't a clue what I'm talking about. I'm not sure how many different ways to describe this bolt; I've called two different dealers in my area and neither one has a clue. Is this just something I could go pick up at the hardware store once I have the original in hand?
Thanks
Thanks
11-21-2009, 09:17 PM
#43
Newbie - Just Registered

Join Date: Oct 2009
Posts: 1
RE Square Nut
Replacing alt in my 96 right now..can't seem to get 1 bolt out of the alt.It's a square nut.
Not sure if the original was replaced with this or not..everything seem pretty easy..just this 1 alt bolt is holding me up..suns gone down..will tackle it again in the a.m..gonna swing by autozone and check the tool section..Hope i can get this thing off..
Hmmm..it may unscrew from the backside..i'll check it tomorrow..
I just finished doing my alternator today, a bit of a pain in the ***, but better than getting raped by a mechanic! Rusty bolts are NOT our friends!! Also may be worth noting that taking out the radiator fans helps a lot if you don't have room to swing that AC unit out of the way once its loose.
 11-23-2009, 05:53 AM
#45
Newbie - Just Registered
Join Date: Nov 2009
Posts: 4
Just to contribute for what I can, I will agree that life would have been easier with the fan shroud out of the way. Getting to some of the AC bolts would have been easier as well as moving the compressor around when extracting the failed alternator. However, I did not remove the fan and was able to complete the job in less than three hours and I'm a total boob when it comes to auto repair. I'm just thankful that for once, I didn't break anything else at the same time.
Regarding the 14mm pulley nut on the tension pulley, I did not have any issues with removing it; just used a 14mm box wrench and took it slowly. However, I'm not attempting to brag about superior mechanical prowess, just stating that if you are really nice to it, it seems to hold up well enough.
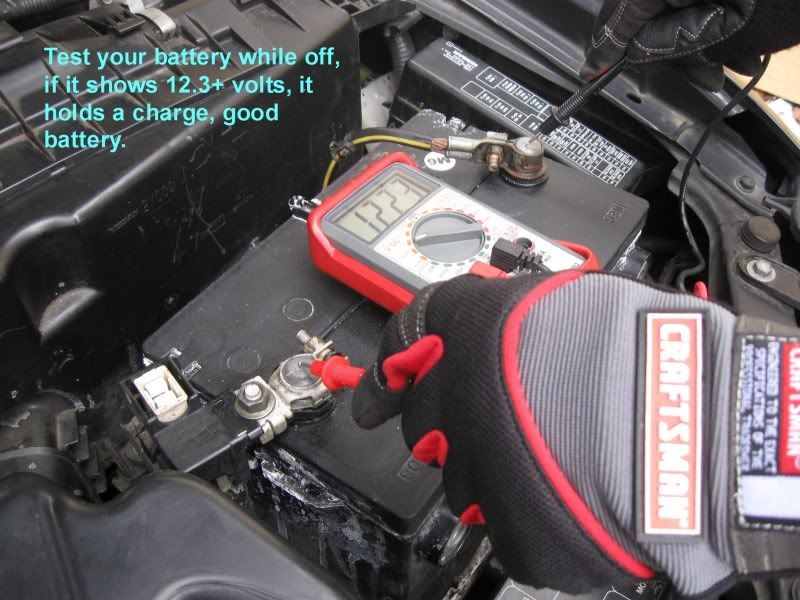
For the record, this is a 2000 Max with 135k miles and the first alternator. Oddly enough, the battery is still original (but probably not past this winter). I guess all those years in California did it well.
Regarding the 14mm pulley nut on the tension pulley, I did not have any issues with removing it; just used a 14mm box wrench and took it slowly. However, I'm not attempting to brag about superior mechanical prowess, just stating that if you are really nice to it, it seems to hold up well enough.
For the record, this is a 2000 Max with 135k miles and the first alternator. Oddly enough, the battery is still original (but probably not past this winter). I guess all those years in California did it well.
01-11-2010, 05:32 PM
#46
Senior Member

Join Date: Oct 2009
Location: Atlanta
Posts: 1,222
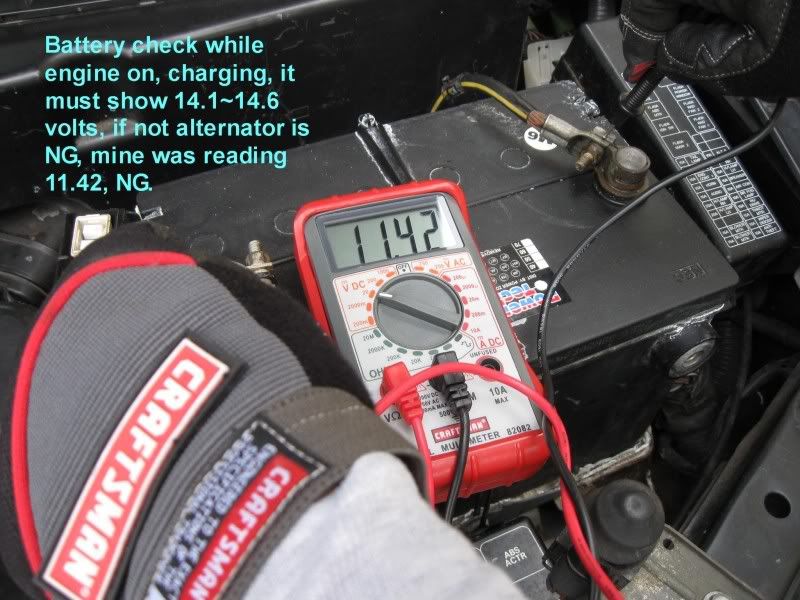
Well it looks like I will have to tackle this job. The battery light and brake light lit and stayed lit. The charging voltage is only 9.6 volts. The belt looks and feels tight, no slippage.
The last few days I have been hearing a whining-high pitch noise, goes up and down nsynch with the rpm. But today when the battery lit up, the noise was gone.
For some of you who have replaced the alternator, does this sound familiar?
The last few days I have been hearing a whining-high pitch noise, goes up and down nsynch with the rpm. But today when the battery lit up, the noise was gone.
For some of you who have replaced the alternator, does this sound familiar?
Last edited by mandyfig; 01-11-2010 at 06:15 PM.
01-12-2010, 07:23 AM
#48
Senior Member
Join Date: Oct 2009
Location: Atlanta
Posts: 1,222
Well I am all set for parts. The Alternator, Serpetine and Power Steering belts (in case I need to since you are there). Set me back $211 with core charge of $21.
Time to heat up the garage and go at it.
And since I owe this Forum some, I will attempt to do a DIY PICS!
Wish me luck.
Time to heat up the garage and go at it.
And since I owe this Forum some, I will attempt to do a DIY PICS!
Wish me luck.
01-12-2010, 08:37 AM
#50
Old Fuddy Duddy

Thread Starter
Join Date: Feb 2001
Posts: 2,712
01-12-2010, 09:09 AM
#52

Agreed with the OP on all points.
I replaced the alternator on my 01 Maxima in the first week of December. It has 64k miles on it. Cause: driven on very salty roads, and parked for 7 months with the guts of the car still wet. Like the corrosion that formed under the belt on the idler pulley is still there wet. Replaced the battery, and after an hour or two of operation the brake and battery lights started coming on intermittently. At highway speeds they'd come off, but when idling in traffic they'd come on again. Charge V was < 12V.
I replaced mine with a Bosch reman unit, which comes with a one or two year road-side assistance and a 2 year warranty or something. CDN$180 + core, but that was discounted super wholesale and the parts shop honored their misquote.
Steps:
1. DISCONNECT BATTERY, negative terminal first. Take it out and put it on a trickle charger or something to be sure it's out. Loosen passenger side lug nuts.
2. Jack up front of car, place on jackstands, make sure it's stable.
3. Remove front passenger wheel. Then remove access panel in wheel well (two screws and a plastic pop fitting).
4. NOW would be the time to squirt some penetrating oil on the nut at the center of the idler pulley - this makes a world of difference. DON'T hose it down so your belts get wet with oil or anything.
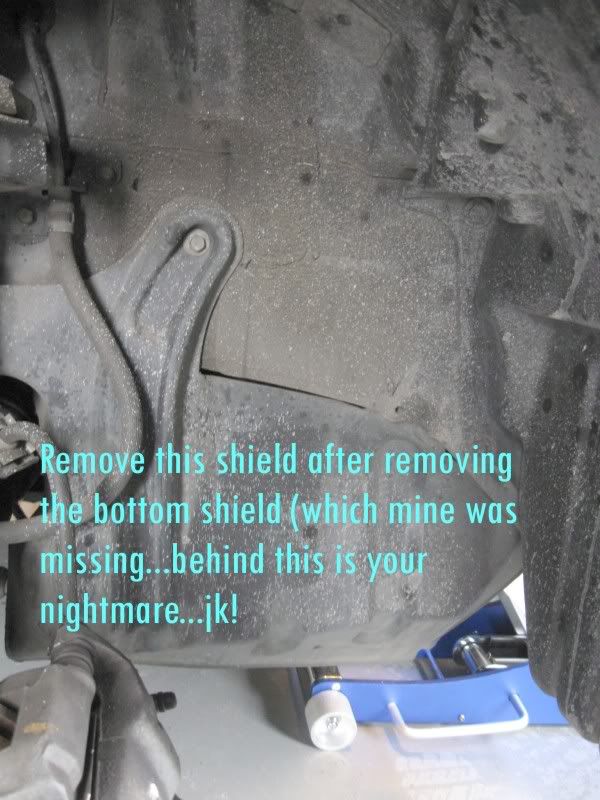
5. Remove front passenger bottom cover. If you have a long tube with a way to aim, look behind the AC compressor mounting plate for the holes the bolts thread into, and give them some penetrating oil love. A drop or two on the bolt ends can't hurt either.
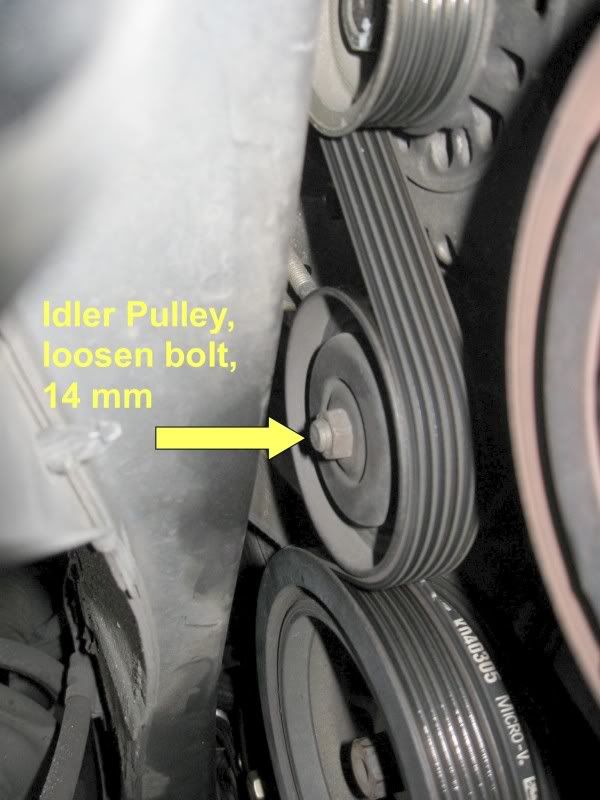
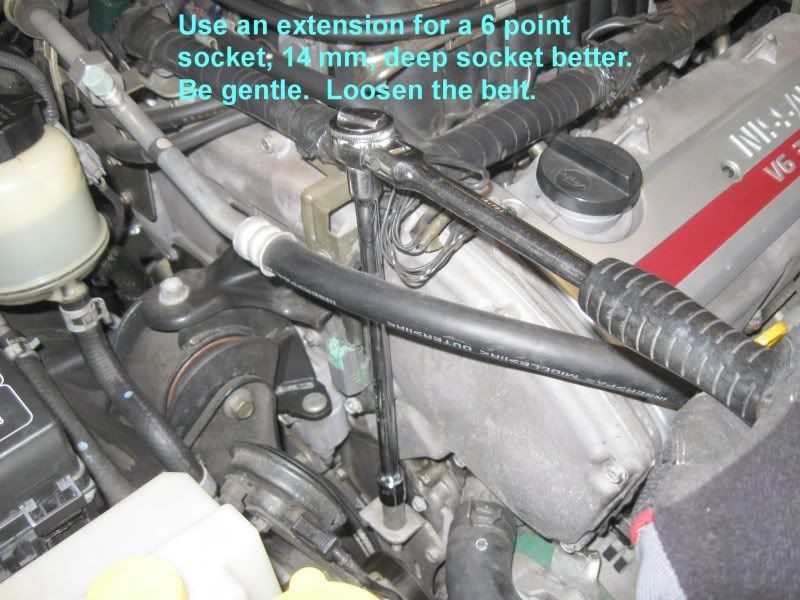
6. Loosen idler pulley nut, then back off the tensioner screw at the top. Remove alternator belt.
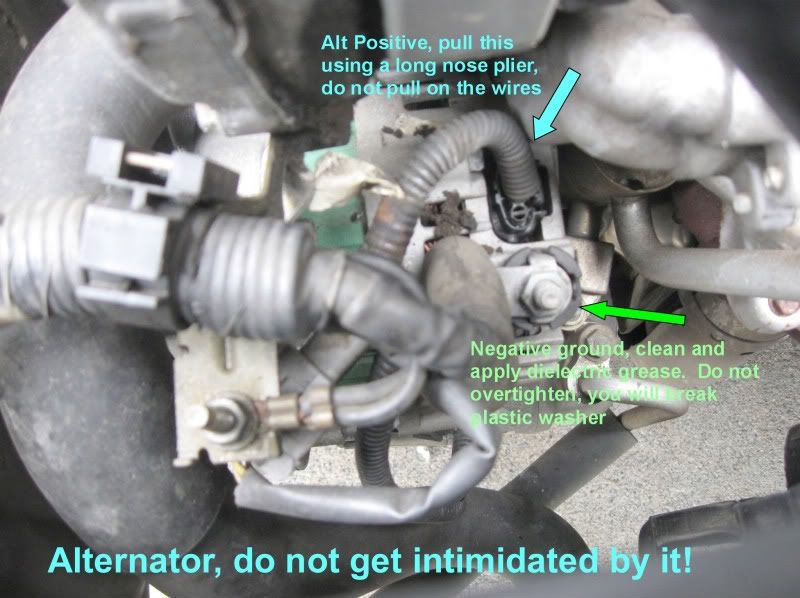
7. Disconnect electrical connector clips at rear of alternator. On my '01 there is a single wire that runs down to the AC compressor, which I suppose is the clutch engagement signal wire. Disconnect that too. Now, notice the two connectors come together, and connect to another harness clip. Disconnect from that harness, and remove the alt/ac harness so it does not get mashed later. NOTE: when cold, the nissan harness plastics are quite brittle.
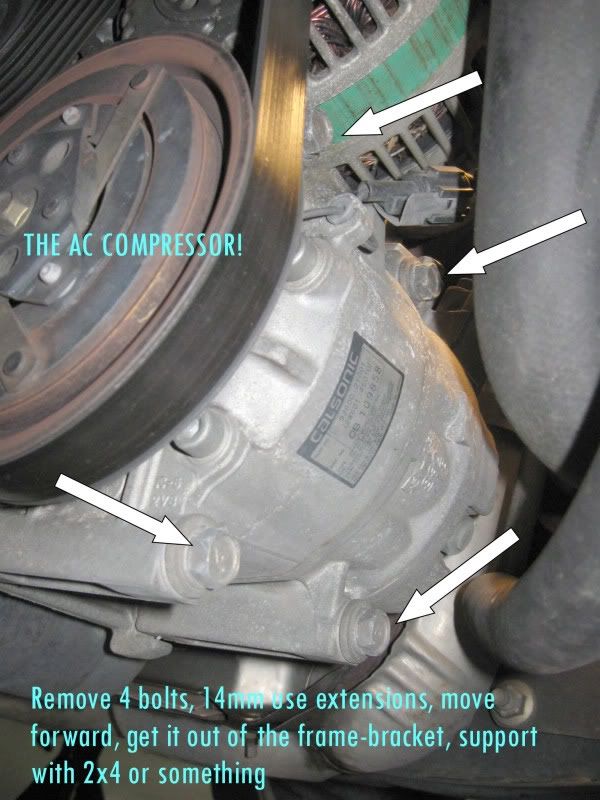
8. Whistle out the four (4) AC compressor mounting bolts. The compressor sits on a little lip on the mounting plate, but don't expect it to hold it up for you. I had a little table of 2x4's there for it to rest on and to de-stress the AC hoses, but I am told it's not essential. It does make getting to other things easier when the weight of the compressor isn't on the hoses, and you know, they hold an easily-evaporating liquid under pressure.
9. Loosen the two alternator mounting bolts. One comes from behind the alternator to the front, so an extension or something is useful.
10. With one hand supporting, remove one, then the other mounting bolt. Don't lose the square nut with the tab welded to it that will fall from the front of the alternator just behind the tensioner pulley. Remove alternator - you'll need to turn it creatively.
11. Inspect replacement alternator, make sure they're the same, etc. There will be a sleeve on one part of the alternator, leave that in place, since the act of tightening the mounting bolt will push that into place.
12. Mount alternator - you'll need a third, or possibly fourth hand for this if you're not on a hoist in a shop. Do the back bolt first, hand-thread the square nut with tab onto the end, and then top bolt after lining eveything up - there will be some bolts that one can loosen to make this easier, like the bracket that held the harness that's bolted to the engine and that the alternator bolts to.
13. Assemble everything in reverse order. Remember to torque your lug nuts right.
14. Last, install battery, make sure doors aren't open or anything else that'll draw a huge amount of power, since you don't want a gigantic spark when you connect it. Connect positive, then negative.
Start car, test charging voltage. It should be between 13.2 and 15V.
Total time assuming you're well organized: 1.5 hours w/o hoist, 1 hour with.
Worked for me. Did I miss anything? Other than having a spare idler pulley nut on hand?
I replaced the alternator on my 01 Maxima in the first week of December. It has 64k miles on it. Cause: driven on very salty roads, and parked for 7 months with the guts of the car still wet. Like the corrosion that formed under the belt on the idler pulley is still there wet. Replaced the battery, and after an hour or two of operation the brake and battery lights started coming on intermittently. At highway speeds they'd come off, but when idling in traffic they'd come on again. Charge V was < 12V.
I replaced mine with a Bosch reman unit, which comes with a one or two year road-side assistance and a 2 year warranty or something. CDN$180 + core, but that was discounted super wholesale and the parts shop honored their misquote.
Steps:
1. DISCONNECT BATTERY, negative terminal first. Take it out and put it on a trickle charger or something to be sure it's out. Loosen passenger side lug nuts.
2. Jack up front of car, place on jackstands, make sure it's stable.
3. Remove front passenger wheel. Then remove access panel in wheel well (two screws and a plastic pop fitting).
4. NOW would be the time to squirt some penetrating oil on the nut at the center of the idler pulley - this makes a world of difference. DON'T hose it down so your belts get wet with oil or anything.
5. Remove front passenger bottom cover. If you have a long tube with a way to aim, look behind the AC compressor mounting plate for the holes the bolts thread into, and give them some penetrating oil love. A drop or two on the bolt ends can't hurt either.
6. Loosen idler pulley nut, then back off the tensioner screw at the top. Remove alternator belt.
7. Disconnect electrical connector clips at rear of alternator. On my '01 there is a single wire that runs down to the AC compressor, which I suppose is the clutch engagement signal wire. Disconnect that too. Now, notice the two connectors come together, and connect to another harness clip. Disconnect from that harness, and remove the alt/ac harness so it does not get mashed later. NOTE: when cold, the nissan harness plastics are quite brittle.
8. Whistle out the four (4) AC compressor mounting bolts. The compressor sits on a little lip on the mounting plate, but don't expect it to hold it up for you. I had a little table of 2x4's there for it to rest on and to de-stress the AC hoses, but I am told it's not essential. It does make getting to other things easier when the weight of the compressor isn't on the hoses, and you know, they hold an easily-evaporating liquid under pressure.
9. Loosen the two alternator mounting bolts. One comes from behind the alternator to the front, so an extension or something is useful.
10. With one hand supporting, remove one, then the other mounting bolt. Don't lose the square nut with the tab welded to it that will fall from the front of the alternator just behind the tensioner pulley. Remove alternator - you'll need to turn it creatively.
11. Inspect replacement alternator, make sure they're the same, etc. There will be a sleeve on one part of the alternator, leave that in place, since the act of tightening the mounting bolt will push that into place.
12. Mount alternator - you'll need a third, or possibly fourth hand for this if you're not on a hoist in a shop. Do the back bolt first, hand-thread the square nut with tab onto the end, and then top bolt after lining eveything up - there will be some bolts that one can loosen to make this easier, like the bracket that held the harness that's bolted to the engine and that the alternator bolts to.
13. Assemble everything in reverse order. Remember to torque your lug nuts right.
14. Last, install battery, make sure doors aren't open or anything else that'll draw a huge amount of power, since you don't want a gigantic spark when you connect it. Connect positive, then negative.
Start car, test charging voltage. It should be between 13.2 and 15V.
Total time assuming you're well organized: 1.5 hours w/o hoist, 1 hour with.
Worked for me. Did I miss anything? Other than having a spare idler pulley nut on hand?
01-12-2010, 05:26 PM
#53
Senior Member
Join Date: Oct 2009
Location: Atlanta
Posts: 1,222
Awesome follow up! I completed this but took me 5 hours, I tried to clean the terminals on the Alt and plugged it back, but alas, the battery and brake lights were still on. So off I went and did the change.
Homeyclaus was right on the money to think about supporting the AC.
And I had an extra set of hands when the alt was taken out and put back in.
Overall, like Colonel said, it is not a huge deal. The Alt I replaced was a remanufactured too however my belt was relatively new. And yes I had to go to Home Depot and get the 10 mm replacement bolt on the alternator, the one in there was almost rounded off. The nut is: 10 1.25 mm.
I bought the Advanced Auto Alt with lifetime warranty, so now I am not worried this failing again, I will just go get another one!
Pics to follow!
Last edited by mandyfig; 01-12-2010 at 05:29 PM.
01-12-2010, 06:03 PM
#54
 01-12-2010, 06:20 PM
#57
Senior Member
Join Date: Oct 2009
Location: Atlanta
Posts: 1,222
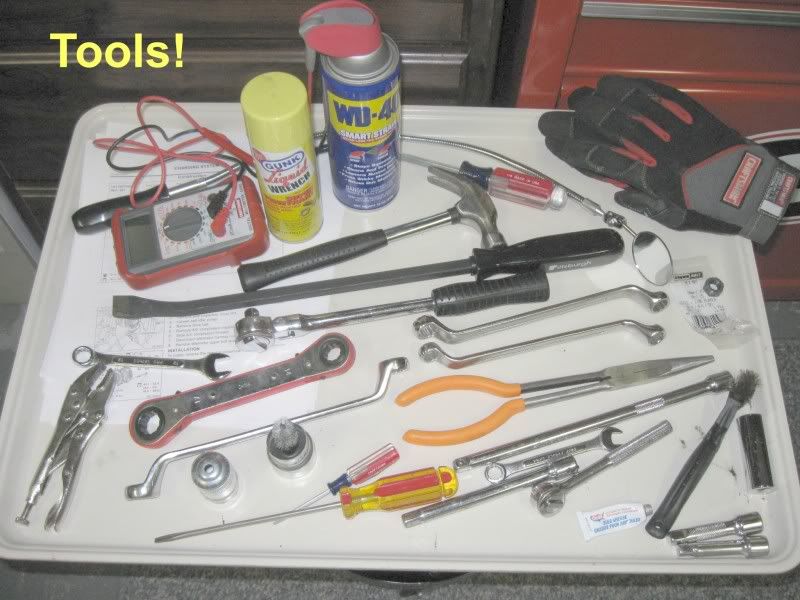
There are "must have" tools.
Offset metric will help you a lot.
Extensions short-mid and long are needed.
Pry bar to yank that alternator out.
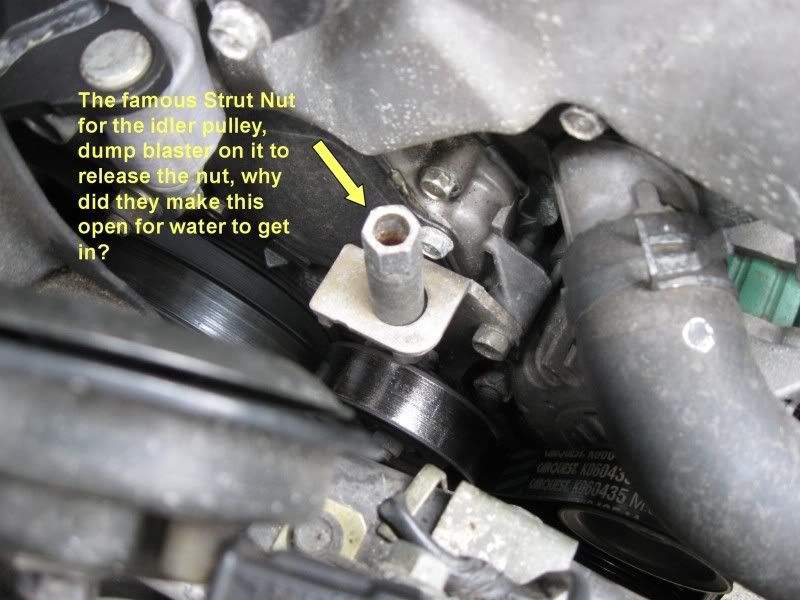
Replacement nut, 10 1.25 mm for the Alternator. The Strut nut for the idler, if you use a box wrench and be careful, you should be good.
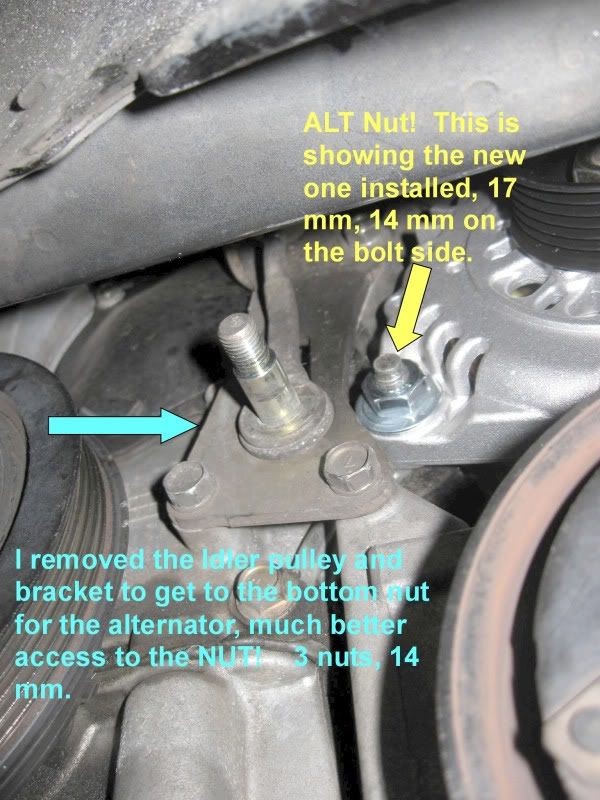
TIP: I removed the Idler bracket to give me space to access the lower alternator bolt. Otherwise you need a very thin offset 14 mm to get the nut out.
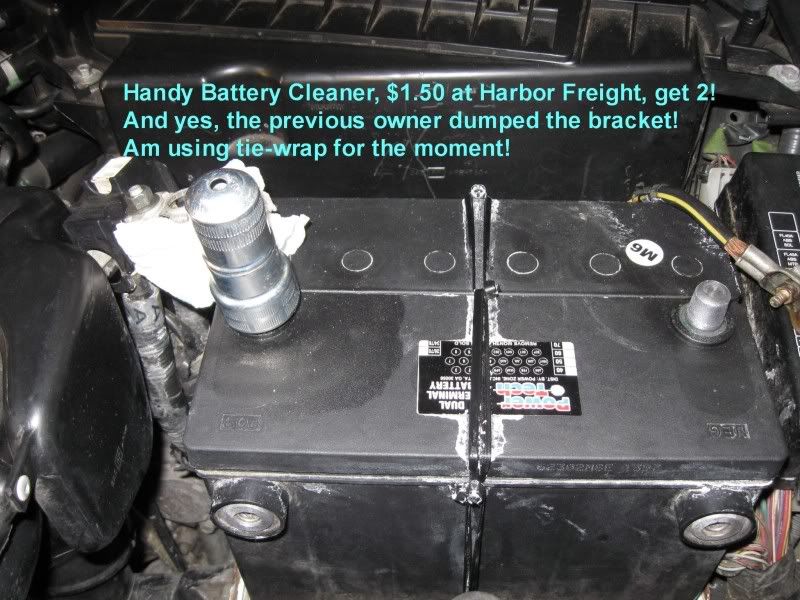
Battery terminal cleaner saves time.
Dielectric grease to coat the terminals.
Baking soda to clean the acid out from the battery.
Would love air driven ratchet tools!!!! Must invest in them.
Offset metric will help you a lot.
Extensions short-mid and long are needed.
Pry bar to yank that alternator out.
Replacement nut, 10 1.25 mm for the Alternator. The Strut nut for the idler, if you use a box wrench and be careful, you should be good.
TIP: I removed the Idler bracket to give me space to access the lower alternator bolt. Otherwise you need a very thin offset 14 mm to get the nut out.
Battery terminal cleaner saves time.
Dielectric grease to coat the terminals.
Baking soda to clean the acid out from the battery.
Would love air driven ratchet tools!!!! Must invest in them.
01-12-2010, 06:36 PM
#59
There are "must have" tools.
Offset metric will help you a lot.
Extensions short-mid and long are needed.
Pry bar to yank that alternator out.
Replacement nut, 10 1.25 mm for the Alternator. The Strut nut for the idler, if you use a box wrench and be careful, you should be good.
TIP: I removed the Idler bracket to give me space to access the lower alternator bolt. Otherwise you need a very thin offset 14 mm to get the nut out.
Battery terminal cleaner saves time.
Dielectric grease to coat the terminals.
Baking soda to clean the acid out from the battery.
Would love air driven ratchet tools!!!! Must invest in them.
01-12-2010, 07:32 PM
#60
Senior Member
Join Date: Oct 2009
Location: Atlanta
Posts: 1,222
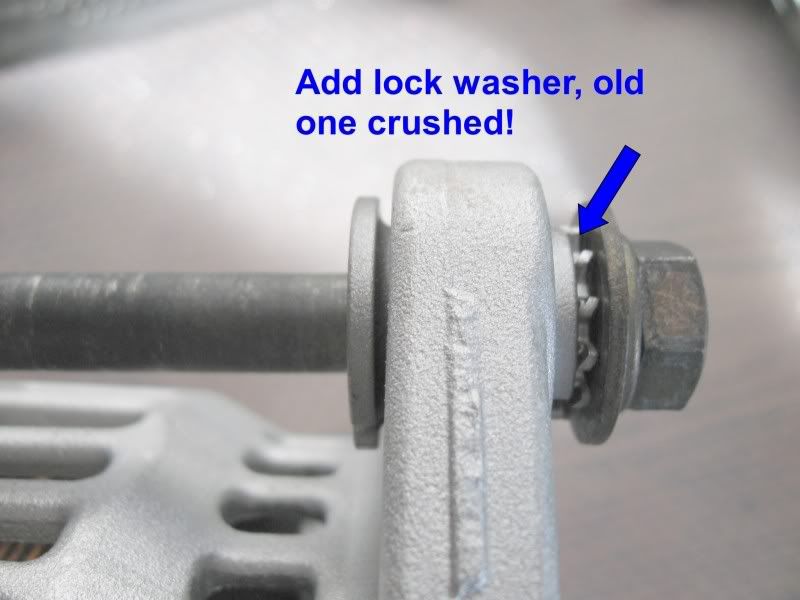
Whoever replaced my alternator last, dumped the washer and rounded off the nut. Can not get decent work nowadays. Hence I did this myself. At least I know I tried doing it the right way. And if it does not last, I am to blame.
01-13-2010, 06:13 AM
#61
Old Fuddy Duddy
Thread Starter
Join Date: Feb 2001
Posts: 2,712
 01-13-2010, 11:00 AM
#62
Senior Member
Join Date: Oct 2009
Location: Atlanta
Posts: 1,222
Pics will be posted as promised, they are done and at my photobucket account, however can not do it at work, they are blocking access.
The pics are not in any kind of order. They will be presented so that newbies can easily identify the components. Overall with this thread which is a sticky already and some of the pics will be enough for some of the members to take this DIY on their own.
With a lifetime warranty on the alternator, it means that you will never have to worry about spending money of it again, of course with some elbow grease.
Best thing is, doing it the 2nd time will be a breeze!
Invest your saved money on some nice tools! Thank you all, special mention to COLONEL!
 01-14-2010, 05:58 AM
#72
Senior Member
Join Date: Oct 2009
Location: Atlanta
Posts: 1,222
Thanks. More pics to come.
Yes, Advance Auto lifetime warranty part. Noise, there was no noise until tha last day prior to failure, that's gone. I have belt shriek and I need to take care of, needs more tightening. I re-used my relatively new belt.
Yes, Advance Auto lifetime warranty part. Noise, there was no noise until tha last day prior to failure, that's gone. I have belt shriek and I need to take care of, needs more tightening. I re-used my relatively new belt.
01-14-2010, 02:38 PM
#77
Senior Member

Join Date: Jun 2001
Location: Colorado Springs
Posts: 497
One thing I've never been sure on is just how much pressure to put on the belts when tightening them up. I know there are gauges that measure belt deflection, but is there a good rule of thumb to go by if you don't have one of those?
Nice writeup btw.
Nice writeup btw.
01-15-2010, 09:53 AM
#79
Senior Member
Join Date: Oct 2009
Location: Atlanta
Posts: 1,222
I adjusted my belts last night.
It has to feel tight. Go underneath and flex the belt. It should not buckle a lot.
The key is tighten it gradually. If it stops squeeking (normally from a crank), you are good to go. Go through the RPM's to check if you will hear a squeek or whining sound.
It has to feel tight. Go underneath and flex the belt. It should not buckle a lot.
The key is tighten it gradually. If it stops squeeking (normally from a crank), you are good to go. Go through the RPM's to check if you will hear a squeek or whining sound.