
Radiator Replacement Writeup
 07-08-2009 | 11:37 AM
#1

Radiator Replacement Writeup
Before I start… I understand that this procedure is not a tough one and is pretty straight forward to most. But for others like me who have never even thought about changing out a radiator this may come in handy. Plus… pics are always a good thing. Also, I am no mech guru of any sort so all comments and tips that may help this thread are very welcome.
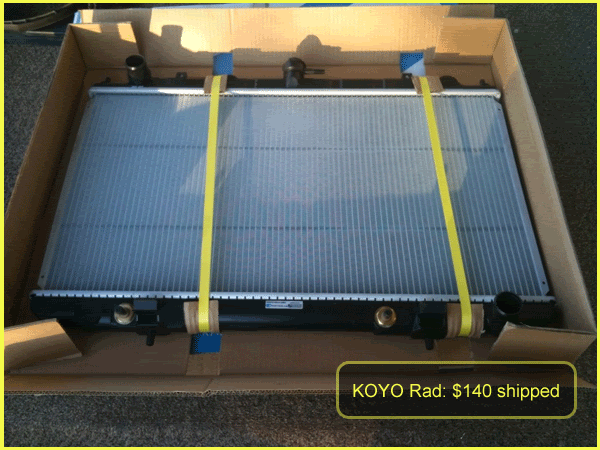
I was quoted by Nissan $792 for radiator replacement. Trust me... spend $140 on the radiator and install it yourself!!!
Items Needed:
1. Drip pan
2. Pliers (or whatever you’d like to grab those hose clamps)
3. Socket Wrench
4. 10mm Socket
5. Flat Head Screwdriver
6. Floor Jack (not necessary but makes it much easier)
7. Radiator Hoses (good to change out after 50-60k)
8. Radiator Hose Clips (the kind that screw tight, not clamps)
9. Funnel
Directions:
1. Remove splash shields (right and left) from underneath the front of the car.
(four 10mm bolts each)
2. With the splash shields removed the lower radiator will be visible.
3. With your drip pan below the radiator, unscrew the drain found here using a flat head screwdriver:
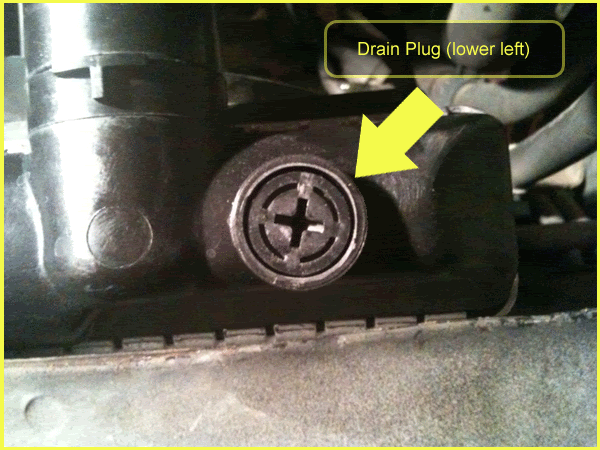
It may take a while for the radiator to completely drain. In fact, mine never stopped dripping completely.
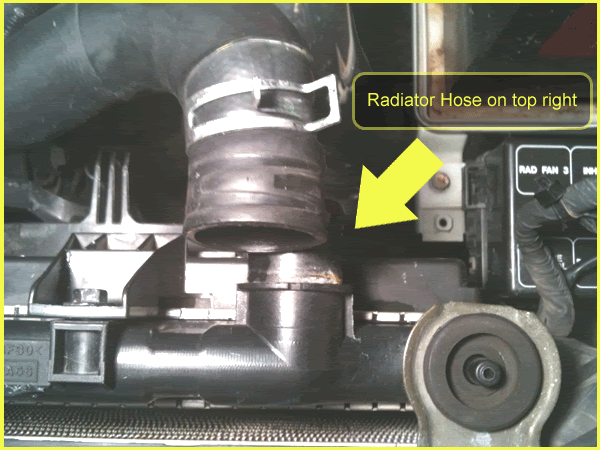
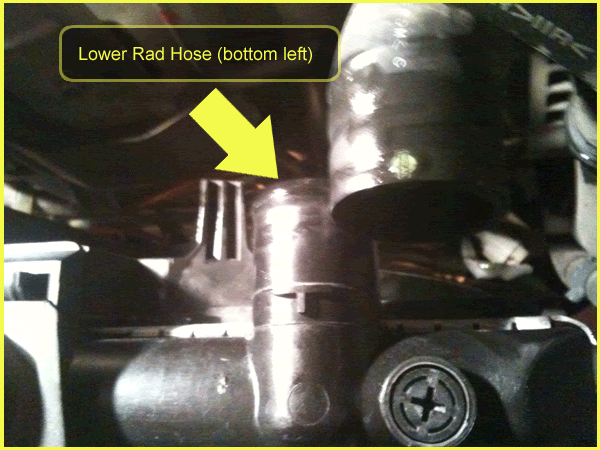
4. After the radiator is drained you can begin to undo hoses.
Top:
Bottom:
AT Lines: (2 if you drive an AT)
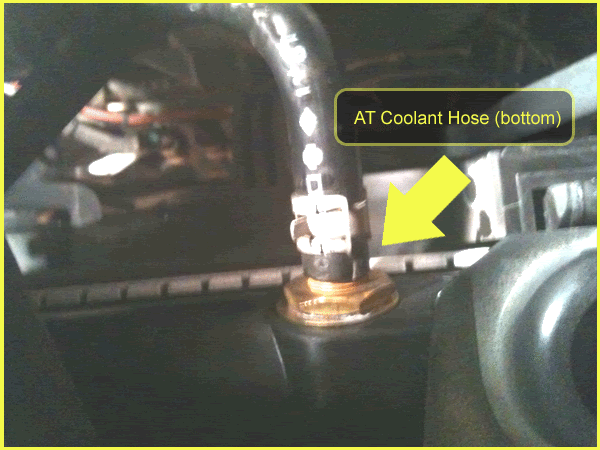
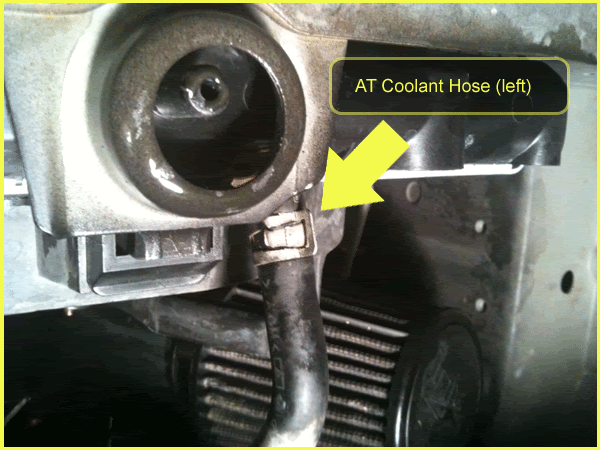
Also don't forget to undo the line from the Reservoir Tank.
I used a pair of rubber bands to keep the AT lines folded closed. Otherwise you’ll lose AT fluid.
***Continued…
I was quoted by Nissan $792 for radiator replacement. Trust me... spend $140 on the radiator and install it yourself!!!
Items Needed:
1. Drip pan
2. Pliers (or whatever you’d like to grab those hose clamps)
3. Socket Wrench
4. 10mm Socket
5. Flat Head Screwdriver
6. Floor Jack (not necessary but makes it much easier)
7. Radiator Hoses (good to change out after 50-60k)
8. Radiator Hose Clips (the kind that screw tight, not clamps)
9. Funnel
Directions:
1. Remove splash shields (right and left) from underneath the front of the car.
(four 10mm bolts each)
2. With the splash shields removed the lower radiator will be visible.
3. With your drip pan below the radiator, unscrew the drain found here using a flat head screwdriver:
It may take a while for the radiator to completely drain. In fact, mine never stopped dripping completely.
4. After the radiator is drained you can begin to undo hoses.
Top:
Bottom:
AT Lines: (2 if you drive an AT)
Also don't forget to undo the line from the Reservoir Tank.
I used a pair of rubber bands to keep the AT lines folded closed. Otherwise you’ll lose AT fluid.
***Continued…
Last edited by C-Young; 07-08-2009 at 01:31 PM.
07-08-2009 | 11:38 AM
#2
Radiator Replacement Writeup
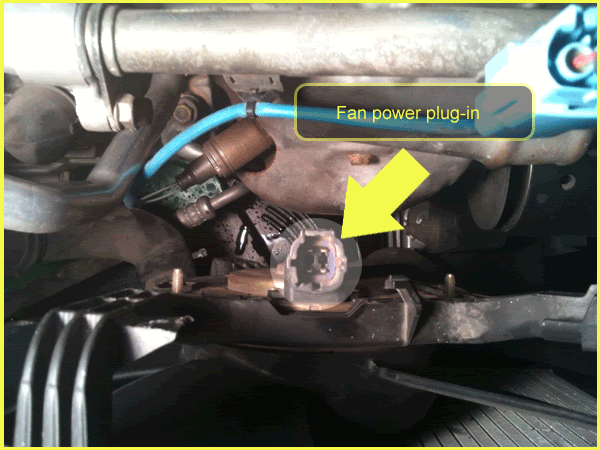
5. Also at this time, unplug the radiator fans from their power source:
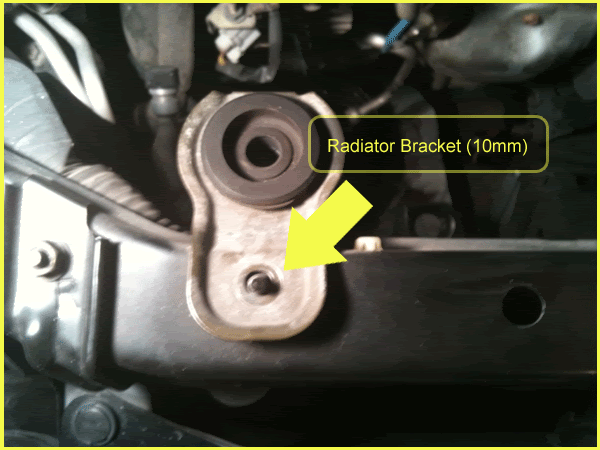
6. Unbolt the two radiator holding brackets:
7. With everything unhooked, etc. you can now slide the entire radiator assembly (fan shroud included) up and out of the engine compartment.
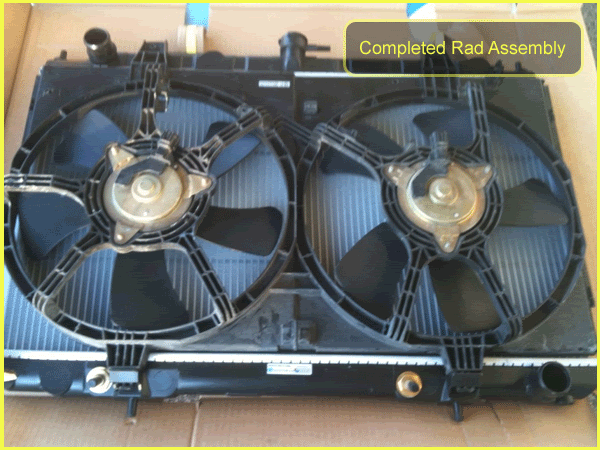
8. Unbolt the fan shroud from the old radiator here:
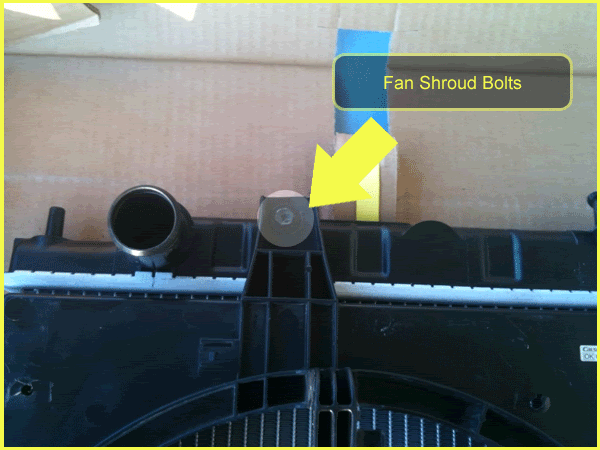
9. Remove fan shroud and place it on your new radiator:
10. Bolt on fan shroud to your new radiator:
11. With the new radiator assembly complete, you can now slide it into its slot in the engine compartment. There are 2 brackets that the bottom of the radiator will fit into. There will be some wiggle.
12. Connect all of your hoses back to the radiator.
13. Connect your fan power lines to their connectors.
14. Bolt your radiator brackets back on so that the radiator prongs go through the bracket holes.
15. Using a funnel and coolant of your choice (I used Prestone 50/50) and begin filling your radiator.
16. Fill until you see the fluid come up to the top.
17. With the radiator cap off, start your car and leave it running for 10-15 minutes all the while checking the fluid level, your temp gauge, and leaks.
18. Let your fans come on to make sure they are working properly.
19. Also check your top radiator hose to make sure it is very warm to the touch so you know your thermostat is not stuck.
20. Once you are satisfied that everything is in order, turn your car off and let it cool down.
21. Pour more coolant in as needed. The level should drop a decent ways after cooling off.
22. Drive your car around and make sure your temp gauge is reading right below half.
23. Also check under your car for any resemblance of leaks.
That’s it! You should be good to go now. Overall it’s a breeze. Just be ready for some mess and trouble getting those damn plastic clips on and off your splash shields.
Thanks to rroderiques77 for his tips and advice.
6. Unbolt the two radiator holding brackets:
7. With everything unhooked, etc. you can now slide the entire radiator assembly (fan shroud included) up and out of the engine compartment.
8. Unbolt the fan shroud from the old radiator here:
9. Remove fan shroud and place it on your new radiator:
10. Bolt on fan shroud to your new radiator:
11. With the new radiator assembly complete, you can now slide it into its slot in the engine compartment. There are 2 brackets that the bottom of the radiator will fit into. There will be some wiggle.
12. Connect all of your hoses back to the radiator.
13. Connect your fan power lines to their connectors.
14. Bolt your radiator brackets back on so that the radiator prongs go through the bracket holes.
15. Using a funnel and coolant of your choice (I used Prestone 50/50) and begin filling your radiator.
16. Fill until you see the fluid come up to the top.
17. With the radiator cap off, start your car and leave it running for 10-15 minutes all the while checking the fluid level, your temp gauge, and leaks.
18. Let your fans come on to make sure they are working properly.
19. Also check your top radiator hose to make sure it is very warm to the touch so you know your thermostat is not stuck.
20. Once you are satisfied that everything is in order, turn your car off and let it cool down.
21. Pour more coolant in as needed. The level should drop a decent ways after cooling off.
22. Drive your car around and make sure your temp gauge is reading right below half.
23. Also check under your car for any resemblance of leaks.
That’s it! You should be good to go now. Overall it’s a breeze. Just be ready for some mess and trouble getting those damn plastic clips on and off your splash shields.
Thanks to rroderiques77 for his tips and advice.
Last edited by C-Young; 07-08-2009 at 01:30 PM.


 07-08-2009 | 12:49 PM
#4

You might want to edit the post and flip them around, as you've got 1-4 as your second post, and 5-23 as the first.
Also FWIW I've always found it easier to pop the fans out first, and reinstall last.
Also FWIW I've always found it easier to pop the fans out first, and reinstall last.
07-08-2009 | 01:23 PM
#5
I'll change anyways since that seems to be the norm. Just always seemed funny to me.
07-08-2009 | 01:36 PM
#6
What always seemed funny to you?

Maybe if you were viewing the thread newest to oldest post in linear, it might've been in order, but who actually views a thread like that? It's the opposite of normal.
07-08-2009 | 02:26 PM
#8
Its funny to me to start at the bottom and read upwards. I'm pretty new at this forum stuff though...
07-08-2009 | 02:27 PM
#9
07-08-2009 | 02:36 PM
#10
We're really starting to get off topic here... but... how would I change that? Cause the #1 post is at the very bottom of the page. I've tried each "display mode" to no avail.
 07-08-2009 | 08:45 PM
#12

 07-10-2009 | 04:23 AM
#15
07-10-2009 | 10:39 AM
#16

Trakrunna
Joined: Nov 2006
Posts: 40
Yeah I pretty much did the same thing when I recently replace my radiator...
But I'm sure if you mention to "burp" the system after installing the new radiator..This is to insure that there is no air in the system. But good write up though.. I wish I had this a few weeks ago before maxus.... lol but everything worked out great.
But I'm sure if you mention to "burp" the system after installing the new radiator..This is to insure that there is no air in the system. But good write up though.. I wish I had this a few weeks ago before maxus.... lol but everything worked out great.
07-10-2009 | 10:44 AM
#17
Trakrunna
Joined: Nov 2006
Posts: 40
Yeah I pretty much did the same thing when I recently replace my radiator...
But I'm sure if you mention to "burp" the system after installing the new radiator..This is to insure that there is no air in the system. But good write up though.. I wish I had this a few weeks ago before maxus.... lol but everything worked out great.
But I'm sure if you mention to "burp" the system after installing the new radiator..This is to insure that there is no air in the system. But good write up though.. I wish I had this a few weeks ago before maxus.... lol but everything worked out great.
 07-10-2009 | 05:42 PM
#18

Senior Member
Joined: Apr 2009
Posts: 388
From: Tucson, AZ
07-10-2009 | 05:44 PM
#19
Also, the system is under pressure when hot. If you open the cap, you're releasing ~13 PSI, basically right into your face.
However if you warm it up without the cap on, there'll be no pressure; that's what the cap is there for (among other duties it has).
07-10-2009 | 05:49 PM
#20
Senior Member
Joined: Apr 2009
Posts: 388
From: Tucson, AZ
Of course someone did.
Also, the system is under pressure when hot. If you open the cap, you're releasing ~13 PSI, basically right into your face.
However if you warm it up without the cap on, there'll be no pressure; that's what the cap is there for (among other duties it has).
Also, the system is under pressure when hot. If you open the cap, you're releasing ~13 PSI, basically right into your face.
However if you warm it up without the cap on, there'll be no pressure; that's what the cap is there for (among other duties it has).
 07-10-2009 | 06:38 PM
#22
 07-22-2009 | 05:51 AM
#24
Wanna add a few comments since I did this recently:
1. The splash shield bolts may be rusted out and if you try to take them out, they'll break. Since I wanted to avoid this, you can take out the fan first to get to the bottom hoses from the top (like pmohr recommended, but not sure if it was for the same reason). The lower hose clamp may still be a little hard to get to from the top, but from the bottom, just reach into the hole in the splash shield and loosen the clamp with some small locking pliers. Then go up top and remove it. I just didn't wanna take the chance of not being able to re-affix the splash shields!
2. Be prepared for a lot of coolant to come out of the lower hose when you disconnect it!
3. Be prepared for some ATF to come out of the middle hose when disconnected!
Last edited by ridinwitha35; 07-22-2009 at 05:53 AM.


 07-22-2009 | 08:56 AM
#26
Wanna add a few comments since I did this recently:
1. The splash shield bolts may be rusted out and if you try to take them out, they'll break. Since I wanted to avoid this, you can take out the fan first to get to the bottom hoses from the top (like pmohr recommended, but not sure if it was for the same reason). The lower hose clamp may still be a little hard to get to from the top, but from the bottom, just reach into the hole in the splash shield and loosen the clamp with some small locking pliers. Then go up top and remove it. I just didn't wanna take the chance of not being able to re-affix the splash shields!
2. Be prepared for a lot of coolant to come out of the lower hose when you disconnect it!
3. Be prepared for some ATF to come out of the middle hose when disconnected!
1. The splash shield bolts may be rusted out and if you try to take them out, they'll break. Since I wanted to avoid this, you can take out the fan first to get to the bottom hoses from the top (like pmohr recommended, but not sure if it was for the same reason). The lower hose clamp may still be a little hard to get to from the top, but from the bottom, just reach into the hole in the splash shield and loosen the clamp with some small locking pliers. Then go up top and remove it. I just didn't wanna take the chance of not being able to re-affix the splash shields!
2. Be prepared for a lot of coolant to come out of the lower hose when you disconnect it!
3. Be prepared for some ATF to come out of the middle hose when disconnected!
2. If you drain the radiator like I said in step 3 you will have minimal coolant flow when you disconnect the hoses.
3. In the step where I say disconnect hoses I wrote this as well "I used a pair of rubber bands to keep the AT lines folded closed. Otherwise you�ll lose AT fluid."
07-22-2009 | 08:59 AM
#27
And no... I just used Prestone 50/50. Hey... its just coolant. Its all going to come back out again when I replace my t-stat with a 350z one anyways.
Last edited by C-Young; 07-22-2009 at 09:01 AM.
07-23-2009 | 05:52 AM
#28
1. I broke all of the cheap plastic ones off long ago (except for a few) and replaced them with sturdy steel fasteners that take a socket wrench to remove. I recommend this highly
2. If you drain the radiator like I said in step 3 you will have minimal coolant flow when you disconnect the hoses.
3. In the step where I say disconnect hoses I wrote this as well "I used a pair of rubber bands to keep the AT lines folded closed. Otherwise you�ll lose AT fluid."
2. If you drain the radiator like I said in step 3 you will have minimal coolant flow when you disconnect the hoses.
3. In the step where I say disconnect hoses I wrote this as well "I used a pair of rubber bands to keep the AT lines folded closed. Otherwise you�ll lose AT fluid."
07-23-2009 | 11:37 AM
#29
07-23-2009 | 08:44 PM
#30
I just know that even after I had let my radiator drain, a good cup or pint or so of coolant came out the lower hose when disconnected, and that AT fluid came out the radiator, which was unexpected (never new the trans was connected to the radiator).
07-23-2009 | 10:15 PM
#31

Newbie - Just Registered
Joined: Jul 2005
Posts: 2
Ebay radiator vs. Koyo version
First let me say thanks for the thread, I plan on using it and some of the others from this forum when I pull and replace the radiator on my '02 Maxima. Its spewing coolant, covering a lot of my engine compartment with dried coolant, as I've seen in some of the pictures in another thread.
Well my question for anyone who wants to give their $.02 is: is there any reason not to go with one of the radiators offered on Ebay for around $80 (shipped)? This is as opposed to going with the Koyo for around $150 (shipped), which I am inclined to do if it wasn't nearly double the price.
Thanks for any input.
07-23-2009 | 10:17 PM
#32
First let me say thanks for the thread, I plan on using it and some of the others from this forum when I pull and replace the radiator on my '02 Maxima. Its spewing coolant, covering a lot of my engine compartment with dried coolant, as I've seen in some of the pictures in another thread.
Well my question for anyone who wants to give their $.02 is: is there any reason not to go with one of the radiators offered on Ebay for around $80 (shipped)? This is as opposed to going with the Koyo for around $150 (shipped), which I am inclined to do if it wasn't nearly double the price.
Thanks for any input.
Well my question for anyone who wants to give their $.02 is: is there any reason not to go with one of the radiators offered on Ebay for around $80 (shipped)? This is as opposed to going with the Koyo for around $150 (shipped), which I am inclined to do if it wasn't nearly double the price.
Thanks for any input.
07-24-2009 | 02:22 PM
#34
First let me say thanks for the thread, I plan on using it and some of the others from this forum when I pull and replace the radiator on my '02 Maxima. Its spewing coolant, covering a lot of my engine compartment with dried coolant, as I've seen in some of the pictures in another thread.
Well my question for anyone who wants to give their $.02 is: is there any reason not to go with one of the radiators offered on Ebay for around $80 (shipped)? This is as opposed to going with the Koyo for around $150 (shipped), which I am inclined to do if it wasn't nearly double the price.
Thanks for any input.
Well my question for anyone who wants to give their $.02 is: is there any reason not to go with one of the radiators offered on Ebay for around $80 (shipped)? This is as opposed to going with the Koyo for around $150 (shipped), which I am inclined to do if it wasn't nearly double the price.
Thanks for any input.
When I was quoted by Nissan $792 to replace my rad, $150 sounded very refreshing so I jumped on it. Needed my car back ASAP and didn't have time to look around for better deal...
Plus I've heard nothing but good from other users that went with Koyo as well.
That pretty much covers it...


 07-28-2009 | 01:04 PM
#40
Thanks to all for your praises. I'm glad it helps some of us less mechanically inclined guys!
I'm not sure how to go about making this a sticky though...
pmohr, you mean guy ... hook a brotha up! I know you hold the power...
I'm not sure how to go about making this a sticky though...
pmohr, you mean guy
... hook a brotha up! I know you hold the power...