Red vinyl - Tailights
 03-17-2011, 12:18 PM
#41

grille then tails lol. i've been thinking about LEDs alot lately. i have somethings to tidy up on the interior first before i tackle that though, so first things first....but yea you need a progress thread, bad
 03-17-2011, 12:24 PM
#42
The nearest I've gone with any kind of progress thread is to totally ***** jowo9's engine bay posts. But I'll admit, it's kind of fun to read back and see where you were going. (whiplash)
03-17-2011, 02:01 PM
#44
I'm telling you, all you need are some shop rags, some product, and some elbow grease. I polished the 2 front power steering coolant lines today, in prep for re-installing my powdercoated engine brace. They're very shiny now.
 Like chrome.
What did you do with your car?
Last edited by Rochester; 03-17-2011 at 02:04 PM.
03-17-2011, 02:51 PM
#45
Senior Member
Thread Starter
iTrader: (4)
Join Date: Jul 2006
Location: Ontario, Canada
Posts: 5,548
LOL you and your hoes...es
My car has been getting FILTHY from all the work I've been doing. Once I get done the Interior Lighting, this thing is getting a good cleaning.
I was going to post a pic of the mayhem, but I'm too ashamed ..
My car has been getting FILTHY from all the work I've been doing. Once I get done the Interior Lighting, this thing is getting a good cleaning.
I was going to post a pic of the mayhem, but I'm too ashamed ..

 03-17-2011, 06:29 PM
#49
Senior Member
Thread Starter
iTrader: (4)
Join Date: Jul 2006
Location: Ontario, Canada
Posts: 5,548
Not a bad idea actually, maybe not really worth the effort required though. Unless someone has a better way?
Anyways, here's some poor quality night shots (Digital Cam with no custom adjustments):
Tails:


Right signal:

Brake:

I have two things I'm going to try on top of what I've done to the tails:
1. Install a dual filament bulb in the signal spot, and wire it to illuminate with the tailights.
1a. If that goes well (I don't think it will look right), then I'd consider wiring the tailights to operate as one bulb on each side. By this I mean, both 'half moons' would brake, and signal, as well as the regular tail light. I have my doubts about that looking good though, but it's worth trying IMO.
2. Install the 'light smoke film' over the reverse lights
Both these things are easily reversable if they don't turn out well. I'm not trying it for a bit though cause my LED's came in today, so I'm off to play.
Last edited by TunerMaxima3000; 03-17-2011 at 06:32 PM.
03-17-2011, 08:31 PM
#50
Senior Member
Thread Starter
iTrader: (4)
Join Date: Jul 2006
Location: Ontario, Canada
Posts: 5,548
Oh and ~ Started ~ http://forums.maxima.org/members-rid...ss-thread.html
03-18-2011, 05:52 AM
#51
Oh and ~ Started ~ http://forums.maxima.org/members-rid...ss-thread.html
 03-29-2011, 04:40 AM
#53
Hourly, or flat-fee?
I'm telling you, all you need are some shop rags, some product, and some elbow grease. I polished the 2 front power steering coolant lines today, in prep for re-installing my powdercoated engine brace. They're very shiny now. Like chrome.
What did you do with your car?
I'm telling you, all you need are some shop rags, some product, and some elbow grease. I polished the 2 front power steering coolant lines today, in prep for re-installing my powdercoated engine brace. They're very shiny now.
Like chrome.What did you do with your car?
 03-30-2011, 09:16 PM
#55

^Yes I would probaby have to get the whole trunk lid painted, I don't know about paint match difficulty, I need to get some body colour spray balm made up anyways so I'll see how that matches up.
As far as the spoiler, I think it makes the rear end look too round.... one may even say Obese. Not to mention pretty much every Maxima has one. Not very original.
My car is in realy good shape too, the paint isn't faded, which is usually what makes paint matching the most difficult.
Enough OT
As far as the spoiler, I think it makes the rear end look too round.... one may even say Obese. Not to mention pretty much every Maxima has one. Not very original.
My car is in realy good shape too, the paint isn't faded, which is usually what makes paint matching the most difficult.
Enough OT
01-11-2012, 07:37 PM
#57
Member

Join Date: Jan 2012
Posts: 155
so at the risk of sounding stupid, these just go right over top of the tail lights? you don't have to open the tail lights up or anything? My biggest gripe is how the tail lights work (it's too "Alteza" for me and I don't think a luxery car should look "ricey"
If it's just a window tint kind of thing, who sells them pre-made with black and the red brake light?
If it's just a window tint kind of thing, who sells them pre-made with black and the red brake light?
03-20-2012, 09:06 AM
#59

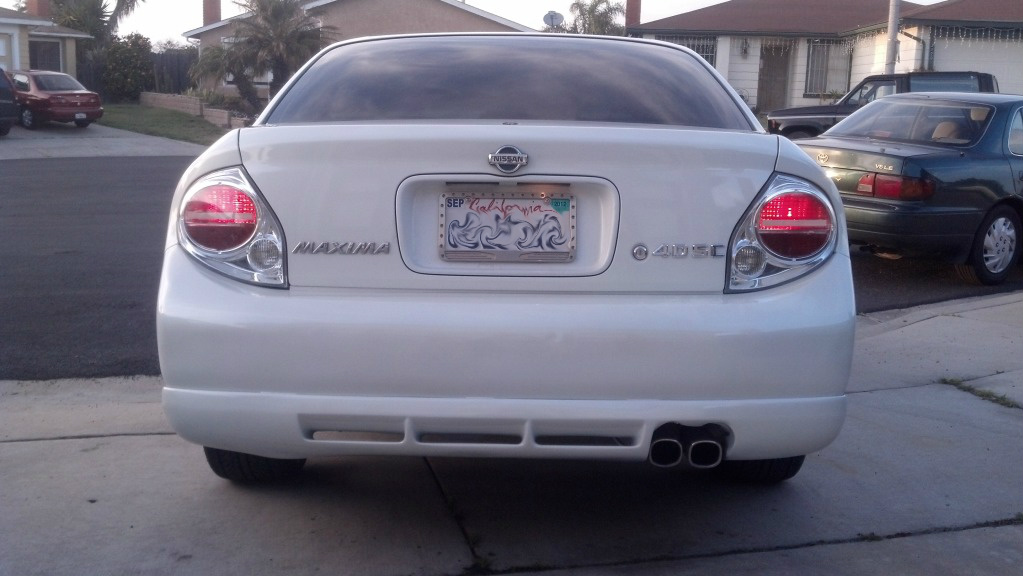
I got my Sheets of Vinyl in today. It just so happened to be a lovely day (for winter) too 
So here's the installation pics:
Before:

Laying the Vinyl on:

Vinyl Cut to Size:

Installed shots:


I have to say, I'm pretty impressed with myself. I suck at window tint, so I was obviously worried about this job. It came out INCREDIBLE. And for those of you that know how picky I am, that's saying a lot.
I will probably re-do the left side, I made a minor error in the cut, it's barely noticeable, but, again, picky .
.
I don't think I'll ever want to take them off, IMO it looks WAY better than the Blue Bat overlay pictures I've seen as well.
As you can probably tell, I decided NOT to install the smoked vinyl over them, they ended up dark enough for my taste, and there was no need.
I had originally though it would help 'blend' in the mismatch in colour. I ended up putting the vinyl over the whole light though, not just the 'half moon' as originally expected.
Either way, it was un-neccessary.
I'll post some night-time shots tonight.
So here's the installation pics:
Before:
Laying the Vinyl on:
Vinyl Cut to Size:
Installed shots:
I have to say, I'm pretty impressed with myself. I suck at window tint, so I was obviously worried about this job. It came out INCREDIBLE. And for those of you that know how picky I am, that's saying a lot.
I will probably re-do the left side, I made a minor error in the cut, it's barely noticeable, but, again, picky
.I don't think I'll ever want to take them off, IMO it looks WAY better than the Blue Bat overlay pictures I've seen as well.
As you can probably tell, I decided NOT to install the smoked vinyl over them, they ended up dark enough for my taste, and there was no need.
I had originally though it would help 'blend' in the mismatch in colour. I ended up putting the vinyl over the whole light though, not just the 'half moon' as originally expected.
Either way, it was un-neccessary.
I'll post some night-time shots tonight.
Tuner what was your process for cutting that circle so perfectly?
03-20-2012, 10:31 AM
#60
Senior Member
Thread Starter
iTrader: (4)
Join Date: Jul 2006
Location: Ontario, Canada
Posts: 5,548
There's a little ridge in your tailight that goes around the oval (circle) portion. Run out to your car and run your fingernail over it, you'll feel it.
I used this as a guide and very carefully traced a brand NEW razor blade over it. There was one spot I mentioned on the left piece that the blade skipped out a bit on me but I was actually able to blend that back in with the heat gun and a microfiber cloth.
So again, just lay it on oversized, install the vinyl as you normally would, make sure it's sealed and on there good, bubbles out, etc. Then make your cut, and peel off excess.
03-20-2012, 11:13 AM
#61
There's a little ridge in your tailight that goes around the oval (circle) portion. Run out to your car and run your fingernail over it, you'll feel it.
I used this as a guide and very carefully traced a brand NEW razor blade over it. There was one spot I mentioned on the left piece that the blade skipped out a bit on me but I was actually able to blend that back in with the heat gun and a microfiber cloth.
So again, just lay it on oversized, install the vinyl as you normally would, make sure it's sealed and on there good, bubbles out, etc. Then make your cut, and peel off excess.
I used this as a guide and very carefully traced a brand NEW razor blade over it. There was one spot I mentioned on the left piece that the blade skipped out a bit on me but I was actually able to blend that back in with the heat gun and a microfiber cloth.
So again, just lay it on oversized, install the vinyl as you normally would, make sure it's sealed and on there good, bubbles out, etc. Then make your cut, and peel off excess.
Unless it's still there, will look into that.
03-21-2012, 05:49 AM
#62

Has anyone ever tried to paint the black area on the tail lights the same color as the body of the car? For example, white paint instead of black paint on TM3000's max... I'd be interested to see what that would look like... Photoshop?
03-21-2012, 06:05 AM
#63
Senior Member
Thread Starter
iTrader: (4)
Join Date: Jul 2006
Location: Ontario, Canada
Posts: 5,548
It's not too aweful an idea, for a photoshop especially, but I doubt highly that it would actually look good simply becuase our tailights don't flow smoothly into the fender lines, they're very defined.
03-21-2012, 09:48 AM
#66


 03-21-2012, 08:38 PM
#74
Junior Member

Join Date: Sep 2010
Location: Chicago, IL
Posts: 39
On my 2000 Grand Cherokee I bought some candy apple red model spray paint from Michaels and taped it off put a couple coats on to transform my amber portion on the rears to all red. It went through 5 winters and held up just fine.
03-21-2012, 08:43 PM
#75
03-28-2012, 04:39 PM
#77

I have two things I'm going to try on top of what I've done to the tails:
1. Install a dual filament bulb in the signal spot, and wire it to illuminate with the tailights.
1a. If that goes well (I don't think it will look right), then I'd consider wiring the tailights to operate as one bulb on each side. By this I mean, both 'half moons' would brake, and signal, as well as the regular tail light. I have my doubts about that looking good though, but it's worth trying IMO.
BTW, here's my tails, painted candy red from the inside:

And the wingless look, showing brake lights with incandescents:
I'm definitely considering pulling the wing, and completely debadging the trunk while I'm at it.
Last edited by EuroDriver; 03-28-2012 at 04:45 PM.