
The DIY subframe collar thread


Member
Joined: Dec 2010
Posts: 139
Has anyone found a place to get the washers? I was all set to do this mod but didnt really know of anywhere to get them and google didnt help find anywhere local. Online, i only found the size i needed in quantity of 100 or more so i just gave up on it at that point.
Member
Joined: Dec 2010
Posts: 139
Home depot doesn't even carry sizes half as big as is needed.
I also live in MA but Auburn is a long ways away. I tried to google local "industrial supply" places but my google-fu must be weak.
I also live in MA but Auburn is a long ways away. I tried to google local "industrial supply" places but my google-fu must be weak.


Newbie - Just Registered
Joined: Jun 2008
Posts: 15
Hi AWeb,
I have a 2000 Max GLE and am interested in doing this project. Many thanks to Jeff. I think I know where to install these based on Jeff's write up, but still don't know how you get the washers jammed into place and how to support the point and get enough play at the point so you can begin to slide the washers in. Can you please put pics up as you go along? Two of your washers are cut just inside the OD instead of all the way like the other "C" shaped washers, where exactly do these non c-shaped ones go?
Thanks much!
Last edited by slimbim; May 26, 2013 at 10:21 PM.

Member
Joined: May 2013
Posts: 294
The top washers need to be notched like the rear ones did to make a C. The ID is a perfect fit so not opening. There are 2 washers on the bottom and only one needs a slight notching like so:

Once all the cutting is done install the C notched washers above the subframe and install the 2 washers on the bottom. The notched one is on top of the untouched washer. The lower washers fit perfectly as well so no opening on the ID is needed.
Once all the cutting is done install the C notched washers above the subframe and install the 2 washers on the bottom. The notched one is on top of the untouched washer. The lower washers fit perfectly as well so no opening on the ID is needed.
The bold is referring to the front mounts. On the bottom, the top washer needs notched like so....I'm guessing because of the way the sub-frame curves it needs clearance.
Last edited by AWeb80; May 26, 2013 at 10:39 PM.
Newbie - Just Registered
Joined: Jun 2008
Posts: 15
Thanks AWeb. So how do I create the clearance to slide/tap/hammer in the upper "C" washers? I don't have access to a hoist. So in other words, I am not sure where I should apply my bottle-jack. Don't want to apply it to any non-chasiss parts where the jack will potentially smash right through the underbody or create an indentation.
Member
Joined: May 2013
Posts: 294
Hi AWeb,
I have a 2000 Max GLE and am interested in doing this project. Many thanks to Jeff. I think I know where to install these based on Jeff's write up, but still don't know how you get the washers jammed into place and how to support the point and get enough play at the point so you can begin to slide the washers in. Can you please put pics up as you go along? Two of your washers are cut just inside the OD instead of all the way like the other "C" shaped washers, where exactly do these non c-shaped ones go?
Thanks much!
I have a 2000 Max GLE and am interested in doing this project. Many thanks to Jeff. I think I know where to install these based on Jeff's write up, but still don't know how you get the washers jammed into place and how to support the point and get enough play at the point so you can begin to slide the washers in. Can you please put pics up as you go along? Two of your washers are cut just inside the OD instead of all the way like the other "C" shaped washers, where exactly do these non c-shaped ones go?
Thanks much!
Here is a quick vid for the rear mount. You'll need a 14 and 19mm socket to do it.
I was NOT able to do the front mounts as the nut is rusted on there. I'm going to have to remove the sway bar end link and disconnect the BJ to lower the Control arm out of the way to get an extension and impact on it. It's not possible to do it with the tools I have. I had a 3' breaker on it today and still couldn't get it to budge.
Looks like I'll be doing sway bar inner bushings and endlinks soon. Might as well put new/upgraded ones in since I'll be removing them anyway.


I am going to try do at least a couple of these, (IIRC they all do not work in conjunction with a LTB)


Senior Member
Joined: Apr 2011
Posts: 539
From: Ontario, Canada
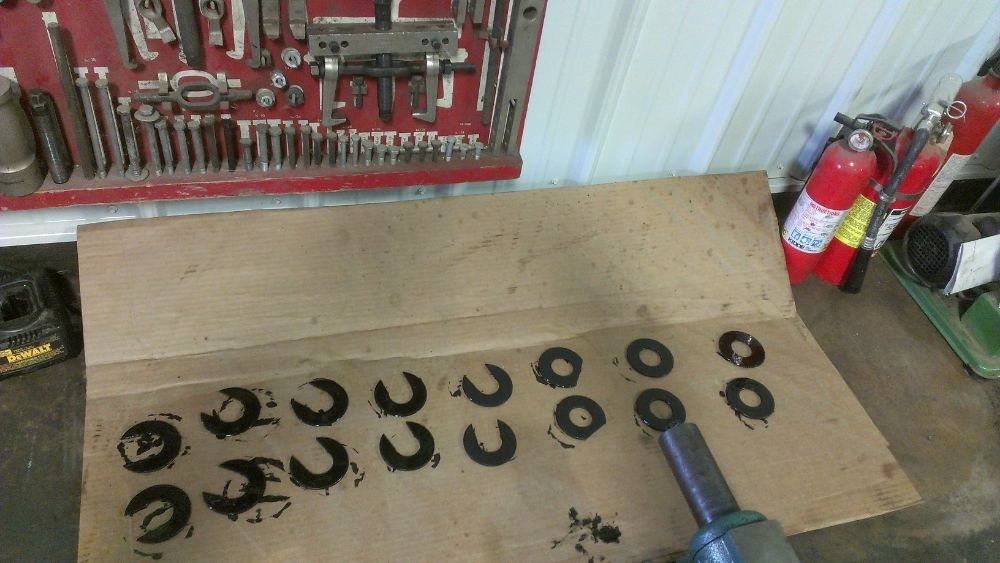
Just finished this up today, I used a metal chop saw while I held the washer with vice grips, to do the c-shape ones. That wasn't too bad, and they fit well but boreing out the inside of the two bottom front's I had a hell of a time. But, it's done.
The only other question I had was, and I tried to find it in the fsm, what should the nuts be torqued to after the install?
Once I have them torqued I can test em out, and hopefully give my positive review.
The only other question I had was, and I tried to find it in the fsm, what should the nuts be torqued to after the install?
Once I have them torqued I can test em out, and hopefully give my positive review.
Last edited by Brl24; Jun 1, 2013 at 05:48 PM.
Member
Joined: May 2013
Posts: 294
I all the times I've had my GP, civic, and my old civic hatch suspension apart, I always just make **** as tight as possible. Never had a problem. I do tq lug nuts though as I want a consistent tightness all around to keep from warping the rotor.
The only time I tq stuff is on engines and trans internals.
The only time I tq stuff is on engines and trans internals.

Senior Member
Joined: Apr 2011
Posts: 539
From: Ontario, Canada
So, after doing a good long test drive on highway, country and city roads...
These are as good as everyone has said, they take a lot of the slop out of the steering wheel, as opposed to before when it was centred you could move it slightly either way with having almost no steering response.
You can tell that the suspension is forced to do the work it is supposed to, instead of that sub frame movin around. Road imperfections and bumps don't give that feeling of loss of control anymore. I think my car is actually driving straighter, the camber of the road doesn't want to pull the car either way as much.
Overall, especially for the price (less than $20), I'm very happy.
The bad: solidifying that subframe excentuated the low speed clunk in the front end, which I half expected. Now to refresh the suspension/components and really enjoy the effects of these collars.
Last edited by Brl24; Jun 3, 2013 at 03:38 PM.

Member
Joined: Feb 2012
Posts: 261
From: Murfreesboro TN
Just finished this today. I had picked up the washers yesterday from a local 'ace hardware' type store for $16. I only went with 3 per corner because these washers were pretty thick. Man it's amazing how much different/better it drives now! No slop, bumps don't veer it off course, no low end clunks....everyone should do this!
Just finished this today. I had picked up the washers yesterday from a local 'ace hardware' type store for $16. I only went with 3 per corner because these washers were pretty thick. Man it's amazing how much different/better it drives now! No slop, bumps don't veer it off course, no low end clunks....everyone should do this!

Junior Member
Joined: Nov 2012
Posts: 41
From: Chicago
Hey Im trying to do this but how exactly would I cut a "C" into the washers? What tool do I need to buy? A hacksaw seems like ALOT of work..
If i have to buy a hand grinder or a metal chop saw I might as well pay for carnals set...
If i have to buy a hand grinder or a metal chop saw I might as well pay for carnals set...
Sent from my iPhone using MaximaOrg

Member
Joined: Feb 2012
Posts: 261
From: Murfreesboro TN
If you have an maxima and its ten years old or better, chances are that your bushings have just about had it. Symptoms of this are a sloppiness in the front end with possibly some clumsiness over low speed rough pavement, directional changes when hitting bumps at higher speeds, and steering sluggishness. All of this can be attributed to worn front subframe bushings. You eliminate them from the equation with the introduction of the collars. They effectively solidify the connection of the subframe to the car. And from personal experience it was one of the best suspension mods I have done. The car gets that tight crisp feel that a new car exhibits. Moreover, they complemented my new lower control arms/end links/tie rod ends nicely. The front end on my car is tight and clunk free.

Senior Member
Joined: Aug 2013
Posts: 789
From: MO, greater KC Area-ish
at the cost of bumpier ride i take it? where are the bushing located? i'm gonna see if i can't get my car on the rack in the near future.
EDIT: instead of using washers would a steel spacer work if i had one made?
EDIT: instead of using washers would a steel spacer work if i had one made?

