
Drop-in LED instrument cluster lighting for 5.5 owners. Finally found one that works!


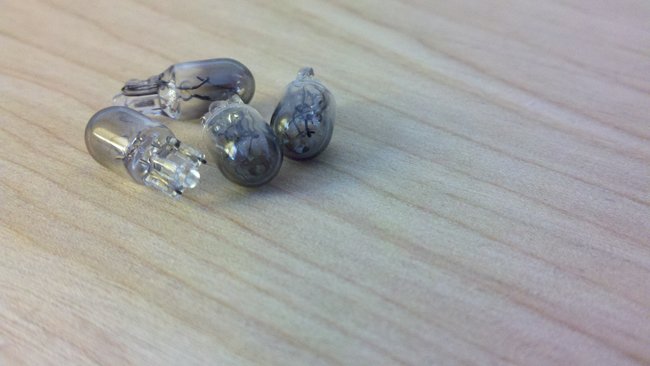
Replace bulb with led? My 2002 has the bulb fused into the holder. I shattered a bulb trying to get them apart with pliers.
Ohh twist and lift! Seems easy after spitting broken glass out of my mouth! Haha
Edit 2: here is what I noticed. With the gauge cluster out, the rpm side is to the left. When installing the led wedge, ensure the + side is facing your left.
Worked for me once I noticed that.
Ohh twist and lift! Seems easy after spitting broken glass out of my mouth! Haha
Edit 2: here is what I noticed. With the gauge cluster out, the rpm side is to the left. When installing the led wedge, ensure the + side is facing your left.
Worked for me once I noticed that.
Last edited by RR5; May 6, 2011 at 03:24 PM.

Thread Starter
Member
Joined: Mar 2011
Posts: 242
From: SoCal

The first week I ran my errands in the evening so I'd have an excuse to flick on the lights


Senior Member
Joined: Dec 2005
Posts: 1,124
From: Leicester, Ma

Rochester,
Did u get these installed yet. I like the cool white as well. The Warm white looks really good being full white and then the cool white has that ice blue look. Waiting on your pics as i know yours will be in perfect clarity and give a true real to life look. Waiting on seeing how your dash looks. Cool or warm.. Decisions, decisions, decisions...

Overexposed but it's kinda close to how it actually looks.
http://i55.tinypic.com/10eepnk.jpg
And the before
http://i55.tinypic.com/2u56ik9.jpg
http://i55.tinypic.com/10eepnk.jpg
And the before
http://i55.tinypic.com/2u56ik9.jpg
Last edited by RR5; May 7, 2011 at 02:32 AM. Reason: Huge image, direct link instead.
Rochester,
Did u get these installed yet. I like the cool white as well. The Warm white looks really good being full white and then the cool white has that ice blue look. Waiting on your pics as i know yours will be in perfect clarity and give a true real to life look. Waiting on seeing how your dash looks. Cool or warm.. Decisions, decisions, decisions...
Did u get these installed yet. I like the cool white as well. The Warm white looks really good being full white and then the cool white has that ice blue look. Waiting on your pics as i know yours will be in perfect clarity and give a true real to life look. Waiting on seeing how your dash looks. Cool or warm.. Decisions, decisions, decisions...
Admittedly, I'm a little apprehensive about taking the cluster apart.

I appreciate the words, but with night-time shots, my pictures won't be any better than what you've been seeing here already. And no, I haven't installed them yet. I'm hoping to get to it tonight or tomorrow.
Admittedly, I'm a little apprehensive about taking the cluster apart.
Admittedly, I'm a little apprehensive about taking the cluster apart.
 when it comes to photographing light output of any kind. This is a see-for-yourself mod more than a this-is-exactly-what-it-looks-like mod for sure.
OAN. I'm always apprehensive to dismantle a cluster, but in this case you don't need to. You're going to pull the entire assembly out of the dash, flip it over onto a soft towel or something, and 1/4 twist the bulb sockets out of the back. Cake.


Rochester, can you take some pics when putting the leds in? I'm trying to imagine how the LED is supposed to go in.
Do we still end up using those black twist on thing's to hold it somehow or is the led supposed to fit just be able to fit on or something? Never messed around with electrical stuff.
Do we still end up using those black twist on thing's to hold it somehow or is the led supposed to fit just be able to fit on or something? Never messed around with electrical stuff.
alright thanks. That's what I was expecting, but after looking at pics, the ends of the leds are rectangular while the stock bulbs are round and seem to screw on so it got me a bit confused. I'll probably get to it when my bulbs come in

Senior Member
Joined: Apr 2004
Posts: 1,861
From: Atlanta
Guys, it's a lot easier than it looks. once you take out the panel the bulb hosusing is a twist and lock. I used a pair a needle nose pliers to twist and remove. Then the old bulbs pull straight out. The bulb is round, but the base is flat. Put the new LEDs in, you may have to use the pliers to pinch the connectors together to ensure they don't pop out... It's a pain if it does and gets stuck inside.
The cluster will come out pretty easily, take your time and cover everything you don't want scratched. The big pain for me was the wire harness connectors but a flathead screwdriver made it snappy.
Thread Starter
Member
Joined: Mar 2011
Posts: 242
From: SoCal


Somebody spoonfeed me, please.
[edit #1]
Nevermind. It only *looks* like a solid piece. It's very deceiving. Anyway, now it's off.
[edit #2]
Black trim molding is off. That part was easy.
[edit #3]
The gauge cluster is off the car and in my hands. Weee!!!
[edit #4]
The old bulbs come out effortlessly, and the new LED's go in the same. They're all a tight fit, which is fine by me, reading how people have had to crimp the bulb holders. Now to plug it back in and see which bulbs need to be switched around for proper polarity.
[edit #5]
Cluster harness connectors are re-attached. Two of the bulbs had to turn around, which you can easily do with everything plugged in. In fact, I didn't really need to unplug any of the harnesses to do this job.
[edit #6]
I'm done. The cluster is freaking beautiful.
Step 1: Remove 3 Philips-head screws from bottom of steering column.
Step 2: pry top steering column cover off...
I found the screws and they're easy enough to back out. But how exactly do you pry the top of the steering column off? What is the "top" exactly, anyway? Because this looks like one solid, wrap-around piece of plastic.Step 2: pry top steering column cover off...
[edit #1]
Nevermind. It only *looks* like a solid piece. It's very deceiving. Anyway, now it's off.
[edit #2]
Black trim molding is off. That part was easy.
[edit #3]
The gauge cluster is off the car and in my hands. Weee!!!
[edit #4]
The old bulbs come out effortlessly, and the new LED's go in the same. They're all a tight fit, which is fine by me, reading how people have had to crimp the bulb holders. Now to plug it back in and see which bulbs need to be switched around for proper polarity.
[edit #5]
Cluster harness connectors are re-attached. Two of the bulbs had to turn around, which you can easily do with everything plugged in. In fact, I didn't really need to unplug any of the harnesses to do this job.
[edit #6]
I'm done. The cluster is freaking beautiful.
Last edited by Rochester; May 7, 2011 at 05:50 PM.
Just as an FYI, the steering column has a ring around the ignition switch. That has to be pulled off before trying to separate the top cover.
Again, use a flathead screwdriver wrapped in paper towel or something to pry the top part off.
Again, use a flathead screwdriver wrapped in paper towel or something to pry the top part off.
Of the step-by-step... nah. But before and after shots, sure I can.
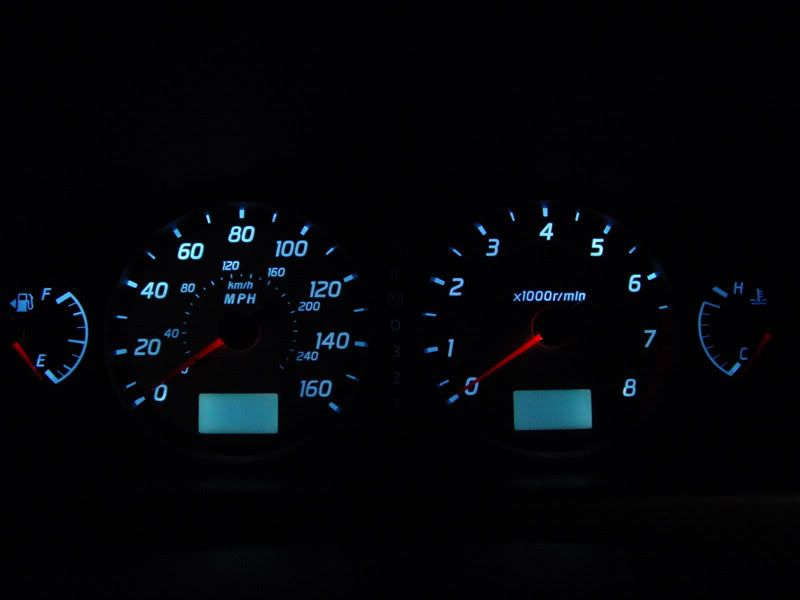
Here's the cluster when the lights are off, with a flash photo. (Yes, I only have 67K miles on the Max.)

And here is the cluster with the lights on, but with the OEM bulbs.

And (drum roll... na-na-na-na-na) here is the cluster on again, but with the cool-white drop-in LED replacements.

Do I love it?
Oh yeah.
It's awesome. I'm very happy.My sincere appreciation to SeedyRom for this mod, and Tuner for all his advice.
 Well done, guys.
Last edited by Rochester; May 7, 2011 at 06:40 PM.
Senior Member
Joined: Apr 2004
Posts: 1,861
From: Atlanta
ummmm..... you're welcome.
 You're the man.

Looks great John, not very blue is it? See what I mean about digital camera's and their trickery! The job I did isn't blue either my camera just shows it. Anyways I LOL'd at your post about the removal process, I fear my instructions may have caused more confusion/second guessing. I'm glad you got it done though, and it looks great man. Another mod off the list for you
Senior Member
Joined: Apr 2004
Posts: 1,861
From: Atlanta
Ummm no you don't but thanks for trying to help
Looks great John, not very blue is it? See what I mean about digital camera's and their trickery! The job I did isn't blue either my camera just shows it. Anyways I LOL'd at your post about the removal process, I fear my instructions may have caused more confusion/second guessing. I'm glad you got it done though, and it looks great man. Another mod off the list for you
Looks great John, not very blue is it? See what I mean about digital camera's and their trickery! The job I did isn't blue either my camera just shows it. Anyways I LOL'd at your post about the removal process, I fear my instructions may have caused more confusion/second guessing. I'm glad you got it done though, and it looks great man. Another mod off the list for you
than the lighter, whiter blue Rochester has pictured here
 ...
...Although, John's time-to-rebuild-your-engine RPM warning and lower LCD look closer to my results.
It would be great if the people that installed the CW would use the photos in this thread to gauge how each one looks on a more objective level.
OAN: Have you all changed the color of your clock to match the new blue? It was another easy mod. I kick myself for not doing it earlier. I hated that green. Snipped the dimmer wire also. I always drive with my headlights on which made it impossible to see the time in the bright, Texas sun.
OAN: Have you all changed the color of your clock to match the new blue? It was another easy mod. I kick myself for not doing it earlier. I hated that green. Snipped the dimmer wire also. I always drive with my headlights on which made it impossible to see the time in the bright, Texas sun.
 I almost always drive with my lights on, too, which makes it near impossible to see the clock during the day.
That's a great idea, nelledge! Where's the write-up? Or can you bullet out the steps off the top of your head?
Or not. Only Tuner knows for sure. Either way, relax... this thread is awesome, and your contributions are a welcome addition.
OK?


Installed them last night. Easy as pie. I was shocked at how good they look. Love the color of the Cool White bulbs.
Here's a picture with some light from outside shining in, so the redline isn't this bright. Also looks great with the Gauge Rings

Here's a picture with some light from outside shining in, so the redline isn't this bright. Also looks great with the Gauge Rings
Zero is on-board!
I wonder how many people have swapped bulbs this since SeedyRom made this thread? It feels like a whole lot of Org members, and then double or triple that for people who just lurk and don't post.
This is really neat to have caught this wave. Man, I love the Org.
I wonder how many people have swapped bulbs this since SeedyRom made this thread? It feels like a whole lot of Org members, and then double or triple that for people who just lurk and don't post.
This is really neat to have caught this wave. Man, I love the Org.
...If by time-to-rebuild-your-engine, you mean the 1100 RPM, take note of the temp gauge. Idle is high when the car is cold. And the gently red door-open indicator has always had a faint glow to it ever since I replaced my dome-light with a LED panel a few years ago. It's kind of an odd thing...
I meant redline. Everyone has one.1. Take off the clock assy by inserting a flat tool (preferably a plastic trim remover or use a towel to protect the trim) and prying up. There are two metal clips holding it in. One on either side of the clock.
2. Unplug the connector.
3. There are three pieces to the clock assy. The trim, the clock holder, and the clock. Remove the trim from the holder(2 phillips head screws). Remove the clock from the holder(2 more phillips head screws).
4. Now, carefully separate the front cover from the clock by releasing the plastic, locking tabs. There is one at each of the four corners. I used my fingers for this. Be careful not to lose the HOUR/MIN buttons and the grey, rubber contacts underneath when you pull apart the clock.
5. Take a piece of cellophane and adhere it over the LCD display. I used two sheets of purple to get the blue. You can plug the clock in and just try different amounts of cellophane to experiment before you adhere your final selection. Here's a great color comparison formula site I found. The cellophane can be purchased from a local craft store. (It cost me 2.49 and you'll have enough left over for all your friends.)
6. Put the clock assembly back together.
7. To stop the clock from dimming, cut the "ILL" wire on the harness. I believe it was orange with a red stripe, but it's marked clearly on the harness and connector. I used electrical tape to wrap up the exposed wires.
8. Plug it in and test it.
9. Reinstall clock assembly into dash being careful not to drop the clips into the ducts.
10. Done! You can also do the color change with your head unit if you're very adventurous, but I'll leave that out of here since everyone uses different units.
This is a great accent to the cluster mod as well as a great way to see your clock during the day with lights on. You'll be just as impressed. It's also a great time to clean your clock display since it's out of the trim. I polished mine up with some PlastiX.
LMK if it would be better to put this in another thread. It goes hand in hand, but it could be muddying the waters. I'll wait to see what everyone thinks.
Last edited by nelledge; May 8, 2011 at 06:10 AM.
Senior Member
Joined: Dec 2005
Posts: 1,124
From: Leicester, Ma
Sorry, John. That was my attempt at trying to be clever. I meant redline. Everyone has one.
I didn't find a write up on the .org, and I got impatient searching so I just did it myself.
1. Take off the clock assy by inserting a flat tool (preferably a plastic trim remover or use a towel to protect the trim) and prying up. There are two metal clips holding it in. One on either side of the clock.
2. Unplug the connector.
3. There are three pieces to the clock assy. The trim, the clock holder, and the clock. Remove the trim from the holder(2 phillips head screws). Remove the clock from the holder(2 more phillips head screws).
4. Now, carefully separate the front cover from the clock by releasing the plastic, locking tabs. There is one at each of the four corners. I used my fingers for this. Be careful not to lose the HOUR/MIN buttons and the grey, rubber contacts underneath when you pull apart the clock.
5. Take a piece of cellophane and adhere it over the LCD display. I used two sheets of purple to get the blue. You can plug the clock in and just try different amounts of cellophane to experiment before you adhere your final selection. Here's a great color comparison formula site I found. The cellophane can be purchased from a local craft store. (It cost me 2.49 and you'll have enough left over for all your friends.)
6. Put the clock assembly back together.
7. To stop the clock from dimming, cut the "ILL" wire on the harness. I believe it was orange with a red stripe, but it's marked clearly on the harness and connector. I used electrical tape to wrap up the exposed wires.
8. Plug it in and test it.
9. Reinstall clock assembly into dash being careful not to drop the clips into the ducts.
10. Done! You can also do the color change with your head unit if you're very adventurous, but I'll leave that out of here since everyone uses different units.
This is a great accent to the cluster mod as well as a great way to see your clock during the day with lights on. You'll be just as impressed. It's also a great time to clean your clock display since it's out of the trim. I polished mine up with some PlastiX.
LMK if it would be better to put this in another thread. It goes hand in hand, but it could be muddying the waters. I'll wait to see what everyone thinks.
I meant redline. Everyone has one.I didn't find a write up on the .org, and I got impatient searching so I just did it myself.
1. Take off the clock assy by inserting a flat tool (preferably a plastic trim remover or use a towel to protect the trim) and prying up. There are two metal clips holding it in. One on either side of the clock.
2. Unplug the connector.
3. There are three pieces to the clock assy. The trim, the clock holder, and the clock. Remove the trim from the holder(2 phillips head screws). Remove the clock from the holder(2 more phillips head screws).
4. Now, carefully separate the front cover from the clock by releasing the plastic, locking tabs. There is one at each of the four corners. I used my fingers for this. Be careful not to lose the HOUR/MIN buttons and the grey, rubber contacts underneath when you pull apart the clock.
5. Take a piece of cellophane and adhere it over the LCD display. I used two sheets of purple to get the blue. You can plug the clock in and just try different amounts of cellophane to experiment before you adhere your final selection. Here's a great color comparison formula site I found. The cellophane can be purchased from a local craft store. (It cost me 2.49 and you'll have enough left over for all your friends.)
6. Put the clock assembly back together.
7. To stop the clock from dimming, cut the "ILL" wire on the harness. I believe it was orange with a red stripe, but it's marked clearly on the harness and connector. I used electrical tape to wrap up the exposed wires.
8. Plug it in and test it.
9. Reinstall clock assembly into dash being careful not to drop the clips into the ducts.
10. Done! You can also do the color change with your head unit if you're very adventurous, but I'll leave that out of here since everyone uses different units.
This is a great accent to the cluster mod as well as a great way to see your clock during the day with lights on. You'll be just as impressed. It's also a great time to clean your clock display since it's out of the trim. I polished mine up with some PlastiX.
LMK if it would be better to put this in another thread. It goes hand in hand, but it could be muddying the waters. I'll wait to see what everyone thinks.
Nelledge,
Ive done this before but took it off. I used red cellophane. For some reason mine seemed to have a faint white look but was not bright at all. And that was with the lights all off. Did you do something to make the clock brighten up while it was a different color. Using the purple cellophane what color did it produce for you?
Ive done this before but took it off. I used red cellophane. For some reason mine seemed to have a faint white look but was not bright at all. And that was with the lights all off. Did you do something to make the clock brighten up while it was a different color. Using the purple cellophane what color did it produce for you?
 ). Cellophane is cellophane, but it comes in many different thicknesses. The thickness, as gauged by the transparency of the film in the photos, of the cellophane in the link I referenced is greater than what I used. I actually used purple shrink cellophane used for gift baskets. It's very thin. These are, after all, just filters. It's better to stack thin filters than only have thick filters. You have to be conservative with this mod, because you're actually blocking part of the luminosity by adding the filters. I could have made my blue darker, but it would have compromised the actual luminosity too much for me. All other things being equal, the human eye is more sensitive to green light. Which means at the same luminosity, it will appear brighter than blue or red. This mod will cause a certain amount of 'dimming'. The extent of that dimming is up to you. This is why you should experiment. Personally, mine is now brighter than the stock green with my headlights always on because I combined it with the 'cut-dimming-wire mod' for the headlights which I always have on. Also, some colors require more filters to attain. Red looks to be one of those colors. It's a tough one. Personally, I love red. My wife's Audi is so awesome at night. Everything is red which allows for less adjustment of your rods and cones. Perfect for night driving. It's just hard to manipulate green to red without significant luminosity loss.
I wish there was a way to send everyone a few layers of this pile of cellophane, but USPS would bankrupt me 50 cents at a time.
). Cellophane is cellophane, but it comes in many different thicknesses. The thickness, as gauged by the transparency of the film in the photos, of the cellophane in the link I referenced is greater than what I used. I actually used purple shrink cellophane used for gift baskets. It's very thin. These are, after all, just filters. It's better to stack thin filters than only have thick filters. You have to be conservative with this mod, because you're actually blocking part of the luminosity by adding the filters. I could have made my blue darker, but it would have compromised the actual luminosity too much for me. All other things being equal, the human eye is more sensitive to green light. Which means at the same luminosity, it will appear brighter than blue or red. This mod will cause a certain amount of 'dimming'. The extent of that dimming is up to you. This is why you should experiment. Personally, mine is now brighter than the stock green with my headlights always on because I combined it with the 'cut-dimming-wire mod' for the headlights which I always have on. Also, some colors require more filters to attain. Red looks to be one of those colors. It's a tough one. Personally, I love red. My wife's Audi is so awesome at night. Everything is red which allows for less adjustment of your rods and cones. Perfect for night driving. It's just hard to manipulate green to red without significant luminosity loss.
I wish there was a way to send everyone a few layers of this pile of cellophane, but USPS would bankrupt me 50 cents at a time.
 I like to keep it simple.... And cheap. I'll leave the pro stuff to Matt.