
Drop-in LED instrument cluster lighting for 5.5 owners. Finally found one that works!


Thread Starter
Member
Joined: Mar 2011
Posts: 242
From: SoCal
Drop-in LED instrument cluster lighting for 5.5 owners. Finally found one that works!
NOTE: This is not a custom LED wiring/replacement thread. This is an LED bulb replacement solution I found since 5.5 owners don't have as many options as earlier models. That is, until now. Total cost being around ~$15 and a half an hour of time.
EDIT: Installation notes/updates at the bottom of this post
First some history. In TunerMaxima3000's custom LED thread (link here) we found out that these later 5.5 clusters are more restrictive and only have two illumination bulbs for the actual gauges (+2 more for the odometer/trip). This means that traditional drop-ins, narrow beam LEDs, etc look terrible in our clusters. I myself tried to use various #74 bulbs from O'Reilly and the same #74 LED from SuperBrightLEDs.com that some '00 guys used. All of these either did little or looked even worse. However, I decided not to give up and bought every version of #74 LED that SuperBrightLEDs sold, figuring if I could create a similar beam pattern to the stock bulb I might get close enough to live with it.
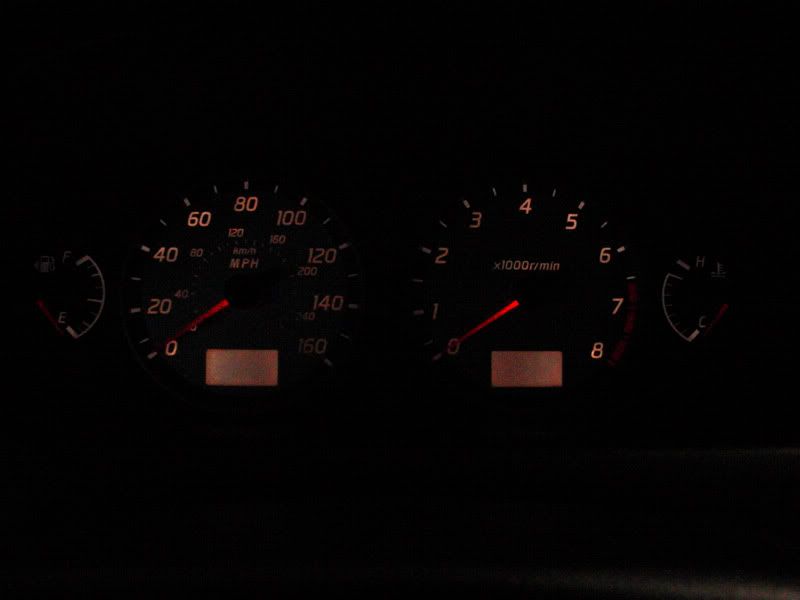
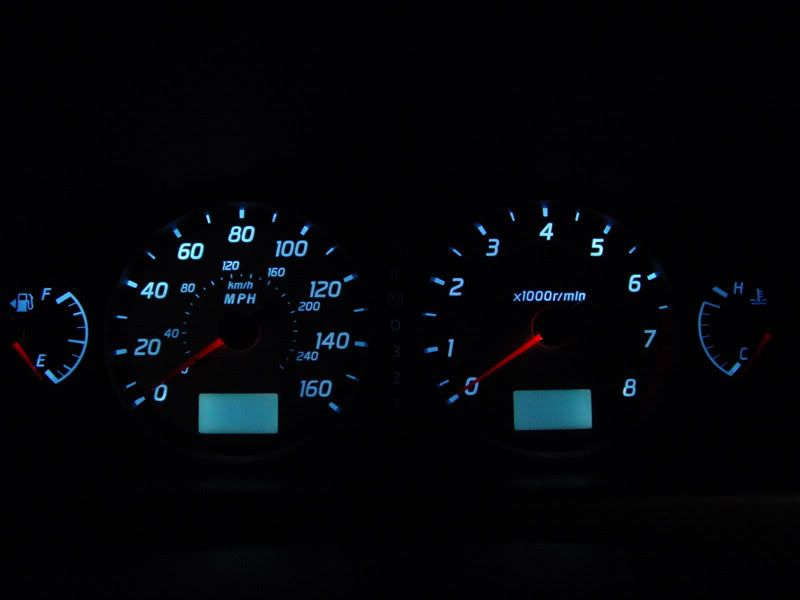
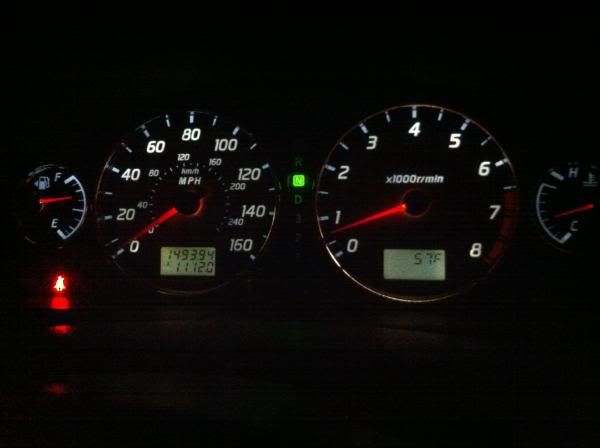
Well I'm pleased to report that I found one specific LED that worked and is MUCH better than stock. First off, be warned that you will get some slight hot-spotting in that certain areas are a bit brighter than others. However, if your cluster is like mine, there's already hot-spotting with STOCK bulbs (see pic). After the upgrade, overall brightness is at least triple what my stock lighting was and it actually smoothed out some of the hot-spotting. Overall I am very happy with it for a total cost of around $15 (four LEDs).
These are the exact LEDs I found that worked the best as a pure solution. I chose the Cool White color (#74-CWHP3) which ends up being a mild blue as seen in pics below.
Model: 74-xHP3 - YOU WILL WANT FOUR OF THEM (2 for gauges, 2 for odometer/trip)
http://www.superbrightleds.com/cgi-b...2F74-xHP3.html
They might be a bit loose in the bulb holder but a flathead screwdriver can be used to push the metal leads together a bit and get a good fit. Also be warned that the 5.5 has a blue film that means changing colors probably wont work well so stick with the Cool White when you choose the color. Any other color is at your own risk. (UPDATE: Warm White pics below)
Anyway, here are the results. Same camera, same dark garage just a few weeks apart. The pics are 100% untouched in Photoshop other than to reduce the image size. The pic was actually brightened a bit because the photo was darker than reality. The difference is night and day on my Max.
100% Stock '02 cluster. Note how there are hotspots even from the factory.
After pic, 100% unmodified. Note the hot spots which are still there but actually a bit less obvious than stock and blend better. The temp gauge though does appear overall darker than the rest.
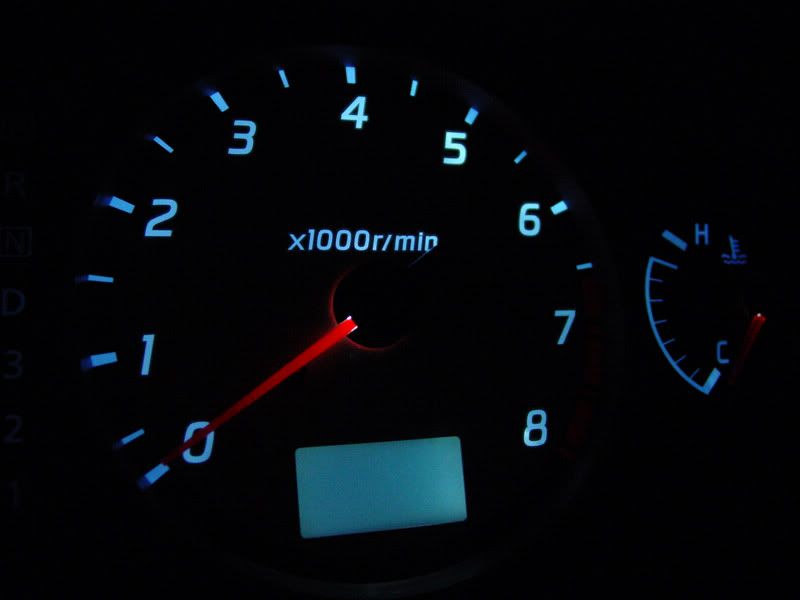
Here are a few closeups, also 100% unmodified. The bulb actually sits right behind the 5,000RPM area which is why that's slightly brighter.
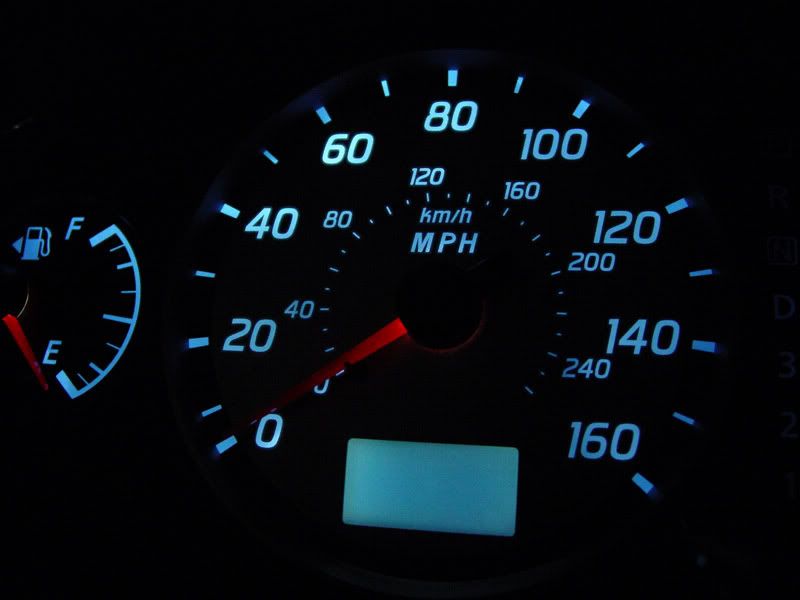
The other side. Again like above, the bulb sits behind the 60mph area causing it to be brighter. Still looks great compared to stock!
So there you have it. A possible very cheap solution to get a noticeable improvement in your stock 5.5 gauge cluster lighting. Please take note that I just finished this tonight and have no guarantees on longevity or that my results will be exactly the same as yours. I have also not tested on other year clusters. That said, you really aren't risking much (around $15-$20) in attempting this as long as you're comfortable removing the cluster, which is not difficult at all.
Post up any questions or concerns and I'll do my best to answer them!
Video of the dimmer switch functioning properly.
UPDATE#1 - Installation info
NOTE: Be gentle with the twist-off bulb holder/bases. They are reportedly hard to find.
NicoClub guide to getting into the cluster area.
http://www.nicoclub.com/archives/max...uge-rings.html
A tip from nelledge.
The LEDs only work when installed one direction, so you may have to flip them if they don't light up. Here's the easy way.
UPDATE#2:
DLO came through with pics of the Warm White LED choice (74-WWHP3) instead of Cool White. It closer to pure white is your goal, these might be what you want. Note he said the hot-spotting is exaggerated by the pics, seems smoother in person.
EDIT: Installation notes/updates at the bottom of this post
First some history. In TunerMaxima3000's custom LED thread (link here) we found out that these later 5.5 clusters are more restrictive and only have two illumination bulbs for the actual gauges (+2 more for the odometer/trip). This means that traditional drop-ins, narrow beam LEDs, etc look terrible in our clusters. I myself tried to use various #74 bulbs from O'Reilly and the same #74 LED from SuperBrightLEDs.com that some '00 guys used. All of these either did little or looked even worse. However, I decided not to give up and bought every version of #74 LED that SuperBrightLEDs sold, figuring if I could create a similar beam pattern to the stock bulb I might get close enough to live with it.
Well I'm pleased to report that I found one specific LED that worked and is MUCH better than stock. First off, be warned that you will get some slight hot-spotting in that certain areas are a bit brighter than others. However, if your cluster is like mine, there's already hot-spotting with STOCK bulbs (see pic). After the upgrade, overall brightness is at least triple what my stock lighting was and it actually smoothed out some of the hot-spotting. Overall I am very happy with it for a total cost of around $15 (four LEDs).
These are the exact LEDs I found that worked the best as a pure solution. I chose the Cool White color (#74-CWHP3) which ends up being a mild blue as seen in pics below.
Model: 74-xHP3 - YOU WILL WANT FOUR OF THEM (2 for gauges, 2 for odometer/trip)
http://www.superbrightleds.com/cgi-b...2F74-xHP3.html
They might be a bit loose in the bulb holder but a flathead screwdriver can be used to push the metal leads together a bit and get a good fit. Also be warned that the 5.5 has a blue film that means changing colors probably wont work well so stick with the Cool White when you choose the color. Any other color is at your own risk. (UPDATE: Warm White pics below)
Anyway, here are the results. Same camera, same dark garage just a few weeks apart. The pics are 100% untouched in Photoshop other than to reduce the image size. The pic was actually brightened a bit because the photo was darker than reality. The difference is night and day on my Max.
100% Stock '02 cluster. Note how there are hotspots even from the factory.
After pic, 100% unmodified. Note the hot spots which are still there but actually a bit less obvious than stock and blend better. The temp gauge though does appear overall darker than the rest.
Here are a few closeups, also 100% unmodified. The bulb actually sits right behind the 5,000RPM area which is why that's slightly brighter.
The other side. Again like above, the bulb sits behind the 60mph area causing it to be brighter. Still looks great compared to stock!
So there you have it. A possible very cheap solution to get a noticeable improvement in your stock 5.5 gauge cluster lighting. Please take note that I just finished this tonight and have no guarantees on longevity or that my results will be exactly the same as yours. I have also not tested on other year clusters. That said, you really aren't risking much (around $15-$20) in attempting this as long as you're comfortable removing the cluster, which is not difficult at all.
Post up any questions or concerns and I'll do my best to answer them!
Video of the dimmer switch functioning properly.
UPDATE#1 - Installation info
NOTE: Be gentle with the twist-off bulb holder/bases. They are reportedly hard to find.
NicoClub guide to getting into the cluster area.
http://www.nicoclub.com/archives/max...uge-rings.html
A tip from nelledge.
The LEDs only work when installed one direction, so you may have to flip them if they don't light up. Here's the easy way.
1. Replace bulbs with LEDs.
2. Position cluster so that you can plug the 3 harnesses back in, and then do that.
3. The dimmer switch needs to be plugged in as well. (obvious, when you think about it)
4. Power the parking lights and check cluster.
5. Keep note of any areas not lit. Remove those sockets, twist them 180, and plug them back in. (Initially, I was doing this to the LED instead. I realized how stupid it was a few times in.)
6. Check again until all four are lit.
I had to slightly bend the internal tabs of one socket to make a tighter fit for the LED, but it's fairly straightforward.
DLO came through with pics of the Warm White LED choice (74-WWHP3) instead of Cool White. It closer to pure white is your goal, these might be what you want. Note he said the hot-spotting is exaggerated by the pics, seems smoother in person.
Last edited by SeedyROM; Apr 13, 2014 at 12:47 AM.
Thread Starter
Member
Joined: Mar 2011
Posts: 242
From: SoCal
Closeup pictures of the actual wedge bulb holders. They really are easy to replace once you get the cluster out. You re-use the black holder, just pop out the old bulb and install the new LED as seen in the pic. Thanks to nelledge for the photos.
For those curious about the backside cluster differences, here are the pics from the original thread. First is what you earlier model guys have. I think these are from an '00 that TunerMaxima3000 posted. Note the center bulbs you can change out with a much better layout.
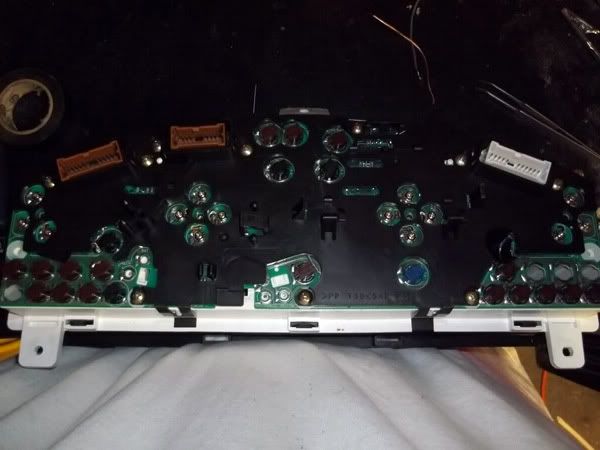
And here's what my '02 cluster looks like. I removed the black plastic cover but you can see that we don't have the same center bulbs for easy lighting. Instead we only have the top two corner black ones to light all four gauges and you need a perfect beam pattern to do it. The bottom two corner bulbs are for the square odometer/trip meter only. I don't think you HAVE to replace those but it wont look as clean since the odometer/trip meter will be yellowish/white.
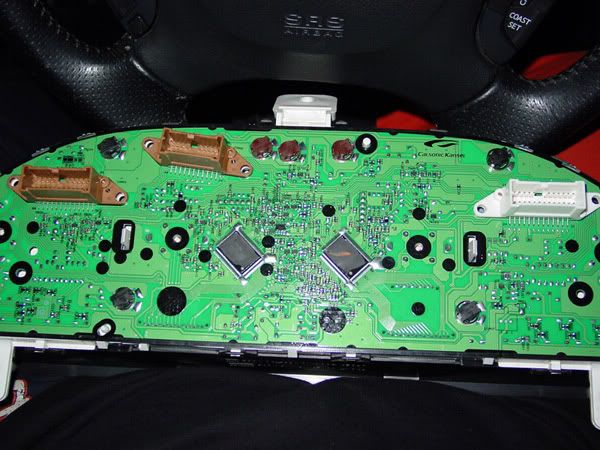
For those curious about the backside cluster differences, here are the pics from the original thread. First is what you earlier model guys have. I think these are from an '00 that TunerMaxima3000 posted. Note the center bulbs you can change out with a much better layout.
And here's what my '02 cluster looks like. I removed the black plastic cover but you can see that we don't have the same center bulbs for easy lighting. Instead we only have the top two corner black ones to light all four gauges and you need a perfect beam pattern to do it. The bottom two corner bulbs are for the square odometer/trip meter only. I don't think you HAVE to replace those but it wont look as clean since the odometer/trip meter will be yellowish/white.
Last edited by SeedyROM; May 7, 2011 at 01:39 PM.


Nice find Man. I'm surprised with the brightness, especially from only 3 SMD 'bulbs'.
Because of the beam pattern being not overly bright, they don't hotspot in the LCD display as bad as some options I've seen. Glad to see you found the 'ideal' brightness to reduce hotspots.
I am curious how it lights up with just the uppers replaced though.
The lower bulbs shouldn't actually allow light into the gauge portion much, so they normally make little to no difference in the gauge face, just in the LCD display. That's based on testing on a 2001-2002 Maufacture date though, maybe the 02-03 is slightly different. I'll know next weekend.
The downfall is you can't really go any brighter than you showed without modification.
Here's a pic with just one custom made 'bulb' retrofitted into the upper position on the speedo.
This is a 2001 gauge but it's the same Stock Illumination set-up (2001-2002 Manf Date). I do have plans to eliminate or reduce the hotspotting, I just haven't had time to get at it.
It's also more accentuated because they're white faced gauges, and the point and shoot magnifies the localization area, it's not that bad in person.


I'm doing a 5.5 GLE next weekend with the above method, I am going to try doing the bottom as well to see if they are in fact different than the 2001-2002 Manf. Date gauges.
I'm sure this will be great info for everyone! An excellent option on the cheap.
Because of the beam pattern being not overly bright, they don't hotspot in the LCD display as bad as some options I've seen. Glad to see you found the 'ideal' brightness to reduce hotspots.
I am curious how it lights up with just the uppers replaced though.
The lower bulbs shouldn't actually allow light into the gauge portion much, so they normally make little to no difference in the gauge face, just in the LCD display. That's based on testing on a 2001-2002 Maufacture date though, maybe the 02-03 is slightly different. I'll know next weekend.
The downfall is you can't really go any brighter than you showed without modification.
Here's a pic with just one custom made 'bulb' retrofitted into the upper position on the speedo.
This is a 2001 gauge but it's the same Stock Illumination set-up (2001-2002 Manf Date). I do have plans to eliminate or reduce the hotspotting, I just haven't had time to get at it.
It's also more accentuated because they're white faced gauges, and the point and shoot magnifies the localization area, it's not that bad in person.
I'm doing a 5.5 GLE next weekend with the above method, I am going to try doing the bottom as well to see if they are in fact different than the 2001-2002 Manf. Date gauges.
I'm sure this will be great info for everyone! An excellent option on the cheap.

^That is common for Cheap mass produced SMD's. Which is the majority of what you are going to purchase, especially at that price. Good ones are very hard to find.
That's why I made my own
That's why I made my own
Thread Starter
Member
Joined: Mar 2011
Posts: 242
From: SoCal
Nice find Man. I'm surprised with the brightness, especially from only 3 SMD 'bulbs'.
I am curious how it lights up with just the uppers replaced though.
The lower bulbs shouldn't actually allow light into the gauge portion much, so they normally make little to no difference in the gauge face, just in the LCD display.
I am curious how it lights up with just the uppers replaced though.
The lower bulbs shouldn't actually allow light into the gauge portion much, so they normally make little to no difference in the gauge face, just in the LCD display.
Great info on the rest of your post. Good luck with the GLE and let me know if that cluster is different from the rest. I really don't know the difference between SE, GLE, etc when it comes to the gauges per year.
Thread Starter
Member
Joined: Mar 2011
Posts: 242
From: SoCal
If you have a little to spend, going with one of TunerMaxima's custom jobs would avoid all these concerns and look great. If not, you might pick up a few extra when ordering since they are so cheap. Even if I have to replace mine once a year it beats the crummy stock lighting

Last edited by SeedyROM; Apr 16, 2011 at 11:51 PM.
^ Good points on the product, if it's cheap enough, and you don't mind/have the ability to remove everything and replace them.
Normally, if they're no good, they die within the first few hours of life. It's a quality control issue, they pound these things out in the hundreds of thousands, and if they get tested at all, it's for a split second and no more. Most of them come from the same factory, there's only a few major factories, they just make different products for different distributors (sometimes, a lot of the stuff is the same, just sold by different people.)
Normally, if they're no good, they die within the first few hours of life. It's a quality control issue, they pound these things out in the hundreds of thousands, and if they get tested at all, it's for a split second and no more. Most of them come from the same factory, there's only a few major factories, they just make different products for different distributors (sometimes, a lot of the stuff is the same, just sold by different people.)
Last edited by TunerMaxima3000; Apr 17, 2011 at 01:49 PM.


Well done Seedy !
I replaced the bulbs my bulbs last year with OEM replacements and while it is slightly better this looks MUCH more attractive.
This may be a dumb question but do they dim like the normal bulbs? On long night drives I sometimes like too shut all my lighting off or turn it way down.
I replaced the bulbs my bulbs last year with OEM replacements and while it is slightly better this looks MUCH more attractive.
This may be a dumb question but do they dim like the normal bulbs? On long night drives I sometimes like too shut all my lighting off or turn it way down.
I can't provide a link but in a few weeks we can yank it out easy enough.
Hmm. This is seriously gaining traction as another little mod project.
I particularly like the idea of drop-in bulb replacement. Tuner's skills at drilling and soldering are far too intimidating for me.
You know, I wish all noobs to the our section of the Org were like SeedyRom. Alas, these are 10 year old cars.
I particularly like the idea of drop-in bulb replacement. Tuner's skills at drilling and soldering are far too intimidating for me.
You know, I wish all noobs to the our section of the Org were like SeedyRom. Alas, these are 10 year old cars.
READ HERE
If it doesnt kill you. As simple as can be. And since it was made for the 5thgens It'll help you even better. Since you're not installing the Chrome Rings, skip those steps. You're just removing the bulbs only.
Hmm. This is seriously gaining traction as another little mod project.
I particularly like the idea of drop-in bulb replacement. Tuner's skills at drilling and soldering are far too intimidating for me.
You know, I wish all noobs to the our section of the Org were like SeedyRom. Alas, these are 10 year old cars.
I particularly like the idea of drop-in bulb replacement. Tuner's skills at drilling and soldering are far too intimidating for me.
You know, I wish all noobs to the our section of the Org were like SeedyRom. Alas, these are 10 year old cars.


You did it i went the same route as you the first time around and orderd the T5 wedge type leds from superbrightleds.com by the time i got them and u told me they didn't work out for u i just trashed them ..... Great write up going to be ordering them right now in blue
Last edited by Clashez; Apr 17, 2011 at 08:59 AM.
Led's and Smd's can be dimmed thru the dimmer switch to a certain point. But they do have a minimum voltage. So they will turn off before the dimmer switch is all the way to minimum. Usually 1/2 voltage will cause an led/smd to "switch off". This is assuming you use the original gauge power source.
AFAIK all the 02+ gauges have a blue face. So if you use a white bulb you will have a brighter gauge than if you use a blue bulb. Using a blue bulb with a blue face loses some intensity due to blue filtering blue.
The reason our gauges look green is the incandescent OEM bulb gives off yellow light. Yellow + blue = ugly green
Non SE guages with blue face can be scraped/sanded off. SE gauges cannot be sanded. If you wanted red gauges on an SE and put red led's back there you would end up with purple.
Last edited by knight_yyz; Apr 17, 2011 at 11:31 AM.
Led's and Smd's can be dimmed thru the dimmer switch to a certain point. But they do have a minimum voltage. So they will turn off before the dimmer switch is all the way to minimum. Usually 1/2 voltage will cause an led/smd to "switch off". This is assuming you use the original gauge power source.
AFAIK all the 02+ gauges have a blue face. So if you use a white bulb you will have a brighter gauge than if you use a blue bulb. Using a blue bulb with a blue face loses some intensity due to blue filtering blue.
The reason our gauges look green is the incandescent OEM bulb gives off yellow light. Yellow + blue = ugly green
Non SE guages with blue face can be scraped/sanded off. SE gauges cannot be sanded. If you wanted red gauges on an SE and put red led's back there you would end up with purple.
AFAIK all the 02+ gauges have a blue face. So if you use a white bulb you will have a brighter gauge than if you use a blue bulb. Using a blue bulb with a blue face loses some intensity due to blue filtering blue.
The reason our gauges look green is the incandescent OEM bulb gives off yellow light. Yellow + blue = ugly green
Non SE guages with blue face can be scraped/sanded off. SE gauges cannot be sanded. If you wanted red gauges on an SE and put red led's back there you would end up with purple.
I suspect a lot of guys were going to try to pop in different colours and expect positive results. It won't happen. The OP's method will only provide these results with white.
As for the stock Set-up, The tint is blue to filter the Incandecent bulb to a White colour. In the 4th gen days, they did this with blue tinted 'condom' over the bulbs.
When the Incandecents get old they change colour and dim, causing the ugly green/orange colouring you guys experience. This is amplified the older they get. Usually changing bulbs to new ones will make an incredible improvement by itself.
If I had to guess why they changed the method, this would be my guess:
They thought installing a blue tint on the gauges, and 2 or 4 bulbs without the condoms would create the same light, and as such, they wouldn't need to use as many bulbs, the stock 4th gen had quite a few more bulbs IIRC. This was a great plan for Nissan, and worked well when new, but as we are experiencing, once they dim they get VERY dim, and hot-spot.
As for colour changing:
Red, Yellow & Blue are Primary colours, unfortunately, Blue/Red are the most desired colours. When working with a Tint, they are unacheivable in most cases without removing the tint.
Two Clarifications:
- Manufacture dates of 06/99 Through 01/2001 (estimated) SE gauges have removable tinting, it's the 5.5 SE gauges that have the solid tinting.
- All 5th gens have a blue tint/film
Last edited by TunerMaxima3000; Apr 23, 2011 at 09:11 AM.

Thread Starter
Member
Joined: Mar 2011
Posts: 242
From: SoCal
You did it i went the same route as you the first time around and orderd the T5 wedge type leds from superbrightleds.com by the time i got them and u told me they didn't work out for u i just trashed them ..... Great write up going to be ordering them right now in blue
I suspect a lot of guys were going to try to pop in different colours and expect positive results. It won't happen. The OP's method will only provide these results with white.
Two Clarifications:
- Manufacture dates of 06/99 Through 01/2001 (estimated) SE gauges have removable tinting, it's the 5.5 SE gauges that have the solid tinting.
- All 5th gens have a blue tint/film.
Two Clarifications:
- Manufacture dates of 06/99 Through 01/2001 (estimated) SE gauges have removable tinting, it's the 5.5 SE gauges that have the solid tinting.
- All 5th gens have a blue tint/film.
Absolutely! If I run into any issues I'll be sure to post up.

Thread Starter
Member
Joined: Mar 2011
Posts: 242
From: SoCal
http://www.youtube.com/watch?v=4Y-TLHMWJGs
You, sir, are the Man. That's very cool that you did this.

Great job man, I'm curious to see if there are any "subtle" changes in the 03's. Actually... I might go fire up the heater in the garage and check it out for myself, that is of course if I can sneak away from the wife and kids.
This is very impressive stuff for the price range, you've just given many people the push they needed to do this, very exciting, thanks for the valuable contribution!
I went out to the garage just now to assess the OEM cluster lighting. And yes, there is a slight hot-spot at 2:00 on the tack, and 10:00 on the speedo.
It's all I can do to keep from pulling the paypal trigger on a handful of drop-in replacement bulbs. But I've already blown through April mod money, so this is on the calendar for May 1st.
And I know that sounds silly, but it's how I stretch things out so I don't burn out doing mods all at once... even wee little ones, like LED bulbs.
This thread is awesome. I just rated it 5-stars.

Member
Joined: Sep 2010
Posts: 165
From: Baltimore,MD
Very helpfull post^^^^
I suspect a lot of guys were going to try to pop in different colours and expect positive results. It won't happen. The OP's method will only provide these results with white.
As for the stock Set-up, The tint is blue to filter the Incandecent bulb to a White colour. In the 4th gen days, they did this with blue tinted 'condom' over the bulbs.
When the Incandecents get old they change colour and dim, causing the ugly green/orange colouring you guys experience. This is amplified the older they get. Usually changing bulbs to new ones will make an incredible improvement by itself.
If I had to guess why they changed the method, this would be my guess:
They thought installing a blue tint on the gauges, and 2 or 4 bulbs without the condoms would create the same light, and as such, they wouldn't need to use as many bulbs, the stock 4th gen had quite a few more bulbs IIRC. This was a great plan for Nissan, and worked well when new, but as we are experiencing, once they dim they get VERY dim, and hot-spot.
As for colour changing:
Red, Yellow & Blue are Primary colours, unfortunately, Blue/Red are the most desired colours. When working with a Tint, they are unacheivable in most cases without removing the tint.
Two Clarifications:
- Manufacture dates of 06/99 Through 01/2001 (estimated) SE gauges have removable tinting, it's the 5.5 SE gauges that have the solid tinting.
- All 5th gens have a blue tint/film
And yeah, the LED's will dim, but as Ray said, not the same way, they don't dim as nicely, and cut off around 1/3-1/2 of the stock dimmer range.

Updated Teaser :D
Finally did my testing tonight. little to No hotspot 5.5 job, Bright as *****, on a budget
Here's a crappy teaser photo, running at 9.2 VDC (LOW voltage, they will actually run at 14.0-14.2ish, which will make it much brighter overall. Ill post that when I get one hooked up to a battery that isn't dead. I can't wait to do this job Friday on the GLE, he was expecting the hotspots, and he's going to get little to no hotspots for the same price
Thanks for the motivation to go test my idea Seedy
Last edited by TunerMaxima3000; Apr 17, 2011 at 09:15 PM.


Senior Member
Joined: Dec 2005
Posts: 1,124
From: Leicester, Ma

Hahaha i knew you were just like the rest of use.. You are addicted hahah
Speedy, so are you saying that with these bulbs, if tyou get the white leds, that the cluster will be a bluish color like yours. I have an 03 GLE and that actually would interest me very much... another project.. i like