
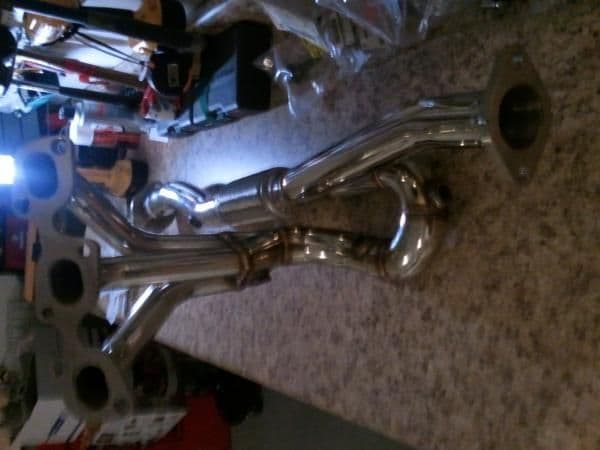
New OBX headers are finally in stock, pics with install, questions and comments


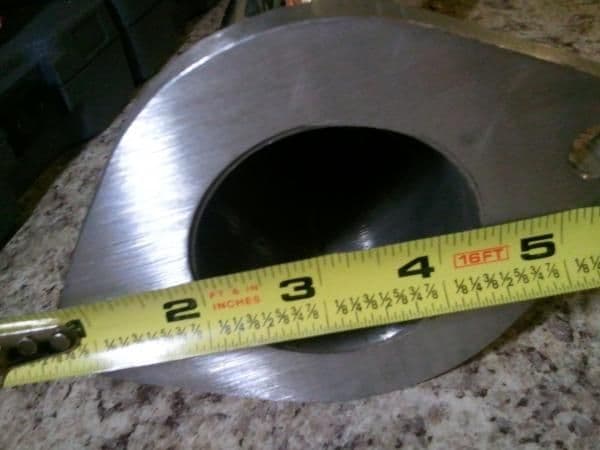
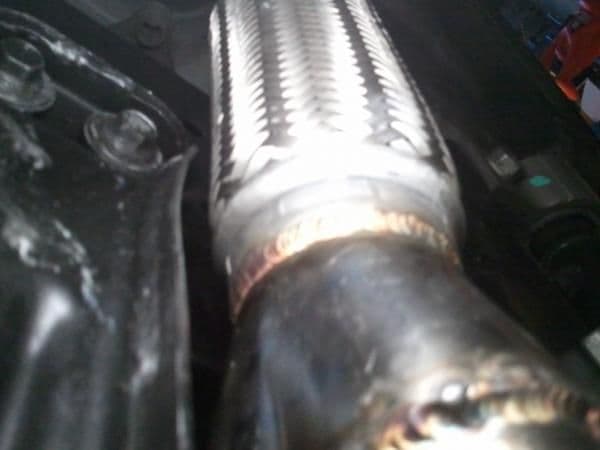
As you can now see the y pipe outlet is not quite at 2.5" but pretty damn close
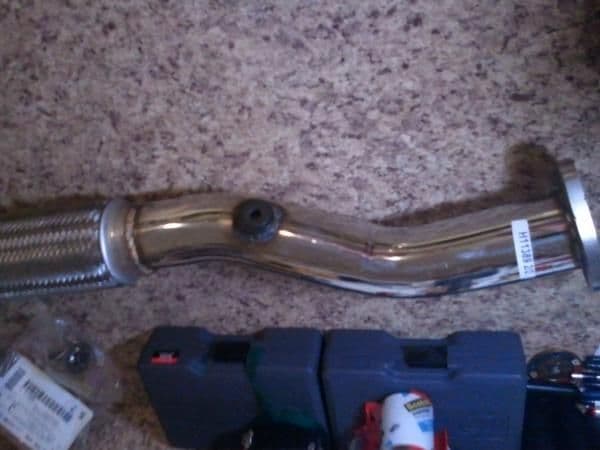
My new wideband bung on the y.
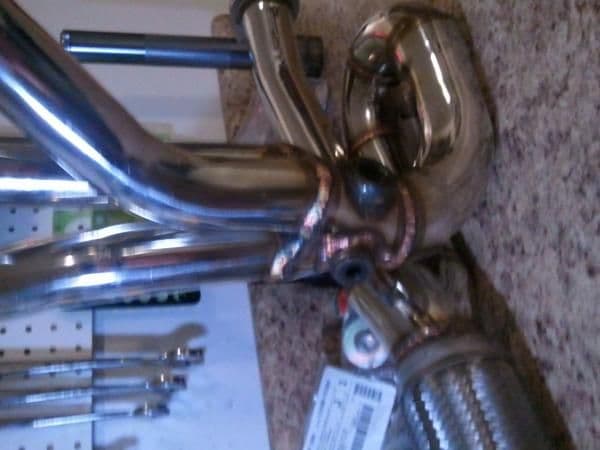
The relocated rear header primary bung and plugged original location
I am scared this wideband bung will not fit. I asked for it to be at the 2:30 position on the pipe but it just may be too upward pointing to fit in the tunnel. You can see it popping out to the left after the flex section in the picture below.
My new wideband bung on the y.
The relocated rear header primary bung and plugged original location
I am scared this wideband bung will not fit. I asked for it to be at the 2:30 position on the pipe but it just may be too upward pointing to fit in the tunnel. You can see it popping out to the left after the flex section in the picture below.

Senior Member
Joined: Oct 2009
Posts: 1,410
From: Frederick, MD
Just cheap lol. If I pay for a direct fit product it should be direct fit, not half *** fit with some mods. If Cattman can do it then OBX can do it. Not like it would take a million dollar research team to fix it. They probably have the issues with pictures in their inbox as we speak because EVERYONE will have these issues when they install them. I helped another friend install them who didn't care that it would take longer and it took us about 6hrs to do it with quite a few smoke and beer breaks mixed in. Not HARD per say other than the obvious difficulty with the rear header but just unnecessary for a product thats marketed as direct fit.
To OP - Good luck on the install. It's not hard, just tedious. If you ever need any help, feel free to hit me up I'm a boss at this as everyone here knows


As you can now see the y pipe outlet is not quite at 2.5" but pretty damn close
My new wideband bung on the y.
The relocated rear header primary bung and plugged original location
I am scared this wideband bung will not fit. I asked for it to be at the 2:30 position on the pipe but it just may be too upward pointing to fit in the tunnel. You can see it popping out to the left after the flex section in the picture below.
Last edited by NmexMAX; Feb 7, 2012 at 06:51 AM.


Junior Member
Joined: Feb 2012
Posts: 23
From: Palm Beach, FL
Hey yall, I'm new here but have been here for years reading your posts and wanted to thank all of you for your help. Now it comes time where I have a question that hasn't already been answered or I just can't find.
As you all know the OBX headers are some of the best, but affordable, headers out there. I can't find any for the 2000 Maxima but the 02-03 are definitely back in stock with a new, beautiful look.
Here's my question: DOES ANYBODY KNOW IF THE 02-03 OBX HEADERS FIT ON THE 2000???
As you all know the OBX headers are some of the best, but affordable, headers out there. I can't find any for the 2000 Maxima but the 02-03 are definitely back in stock with a new, beautiful look.
Here's my question: DOES ANYBODY KNOW IF THE 02-03 OBX HEADERS FIT ON THE 2000???
Junior Member
Joined: Feb 2012
Posts: 23
From: Palm Beach, FL
Bryan, from what I read the difference in power production is really minimal. If you look around you can probably find dyno tests and such. Cattman are really just for people trying to squeeze every little bit of power out of their engine or people that don't mind paying for an actual drop in part instead of dealing with the hassle of instaling OBX's.
If the power is the only thing stopping you from going cattman and not the 400 bones extra, then you might as well go cattman, save yourself some trouble.
If the power is the only thing stopping you from going cattman and not the 400 bones extra, then you might as well go cattman, save yourself some trouble.

Hey yall, I'm new here but have been here for years reading your posts and wanted to thank all of you for your help. Now it comes time where I have a question that hasn't already been answered or I just can't find.
As you all know the OBX headers are some of the best, but affordable, headers out there. I can't find any for the 2000 Maxima but the 02-03 are definitely back in stock with a new, beautiful look.
Here's my question: DOES ANYBODY KNOW IF THE 02-03 OBX HEADERS FIT ON THE 2000???
As you all know the OBX headers are some of the best, but affordable, headers out there. I can't find any for the 2000 Maxima but the 02-03 are definitely back in stock with a new, beautiful look.
Here's my question: DOES ANYBODY KNOW IF THE 02-03 OBX HEADERS FIT ON THE 2000???
By the way, I'm in palm beach too. Do you drive the white 5th gen I always see in lake worth?
Just finished installing them! I have great news. THERE WERE NO MODIFICATIONS NEEDED FOR THE REAR MOUNT BRACKET AND CROSS MEMBER!!!!!! I only need to relocate the rear header primary bung, and cut the rear primary wires out of the main harness to gain enough slack to reach. NO WIRE SPLICING NEEDED FOR ANY OF THE FOUR SENSORS. I am very happy with the sound and power.
Based on my experience, obx may have made a few changes to their design.
By the way, I used antifoulers for both secondaries and no codes. But I will followup after I have put a few hundred miles on.
Based on my experience, obx may have made a few changes to their design.
By the way, I used antifoulers for both secondaries and no codes. But I will followup after I have put a few hundred miles on.


Yes 5.5 6 speed, I have some after pics that I well upload in the next day. Being on the ground for at least eight hours, I was not in the mood to take pics. After pics are all you need. The scariest or hardest part was to remove one of the secondary sensors from the old setup and the SLOWLY cut the main harness open by a few inches to isolate and afford the rear primary o2 sensor the slack needed to reach its spot in the new header.
After so much animosity toward obx on this site I was worried that the install would completely suck. I for one will attest to these headers are a great addition that fit perfectly. The test of time will tell the rest.
After so much animosity toward obx on this site I was worried that the install would completely suck. I for one will attest to these headers are a great addition that fit perfectly. The test of time will tell the rest.
Junior Member
Joined: Feb 2012
Posts: 23
From: Palm Beach, FL
That's awesome news congrats!
Upload some vids on youtube of the sound! Also, pics of the re-welded bung and hanger would be greatly appreciated and maybe an updated "parts needed" write up.
I'm worried about some rusty bolts so I want to make sure everything goes on at once as this is my DD.
Upload some vids on youtube of the sound! Also, pics of the re-welded bung and hanger would be greatly appreciated and maybe an updated "parts needed" write up.
I'm worried about some rusty bolts so I want to make sure everything goes on at once as this is my DD.
Last edited by NmexMAX; Feb 7, 2012 at 06:52 AM.

Just finished installing them! I have great news. THERE WERE NO MODIFICATIONS NEEDED FOR THE REAR MOUNT BRACKET AND CROSS MEMBER!!!!!! I only need to relocate the rear header primary bung, and cut the rear primary wires out of the main harness to gain enough slack to reach. NO WIRE SPLICING NEEDED FOR ANY OF THE FOUR SENSORS. I am very happy with the sound and power.
Based on my experience, obx may have made a few changes to their design.
By the way, I used antifoulers for both secondaries and no codes. But I will followup after I have put a few hundred miles on.
Based on my experience, obx may have made a few changes to their design.
By the way, I used antifoulers for both secondaries and no codes. But I will followup after I have put a few hundred miles on.
This is awesome news! I am definitely going to be in the market for some of these now!

This thing sounds like a 350Z on steroids. I absolutely love the power increase. The upper rpm range does not feel choked and revs very freely. I need to learn how to post videos.

http://forums.maxima.org/off-topic/5...ube-clips.html
Last edited by NmexMAX; Feb 7, 2012 at 08:50 AM.
Here are some installed pics. I will update the first post with these pics and helpful install hints.
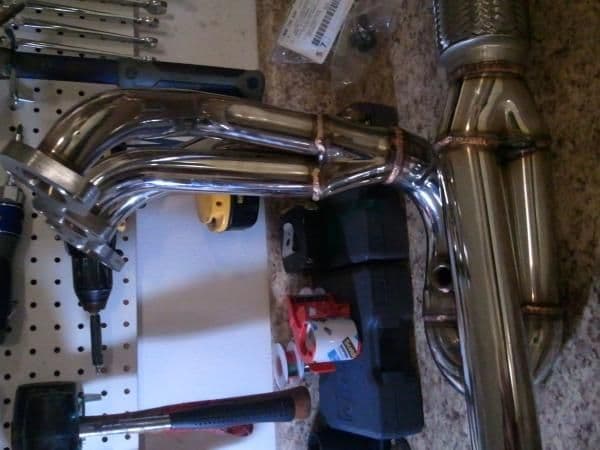
As you can see one of the primaries comes very very close close to the front motor mount bracket but it did not require trimming. Although some may be uncomfortable with how close they are, it is no problem. The mount and header will NOT move even though mine are basically touching it does not matter.

The y pipe comes about 1/4 of an inch from touching the sub frame cross member. Again this is not a problem. I have driven it like this enough to not experience any noise and the way I see it the motor really only moves front to back so this tight space does not come into play.
In order for the front primary to have enough wire slack to reach the new header bung you will have to cut the tape holding the group of wires that travels directly over the middle coil from the larger harness that runs along the top of the valve cover. The tape was holding both harnesses together to about right in the middle of the top middle of the valve cover. Easy fix takes one second.
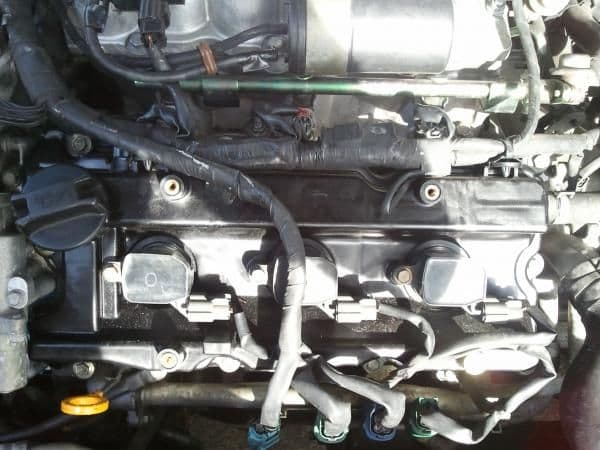
As you can see below the far left plug has to be unclipped from the coolant pipe in order for that primary to reach.
The rear primary wire has to be extended too. From all of my research people here have been saying to cut the primary either at the wire harness and add some wire to lengthen it or to cut the actual o2 wire and extend those by adding wire. Problem is that is can mess with the voltages. The wire is stainless steel which is nearly impossible for an amateur to solder correctly. My method requires NO WIRE CUTTING!!! You need to remove the wire harness cover pictures below and simply separate the o2 wires from the rest of the wires. First you need to separate is from the green plug wires, then you need to slit the right side of the main harness that fees into the back of the plastic box. PLEASE TAKE YOUR TIME!!! Be very careful to cut precisely and slowly. Doing this will give you enough slack to reach the rear primary o2 sensor.
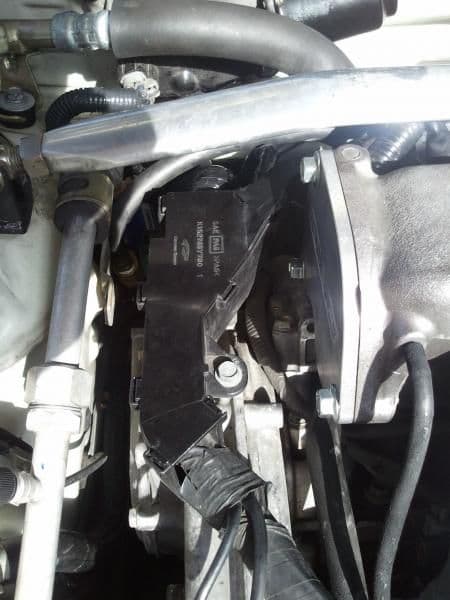
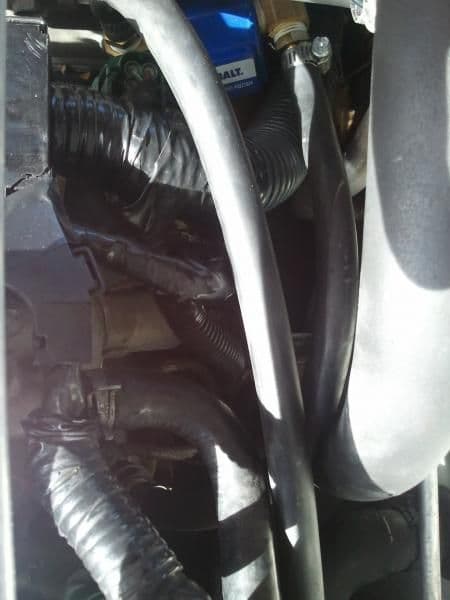
This next pictures shows exactly where my o2 wire is coming out of the main harness. It is wrapped in a black plastic protector. This picture is taken along the firewall from the driver side, so the top of the picture is the passenger side, the bottom is the drivers side and as you can see the top left is the upper part of that black wire harness box. The fattest harness coming from the box is what you need to slit the side of and separate the 02 wire from. My o2 wire is running out of that harness down toward the middle of the picture.
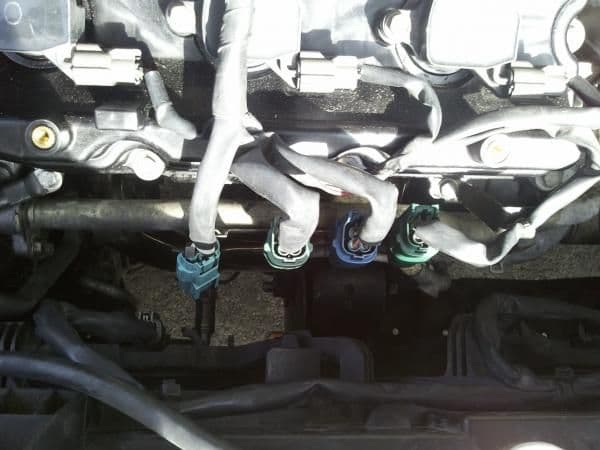
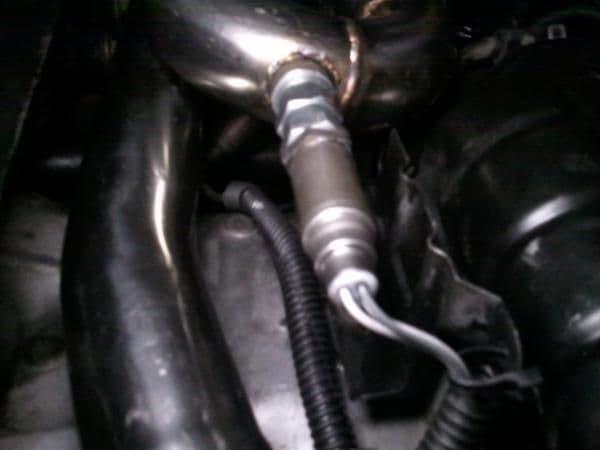
The following picture is of one of my secondary sensors. I have the antifouler setup and as of about 75 miles no CEL. This secondary is the one with a green plug and red wire cover. The wire running above it is actually the other secondary which is the blue plug with white wire cover. I secondaries have different length wires so I recommend this configuration
 .
.
As you can see one of the primaries comes very very close close to the front motor mount bracket but it did not require trimming. Although some may be uncomfortable with how close they are, it is no problem. The mount and header will NOT move even though mine are basically touching it does not matter.
The y pipe comes about 1/4 of an inch from touching the sub frame cross member. Again this is not a problem. I have driven it like this enough to not experience any noise and the way I see it the motor really only moves front to back so this tight space does not come into play.
In order for the front primary to have enough wire slack to reach the new header bung you will have to cut the tape holding the group of wires that travels directly over the middle coil from the larger harness that runs along the top of the valve cover. The tape was holding both harnesses together to about right in the middle of the top middle of the valve cover. Easy fix takes one second.
As you can see below the far left plug has to be unclipped from the coolant pipe in order for that primary to reach.
The rear primary wire has to be extended too. From all of my research people here have been saying to cut the primary either at the wire harness and add some wire to lengthen it or to cut the actual o2 wire and extend those by adding wire. Problem is that is can mess with the voltages. The wire is stainless steel which is nearly impossible for an amateur to solder correctly. My method requires NO WIRE CUTTING!!! You need to remove the wire harness cover pictures below and simply separate the o2 wires from the rest of the wires. First you need to separate is from the green plug wires, then you need to slit the right side of the main harness that fees into the back of the plastic box. PLEASE TAKE YOUR TIME!!! Be very careful to cut precisely and slowly. Doing this will give you enough slack to reach the rear primary o2 sensor.
This next pictures shows exactly where my o2 wire is coming out of the main harness. It is wrapped in a black plastic protector. This picture is taken along the firewall from the driver side, so the top of the picture is the passenger side, the bottom is the drivers side and as you can see the top left is the upper part of that black wire harness box. The fattest harness coming from the box is what you need to slit the side of and separate the 02 wire from. My o2 wire is running out of that harness down toward the middle of the picture.
The following picture is of one of my secondary sensors. I have the antifouler setup and as of about 75 miles no CEL. This secondary is the one with a green plug and red wire cover. The wire running above it is actually the other secondary which is the blue plug with white wire cover. I secondaries have different length wires so I recommend this configuration

Senior Member
Joined: Nov 2004
Posts: 605
From: St. Charles, MO

The power is addictive and lane changes have never been more aggressive and easier
Originally Posted by 02whitemaximase
In order for the front primary to have enough wire slack to reach the new header bung you will have to cut the tape holding the group of wires that travels directly over the middle coil from the larger harness that runs along the top of the valve cover. The tape was holding both harnesses together to about right in the middle of the top middle of the valve cover. Easy fix takes one second.
Also, trying to keep this thread as clean as possible, thanks for the write-up, good things.

Y pipe diameter is 2 3/8 to be on point. Been over a hundred miles now with no cel. I think this antifouler trick is working. I an knocking on wood. I will clean up my posts as some sound like a three year old wrote them.

As you can now see the y pipe outlet is not quite at 2.5" but pretty damn close
My new wideband bung on the y.
The relocated rear header primary bung and plugged original location
I am scared this wideband bung will not fit. I asked for it to be at the 2:30 position on the pipe but it just may be too upward pointing to fit in the tunnel. You can see it popping out to the left after the flex section in the picture below.
My new wideband bung on the y.
The relocated rear header primary bung and plugged original location
I am scared this wideband bung will not fit. I asked for it to be at the 2:30 position on the pipe but it just may be too upward pointing to fit in the tunnel. You can see it popping out to the left after the flex section in the picture below.
Last edited by CMax03; Feb 19, 2012 at 12:14 AM.
You should connect a obd to it to see if its reading your O2 sensor and all because I gutted my cats got no codes but when I went to inspect the car it showed on the obd that the O2 sensor wasn't ready and all
It showed that it was monitoring it
It showed that it was monitoring it
No tune, been around a 1,000 miles with no cel and my gas mileage is about the same but I have been revving the car out much more because of the better acceleration and fun noise, haha.

Junior Member
Joined: Jun 2010
Posts: 86
From: conn.
quick question. with those headers how does the power feel below 4000rpm. becuase i have a 02 6spd with cattman pop charger cattman y pipe nwp 5piece spacers and bop and a megan racing cat back. and up too 4000rpm it feels gutless after 4000rpm it pulls pretty hard but seems like its got more. im thinking my warm up cats might be going.

quick question. with those headers how does the power feel below 4000rpm. becuase i have a 02 6spd with cattman pop charger cattman y pipe nwp 5piece spacers and bop and a megan racing cat back. and up too 4000rpm it feels gutless after 4000rpm it pulls pretty hard but seems like its got more. im thinking my warm up cats might be going.


Member
Joined: Mar 2006
Posts: 108
So I installed my set of OBX headers this weekend. Not a task for the faint of heart. I absolutely cannot see trying to accomplish this without removing the upper intake manifold. Additionally, heat shild bolts strip incredibly easy and I had to grind off and drill out a few. I also had to grind down the engine crossmember and the front and rear engine mount brackets so they werent sitting directly on the headers. Otherwise, they fit great, lol. I'm 15 hours in so far and I just need to install my secondary o2 sensors (and replace one because I stripped it with an o2 sensor socket!). I cant wait to drive it and feel the powa! My hands look like hamburger and my back hurts but there's nothing like the satisfaction of completing a job yourself and also saving some dollars on the install.
I stripped one of my secondaries too and one heat shield bolt. As far as the motor mounts brackets, I think it will be hit or miss. Because they my headers came so close to the brackets I knew I was lucky. Not every set of these headers is exactly the same. Hope the rest of your install goes well and enjoy the satisfaction of doing it yourself and saving hundreds of dollars.
By the way, over 1,500 miles since my install and still not check engine light!
By the way, over 1,500 miles since my install and still not check engine light!
Member
Joined: Mar 2006
Posts: 108
Sweet! Also, extending the primaries is easy, much easier than cutting and resoldering and potentially having voltage issues, etc. if not done properly. Also, when you drilled out the non-fouler, did you just drill out the thin metal part or did you have to drill out with a huge bit?