
It really seems like my car is rejecting this mod.
As some of you know we can swap the dual piston brakes from a g/z onto our cars ( with a bit of work, its not plug and play ) . So I know a few guys here have em
I managed to get pads/calipers/rotors off a 2007 350z so I went to work...I didn't know that the z rotors went from 11.7x.95"..to 12.5x1.10' in 2006 so after I installed everything the wheel was dead locked...
I could only drive the car if I loosened the 14mm slider bolts to the point you could turn them by hand...so I had to get the rotors machined down by 6mm diameter total.....
....installed everything and when everything was torqued up the wheel basically didnt move again when I tried by hand. So I loosened now the 19mm bracket bolts but now Im dealing with a rubbing under braking
( kinda sounds like you're braking while driving on rumble strips). I think the rotors were designed faulty or something because they only rub at one point during rotation on both wheels. Every revolution bring a rub, and that's what I cant understand.
2006-2007-350z
front - 318mm x 28mm (12.5" x 1.10")
rear - 307mm x 16mm (12.1" x 0.63")
200?-2005
Standard
front - 11.7"x0.95"
rear - 11.5"x0.63"
I want to have everything tightened down but doing this would equal a dead stiff wheel for me....get a rotor with a smaller width ?

Junior Member
this will solve all your problems http://forums.maxima.org/advanced-su...on-brakes.html

Just reading "they only rub at one point during rotation" sounds like the rotors themselves weren't milled down correctly.
OP if you could update your first post to ensure new ppl reading it don't think it's plug-n-play that'd be great...because it definitely isn't.
OP if you could update your first post to ensure new ppl reading it don't think it's plug-n-play that'd be great...because it definitely isn't.
I already know about that post, my rotors are already shaved down. Im just out of options....I wanna know what other people have done to get past it
Are you sure the rotor itself is rubbing on the outside and possibly not on the inside pad surface?...as if it were warped slightly?
Quote:
There aren't any others, that have posted anyway, with the DP setup.Originally Posted by Maxterror
I already know about that post, my rotors are already shaved down. Im just out of options....I wanna know what other people have done to get past it
they might be warped I hope not, its rubbing on the caliper not the pad...I can hear the metal. I just don't see how they could be warped when it came off a show car that got gutted the minute it came to Canada

Quote:
OP if you could update your first post to ensure new ppl reading it don't think it's plug-n-play that'd be great...because it definitely isn't.
the same thing happened before they were milled , when we spun them without tightening a few things we kept getting rubbing at one spot then it would go free then rub again. so I might have to try and get some kind of rotor that has a smaller diameter and smaller width Originally Posted by MrEous
Just reading "they only rub at one point during rotation" sounds like the rotors themselves weren't milled down correctly.OP if you could update your first post to ensure new ppl reading it don't think it's plug-n-play that'd be great...because it definitely isn't.
Ok do this then...mark the rotor all the way around. Spin the rotor so the metal grinds and find out where the rotor is hitting as well as what part/side of the rotor itself diameter is hitting.
That's what I had to do when I did my project.
That's what I had to do when I did my project.
Senior Member
remove the pads and hardware, compress the pistons out of the way, and re-test it without applying hte brake. that will tell you if it's a 'offset' issue, either a rotor warped, caliper and rotor not 'in-line' properly, etc.

Senior Member
Im very interested in this mod myself in the future and i would like to see some pictures of the rotor milled down and if you are grinding down the caliper where is it that it needs to be grinded down? Any pictures would be great cause the other thread doesnt go ito enough details its very vague
the rotor milled down looks the same as a regular rotor...just 6mm smaller so you cant really notice it unless you have a normal one to compare it to . Tomorrow Im gonna try to mark it and do what tunermax said to try and isolate the rubbing
Quote:
Not enough pics of grinding?Originally Posted by DjHackStyle
Im very interested in this mod myself in the future and i would like to see some pictures of the rotor milled down and if you are grinding down the caliper where is it that it needs to be grinded down? Any pictures would be great cause the other thread doesnt go ito enough details its very vague
From the thread referenced in Post #2...http://forums.maxima.org/8431140-post83.html
Quote:
I decided to grind down the caliper 'ceiling' itself so new rotors wouldn't need to be milled down.
Anyway, here are some final pics: (click to see bigger)
Before and after


Rest of the pics


INTERESTINGLY...the pad has more contact area than a Wilwood pad does.


Originally Posted by MrEous
Well they're done. The total taken off is only about 2mm off the caliper. I ended up borrowing an angle grinder from a friend and stuck a 7" wheel to grind them down. It isn't perfect but it looks a ton better than when I was attempting it with a Dremel. <--:haha:I decided to grind down the caliper 'ceiling' itself so new rotors wouldn't need to be milled down.
Anyway, here are some final pics: (click to see bigger)
Before and after
Rest of the pics
INTERESTINGLY...the pad has more contact area than a Wilwood pad does.
Senior Member
Lolz ok i didnt read all the way to the end, shoot me. Great pictures so u grinded the ceiling of the caliper AND the inner edges of the carrier bracket right and then everything else bolted on? Even using the stock lines? These are stock 07 350z rotors?
Quote:
Yup after the grinding of both areas it bolted on fine. They are 2007, stock rotors, stock bolts too...lines from Maxima fit.Originally Posted by DjHackStyle
Great pictures so u grinded the ceiling of the caliper AND the inner edges of the carrier bracket right and then everything else bolted on? Even using the stock lines? These are stock 07 350z rotors?
If anyone has the carrier bracket (torque member / caliper mounting bracket?) from a 6th gen they could try using that with the dual piston caliper body first. You might not need to do any grinding at all! I didn't have any available, and couldn't find just the bracket anywhere, or else I would have tried that first.
Senior Member
Quote:
If anyone has the carrier bracket (torque member / caliper mounting bracket?) from a 6th gen they could try using that with the dual piston caliper body first. You might not need to do any grinding at all! I didn't have any available, and couldn't find just the bracket anywhere, or else I would have tried that first.
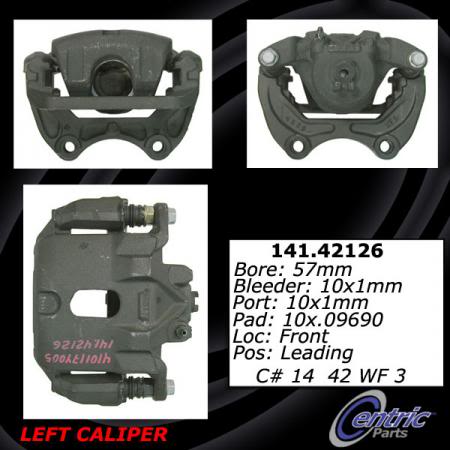
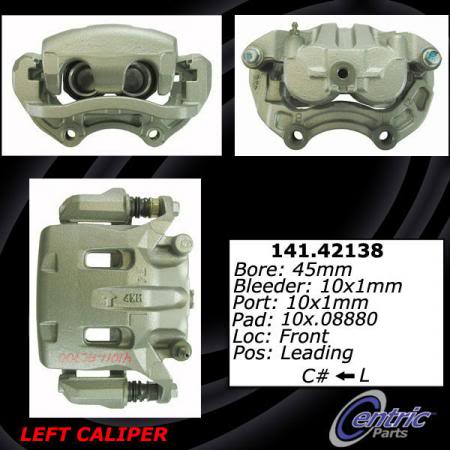
good info you might be on to something, heres some pictures of a 2006 maxima caliper and carrier (top) and a 2007 350z caliper and carrier (bottom), the mounting holes on both look pretty similar it looks as if the 6th gen maxima carrier might move the 350z dual pistol caliper upwards out of the way, IF everything bolts on. just looking at these pictures i think its worth a shot for someone to try it out, looks very promising, good idea.Originally Posted by MrEous
Yup after the grinding of both areas it bolted on fine. They are 2007, stock rotors, stock bolts too...lines from Maxima fit.If anyone has the carrier bracket (torque member / caliper mounting bracket?) from a 6th gen they could try using that with the dual piston caliper body first. You might not need to do any grinding at all! I didn't have any available, and couldn't find just the bracket anywhere, or else I would have tried that first.
I'm planning on getting to a pick-n-pull sometime soon and I'll snag the mounting brackets.
If anything I'll just bolt them on with the G/Z dp calipers and check fitment. It'll be worthwhile.
If anything I'll just bolt them on with the G/Z dp calipers and check fitment. It'll be worthwhile.
Senior Member
Just by looking at those pictures I can tell you the Maxima Torque Bracket will not fit the 350Z Caliper.
And If i'm not mistaken, it looks like the part that was ground down was the caliper itself, not the torque member, but I could be wrong. The caliper looks ground in the pics Eous posted.
And If i'm not mistaken, it looks like the part that was ground down was the caliper itself, not the torque member, but I could be wrong. The caliper looks ground in the pics Eous posted.
I rolled the car in my work parking lot when I was done ( car was cold) and no rubbing....its not until I was on my commute that it started so Im guessing it expanded as it got hotter...and its still only rubbing at one point per revolution...so tomorrow ill take the pads out and compress the piston and try to find the closest contact points...maybe ill need a washer for the bolts
I machined the diameter of the rotors down for him. They are not warped. They are still basically brand new. We figured this was better than hacking the inside of the caliper out.
After seeing the pics Maxterror sent me it looks to me that the offset of the caliper and the offset of the rotor do not match up after mounting to the Maxima knuckle.
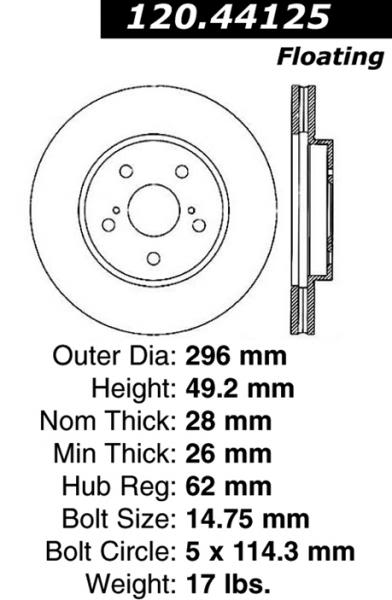
Edit... BTY i checked some info out and found that the Pathy rotors from a 4.0L are the same thickness as the Z rotors but a few mm smaller, so buy the pathy rotors and no machining or grinding.
Z rotors are 320mm x 28mm, pathfinder rotors are 295.6mm x 28mm
After seeing the pics Maxterror sent me it looks to me that the offset of the caliper and the offset of the rotor do not match up after mounting to the Maxima knuckle.
Edit... BTY i checked some info out and found that the Pathy rotors from a 4.0L are the same thickness as the Z rotors but a few mm smaller, so buy the pathy rotors and no machining or grinding.
Z rotors are 320mm x 28mm, pathfinder rotors are 295.6mm x 28mm
^^ So washers will help then...temporarily?
Curious why only one portion of the rotor is making a sound though while the rest is fine.
Curious why only one portion of the rotor is making a sound though while the rest is fine.
Senior Member
That's what I was thinking too Ray, sounds like an offset issue.
Eous, to speculate, if one caliper bolt/surface is dinged or otherwise 'off' at all, then the caliper could be on a slight angle which would cause these issues.
the first thing I'd do actually is take it all back apart and check the mating surfaces of the rotor, hub, caliper bracket, and so on. make sure everything is perfectly flat with no dimples, dings, etc. Then check your threads and bolt to make sure they look good. Then reinstall and test without pads and compress pistons as discussed earlier.
Can you post the pics he sent? It wouldn't happen to be the metal guide that holds the pads in place would it?
Quote:
Z rotors are 320mm x 28mm, pathfinder rotors are 295.6mm x 28mm
Awesome find!Originally Posted by knight_yyz
Edit... BTY i checked some info out and found that the Pathy rotors from a 4.0L are the same thickness as the Z rotors but a few mm smaller, so buy the pathy rotors and no machining or grinding.Z rotors are 320mm x 28mm, pathfinder rotors are 295.6mm x 28mm
I can't post the picture, it's actually a 5 second video and my smartphone won't let me save it and upload it to photobucket. But To me, from looking at the pictures, the rotor is sitting inside the car too much, it needs to sit farther out. It's almost like he needs to put some washers on the studs before he puts the rotor on.
I haven't seen the full setup in person, just the rotors
I haven't seen the full setup in person, just the rotors
Senior Member
Quote:
After seeing the pics Maxterror sent me it looks to me that the offset of the caliper and the offset of the rotor do not match up after mounting to the Maxima knuckle.
Edit... BTY i checked some info out and found that the Pathy rotors from a 4.0L are the same thickness as the Z rotors but a few mm smaller, so buy the pathy rotors and no machining or grinding.
Z rotors are 320mm x 28mm, pathfinder rotors are 295.6mm x 28mm
296mm is 11.65" and the z rotors are 12.6" i dunno if i wanna lose a whole inch of rotor and on top of that i gotta redrill it from 6 lug pattern to 5 lug...theres gotta be a better rotor out there that already uses the 5x114.3 pattern and is maybe like 12.3~12.4 or something just enough to clear the calipers and still be close to the 12.6 rotorOriginally Posted by knight_yyz
I machined the diameter of the rotors down for him. They are not warped. They are still basically brand new. We figured this was better than hacking the inside of the caliper out. After seeing the pics Maxterror sent me it looks to me that the offset of the caliper and the offset of the rotor do not match up after mounting to the Maxima knuckle.
Edit... BTY i checked some info out and found that the Pathy rotors from a 4.0L are the same thickness as the Z rotors but a few mm smaller, so buy the pathy rotors and no machining or grinding.
Z rotors are 320mm x 28mm, pathfinder rotors are 295.6mm x 28mm
Senior Member
im willing to spend some time looking for a fitting rotor for this upgrade to be a bolt on mod, but im not as experienced as some of you guys here in knowing all the specifications, i found a 07 toyota solara rotor might fit, what else do i need to know to see if it fits? cause i see some numbers i dont understand that might be important
07 toyota solara V6 front rotor specs
07 toyota solara V6 front rotor specs
Regarding the solar rotor... The height of the hat may or may not be a problem. And the 14mm bolt holes might be too big. Nissan uses 12mm. Other than that it is a possibility
Okay, for those who've had their eyes on this , here's how it went for me from start to finish...
remember I got the brakes from a 2007 350z, I know the rotors for earlier years are smaller diameter . and I have a 2002 maxima
this was my step by step :
- buy brakes..calipers pads rotors
- get spacers..depending on what wheel you have because obviously the z calipers are bigger...my 19's have a 42 or 45 offset, cant remember...but I got 25mm spacers..i could get away with about 15-20
- get the rotors shaved, knight can probably clarify but I think he shaved 3mm( so 6mm total diameter)
- you'll need to basically push the rotor out, I bought washers from my local hardware store ....the hole in the middle of the washer is 1/2"....the thickness of the washers I bought was 1.5mm because those are the only ones they had , I really think you should buy 1mm for it to be perfect( because you have quite a bit of space on the inside of the rotor now and its closer to the outside of the caliper now ). But be aware of the washer size because remember the rotor still needs to sit over these and touch the hub so it must clear. because my hardware store had only one size I had to use my bench grinder and shave them down....so if you can find a washer with a half inch center and about a 2-2.5 mm ring you'll be golden.
- place the washer rings on all the lug studs
- place the rotor on
- put the entire caliper on with the piston piece and everything ( make sure the bolts that hold the piston piece are loose so that it gives when you try to squeeze it onto the rotor)
- take the piston piece off and put it out of your way ....dont disconnect the brake line
- tighten up the caliper bracket ( if you have spacers tighten them up to hold the rotor nice and snug )
- compress the piston and put it over the pads and bracket etc ..tighten that up
now I have my washers behind the rotor, the caliper is put back on and tightened. Its still not loose to the point where I can spin the rotor with one finger but I can move it with one hand. I put the wheels on and good to go.
I drove for about 20 km and no problem , the brakes grab amazing and I got up to a very " nice " speed and hit the brakes , I've never felt my max stop that short before.
Im gonna drive for about 100km over the next few days and see how it feels then go in an re-torque a few things.
There is no rubbing now as far as I can tell. Later on Ill probably get smaller washers just so it looks neater or if there's even such a thing as 1mm wheel spacers

Senior Member
You better bed those pad in right and you should be using the washers on the caliper bolts not the actual studs as that is one of the worst ideas ever. Worse than cheap spacers
Quote:
Explain how the stud idea is a bad idea. and there's no point putting washers on the caliper bolt if Im trying to push the rotor out.Originally Posted by ShocknAwe
You better bed those pad in right and you should be using the washers on the caliper bolts not the actual studs as that is one of the worst ideas ever. Worse than cheap spacers
You would have to machine the caliper mounts to move them in the correct direction, adding washers will move the calipers the wrong way.
Calipers inward or rotors outward to keep the rotors centered.
Calipers inward or rotors outward to keep the rotors centered.
Senior Member
You run hardware store washers on your studs if you want to. Get a spacer machined if you cant figure out another way to get the caliper in position but that is a bad idea
Quote:
there's a place near my work that machines spacers, but I dont think I've ever heard of anyone running 1mm spacers. Maybe they are too small to be made or something. Up until now I dont see anyone else saying they had this mod completed so I wasn't gonna spend time/money trying stuff out...the washers now tell me that you need to push the rotors out about 1-1.5mm...but you keep saying its a bad idea and Im asking whyOriginally Posted by ShocknAwe
You run hardware store washers on your studs if you want to. Get a spacer machined if you cant figure out another way to get the caliper in position but that is a bad idea
Senior Member
Once clamped down even the slightest radial movement can cause the lugs to shear off. Most harware store washers arent meant for that. Sure they will make a spacer to whatever size you tell them. They sell them too. Google "rotor spacers" or something like that. Its not a new problem and a lot of people have tried what you are doing and the lugs have sheared off. Nissan studs are strong and you probably wont have a problem but its best to get a hubcentric spacer for that
Senior Member
Quote:
This makes sense to me, I understand the rotor must be pushed OUT 1~1.5mm to be centered and clear it, so i believe that putting washers between the carrier bracket and knuckle and then bolt it up, will bring the whole caliper/carrier assembly closer towards inside which is the same thing as pushing the rotor out, i dont see why this wouldnt work and might be safer? Correct me if im wrongOriginally Posted by ShocknAwe
You better bed those pad in right and you should be using the washers on the caliper bolts not the actual studs as that is one of the worst ideas ever. Worse than cheap spacers