
DIY: Make a Short Ram for Cheap


Thread Starter
Newbie - Just Registered
Joined: Dec 2012
Posts: 5
From: Philly
DIY: Make a Short Ram for Cheap
Whats up everybody. This is a sick quick mod that can be done by yourself and can be bought at any auto parts store. I did this last night in less than an hours start to finish. Its your very own custom short ram intake. List below are the supplies needed:
1. Pipe Coupler (Qty. 2 or 3) "3 if you buy a filter without the tightening clamp." Size 3 inch
2. 6 inch length pipe with a 3 inch diameter.
3. Air Duct Mounting Bracket (Qty. 1)
4. Hex Bolts and Nuts (Qty. 4) "These are need to secure the Air Duct Mounting Bracket to your stock Mass Air Flow Sensor."
5. 3 inch HI-Flow Air Filter (Qty. 1) The brand you choose is completely up to you. I chose the K&N personally.
6. Breather Filter (Qty. 1)
NOW THAT YOU HAVE THE LIST OF SUPPLIES WE CAN GET STARTED.
STEP 1. Your are going to have to uninstall the factory intake system completely. This can be done with a Flat-head Screwdriver, Phillips-head Screwdriver, and a 10mm socket and wrench.
STEP 2. Remover the plastic Engine Cover. 4 bolts that require you to use a Hex-head. Not sure what size, but if you have a Hex wrench set you'll be able to size it up.
STEP 3. Take caution when disconnecting the MAF Assembly. If you bang it around to hard you could brake it. What I did was disconnected the wire harness from the MAF first then disassembled it using the 10mm socket. It helps to have a universal adapter for the lower bolts. <---Also known as a swivel adapter. Then just set it aside carefully.
STEP 4. Take your first PIPE COUPLER loosen the clamps enough to be able to slide it to the edge but not off. Next connect one end to the Valve Opening of the upper manifold and tighten the clamp. This doesn't just slip on easily. You will have to use a little bit of muscle.
STEP 5. Take the 6 INCH PIPE and insert that into the opened end of the couple. Then tighten the clamp.
STEP 6. Take your second PIPE COUPLER and attach one end to the 6 inch pipe. Tighten the clamp.
STEP 7. Connect your stock MASS AIR FLOW SENSOR to the other open end of the Pipe Coupler. Then tighten the clamp.
STEP 8. Connect the flat end of the AIR DUCT MOUNTING BRACKET to the stock Mass Air Flow Sensor with 4 and nuts. Be sure not to over tighten the bolts. The stock MAF is plastic and the Air Duct Bracket can be plastic...They will crack and break if over-tightened. JUST UNTIL TIGHT.
STEP 9. Attach your HI-FLOW AIR FILTER onto theAir Duct Mounting Bracket. Then tighten the clamp.
STEP 10. Install the Breather Filter onto the part of your engine where you took off the only rubber pipe that was connected to your stock Air Intake Assembly. This part may also require a bit of muscle. Also heating up and stretching very lightly the rubber may help better with installing this. IF YOU DO NOT KNOW WHERE TO LOCATE, LOOK FOR YOUR OIL DIPSTICK. AND TO THE LEFT OF THAT IS WHERE YOU WILL INSTALL THE BREATHER FILTER.
STEP 11. Connect the wire harness back to the MAF HOUSING.
STEP 12. Start Your Engine. I didn't have any Check Engine Light come on when I installed mine. Nor should you if you follow the steps and make sure that you have solid connections along with tight connections.
STEP 13. Re-Install the plastic Engine Cover.
STEP 14. ENJOY Your very own CUSTOM SHORT RAM INTAKE.
Now I plan on insulating mine a bit more to reduce the amount of hotter air surrounding it. But if your not trying to race but are just looking for a little extra performance, like myself, then there really is no need to.
Pretty cut and dry. Right? No real big mess. Very time efficient. And there is added performance. Oh yea and about a quarter of the price of some of those aftermarket ones out there.
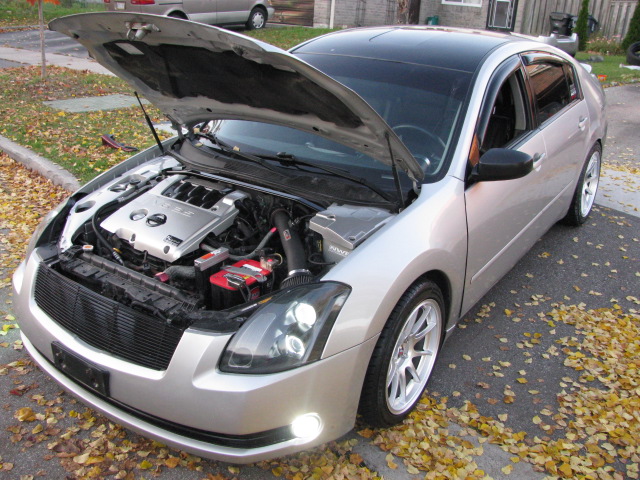
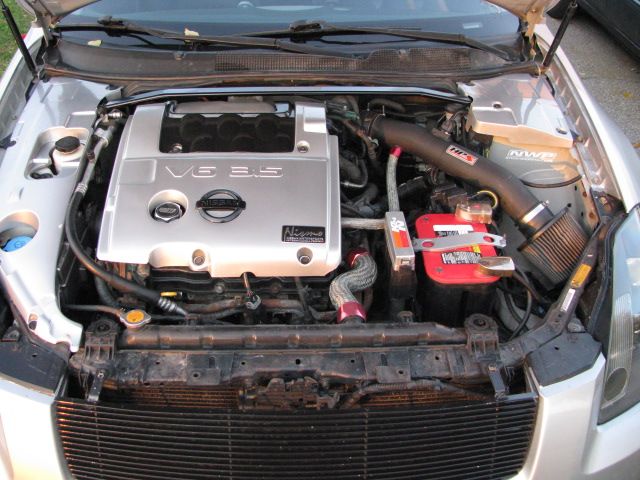
Below is a picture of what it will or could look like:

1. Pipe Coupler (Qty. 2 or 3) "3 if you buy a filter without the tightening clamp." Size 3 inch
2. 6 inch length pipe with a 3 inch diameter.
3. Air Duct Mounting Bracket (Qty. 1)
4. Hex Bolts and Nuts (Qty. 4) "These are need to secure the Air Duct Mounting Bracket to your stock Mass Air Flow Sensor."
5. 3 inch HI-Flow Air Filter (Qty. 1) The brand you choose is completely up to you. I chose the K&N personally.
6. Breather Filter (Qty. 1)
NOW THAT YOU HAVE THE LIST OF SUPPLIES WE CAN GET STARTED.
STEP 1. Your are going to have to uninstall the factory intake system completely. This can be done with a Flat-head Screwdriver, Phillips-head Screwdriver, and a 10mm socket and wrench.
STEP 2. Remover the plastic Engine Cover. 4 bolts that require you to use a Hex-head. Not sure what size, but if you have a Hex wrench set you'll be able to size it up.
STEP 3. Take caution when disconnecting the MAF Assembly. If you bang it around to hard you could brake it. What I did was disconnected the wire harness from the MAF first then disassembled it using the 10mm socket. It helps to have a universal adapter for the lower bolts. <---Also known as a swivel adapter. Then just set it aside carefully.
STEP 4. Take your first PIPE COUPLER loosen the clamps enough to be able to slide it to the edge but not off. Next connect one end to the Valve Opening of the upper manifold and tighten the clamp. This doesn't just slip on easily. You will have to use a little bit of muscle.
STEP 5. Take the 6 INCH PIPE and insert that into the opened end of the couple. Then tighten the clamp.
STEP 6. Take your second PIPE COUPLER and attach one end to the 6 inch pipe. Tighten the clamp.
STEP 7. Connect your stock MASS AIR FLOW SENSOR to the other open end of the Pipe Coupler. Then tighten the clamp.
STEP 8. Connect the flat end of the AIR DUCT MOUNTING BRACKET to the stock Mass Air Flow Sensor with 4 and nuts. Be sure not to over tighten the bolts. The stock MAF is plastic and the Air Duct Bracket can be plastic...They will crack and break if over-tightened. JUST UNTIL TIGHT.
STEP 9. Attach your HI-FLOW AIR FILTER onto theAir Duct Mounting Bracket. Then tighten the clamp.
STEP 10. Install the Breather Filter onto the part of your engine where you took off the only rubber pipe that was connected to your stock Air Intake Assembly. This part may also require a bit of muscle. Also heating up and stretching very lightly the rubber may help better with installing this. IF YOU DO NOT KNOW WHERE TO LOCATE, LOOK FOR YOUR OIL DIPSTICK. AND TO THE LEFT OF THAT IS WHERE YOU WILL INSTALL THE BREATHER FILTER.
STEP 11. Connect the wire harness back to the MAF HOUSING.
STEP 12. Start Your Engine. I didn't have any Check Engine Light come on when I installed mine. Nor should you if you follow the steps and make sure that you have solid connections along with tight connections.
STEP 13. Re-Install the plastic Engine Cover.
STEP 14. ENJOY Your very own CUSTOM SHORT RAM INTAKE.
Now I plan on insulating mine a bit more to reduce the amount of hotter air surrounding it. But if your not trying to race but are just looking for a little extra performance, like myself, then there really is no need to.
Pretty cut and dry. Right? No real big mess. Very time efficient. And there is added performance. Oh yea and about a quarter of the price of some of those aftermarket ones out there.
Below is a picture of what it will or could look like:
Last edited by 03graymax; Jan 5, 2013 at 06:24 AM.


Although Im sure some will appreciate the effort there are literally hundreds of threads like this. Dont take this the wrong way, its not personal I promise maybe you came in at a bad time in the .org but.......WTF is up with useless threads taking up space in the recent list?
Thread Starter
Newbie - Just Registered
Joined: Dec 2012
Posts: 5
From: Philly
You're absolutely right. Some will like this thread. But instead of having to search page by page by page to find something like this there is a newer one. If the information is useless to you...Great idea don't click on it. You're only wasting your own time guy! Nothing personal. Just trying to help someone else like me who also came into .org at a bad time.

Senior Member
Joined: Apr 2011
Posts: 539
From: Ontario, Canada
Nice write-up man, very well put together, some more pics of the parts used would be helpful. I can appreciate a recent thread that isn't 8 yrs old, simple, common mod or not, a good recent thread will encourage new members to search and use the info on this site, instead of starting all the useless repeat threads I believe shocknawe is talking about.

Newbie - Just Registered
Joined: Jan 2013
Posts: 1
From: Las Vegas
sorry im new to the computer stuff. i have a 7th gen max. this wont trigger any type of codes from the computer will it? i know you said no lights came on, but are light triggers and codes the samething?
Thread Starter
Newbie - Just Registered
Joined: Dec 2012
Posts: 5
From: Philly
DaCruzer: Yes. Light Codes, Check Engine Light, Service Engine Soon....One in the same. However I have no idea what this may do for an '07 Max. I have an '03 Max so I'm only speaking on behalf of the 5th Gen Max that I have. Don't worry about that I'm new stuff either man. So am I. Only one month older than you on this site. Search, Ask, Learn, Fix, Create....Thats whats awesome about people helping people. Everyone on this site was a new person one point in there life. Enjoy the site.
Last edited by 03graymax; Jan 5, 2013 at 06:22 AM.


STEP 10. Install the Breather Filter onto the part of your engine where you took off the only rubber pipe that was connected to your stock Air Intake Assembly. This part may also require a bit of muscle. Also heating up and stretching very lightly the rubber may help better with installing this. IF YOU DO NOT KNOW WHERE TO LOCATE, LOOK FOR YOUR OIL DIPSTICK. AND TO THE LEFT OF THAT IS WHERE YOU WILL INSTALL THE BREATHER FILTER.
umm, wat?

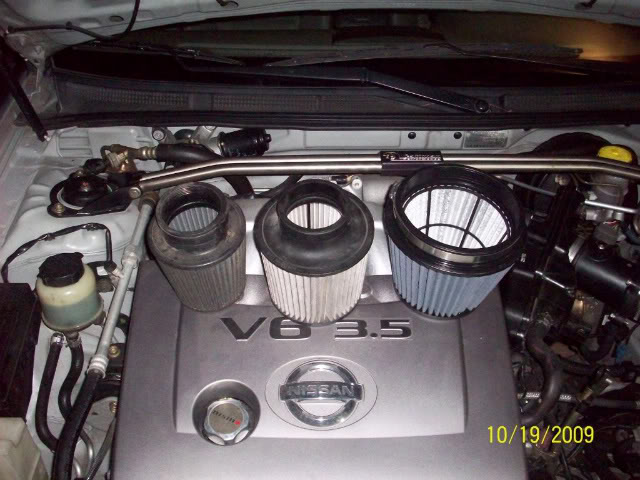
I like his better, deletes the resonator, less restrictions, and cuts the Crank Vent from recirculating. Though most might not like that, a catch can would be better for most guys prolly.
Then again, who really cares, none of them really help performance, so whats the diff other than noise? lol.
Then again, who really cares, none of them really help performance, so whats the diff other than noise? lol.


Senior Member
Joined: Jun 2011
Posts: 1,218
From: Mississauga, ON, CANADA

I like his better, deletes the resonator, less restrictions, and cuts the Crank Vent from recirculating. Though most might not like that, a catch can would be better for most guys prolly.
Then again, who really cares, none of them really help performance, so whats the diff other than noise? lol.
Then again, who really cares, none of them really help performance, so whats the diff other than noise? lol.
I always associate the benifit of a bellmouth as being liken to an interstate. If everyone just tried to pull into a fast moving interstate, there would be a lot of collisions and things would slow down (turbulence). However, with the bellmouth, it acts as an on ramp for the incoming air surrounding the tube opening, allowing the air already traveling along the interstate path (more straight) to accept additional traffic that can quickly get up to the speed (velocity) of already present traffic. Essentially, a bellmouth allows more, less turbulent air to be incorporated into the intake path. Nissan even has one built into their stock air box if anyone has ever looked. At least the 3rd gens do.
I always associate the benifit of a bellmouth as being liken to an interstate. If everyone just tried to pull into a fast moving interstate, there would be a lot of collisions and things would slow down (turbulence). However, with the bellmouth, it acts as an on ramp for the incoming air surrounding the tube opening, allowing the air already traveling along the interstate path (more straight) to accept additional traffic that can quickly get up to the speed (velocity) of already present traffic. Essentially, a bellmouth allows more, less turbulent air to be incorporated into the intake path. Nissan even has one built into their stock air box if anyone has ever looked. At least the 3rd gens do.
Senior Member
Joined: Jun 2011
Posts: 1,218
From: Mississauga, ON, CANADA
Lol ok I get your point... Velocity stack helps with that too I guess by smoothly sucking the air, like a tapered entrance on a culvert... I'll try the bellmouth+vstack once I get my place racing intake pipes, damn I spent like 300 so far on intake setups lol
Tuner, it took me a while but hello Fellow tmec'er! I want your g35 when your done with it... Seriously I want dibs lol
Tuner, it took me a while but hello Fellow tmec'er! I want your g35 when your done with it... Seriously I want dibs lol
Last edited by NmexMAX; Jan 8, 2013 at 09:56 AM.


Member
Joined: Feb 2012
Posts: 261
From: Murfreesboro TN


Member
Joined: May 2011
Posts: 211
Although Im sure some will appreciate the effort there are literally hundreds of threads like this. Dont take this the wrong way, its not personal I promise maybe you came in at a bad time in the .org but.......WTF is up with useless threads taking up space in the recent list?
whats up with useless posts that are uncalled for?

Senior Member
Joined: Nov 2007
Posts: 539
I have a question and I figure I'll ask it here rather than start a new thread......I have the simple setup with the stock resonator etc. Only thing I could use would be a better quality filter.......My question is this. I have left my stock underhood intake on the car (the one that flattens out and supposedly sucks air from under the hood) because there appear to be two important sensors in it...one that looks like it may be a thermometer of some sort and the other that looks pretty big and is bolted onto the top. What did you guys do with these sensors when ditching that whole piece?! Because I see you all have no piece like mine!
Member
Joined: May 2011
Posts: 211
I have a question and I figure I'll ask it here rather than start a new thread......I have the simple setup with the stock resonator etc. Only thing I could use would be a better quality filter.......My question is this. I have left my stock underhood intake on the car (the one that flattens out and supposedly sucks air from under the hood) because there appear to be two important sensors in it...one that looks like it may be a thermometer of some sort and the other that looks pretty big and is bolted onto the top. What did you guys do with these sensors when ditching that whole piece?! Because I see you all have no piece like mine!
one sensor I believe is the mass air flow. you need that lol. It disconnects from the stock air box. You will need a MAF adapter if you do take it apart. buy it in advance


I have left my stock underhood intake on the car (the one that flattens out and supposedly sucks air from under the hood) because there appear to be two important sensors in it...one that looks like it may be a thermometer of some sort and the other that looks pretty big and is bolted onto the top. What did you guys do with these sensors when ditching that whole piece?! Because I see you all have no piece like mine!