
Yes, this has been covered before, but as our cars age this is going to become an increasingly common issue for 5/5.5gens. I've searched other write ups and although the written information is there, the images have vanished. For me, I can interpret written info but images tend to help me much more to visualize what I need to do and what tools I will need to get together.
To start, I searched around for the best price, expecting to find it on eBay. Not even close. Found the best price at AutoZone - $60 for the set. I luckily had earned my $20 rewards so I got the bushings for $45 after tax. You may find there are two types of ES Bushings - red and black. They are effectively the same compound. However, the black has lubricant added (graphite) making it black and cutting down on noises. The red has no lubricant and is prone to squeeking and other rubbing noises.
So, here we go: First, jack up rear end of car and utilize jack stands. Pull off rear wheels. Remove brake calipers and brake pads and position pads so that you know which side they should be re-installed on. Disconnect the ebrake cables from the calipers, remove the c-pin thingy securing the cable, and unbolt the cables from the trailing arms then put the cables to the outside of the car (out away from the trailing arms). Disconnect the c-pin thingy from the brake line and set the caliper down on the ground beneath the gas tank...away from the rear beam and trailing arm.
Disconnect the abs sensor (both sides) at it's plug and unbolt the 10mm bolt that holds the sensor connector to the underbody. This way it simply comes out with the rear end.
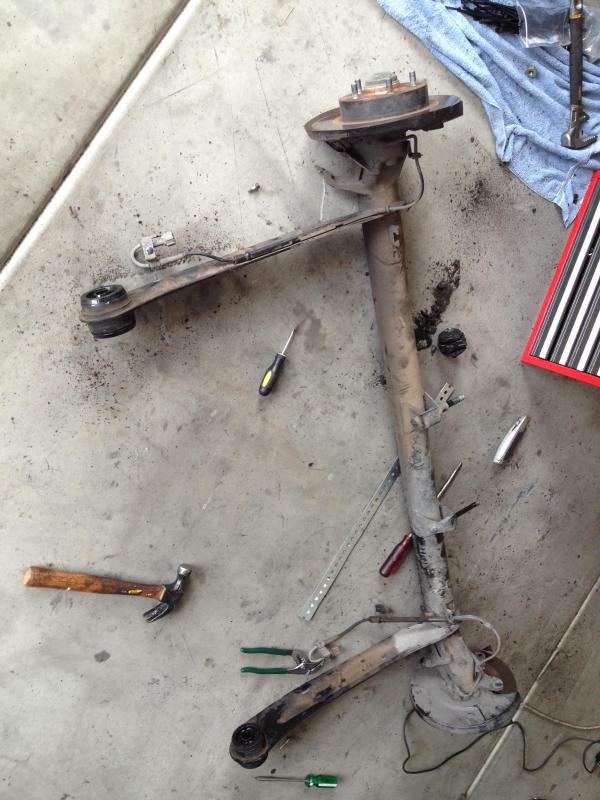
Working on one side at a time. Put a small jack up under the first side you work on, beneath the beam itself. Remove the trailing arm bolt. Remove the lower bolt from the strut. Then, I removed the top bolt to the rear link (where it bolts to the underbody). The side you have unbolted should not drop down and be resting on the jack. Keep it up close to stock position so as to not bind the other side. Now, do the other side. Here is an image of the rear beam on the second side. You can see the other side supported by the jack. You will naturally have to be carefull and not let this second side just drop. It's heavy, but one person can drop it by themself. If you are a weakling, then simply use a second jack under that side as well.

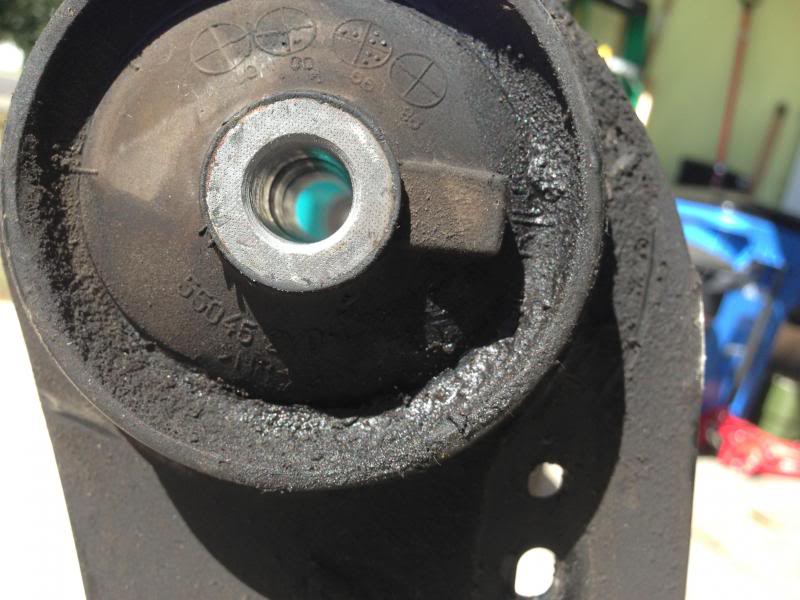
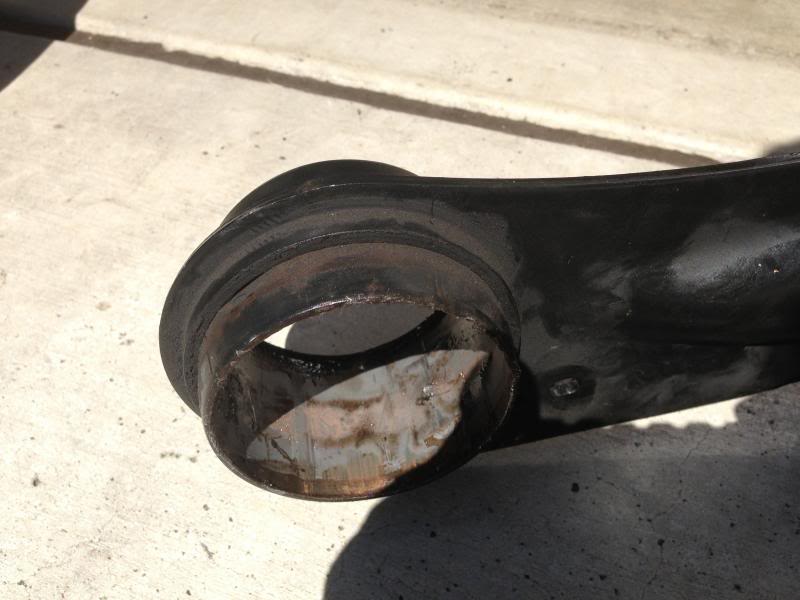
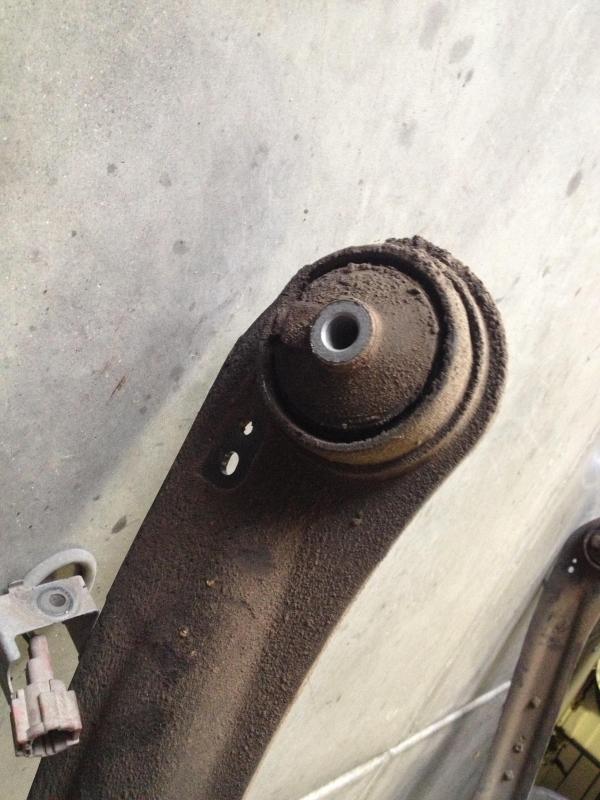
Here is what my old bushing looked like. Clearly leaking and damaged.

I was able to tear the rubber simply by using a screwdriver and rotating the bushing around, ripped right apart. Confirming it was time to do this!

Since July 4th is upon us, I figured I'd post a pick of some fireworks...well, fire. Yes, using a torch makes quick work of these buggers! Remember, these are filled with oil!

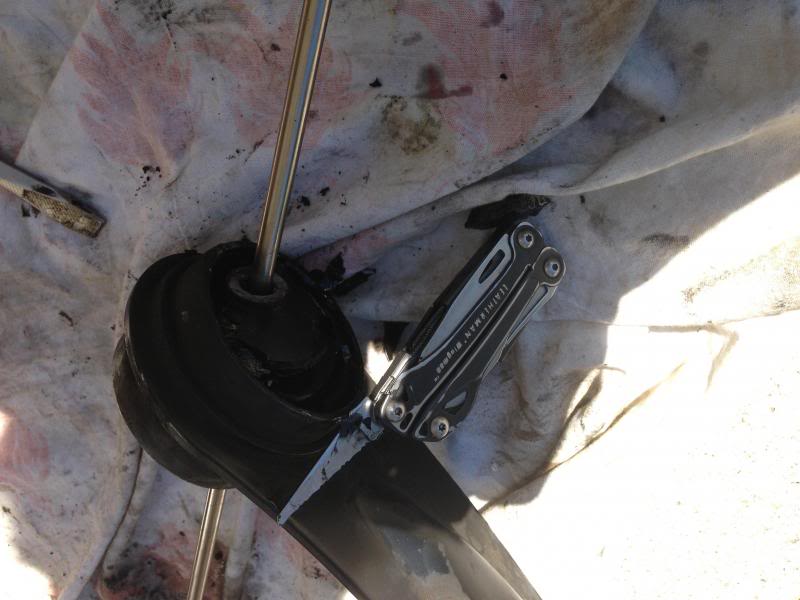
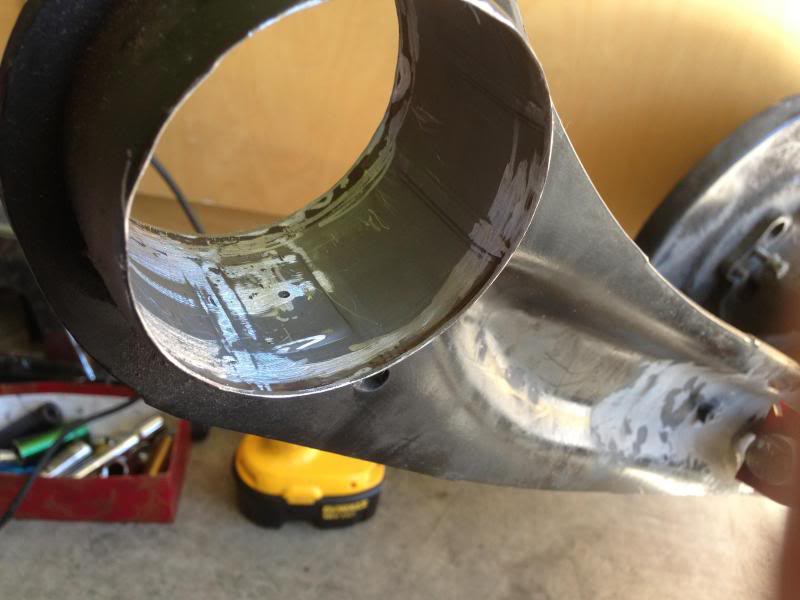
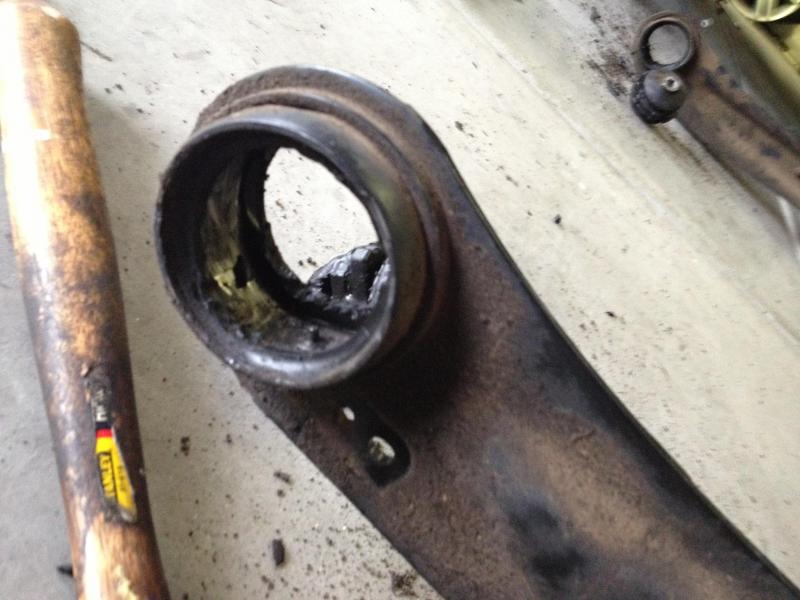
Here is what the bushing looks like removed. After torching, simply take a screwdriver and pry out. WARNING: Do not stand to either side of the trailing arm when pulling the old bushing out! Stand facing the rear beam so that when you remove the old bushing, it comes out to the left or right of you. This way you avoid getting splashed with oil, possibly boiling HOT oil since you just torched these suckers! Lets be safe!

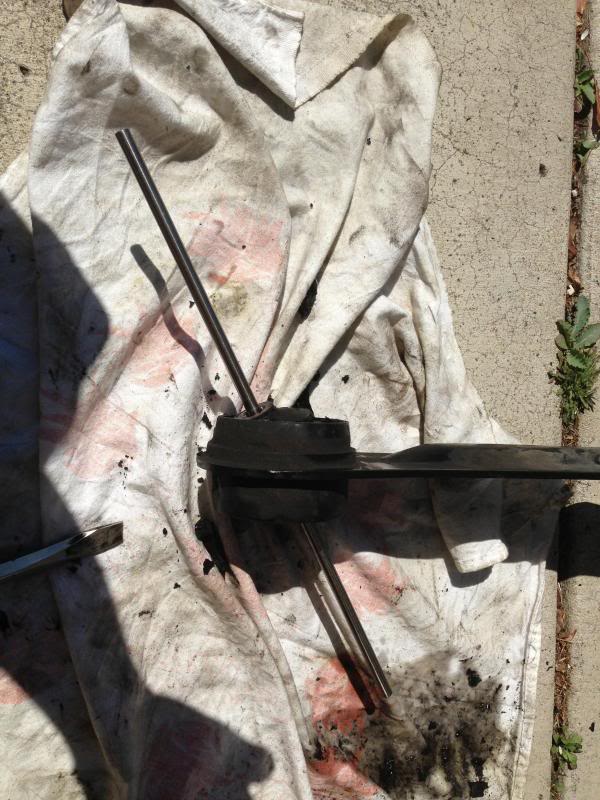
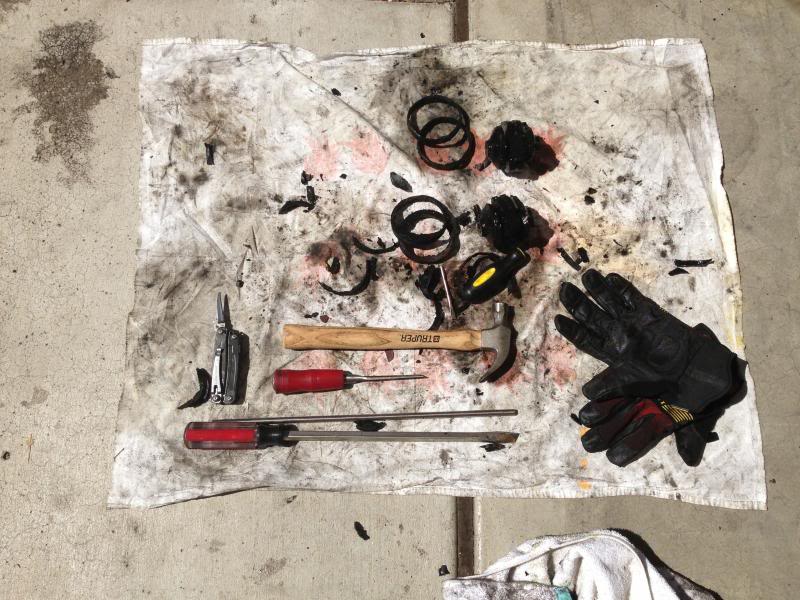
We are approaching the part that was absolutely the most frustrating and time consuming! First, there are two rings on each side of the trailing arm. You must take a screw driver or something and knock them loose. Once you have them crooked and with one end protruding from the arm, you can take a screwdriver and pry them out. Remember, there are two per side.


Here was the torture for me! After you remove the rings, there remains a metal lip on the outer openings of the arm housing. I was prepared with my dremel. However, I was either using the wrong stone or bit, obviously, becuase it took at least 1.5 hours to grind the metal down on both sides and for both trailing arms! Also, mind the two metal pins on the inside of each trailing arm. These MUST be grinded down as well. In any case, when you are done, it should look like this:

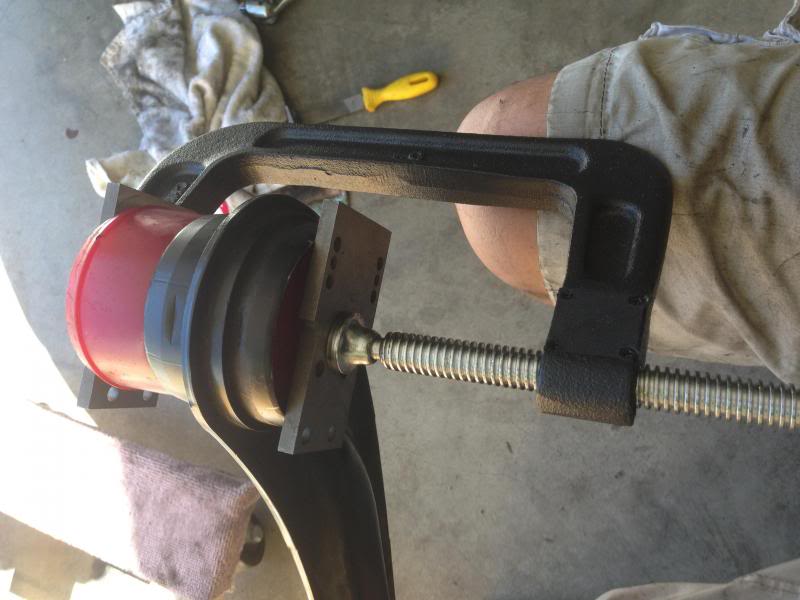
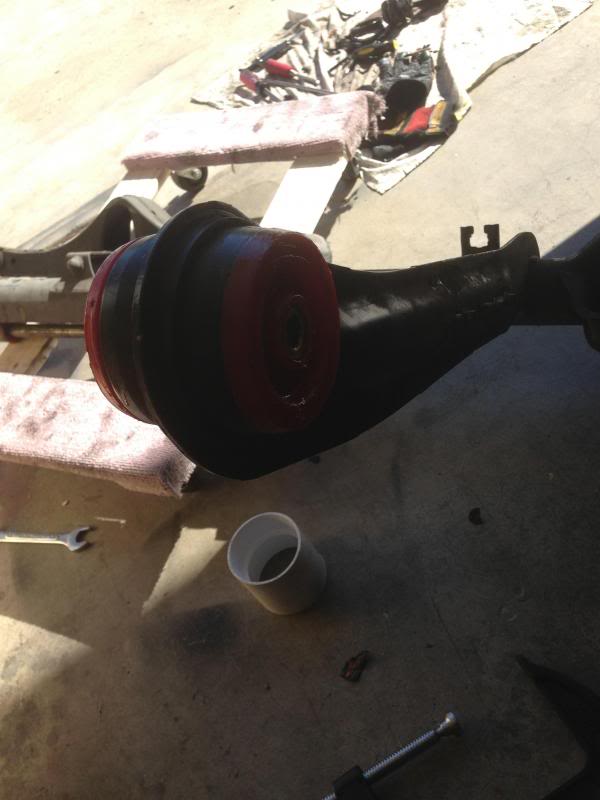
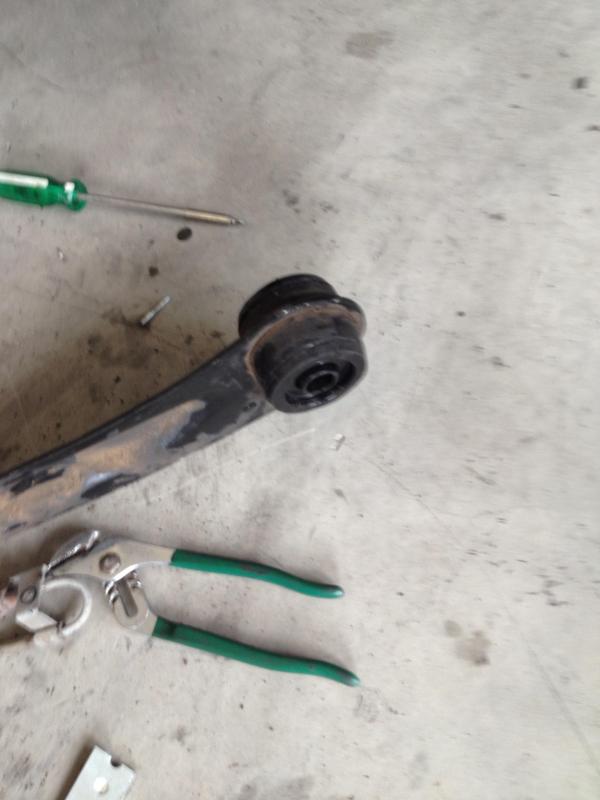
Afterward, you are now ready to install your new ES bushings. The instructions say to not lubricate the bushings. So, I got them started by hand, then used a BFH with my foot pressing against the other side and just pounded them into place. Others have used long bolts and tightened the bushings into place. That can work too,, and I highly recommend it! But, I would suggest using an impact to make quick work of it. You may still have to hammer the bushing in the remaining 2% of the way because the bushing does stick out from both sides. Once the Bushing is instaled, the ES comes with lube for the metal rod. I was able to press this through easily by hand.

Re-install everything. Repaint trailing arm, beam as you like. I added some fresh black to the arm and beam. I also repainted my Stillen sway bar where I dragged my beam out from under the car. To avoid this, having some cardboard down or little furniture rollers under each rotor would make this significantly easier!
Driving Impressions:
I can hear the bushings move against the brackets they sit tightly against, but only when I or a passenger is getting in/out of the car. I'm hoping that goes away!
Rattle and squeeking over bumps is no more! The rear end slop is GONE! I've not driven on back roads or interstate on/exit ramps, so can't speak more to rear end stability, but just having the noise and slop gone was worth all the work!
To start, I searched around for the best price, expecting to find it on eBay. Not even close. Found the best price at AutoZone - $60 for the set. I luckily had earned my $20 rewards so I got the bushings for $45 after tax. You may find there are two types of ES Bushings - red and black. They are effectively the same compound. However, the black has lubricant added (graphite) making it black and cutting down on noises. The red has no lubricant and is prone to squeeking and other rubbing noises.
So, here we go: First, jack up rear end of car and utilize jack stands. Pull off rear wheels. Remove brake calipers and brake pads and position pads so that you know which side they should be re-installed on. Disconnect the ebrake cables from the calipers, remove the c-pin thingy securing the cable, and unbolt the cables from the trailing arms then put the cables to the outside of the car (out away from the trailing arms). Disconnect the c-pin thingy from the brake line and set the caliper down on the ground beneath the gas tank...away from the rear beam and trailing arm.
Disconnect the abs sensor (both sides) at it's plug and unbolt the 10mm bolt that holds the sensor connector to the underbody. This way it simply comes out with the rear end.
Working on one side at a time. Put a small jack up under the first side you work on, beneath the beam itself. Remove the trailing arm bolt. Remove the lower bolt from the strut. Then, I removed the top bolt to the rear link (where it bolts to the underbody). The side you have unbolted should not drop down and be resting on the jack. Keep it up close to stock position so as to not bind the other side. Now, do the other side. Here is an image of the rear beam on the second side. You can see the other side supported by the jack. You will naturally have to be carefull and not let this second side just drop. It's heavy, but one person can drop it by themself. If you are a weakling, then simply use a second jack under that side as well.

Here is what my old bushing looked like. Clearly leaking and damaged.

I was able to tear the rubber simply by using a screwdriver and rotating the bushing around, ripped right apart. Confirming it was time to do this!

Since July 4th is upon us, I figured I'd post a pick of some fireworks...well, fire. Yes, using a torch makes quick work of these buggers! Remember, these are filled with oil!

Here is what the bushing looks like removed. After torching, simply take a screwdriver and pry out. WARNING: Do not stand to either side of the trailing arm when pulling the old bushing out! Stand facing the rear beam so that when you remove the old bushing, it comes out to the left or right of you. This way you avoid getting splashed with oil, possibly boiling HOT oil since you just torched these suckers! Lets be safe!

We are approaching the part that was absolutely the most frustrating and time consuming! First, there are two rings on each side of the trailing arm. You must take a screw driver or something and knock them loose. Once you have them crooked and with one end protruding from the arm, you can take a screwdriver and pry them out. Remember, there are two per side.


Here was the torture for me! After you remove the rings, there remains a metal lip on the outer openings of the arm housing. I was prepared with my dremel. However, I was either using the wrong stone or bit, obviously, becuase it took at least 1.5 hours to grind the metal down on both sides and for both trailing arms! Also, mind the two metal pins on the inside of each trailing arm. These MUST be grinded down as well. In any case, when you are done, it should look like this:

Afterward, you are now ready to install your new ES bushings. The instructions say to not lubricate the bushings. So, I got them started by hand, then used a BFH with my foot pressing against the other side and just pounded them into place. Others have used long bolts and tightened the bushings into place. That can work too,, and I highly recommend it! But, I would suggest using an impact to make quick work of it. You may still have to hammer the bushing in the remaining 2% of the way because the bushing does stick out from both sides. Once the Bushing is instaled, the ES comes with lube for the metal rod. I was able to press this through easily by hand.

Re-install everything. Repaint trailing arm, beam as you like. I added some fresh black to the arm and beam. I also repainted my Stillen sway bar where I dragged my beam out from under the car. To avoid this, having some cardboard down or little furniture rollers under each rotor would make this significantly easier!
Driving Impressions:
I can hear the bushings move against the brackets they sit tightly against, but only when I or a passenger is getting in/out of the car. I'm hoping that goes away!
Rattle and squeeking over bumps is no more! The rear end slop is GONE! I've not driven on back roads or interstate on/exit ramps, so can't speak more to rear end stability, but just having the noise and slop gone was worth all the work!


Senior Member
How hard was it to allign the new bushing to the bracket since the bushing is sticking out the housing quite a bit?
How many miles you got on your car before you changed to ES Bushing.
Thanks
How many miles you got on your car before you changed to ES Bushing.
Thanks
Bushing slides right between the brackets easily. Most of the issue getting the first side in was due to the beam being crooked. So I used my little jack to move it into place. Using the jack helped to stablize the trailing arm and align the bolt holes.
Car has roughly 175k miles and lowered two years ago.
Car has roughly 175k miles and lowered two years ago.

Senior Member
Greg Thanks alot for this ! This is a heck of project and a how-to like this really helps more than I can explain.
You are so right this will be common soon. Seen a few reads recently on this very subject. (link for reference)
http://forums.maxima.org/5th-generat...ml#post8812683
im at 158k lowered 80k and pretty sure original trailing arm bushings are on there
i am almost at a point where it is worse than sloppy.
Post your impressions after a drive or two !!!
Updated a few things left out, like where I found the best price - Autozone. Also addressed the difference between the red and black bushings offered. Black are embedded with graphite to reduce noises. So, IMHO, black is better.
Current impressions: Significantly less noise. Anything I'm hearing is (I beleive) the ebrak cables rattling against my Stillen sway bar mounts at times. Rear seems more solid, feels like the suspension is able to more effectively do its job. Body roll feels reduced, more controlled, and equal in both directions. Rear end just feels more stable. Not heard anymore bushing squeeks today. I figured it would take a few hundred miles for them to settle. Watch, they'll squeek a bit in the morning just to show me who's boss!!
I could only imagine the difference with someone who has their oem bushing completely obliterated. Mine were definately on their way out, but working.


Senior Member
Sorry to ask what may be a stupid question but how did you know to consider replacing the bushings? Was there any tell in the handling or do you have to visually inspect - presumably you have to jack up the rear and check for play with a crow bar.
The photo of the original bushing is a bit fuzzy. Was the tear/leaking that obvious? All I can see is a bit of oil buildup on the bottom right side of the bushing but does that have to come from an internal leak?
Thanks.
The photo of the original bushing is a bit fuzzy. Was the tear/leaking that obvious? All I can see is a bit of oil buildup on the bottom right side of the bushing but does that have to come from an internal leak?
Thanks.
Quote:
The photo of the original bushing is a bit fuzzy. Was the tear/leaking that obvious? All I can see is a bit of oil buildup on the bottom right side of the bushing but does that have to come from an internal leak?
Thanks.
Not stupid AT ALL. For me, I observed increased slop in the rear end and noise - clunking and squeeking. Some have reported clearer indications such as oil spots on the driveway beneath the bushing area. Now, keep in mind none of what I noted was enough to tell me for a fact. It was more a guess given my observations and the high mileage of the car. Originally Posted by ajahearn
Sorry to ask what may be a stupid question but how did you know to consider replacing the bushings? Was there any tell in the handling or do you have to visually inspect - presumably you have to jack up the rear and check for play with a crow bar.The photo of the original bushing is a bit fuzzy. Was the tear/leaking that obvious? All I can see is a bit of oil buildup on the bottom right side of the bushing but does that have to come from an internal leak?
Thanks.
Although the image of the stock bushing is a bit fuzzy, the oil on the right is clearly visable and confirmed it to be cracked, busted, and leaking....if perhaps only slight at the time. Indicating to me I caught them early. The bushings are oiled filled and there is nothing in the area which would cause them to otherwise be oily.
I don't think pushing on the rear will tell you anything. The bushing are designed to move and flex as part of the rear suspension design. A visual inspection in absence of other indicators, is necessary to confirm they are bad. However, I had already decided to do this from the beginning (even if they were found to visually look good) because the mileage of my car, I'm lowered, and I plan to keep the car.
Hope that helped.
Senior Member
Thanks for the very prompt reply. I've got 105k and lowered since about 8k but I haven't notice anything obvious. Its my daily drive and I'm afraid something like this would easily be missed over time. I'm still on my original struts and shocks so I'm starting to wonder if I'm just not paying attention.
Got to change the oil this weekend so I'll give it a look. These kind of step-by-step postings are a big help.
Got to change the oil this weekend so I'll give it a look. These kind of step-by-step postings are a big help.

Senior Member
The stock bushings are oil filled obvoisly.
Are the replacements also oil filled or solid rubber?
More and more I read the more I want to fix. lol
Are the replacements also oil filled or solid rubber?
More and more I read the more I want to fix. lol

I have some es bushings laying around for two years already that I might have to put in. Can you put the wheels back on right after unhooking the breaks in order to make it easier to drag the assembly out? I will also use this occasion to install my QTP link.

Junior Member
I did this about a year ago and it was a ***** of a job, but it made a HUGE difference in how my car drove. I feel like it totally transformed how fun my car was to drive, took all the slop and clunking out of the car. Paying someone to do this would prob be close to 1000 bucks but it's definitely doable at home if you have a decent tool set. This was my car in the middle of things:


Member
Easier way to get that junk out of it is a press. Takes like 1 minute. Got one at harbor freight and I continue to use it for wheel bearings, motor mounts, etc. I put mine on slightly bigger pvc or exhaust pipe and press it out. Also you can press new mount in a minute too. LOL
http://www.harborfreight.com/20-ton-...ess-32879.html
I got mine on sale for $149.99. I continue to use it so worth it!
The second easiest way (cheapest) way is to use a hole saw slightly under the size of the inside diameter of the mount to where it cuts the rubber out. Put it in a vice, then with a saw zaw cut through the first layer of metal in the inside of the mount in two parts. Chisel along the edge and pops out.
Quote:
Do you re use the TA pivot bolts and nuts?
Thanks
You re-use all the stock hardware. Originally Posted by Genes1s
Bumpin old thread...Do you re use the TA pivot bolts and nuts?
Thanks
Quote:
Are the replacements also oil filled or solid rubber?
More and more I read the more I want to fix. lol
The replacement bushings are solid rubber. Just ensure you get the black ones as they are designed not to "squeek."Originally Posted by Donkeypunch
The stock bushings are oil filled obvoisly. Are the replacements also oil filled or solid rubber?
More and more I read the more I want to fix. lol
Quote:
I guess you could put the wheels back on. However, unless you have the car up high enough, the rear end will sit too high to clear the underbody or even the tires clear the wheel well or back bumper. I think using wheel dollies or maybe two floor creepers or a couple little furniture dollies would work though. Originally Posted by McSteve
I have some es bushings laying around for two years already that I might have to put in. Can you put the wheels back on right after unhooking the breaks in order to make it easier to drag the assembly out? I will also use this occasion to install my QTP link.
Quote:
http://www.harborfreight.com/20-ton-...ess-32879.html
I got mine on sale for $149.99. I continue to use it so worth it!
The second easiest way (cheapest) way is to use a hole saw slightly under the size of the inside diameter of the mount to where it cuts the rubber out. Put it in a vice, then with a saw zaw cut through the first layer of metal in the inside of the mount in two parts. Chisel along the edge and pops out.
Hard way? Meh. Nothing hard about setting rubber on fire. AND it was fun (hear Beavis saying, "Fire, fire! Fire, fire!). Actually using muscles and drilling into oil filled pockets behind the rubber, that sounds like more work! Eh, honestly, its all good options. Beating the new bushings in though!? Oh yeah, that's hard. But, I'd rather spend 30 minutes pounding in the mounts with a hammer than spend $150 if I don't have to. As mentioned in my original post as well as other write ups, using a long bolt/nut and large washers is an easier way to press the new mounts in (easier than pounding in).... and are only a few bucks at Lowes. Originally Posted by melvinman2003
Easier way to get that junk out of it is a press. Takes like 1 minute. Got one at harbor freight and I continue to use it for wheel bearings, motor mounts, etc. I put mine on slightly bigger pvc or exhaust pipe and press it out. Also you can press new mount in a minute too. LOLhttp://www.harborfreight.com/20-ton-...ess-32879.html
I got mine on sale for $149.99. I continue to use it so worth it!
The second easiest way (cheapest) way is to use a hole saw slightly under the size of the inside diameter of the mount to where it cuts the rubber out. Put it in a vice, then with a saw zaw cut through the first layer of metal in the inside of the mount in two parts. Chisel along the edge and pops out.
The way I see it, others will want to save the unnecessary money as well associated with a press. Lets also keep in mind, not everyone has a big enough garage like you and I in order to add/store another peice of equipment.
Member
That press has saved me hundreds of dollars and the time saving is important. Mine didn't take up that much space but my garage is a two car and we got small cars. Not to mention when someone needs to use a press they can use mine and I usually get free lunch or something in return.
I probably worked on 8 other cars this past year. I am a magnet for fixing cars I guess. I always get suckered into doing something lol. I get paid in food, beer, cash, and trade so its all good.
I just see it as convenience you only have a short time on this earth. Might as well spend the money and gain time back in return. I found buying the tools pays off in the long run. My air tools make things so easy its hard to go back to beating things with a hammer LOL. If you do get a air chisel. They are awesome! I reconstructed my buddys gs400 with a air chisel and tig welder. Its been in like 5 accidents. We call it the car that never dies. LOL.
Senior Member
I'm in the middle of doing this. Got all the bolts and nuts loose, tomorrow I'll pull the axle out and start removing the old leaky bushings. Once I have the wheel off the first thing I do was washing the under carriage, brake, calipers, etc. This made it easier to work underneath without getting those brake dust and stuff getting on your face and eyes ( already wear safety glasses). For same reason my calipers are sticky, so we'll see what's going on when I get done with the bushing. I'm lucky I don't have rust on underneath. TA pivot came out in 5 minutes after multiple PB blasters. It's going to be long weakend, but it's worth it
So, I didn't know that the black one works better in term of no squeak, what can we done to minimize the squeak for the red ones.
So, I didn't know that the black one works better in term of no squeak, what can we done to minimize the squeak for the red ones.
Nothing can be done that I'm aware that wont get washed off when it rains. The black ones are that color due to the lube added/embedded in the rubber itself. I suppose you could apply some of that lube they send with the new bushings on the outside of the bushings and the inside of the brackets underneath the car. They send enough of that lube, you should have plenty.
Senior Member
Good job, Chris.
Always wanted to do this, but it kept slipping down the list of priorities, and then the car was gone. I've been trying to get merovi to do this on my old Maxima. And the passenger/tranny mounts, too.
Anytime you replace 10 year old bushings, it's a good thing.
 No, that's way off.
Always wanted to do this, but it kept slipping down the list of priorities, and then the car was gone. I've been trying to get merovi to do this on my old Maxima. And the passenger/tranny mounts, too.
Anytime you replace 10 year old bushings, it's a good thing.
Quote:
What? Originally Posted by Maxident
Paying someone to do this would prob be close to 1000 bucks
No, that's way off.Senior Member
Quote:
Once in a while. I kind of miss it. I see you're still having fun with your 5th gen.Originally Posted by Chris Gregg
Thanks! Good to see you still trolling the forums at times, Roch!
Stillen RSB, and ES bushing in the trailing arm. Have you considered the RSTB?
When I first bought the car I was looking for everything I could. But, as I modded, I found this is just such a different car then my '89 Maxima turbo. Some things I did to my '03 just didn't add positively to my driving enjoyment. Like I ended up removing the FSTB and front subframe collars. I decided about that point I just wasn't going to get anymore carried away with this car. Besides, my wife wants the car in the next year or so when my son starts driving. He will instead get her Liberty. I've also got my 260z project car, so I'm pretty much done with my '03 other than maybe a new shifter and Weathertech window visors, simple stuff.
Senior Member
RTA bushings are finally installed. Glad I bought spare OEM bolt and nuts since I stripped the lateral link nut when torque it to 83 ft-lb. I couldn't get the driver side TA pivot bolt to torque to spec, but I think it's close. I don't have tall enough jack stand and my torque wrench has 2 feet lever, so it was hard to manuver around. I bought extra SuperLube and lubed the brackets and the outside wall of the RTA bushings. I didn't even have to hammer in, just give it a good push and it went right in nicely. I didn't need to use torch to remove the rubber either. I used sharp serrated blade and walked around it few times till it was separated, then I used long screw driver to wingle it around till it pushed out. Once I took the metal retaining ring, the rubber just felt apart. I didn't lube the OD of the bushing since the instruction said not to do that. I did put a little at the lip just to get started. I used C-Clamp and PVC extention and worked real nice.

It's leaking but it wasn't as bad as I thought
I used these to get the center core out
This was what it looked like after the metal rings were take out, pretty clean actually
Grind the lips
Pressed in new bushings
Driving impression:
I felt every bumps, crevices, rocks, etc it was kinda weird at first. Going to rail road crossing was also bumpy like airplane turbulance sort if. Cornering was awesome. Going 35 mph on 15 mph hair pin wasn't so scary anymore. It is actaully oversteer a little now...but maybe that's just my perception. The front still feel sloppy, but I hope that would change when I replace all the bushings with every available ES.
Overall it wasn't too bad, no air and fancy tool, just regular ratchets and tools. Took me about 9 hours from start to finish including cleaning, dinner, lunch, replacing brake pads, chassis lube, and few beers.
I'm sore now........
Senior Member
can you double clarify which bolts and nuts you bought spares for in anticipation of the originals breaking?
Im guessing the bolts through the actually bushings.
What did you use the PVC extension for exactly? during the c-clamp process?
Thanks for all the pics, the more pics on this topic the better. It is a huge job and will save org members many many dollars if they can do it themselves.
Been in need to do mine for a while now.
Quote:
Great work! Great images!Originally Posted by Genes1s
I didn't lube the OD of the bushing since the instruction said not to do that.
To clarify a suggestion I had made on the red bushings about lubrcating them. You are absolutely right, you should NOT lube the outer part where the bushing is held in place by the torque arm. I was speaking to the part exposed AFTER installing, that makes contact with the under carriage brackets, just like you noted doing in your post.
Just wanted to ensure I had not confused anyone looking to do this. You DO NOT want to lube the drum surface where it is held in place by the TA.
Senior Member
Quote:
Im guessing the bolts through the actually bushings.
What did you use the PVC extension for exactly? during the c-clamp process?
Thanks for all the pics, the more pics on this topic the better. It is a huge job and will save org members many many dollars if they can do it themselves.
Been in need to do mine for a while now.
Pretty much 3 bolts nuts, 2 for the nes that go thru the bushings, and one for the lateral link that attach the panhard arm to the body. The bolt is $8 a piece at the delearship! Crazy..Originally Posted by Prophecy99
can you double clarify which bolts and nuts you bought spares for in anticipation of the originals breaking?Im guessing the bolts through the actually bushings.
What did you use the PVC extension for exactly? during the c-clamp process?
Thanks for all the pics, the more pics on this topic the better. It is a huge job and will save org members many many dollars if they can do it themselves.
Been in need to do mine for a while now.
The PVC is the one you find at the homedepot the 3" coupling hub ( Inside Dia is 3.25"). you only need the last .5"- .75" of travel so get the shorter e one if you can so can use smaller C-clamp. Smaller C clamp is easier to set and hang on to.
Get 2 floor jacks, one on each side to raise and lower the assy to alligator the trailing arm to the mounting bracket, this made the installation a lot easier trust me.
Raise the car a little higher on the jack stand so you can toque the bolt easier, you need the clearance to move/swng around your torque wrench when torquing it.
One more thing, once I raised car on the jack stand, I cleaned clean all the dust,debris, road junk as much as you can, and in my case I gave good quick wash. This helped me to get up close without getting too much dust in my eyes and nose ( already with safety glasses). Once cleaned, I gave a good spray with PB blasters.
On a side not...sell me your LTB..


Newbie - Just Registered
Hey, I've been a lurker here for quite awhile and really stumbled across this thread and was wondering what may be a noob question. My 2002 Max is a GLE and the rear right bushing has gone bad. From what I was told, its about a grand to repair/install. That was some time ago so I may not be completely accurate on that. However, the mechanic also told me its not bad enough for me to have to fix it any time soon, only to do so if I were planning a long trip.
Basically what I mean to ask is, is this the same way you would go about repairing my 02 GLE? Someone told me that depending on the model, its much easier to fix.
Basically what I mean to ask is, is this the same way you would go about repairing my 02 GLE? Someone told me that depending on the model, its much easier to fix.
Quote:
Basically what I mean to ask is, is this the same way you would go about repairing my 02 GLE? Someone told me that depending on the model, its much easier to fix.
Andrew, Originally Posted by Andrew9mb
Hey, I've been a lurker here for quite awhile and really stumbled across this thread and was wondering what may be a noob question. My 2002 Max is a GLE and the rear right bushing has gone bad. From what I was told, its about a grand to repair/install. That was some time ago so I may not be completely accurate on that. However, the mechanic also told me its not bad enough for me to have to fix it any time soon, only to do so if I were planning a long trip. Basically what I mean to ask is, is this the same way you would go about repairing my 02 GLE? Someone told me that depending on the model, its much easier to fix.
Yes, this would be the same for any 2000 thru 2003 Maxima. For some reason I want to say its the same or similar to the '95 thru '99 as well.
For $1k, I'll personally drive to your home, cook you breakfast, buy all the parts needed, replace your control arm bushings, bake you a cake, and drive home. Yeah, that's too much IMHO.
Really, where in TN are you?
Senior Member
Quote:
Yes, this would be the same for any 2000 thru 2003 Maxima. For some reason I want to say its the same or similar to the '95 thru '99 as well.
For $1k, I'll personally drive to your home, cook you breakfast, buy all the parts needed, replace your control arm bushings, bake you a cake, and drive home. Yeah, that's too much IMHO.
Really, where in TN are you?
Originally Posted by Chris Gregg
Andrew, Yes, this would be the same for any 2000 thru 2003 Maxima. For some reason I want to say its the same or similar to the '95 thru '99 as well.
For $1k, I'll personally drive to your home, cook you breakfast, buy all the parts needed, replace your control arm bushings, bake you a cake, and drive home. Yeah, that's too much IMHO.
Really, where in TN are you?
 . I went to get a quote to do this same job and they said, quote " oh..there is no way to replace the bushing, you need to get replace the whole assy".
In my 20+ years with Maximas, the main thing I learned is that mechanics and most times even the dealers/parts depts are ignorant about these cars. Naturally, I don't expect every mechanic to know everything (and I surely don't), though I do expect that I will have to tell/teach them about things specific to these cars.
Ex: spoke to a "mechanic" this past weekend in passing, who swore the old VG engines had hydrolic timing tensioners. He tries to argue with me. I'm just glad the conversation was in passing and not someone I needed to work on any of my cars!
I think I about heard it all though after seeing someone post in the local for sale adds for a two door Maxima.
Senior Member
Quote:
........(see above)..................
......sell me your LTB..
Thanks for the clarification, and extra detail in reinstalling the assembly once you replace the bushings. It is quite a task but worth doing instead of dishing out $1,000 for a shop to do it.Originally Posted by Genes1s
Pretty much 3 bolts nuts, 2 for the nes ............(see above)..................
......sell me your LTB..
If I ever decide to sell it you'll be the first to know, and by the way it is one of my fave mods.
Check out Ultra Racing, they sell a LTB just not as nice
I am looking into their side lower bars.
Senior Member
Quote:
If I ever decide to sell it you'll be the first to know, and by the way it is one of my fave mods.
Check out Ultra Racing, they sell a LTB just not as nice
I am looking into their side lower bars.
I've seen those, but I'm not sure if it is any good, they looked wimpy and closer look revealed that weld joint is a suspect. I'm making my own for now, hope to get tube bender, notcher, and welder this weekend.Originally Posted by Prophecy99
Thanks for the clarification, and extra detail in reinstalling the assembly once you replace the bushings. It is quite a task but worth doing instead of dishing out $1,000 for a shop to do it.If I ever decide to sell it you'll be the first to know, and by the way it is one of my fave mods.
Check out Ultra Racing, they sell a LTB just not as nice
I am looking into their side lower bars.
Newbie - Just Registered
Quote:
Yes, this would be the same for any 2000 thru 2003 Maxima. For some reason I want to say its the same or similar to the '95 thru '99 as well.
For $1k, I'll personally drive to your home, cook you breakfast, buy all the parts needed, replace your control arm bushings, bake you a cake, and drive home. Yeah, that's too much IMHO.
Really, where in TN are you?
Its nice to see someone from Tennessee!Originally Posted by Chris Gregg
Andrew, Yes, this would be the same for any 2000 thru 2003 Maxima. For some reason I want to say its the same or similar to the '95 thru '99 as well.
For $1k, I'll personally drive to your home, cook you breakfast, buy all the parts needed, replace your control arm bushings, bake you a cake, and drive home. Yeah, that's too much IMHO.
Really, where in TN are you?
Ha, I appreciate the offer. I may take you up on it eventually.I'm in Murfreesboro/Smyrna. I talked to my Dad (has worked at nissan for 20+ years) and he told me that he would email this link to our Mechanic friend (also from Nissan) and see what exactly he would do. I believe what he mentioned is that the trailing arm is sometimes welded to the rear axle and sometimes not.
Well, I would say it is ALWAYS welded together, that's just the design of the Maxima trailing arms. Also why the whole thing has to be dropped and dragged out from under the car in order to change the bushings. I would pay money to see a rear beam attached to the trailing arms on the Maxima in ANY way other than welding from the factory.

I did today on my 00'. The bushings were completely toast. No oil in them at ALL! This car has less than 200k on it. I did not have to torch the rubber out. I used a dremel to create a slit in the ring and they came out easy.. Grinding was easy as well. I do not have a press, so I used a hammer to push the ES bushings in. I was able to complete this in 3.5 hours.


Member
Anyone have an autozone product number? Id like to replace this on my 4th gen if I can... I cannot seem to find it though.
Courtesy doesnt list a part number.
http://www.courtesyparts.com/maxima-...1873_1877.html
Courtesy doesnt list a part number.
http://www.courtesyparts.com/maxima-...1873_1877.html
There is no OEM replacement that I'm aware of.
I don't have a part number, but you should be able to put in make and year of your car, then do a part name search for "ES" or "trailing arm." I know I went down to Autozone and they pulled it right up. Cheapest price I'd found. However, I want to say if you just google the ES part number, its the same in the
Autozone system.
Member
Found the part at autozone like you said
http://www.autozone.com/autozone/par...9_253662_5934_
edit: for the 4th gen these don't fit, for the 4th gen the ES part number is 7.3120
link:
http://www.energysuspensionparts.com...sp?prod=7.3120
http://www.autozone.com/autozone/par...9_253662_5934_
edit: for the 4th gen these don't fit, for the 4th gen the ES part number is 7.3120
link:
http://www.energysuspensionparts.com...sp?prod=7.3120