
Painted Headlight Mod

Originally Posted by NismoMax80
Looks great, i knew it would on white.
i don't think waiting for the paint to "gas out" is at all extreme.
What about a CF hood??
i don't think waiting for the paint to "gas out" is at all extreme.
What about a CF hood??
I am working on a photoshop version of this... i would love a CF hood.. I will be painting my top of the car black in the next 1-2 years...(school comes first, ARG!!)

Joined: May 2005
Posts: 10,197
From: Displaced New Yorker in Southern, MD
Great job, I may go dark on red. I have decided that with my new RedLineMax bumper, I am going with the powder coated black bumper for a more agressive look. Again, looks great dude...

Joined: May 2005
Posts: 10,197
From: Displaced New Yorker in Southern, MD
Originally Posted by Redmax
chris if you want we can pain the inside of your headlights body color


Originally Posted by DeusExMaxima
It really isnt too hard, but its true, you have to go SLOOOOOW and block out a lot of time. My only hitch was that I didnt let them dry long enough and I am getting some haze on the inside. It doesnt appear to be water and its not getting worse. I think I can take the headlights out and get a microfiber cloth in there to wipe it down. But its a great mod, epsecially on darker cars. I believe the best look is body color.

Originally Posted by hpric
Dang, I'd be too nervous to throw these in the oven
LOL.. i swear you and chern are funny.. REALLY guys, the OVEN is the LEAST of your worries trust me.. You can ask Deus the same, and i bet he would agree.. Its when you take it out you have to be careful.. Just use towels or non abrasive gloves (non-nylon DUH!!).. Really, really easy.
Guys i really have to tell you, that i have never done something like this. First time, for ANY BIG PROJECT. And all i did was follow DeusExMaxima's original instructions.. It needs to be tweaked a bit, but i am sure it was his first time doing it himself, and left out domething, and left in the important points. My next write up will included things that might seem OVER Extreme, but this is to encourage those of you that are thinking about doing this themselves.
I tell you one thing, i am glad i did this. It was an exciting project, and i feel good that i did it myself (all but the Painting, that i left to the pro's).. I recomend using a pro to do the painting. Again you can do this ALL BY yourself, but i found it less stressful if i let a TRUSTED PRO, do the painting for me.. Plus they can use the better paints, High Temp. The 'can' stuff can be tricky, and will take multiple coats, and alot of patients. For myself, i just dropped it off and waited till they worked out the kinks. One of my headlight's interior part was giving them a serious prob. Keep getting "fish eyes". This is a process where the paint does not want to adhere to the material. You have to sand it out all over again, and re-apply it. They had to do it a couple of times. Again i have stated this earlier, and applogize for the repeat, but i wanted to make sure to explain WHY, i encourage those of you to atleast get someone you trust to paint them instead.
Just TAKE YOUR TIME, your REALLY, REALLY need to have time to do this, as in a very patient mind, and steady hand. It took me about 2-3 weeks to do mine, and most of that time it was sitting around. took about 1 - 2 1/2 hours to take them apart, including getting it ready for the oven. 250 degrees is not that high, but it will burn you if you are not careful. Have some knee pads ready, lol.... If i had to do this again i might use a small pillow for the hot headlight to help stabilize it, but you have to becareful of the tabs, but i think it would be a better choise than the hard floor....
 I broke one, but it dod not hurt the headlight, nor when they installed it in my car.. they (Dealership) were sure to Mention that on the paperwork... man i need a lift...ARG!!
More Later...
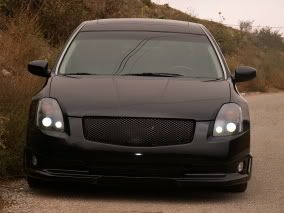
Oh yeah Deus, that pic is one of my fav... looks like a black panther waiting for its prey. GrOWL!!!!

Originally Posted by KCmaxx
Post some more pics... Both pages of your cardomain are the exact same. Id like to see a few more side and frontal angles.
Sorry bro skipped your post.. I should have more pics soon. I have taken them, just havent loaded them.. I am at work and i tried loading them on the computer here, but its Windows2000, and doesnt have the driver it needs. ARG.. Cant download it here. Oh, well, ill have to wait till i have the time.. LAter..

One thing it's not clear to me and sorry for bumping this. But Im in the middle of doing this and Im stuck. Do you remove the entire fog light assembly?? or just the bulb and spring and leave the rest in there??


I used all these for mine. I will post pictures later but it came out really glossy.
Scuffed up the headlight, whipped it with thinner then applied 2 coats of Self-Etching Primer. Then two coats of filler primer and last 3 cots of VHT high temperature engine enamel.


With Filler Primer

With Self Etching Primer

With Engine Eamel

Scuffed up the headlight, whipped it with thinner then applied 2 coats of Self-Etching Primer. Then two coats of filler primer and last 3 cots of VHT high temperature engine enamel.
With Filler Primer
With Self Etching Primer
With Engine Eamel
Last edited by RAZ76; Nov 1, 2009 at 09:08 AM.

Looks good Raz, can't wait to see the final outcome.
I used all these for mine. I will post pictures later but it came out really glossy.
Scuffed up the headlight, whipped it with thinner then applied 2 coats of Self-Etching Primer. Then two coats of filler primer and last 3 cots of VHT high temperature engine enamel.
With Filler Primer
With Self Etching Primer
With Engine Eamel
Scuffed up the headlight, whipped it with thinner then applied 2 coats of Self-Etching Primer. Then two coats of filler primer and last 3 cots of VHT high temperature engine enamel.
With Filler Primer
With Self Etching Primer
With Engine Eamel
I finished them last night and they look a lot better. Now I need some black tails. Thanks to the guys that took the time to make the how to for this. Helped a lot.
I also painted the grill black and removed the bottom billet grill.
Before:

After:


I also painted the grill black and removed the bottom billet grill.
Before:
After:
Last edited by RAZ76; Nov 1, 2009 at 10:35 PM.
Your headlights looks good, i wish I can do my headlights like that, but i'm too chicken **** to do it, LOL. Are you going to black out your corner lights next? And the grille looks good too. 

You talking about the bumper ones?? Not sure yet. Would like to switch to the 07 front but doing more research on that. Next Im doing lowering springs and then I want to tackle the Intake and full exhaust. I have a 6speed, Im in desperate need of good sound coming from it. I just did the heads because it was easy and had the materials to do it.
Last edited by RAZ76; Nov 1, 2009 at 09:16 PM.

You talking about the bumper ones?? Not sure yet. Would like to switch to the 07 front but doing more research on that. Next Im doing lowering springs and then I want to tackle the Intake and full exhaust. I have a 6speed, Im in desperate need of good sound coming from it. I just did the heads because it was easy and had the materials to do it.
Wow thats a good deal!


Member

Joined: Jun 2009
Posts: 43
From: Bartlett, TN
OK. All the "How To's" I've seen for dissambly of the 6th gen headlight are for factory HID housings. I have halogen housings and although most of the procedure will still be the same, I can tell you thst the removal of the headlight reflector housing is enough to make God curse! I have a moistere problem so I decided to dry them out and paint them at the same time. I have both left and right side removed, all the bulbs and wireing harness removed from the first assembly. I removed the 4 screws that hold in the headlight reflector, but there is no way that thing will fit through the hole in the back of the hoising. What am I doing wrong? Can anyone steer me in the right direction? any help is appreciated.
Last edited by goodmike; Dec 20, 2009 at 12:41 PM.

Member
Joined: Jun 2009
Posts: 43
From: Bartlett, TN
So I sloved the problem in #73. My fault. Every thing is dissambeled and painted. Looks great. I'd post pictures if I knew how...one learning experience at a time. My question now is do I have to remove any of that sticky black crap that holds the cover over the housing and install new, or do I keep what's there, heat it up and press it back together. Don't forget, I'm not a real idiot but I have played one on TV.


Last edited by SmokinMaxSE; Jan 19, 2010 at 04:00 PM.
Send them by mail to Maxxpower. www.maxpowercustoms.com