Rear mesh valence idea
 05-21-2008, 04:23 PM
#1
Supporting Maxima.org Member

Thread Starter
iTrader: (1)
Join Date: Nov 2004
Location: Upland CA
Posts: 7,353
Rear mesh valence idea
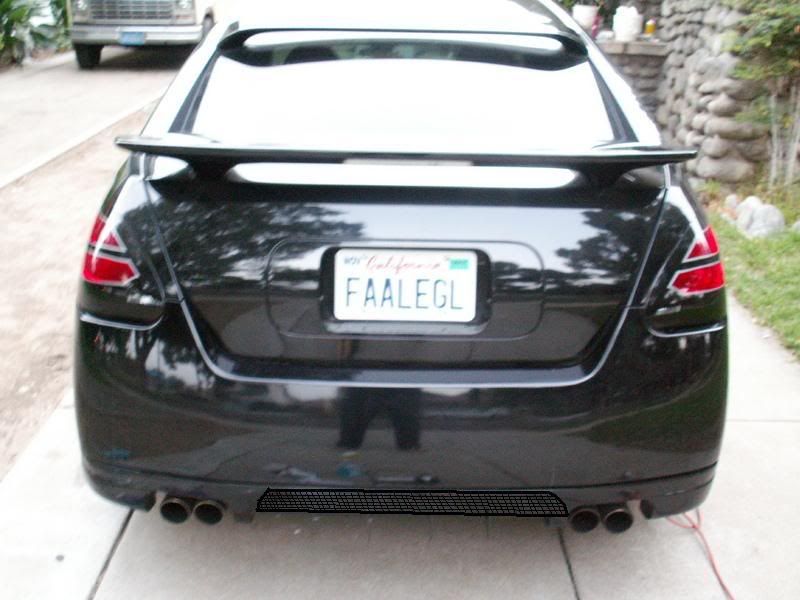
I always though the rear of the Maxima looked kind of bulky. Without a total redesign, I have been thinking of ways to shrink down the look of the car. In 07, of course, a crease was added to the bumper and a cut out of sorts was added as well. Many of you know I had been working on a rear valence like the new GTR, but it was a LOT of work and skill and I had a hard time with it
Sooooooo, I thought, why not have a mesh insert placed between the exhaust tips on the rear bumper much like this horrible picture

What do u guys think? Feel free to do a better job with photoshop and maybe using a different picture.
Here is another try:
Sooooooo, I thought, why not have a mesh insert placed between the exhaust tips on the rear bumper much like this horrible picture
What do u guys think? Feel free to do a better job with photoshop and maybe using a different picture.
Here is another try:
Last edited by DeusExMaxima; 05-21-2008 at 04:41 PM.
 05-21-2008, 05:31 PM
#4
 05-21-2008, 08:13 PM
#6
Supporting Maxima.org Member
Thread Starter
iTrader: (1)
Join Date: Nov 2004
Location: Upland CA
Posts: 7,353
The stryrofoam bumper core is there, but Im sure it could be painted black. There is a function to the mesh in that air that would otherwise be caught by the bumper in a parachute effect would instead pass through the mesh. Also, I would paint the mesh black.
05-21-2008, 09:10 PM
#7

Whats happening between the rear lights and trunk, it looks like you got a crease/line from something, what is it cause both sides have it.
Will cutting a hole in the rear bumper really make it look less bulky, I like the bulkiness, I've always felt the front is to sculpted and narrow and does not flow with the rear, probably why I'll eventually put a new front bumper on.
Will cutting a hole in the rear bumper really make it look less bulky, I like the bulkiness, I've always felt the front is to sculpted and narrow and does not flow with the rear, probably why I'll eventually put a new front bumper on.
05-21-2008, 09:24 PM
#8
Supporting Maxima.org Member
Thread Starter
iTrader: (1)
Join Date: Nov 2004
Location: Upland CA
Posts: 7,353
Whats happening between the rear lights and trunk, it looks like you got a crease/line from something, what is it cause both sides have it.
Will cutting a hole in the rear bumper really make it look less bulky, I like the bulkiness, I've always felt the front is to sculpted and narrow and does not flow with the rear, probably why I'll eventually put a new front bumper on.
Will cutting a hole in the rear bumper really make it look less bulky, I like the bulkiness, I've always felt the front is to sculpted and narrow and does not flow with the rear, probably why I'll eventually put a new front bumper on.
05-21-2008, 09:57 PM
#10
Supporting Maxima.org Member
Thread Starter
iTrader: (1)
Join Date: Nov 2004
Location: Upland CA
Posts: 7,353
Cut edge could be covered by a frame of some kind. I thought about going above the lower crease too a little bit. Any thoughts from anyone? Photoshops???
Last edited by DeusExMaxima; 05-21-2008 at 11:02 PM.


 05-22-2008, 03:12 PM
#18
Supporting Maxima.org Member
Thread Starter
iTrader: (1)
Join Date: Nov 2004
Location: Upland CA
Posts: 7,353
I think the black mesh looks more stealth but it could be done with silver mesh on the right car. Again, I think it functions to let air pass through instead of getting caught on the bumper, like a parachute, hence "the parachute effect".

 05-22-2008, 06:24 PM
#22
Supporting Maxima.org Member
Thread Starter
iTrader: (1)
Join Date: Nov 2004
Location: Upland CA
Posts: 7,353
I'm trying to figure out how to make a frame for the valence so it covers the edge that I cut on the bumper and then the mesh will attach to the frame. Any ideas?
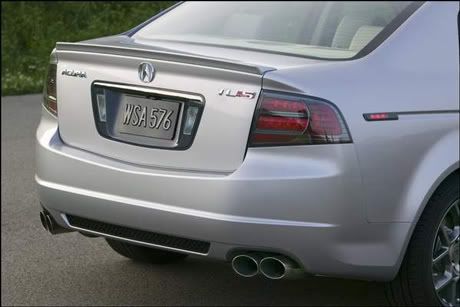
Here is a pic from Summit racing website of street scene rear valence on a Ford Fusion:

Here is a pic from Summit racing website of street scene rear valence on a Ford Fusion:
Last edited by DeusExMaxima; 05-22-2008 at 06:33 PM.
05-22-2008, 06:44 PM
#23
Why not just cut out the shape in the bumper, but leave 1/2" to 1" of the lower bumper intact?
All you need to keep the mesh in place is 3m double sided tape. It's what holdin strong on my front.
All you need to keep the mesh in place is 3m double sided tape. It's what holdin strong on my front.
05-22-2008, 08:46 PM
#25
Cut within an 1/8" from where you want your final cut with the cut off discs of a dremel. Then switch to the cylinder shaped sanding attachment to get a smooth even edge. Then apply the trim piece.
From the backside of the bumper apply 3m doublesided tape, put mesh on, then sandwich the mesh with another layer of tape. And your done. No need to paint.

 05-22-2008, 11:11 PM
#27
Supporting Maxima.org Member
Thread Starter
iTrader: (1)
Join Date: Nov 2004
Location: Upland CA
Posts: 7,353
The only problem I see with the border is what to do with the ends as there would be a gap of some kind. The opening will be about 26" on top and 24" on bottom. Any suggestions as to how to blend in the ends of the border?
05-23-2008, 03:05 PM
#31

 05-23-2008, 03:12 PM
#32
05-23-2008, 03:56 PM
#34
Use a dremel tool w/ the metal cutting disc's. to get within 1/8" to 1/4" from where you want the final cut.
Then switch the disc's to the cylinder shaped sander to cut and sand to the point you want to end up at. Take your time so the dremel doesn't get away from you and mess up the paint.(taking your time, you'll probably be done in 1/2hr) I suggest a variable speed dremel at about 1/2 to 3/4 of it's max rpm.
If you didn't already invest in a dremel, do it, it's a tool I end up using about 5-10 times in a month.
05-23-2008, 03:58 PM
#35
Make sure you leave enough room on the bottom for the width of your 3m tape you'll use to hold it on. If you run the edge of the tape to the cutout you'll see the grey tape. (which you can hide later w/ touch up paint)
05-23-2008, 04:50 PM
#36
Supporting Maxima.org Member
Thread Starter
iTrader: (1)
Join Date: Nov 2004
Location: Upland CA
Posts: 7,353
I do have a dremel. I went to Autozone and they had two types of door guard, the stick on type and the U shaped kind. NOt sure if its long enough as it comes in 2 27" strips. I may have to shorten the opening in order to accomodate these strips.
05-23-2008, 05:03 PM
#37
Get another box, and take your time cutting the ends of the top and bottom trim pieces at angles, then add seperate short peices to the side to line up at the angles of the top and bottom. On my front bumper, I had them meet up in the middle and you cant see the seam unless your less that a foot away.
05-23-2008, 05:22 PM
#39


