
Interior LED Modd


Interior LED Modd
Hey guys,
For all of you who want the LED Conversion modd to get rid of that orange and change the color. E-mail me at thealliance43@yahoo.com
Will be done within a week OR SOONER!!!
Thanks for the pix, 04 Max Illin.
$500.00 Full Modd
HOLIDAY SALE!!! $400 MODD PRICE ENDS DEC. 21st!!!
HAPPY HOLIDAY'S GUYS!!!
the LED MODD will include the following to be sent to me/or dropped off:
-Screen
-Speedometer
-Radio Controls
-A/C Heat Controls
-All Four Doors
Your car will operate fine without these pieces in them.... So the turn around time will be about a week
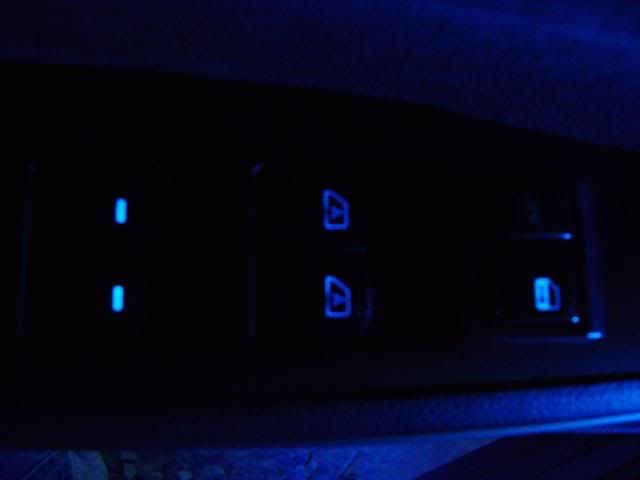
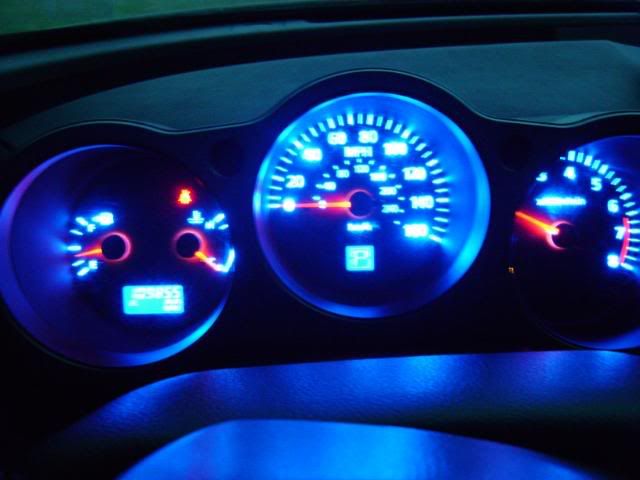
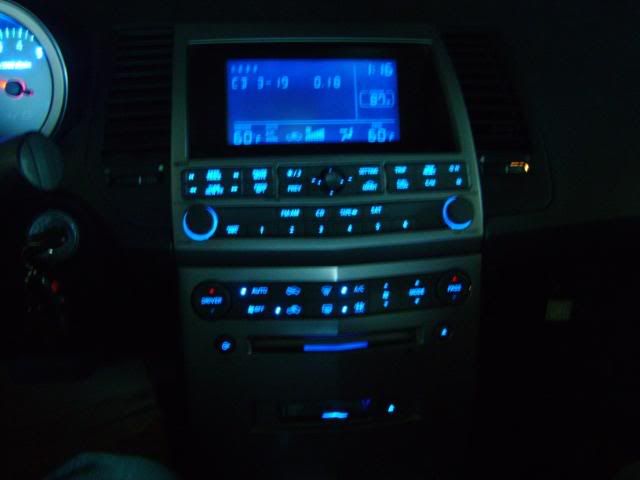
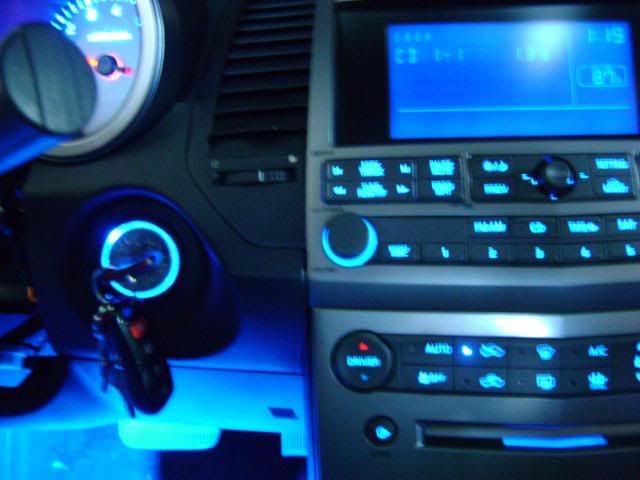
Check with me if you want a different color than blue. I personally think the blue looks the best. I recently just did Castor Troy's (6thgenmaxima.org) Interior and it came out perfect as well as my own. Also Requires Shipping at buyers expense. These are pix from my car after the modd. Please only email me when your ready to do the modd. Thanks
-Brian
PLEASE NOTE:
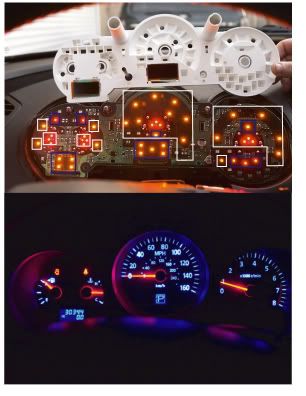
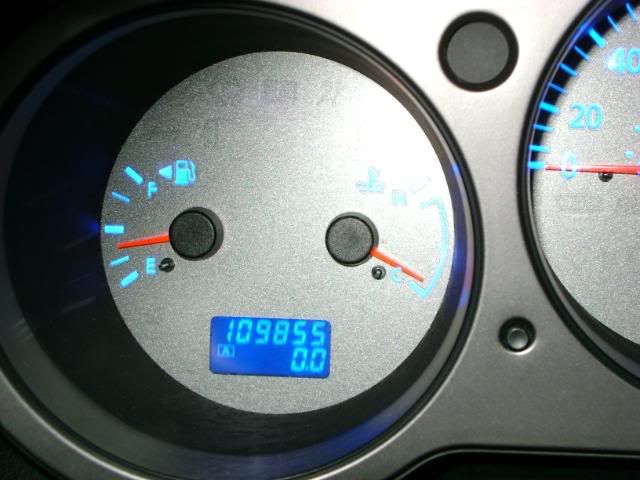
Keep in mind that the "hotspots" you see are in the speedometer. This is normal and part of the modd... As of right now there's no way to fix this. Some places is where the leds are directly emitted through your speedometer.


please only serious inquirers only.
For all of you who want the LED Conversion modd to get rid of that orange and change the color. E-mail me at thealliance43@yahoo.com
Will be done within a week OR SOONER!!!
Thanks for the pix, 04 Max Illin.
$500.00 Full Modd
HOLIDAY SALE!!! $400 MODD PRICE ENDS DEC. 21st!!!
HAPPY HOLIDAY'S GUYS!!!
the LED MODD will include the following to be sent to me/or dropped off:
-Screen
-Speedometer
-Radio Controls
-A/C Heat Controls
-All Four Doors
Your car will operate fine without these pieces in them.... So the turn around time will be about a week
Check with me if you want a different color than blue. I personally think the blue looks the best. I recently just did Castor Troy's (6thgenmaxima.org) Interior and it came out perfect as well as my own. Also Requires Shipping at buyers expense. These are pix from my car after the modd. Please only email me when your ready to do the modd. Thanks
-Brian
PLEASE NOTE:
Keep in mind that the "hotspots" you see are in the speedometer. This is normal and part of the modd... As of right now there's no way to fix this. Some places is where the leds are directly emitted through your speedometer.
please only serious inquirers only.
Last edited by thealliance43; Nov 24, 2008 at 11:14 PM.


Senior Member
Joined: Nov 2007
Posts: 679
From: Fort Walton Beach
Wait, so you are saying by changing that 1 LED on the front dome light area will change all my 'button' lights (window button, door lock, shifter light, dash lights(A/C, Defrost, etc))????
No, he takes apart each part in your car a(window button, door lock, shifter light, dash lights(A/C, Defrost, etc) and removes the amber LED and replaces it with a color of your choice basically.
Doing this mod gives your interior the potential to look like this...probably the sickest 6th gen interior ive seen..i love it.
http://www.cardomain.com/member_page...8_298_full.jpg
http://www.cardomain.com/member_page...8_298_full.jpg

Senior Member
Joined: Nov 2007
Posts: 679
From: Fort Walton Beach
Definitely!! I have the Super White LED's (through www.autolumination.com ) throughout the car and would like the same color for everything else. How much am I looking at for this? What exactly is required to be mailed and how would I take all this off.


Member
Joined: May 2007
Posts: 210
From: Silver Spring, MD


[QUOTE=04MAX_ILLIN;6473532]Doing this mod gives your interior the potential to look like this...probably the sickest 6th gen interior ive seen..i love it.

Hye that's my interior!! Thanks for the props, do it guys best mod ever!
But remember you can get creative, hes color options. I did my gauge cluster twice, first round with all wht and then I changed it to blue and wht combo. But I did do all blue in the gauges with wht where the mileage/gear is. Also i did my stock stereo ***** in wht and the rest blue, I think red ***** would look sick. The world is yours, go for it!
here's the template i used for GEC when I did mine a few years back, basically telling him what colors i wanted where (colored squares)
And my original wht version:
And current (note the wht where the km/h is)

hey guys it will be alot easier to me if you can plz e-mail me with requests and interest in this modd... my time has been limited so i can't promise i'd check the threads everyday. this is my email for all ppl interested or have questions
thealliance43@yahoo.com
i will also be attaching these instructions to dissemble the dash for 6thgenmaxima.org
thealliance43@yahoo.com
i will also be attaching these instructions to dissemble the dash for 6thgenmaxima.org
Here are step-by-step instructions to taking apart your dash to either get to the stereo, or the LED screen. I take no responsibility for these instructions or any damage this may cause to your vehicle. Follow at your own risk! Enjoy!
Step 1: Remove shifter **** - Shifter **** is made of two parts, the leather handle, and the lower aluminum-looking cone-shaped piece. Grasp the cone-shaped lower piece, rotate counter-clockwise and pull down at the same time to release from shifter handle. Once this is done, there is a small gold clip holding the handle in place, remove this and handle will slide off, remove this as cone-shaped piece.
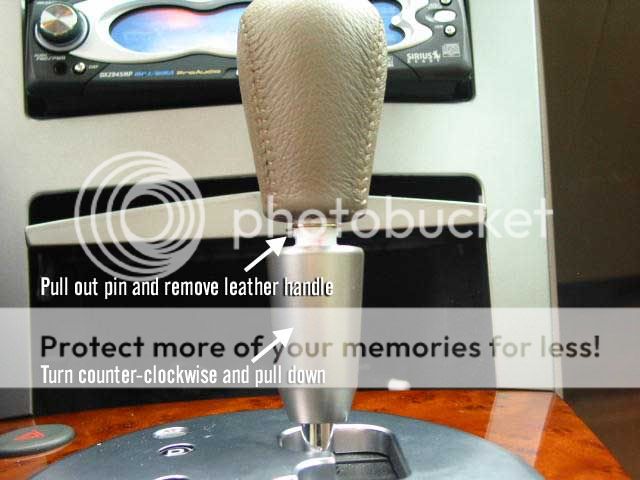
WARNING:
If you twist the shift **** thing as instructed you will end up breaking it. You just need to pull down on that plastic piece. There is a TSB addressing this issue.
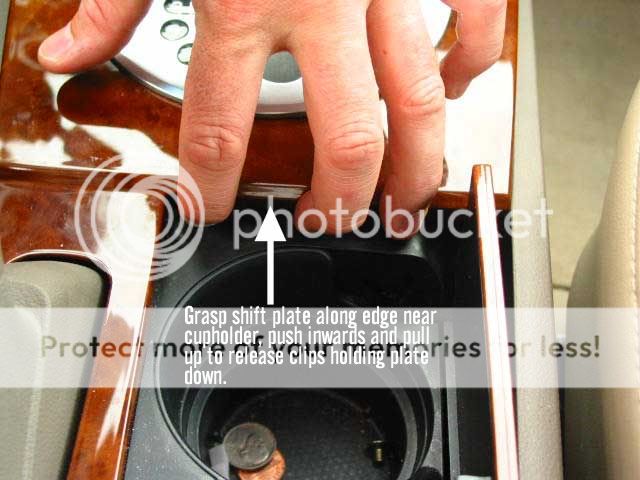
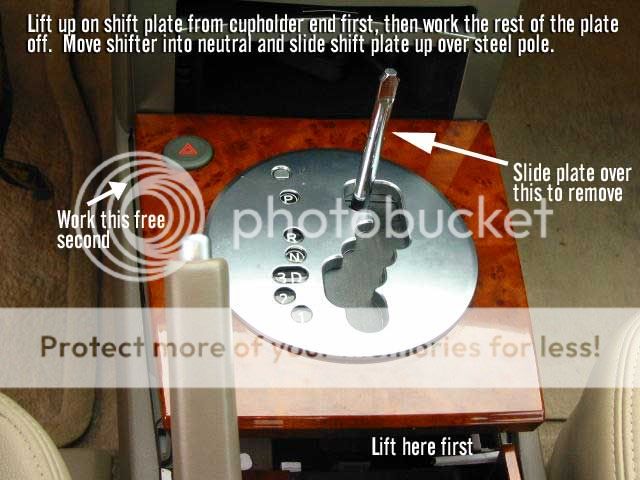
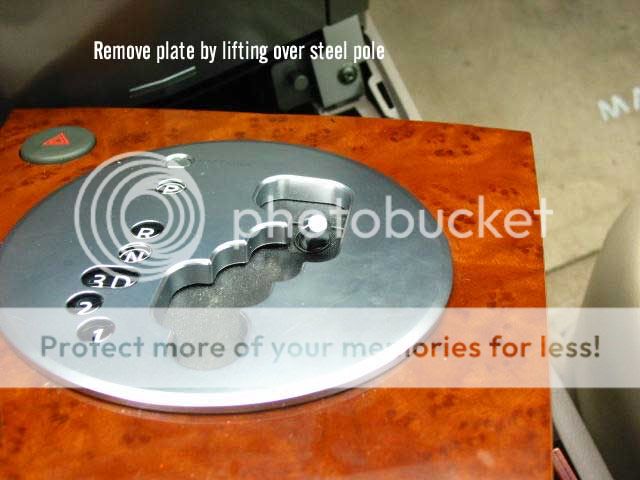
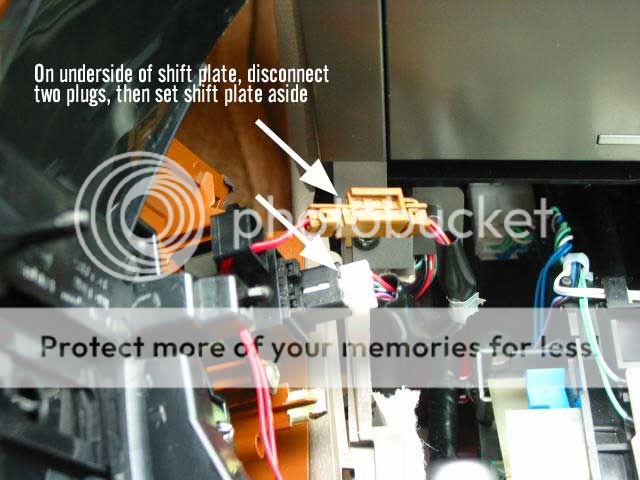
Step 2: Remove wood-colored faceplate and shifter piece - Open cupholder door. Using your fingers, press along edge of wood piece where cupholder door goes and pull up. Gentle but heavy force may be needed to pull up plate. Make sure you are slightly pushing the side of the plate inwards while you do this. Once you get the end of it released, you'll need to put the key in the ignition, turn it till the air comes on, put foot on the brake and move shifter **** into the neutral position. Lift up the whole plate to completely release. Underneath there are two connectors, one brown and one white, that you will need to disconnect before removing plate. Set aside.
Step 1: Remove shifter **** - Shifter **** is made of two parts, the leather handle, and the lower aluminum-looking cone-shaped piece. Grasp the cone-shaped lower piece, rotate counter-clockwise and pull down at the same time to release from shifter handle. Once this is done, there is a small gold clip holding the handle in place, remove this and handle will slide off, remove this as cone-shaped piece.
WARNING:
If you twist the shift **** thing as instructed you will end up breaking it. You just need to pull down on that plastic piece. There is a TSB addressing this issue.
Step 2: Remove wood-colored faceplate and shifter piece - Open cupholder door. Using your fingers, press along edge of wood piece where cupholder door goes and pull up. Gentle but heavy force may be needed to pull up plate. Make sure you are slightly pushing the side of the plate inwards while you do this. Once you get the end of it released, you'll need to put the key in the ignition, turn it till the air comes on, put foot on the brake and move shifter **** into the neutral position. Lift up the whole plate to completely release. Underneath there are two connectors, one brown and one white, that you will need to disconnect before removing plate. Set aside.
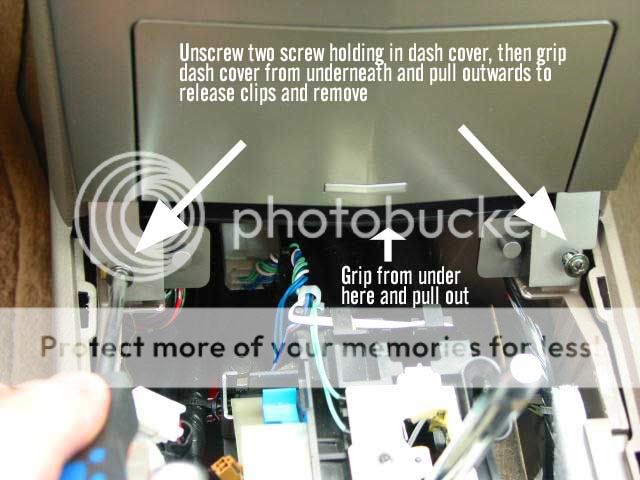
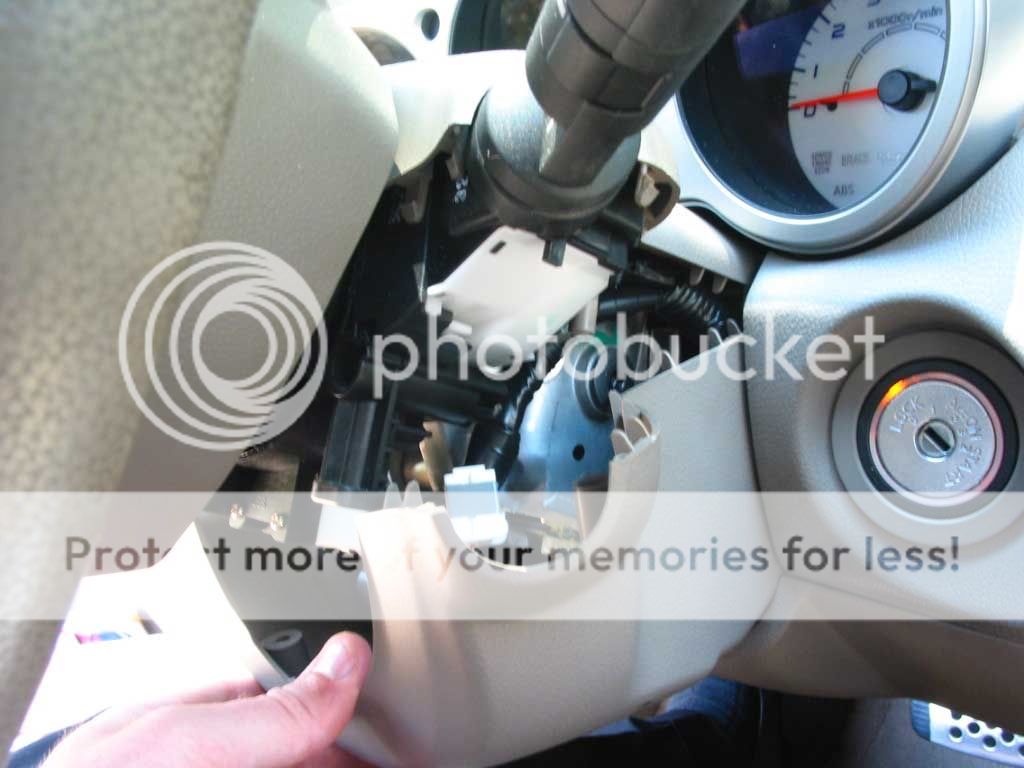
Step 3: remove two lower screws that hold the dash kit in place, place them in a safe place. Use fingers on inside of lower storage area (below cassette opening) to pull out the dash kit and release from its clips. Remove lower half first, then pull out upper half. there is another connector on the back of that piece that needs to be unplugged. Set dash kit aside.
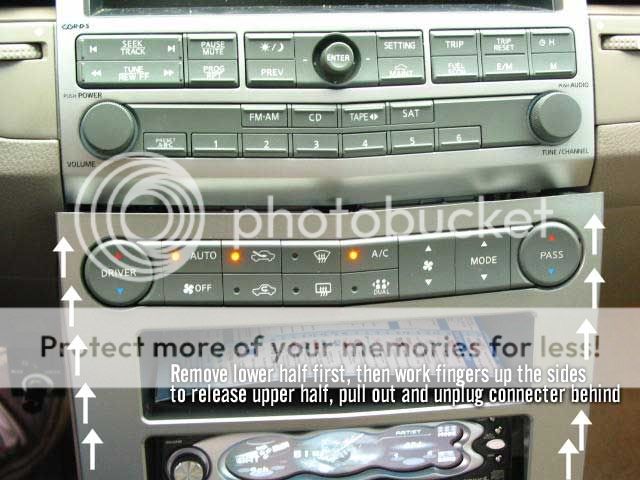
Step 4: Remove 2 screws holding in climate/audio control panel and LED screen. Holding this panel from underneath the radio controls, Pull piece outwards. The two middle air vents are also attached, and will come out as well. Lift out lower end first, then tilt upwards to release clips holding in the top edge. One connector on the back needs to be removed.

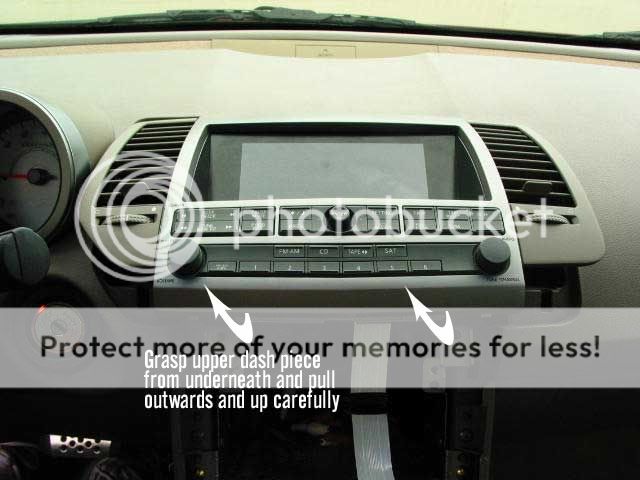
Step 5: Remove LED screen: remove 4 small gold screws on both sides of LED screen housing to separate screen from the rest of the panel.
Now you have successfully removed the LED screen. Pretty easy! To put back in, screw 4 gold screws back in, put whole panel piece back in first by inserting clips on top edge back trhough their holes, then slowly lower front edge down while making sure top edge stays flush with rest of dash. Carefully reconnect the plug, then lower all the way back flush. Screw back in the 2 screws. take Dash kit, reconnect wires, pop in the top part first back into slots, then lower part, then screw in 2 screws at bottom. Put the car back in neutral, plug in 2 connectors to shifter panel (brown and white), then slip shifter tube through the hole on the shifter panel, and carefully fit the panel back into plce, starting with the edge closest to the dash and ending with the edge closest to the armrest/cupholder. Place cone part of shifter back over steel tube, place shifter **** on and carefully slide the gold clip back through the white part of the shifter ****, it should line up with the 2 grooves on either side of the **** and the 2 grooves on steel tube. Slide cone-shaped part back up and carefully rotate over gold clip until its tight. It may take a couple tries to get this last part right.
-TEK-NIQ (6thgenmaxima.org)
Step 4: Remove 2 screws holding in climate/audio control panel and LED screen. Holding this panel from underneath the radio controls, Pull piece outwards. The two middle air vents are also attached, and will come out as well. Lift out lower end first, then tilt upwards to release clips holding in the top edge. One connector on the back needs to be removed.
Step 5: Remove LED screen: remove 4 small gold screws on both sides of LED screen housing to separate screen from the rest of the panel.
Now you have successfully removed the LED screen. Pretty easy! To put back in, screw 4 gold screws back in, put whole panel piece back in first by inserting clips on top edge back trhough their holes, then slowly lower front edge down while making sure top edge stays flush with rest of dash. Carefully reconnect the plug, then lower all the way back flush. Screw back in the 2 screws. take Dash kit, reconnect wires, pop in the top part first back into slots, then lower part, then screw in 2 screws at bottom. Put the car back in neutral, plug in 2 connectors to shifter panel (brown and white), then slip shifter tube through the hole on the shifter panel, and carefully fit the panel back into plce, starting with the edge closest to the dash and ending with the edge closest to the armrest/cupholder. Place cone part of shifter back over steel tube, place shifter **** on and carefully slide the gold clip back through the white part of the shifter ****, it should line up with the 2 grooves on either side of the **** and the 2 grooves on steel tube. Slide cone-shaped part back up and carefully rotate over gold clip until its tight. It may take a couple tries to get this last part right.
-TEK-NIQ (6thgenmaxima.org)
Gauges
Here is the step-by-step to get access to your gauges (fuel, tachometer, speedometer, etc) in order to swap for the reverse-glow gauges, clean out inside of plastic, etc...
First, this is fairly easy once you figure it out the first time. Here are my step-by-step tips to get access to the gauges.
****IMPORTANT NOTE BEFORE YOU BEGIN****
If you plan to remove the needles, you'll need to remember how to put them back on so they are accurate. This may require you to drive down the freeway or a straight stretch of road at a certain speed, noting speed and RPMs at that speed (ie if your RPMs are 3,000 at 80mph, get your friend to set their cruise control to 80, pace them and set your own cruise control and push needles back on at 3000 and 80mph respectively). Also note fuel level and normal car operating temp. After removing needles, it may be easiest to put speedometer and tachometer needles back on while driving. Get a friend to set their cruise control at your specified speed, so you can be pacing them and place the needles back in the right position.
________________**continue**___________________
1. Need the following tools: Phillips screwdriver, flat-head screwdriver (or preferably something thin and plastic), and socket wrench only if you need to disconnect battery to work on electrical system.
2. Underneath the steering wheel there are 3 screw holes... Remove these screws with phillips screwdriver.

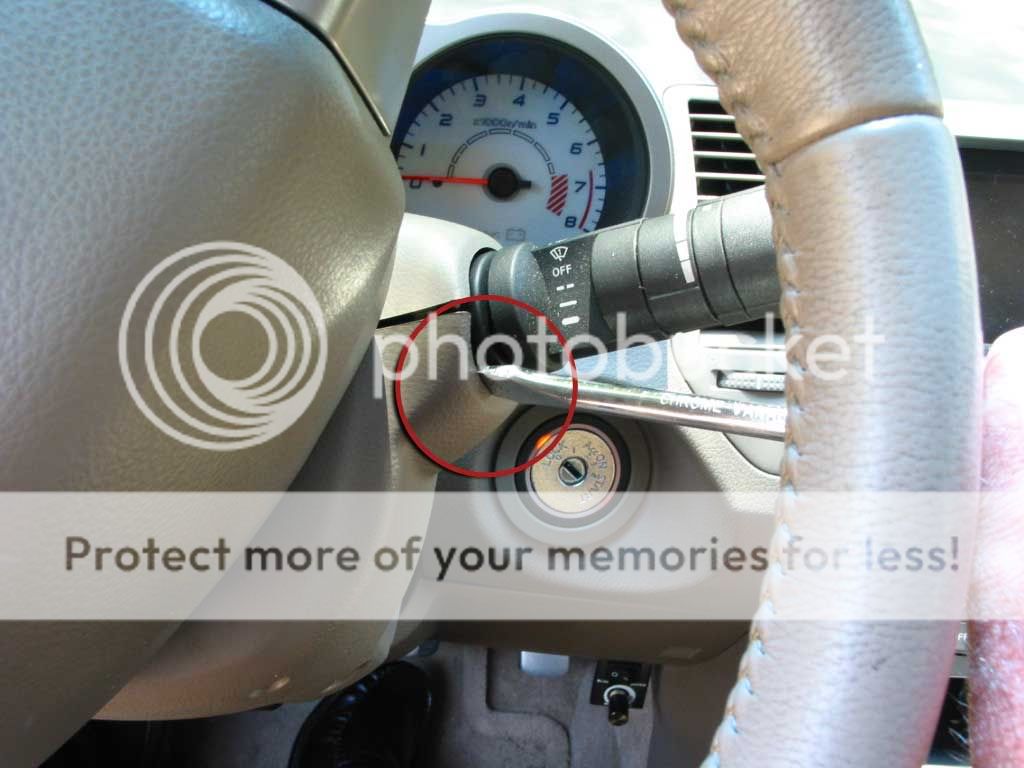
3. Adjust the steering wheel all the way out and down. Inserting flat-head screwdriver in between two plastic pieces on the right side of the steering wheel where the windshield wiper **** is. Carefully pop apart plastic housing surrounding steering wheel and set aside.
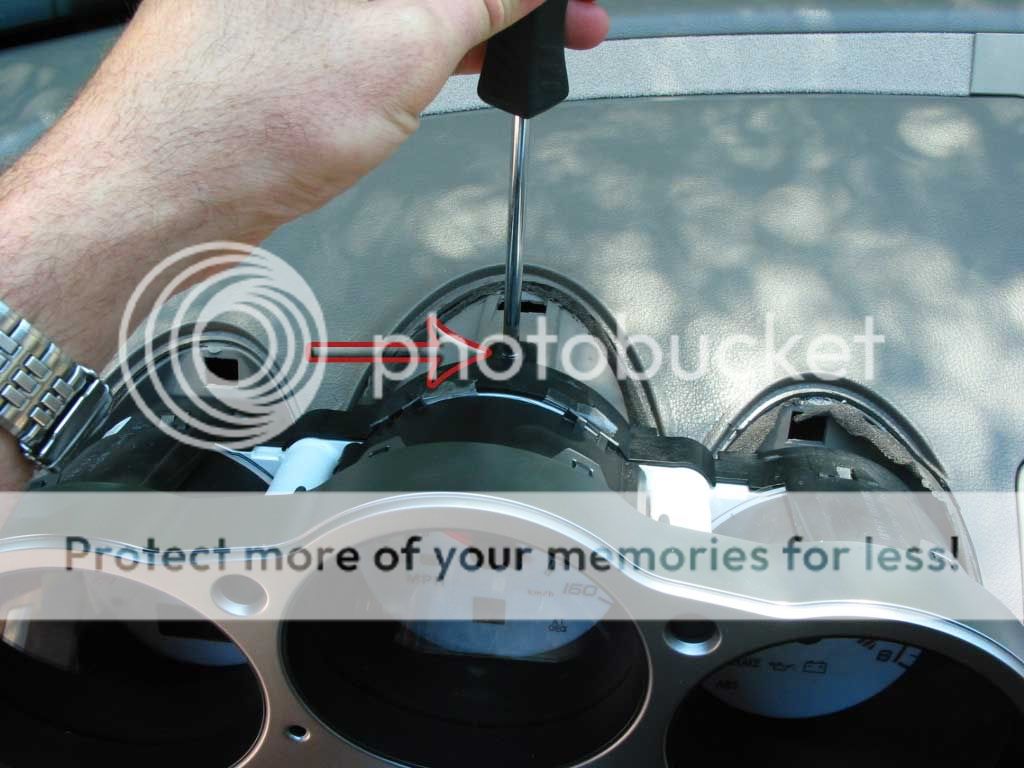
4. Remove plastic covering over gauges. Using flat-head screwdriver or thin plastic, slide under top middle plastic piece and slowly lift up to pop out. Then slide under each piece on left and right, pop out front part first, then lift and pull towards you.
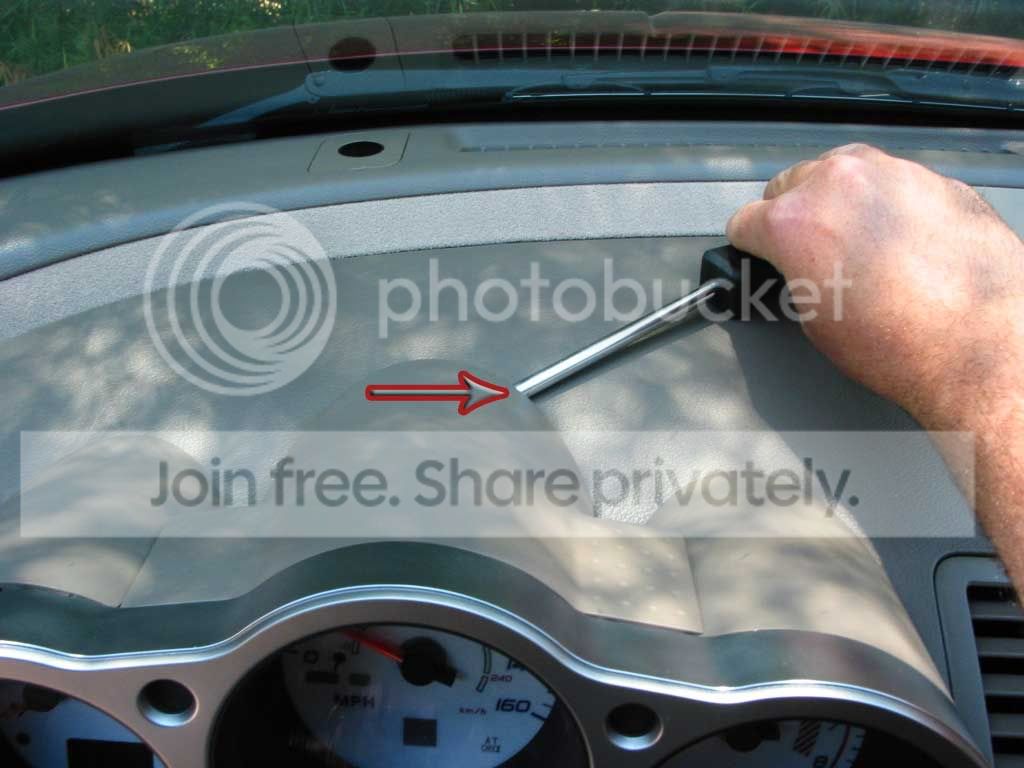
Take off all three plastic pieces starting with the middle first. you'll then see a screw
First, this is fairly easy once you figure it out the first time. Here are my step-by-step tips to get access to the gauges.
****IMPORTANT NOTE BEFORE YOU BEGIN****
If you plan to remove the needles, you'll need to remember how to put them back on so they are accurate. This may require you to drive down the freeway or a straight stretch of road at a certain speed, noting speed and RPMs at that speed (ie if your RPMs are 3,000 at 80mph, get your friend to set their cruise control to 80, pace them and set your own cruise control and push needles back on at 3000 and 80mph respectively). Also note fuel level and normal car operating temp. After removing needles, it may be easiest to put speedometer and tachometer needles back on while driving. Get a friend to set their cruise control at your specified speed, so you can be pacing them and place the needles back in the right position.
________________**continue**___________________
1. Need the following tools: Phillips screwdriver, flat-head screwdriver (or preferably something thin and plastic), and socket wrench only if you need to disconnect battery to work on electrical system.
2. Underneath the steering wheel there are 3 screw holes... Remove these screws with phillips screwdriver.
3. Adjust the steering wheel all the way out and down. Inserting flat-head screwdriver in between two plastic pieces on the right side of the steering wheel where the windshield wiper **** is. Carefully pop apart plastic housing surrounding steering wheel and set aside.
4. Remove plastic covering over gauges. Using flat-head screwdriver or thin plastic, slide under top middle plastic piece and slowly lift up to pop out. Then slide under each piece on left and right, pop out front part first, then lift and pull towards you.
Take off all three plastic pieces starting with the middle first. you'll then see a screw
6. Under guage cluster are two hidden screws, unscrew both but don't remove, it's easier to pull out gauge cluster and screws will come out with it, then you can take them out.
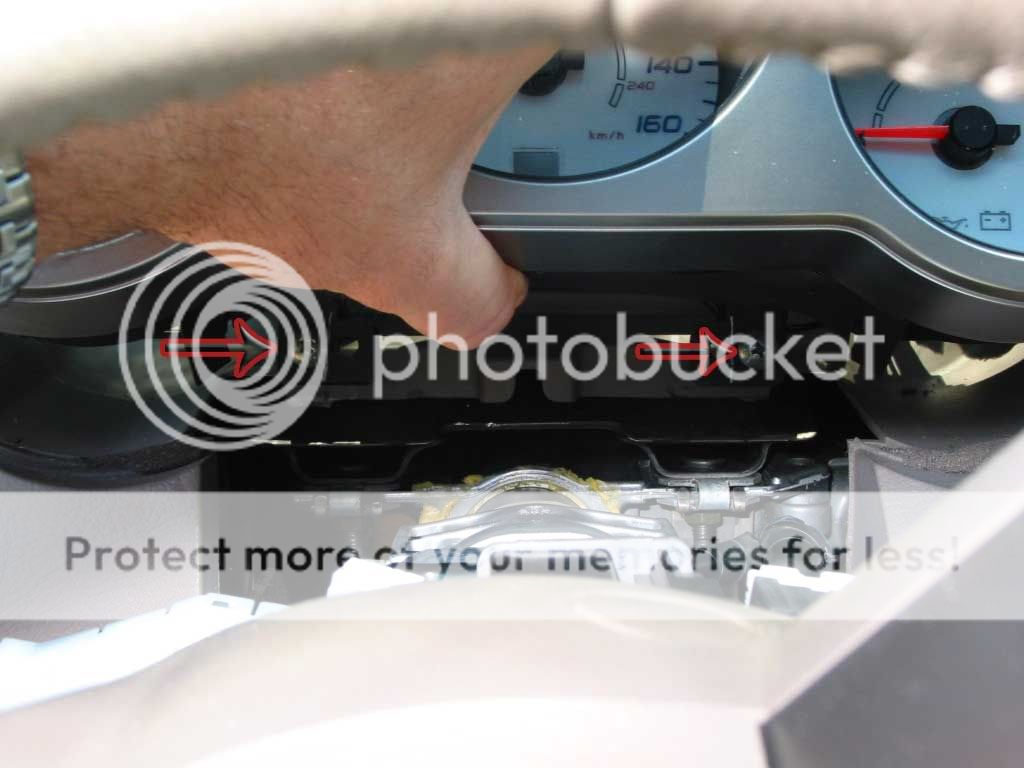
Then just unplug it and your set.... you've taken the gauge cluster off your car. very easy to do just might be a problem for the bottom two screws... Good luck to all i hope this helped.
-TEK-NIQ (6thgenmaxima)
(Lil add in's from me)
Then just unplug it and your set.... you've taken the gauge cluster off your car. very easy to do just might be a problem for the bottom two screws... Good luck to all i hope this helped.
-TEK-NIQ (6thgenmaxima)
(Lil add in's from me)


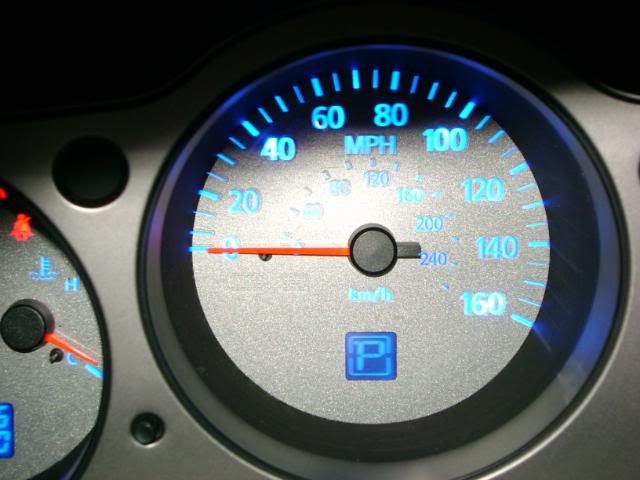
I will also be doing this mod for anyone interested. I am including photos of the project car that I did. Price will be 450 not including shipping to and from me. Just pm me with inquiries. I am not trying to take business from you alliance just offering the same service to help other members get the desired mod they want. By the way, great looking job on the swap.
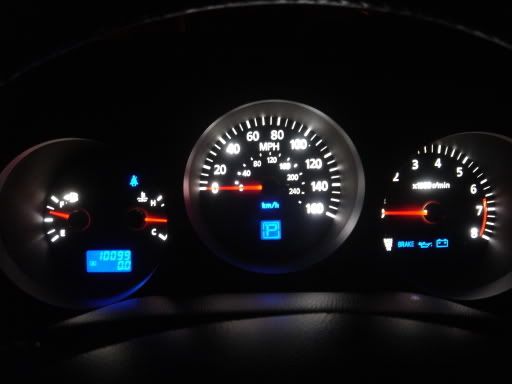
Heated seats- picture is a little blurry
Instrument cluster with no flash
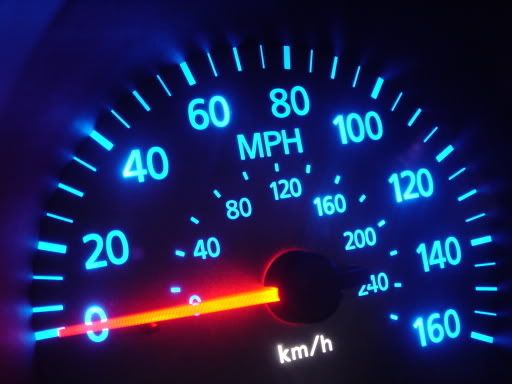
With flash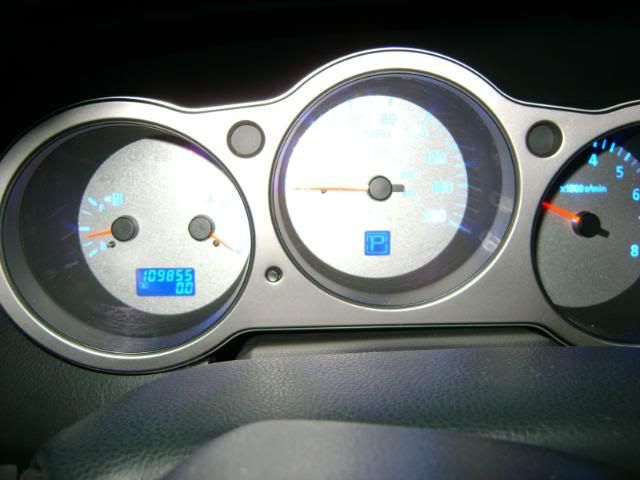
next post
Heated seats- picture is a little blurry
Instrument cluster with no flash
With flash
next post

I am not sure but send it to alliance or myself and we will pop its cherry.
I have not looked at the 07 or 08 dash but it should not be that much different or difficult than the 04-06.
I have not looked at the 07 or 08 dash but it should not be that much different or difficult than the 04-06.
yea the only thing is we can't test it.... because the connectors are different... so unless you leave your car with one of us... theres really no way of making sure everything works perfect

Hey guys, I found a gauge cluster on EBAY, I bought one when I did mine so I wouldn't have any down time...
http://cgi.ebay.com/ebaymotors/2004-...m200233736784&
(remember the mileage is stored on the cluster so your miles will be thrown off when you have it installed)
http://cgi.ebay.com/ebaymotors/2004-...m200233736784&
(remember the mileage is stored on the cluster so your miles will be thrown off when you have it installed)
