
CoryXavier BOP plate install how 2


CoryXavier BOP plate install how 2
Thanks to all who have brought my product. below are steps to install the bop plate.

tools needed:
flat head screw driver
rachet
extension
10mm socket
1/2 wrench
12mm gear rachet wrench ( very important you buy this if you dont have it )
ultra grey rtv gasket maker
zip tie
CoryXavier BOP kit ( hardware included )
step 1
remove engine cover

step 2
using 10mm socket , extension and rachet remove bolt holding wire harnes

step 3
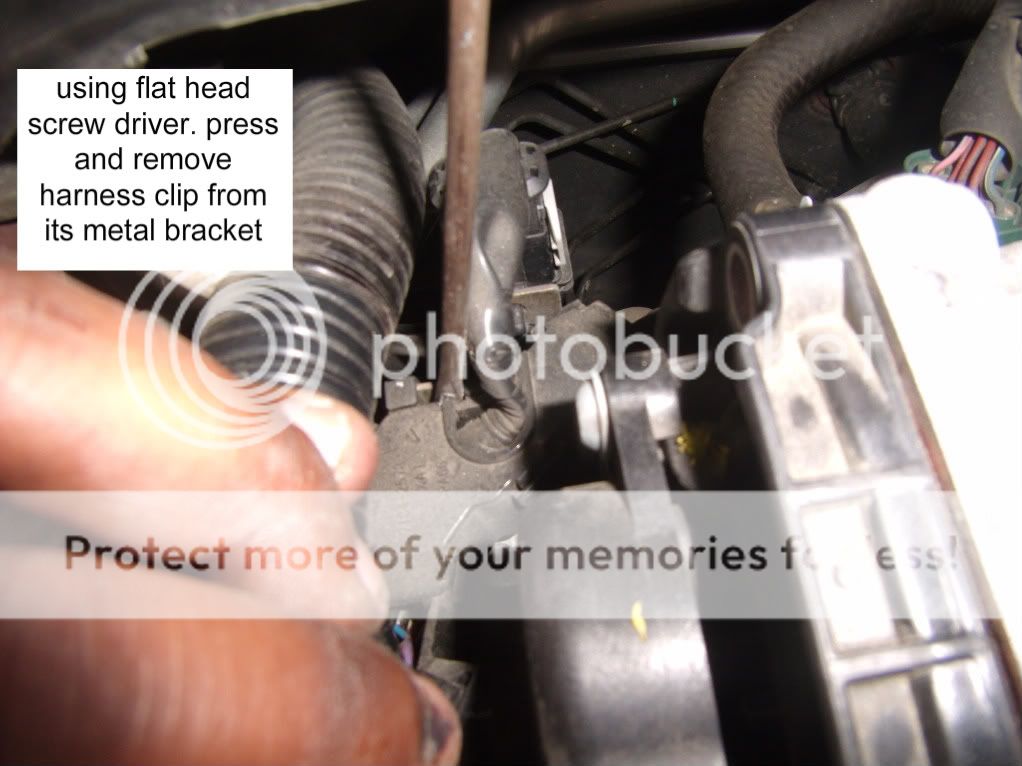
using flat head screw driver press clip holding the harness to the metal bracket. be carefully not to break this while doing this. if so it doesnt effect the way the harness is positioned. just a fyi
step 4
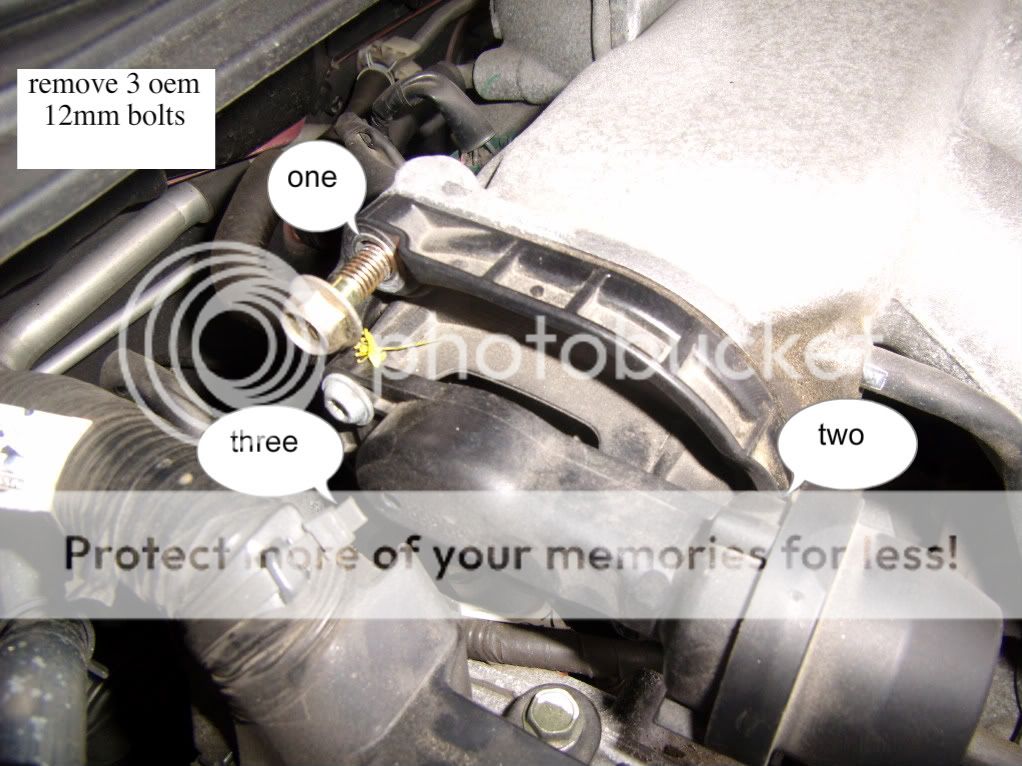
remove the 12mm o.e.m bolts holding the V.I.A.S using a 12mm rachet gear wrench. bolt number 3 will be the hardest to remove. please use gloves and have patience for this bolt
step 5
remove V.I.A.S from manifold

step 6
remove air line from V.I.A.S and the valve as shown

step 7
using the blue cap that came with the kit apply as shown to the line the vias was connected to

step 8
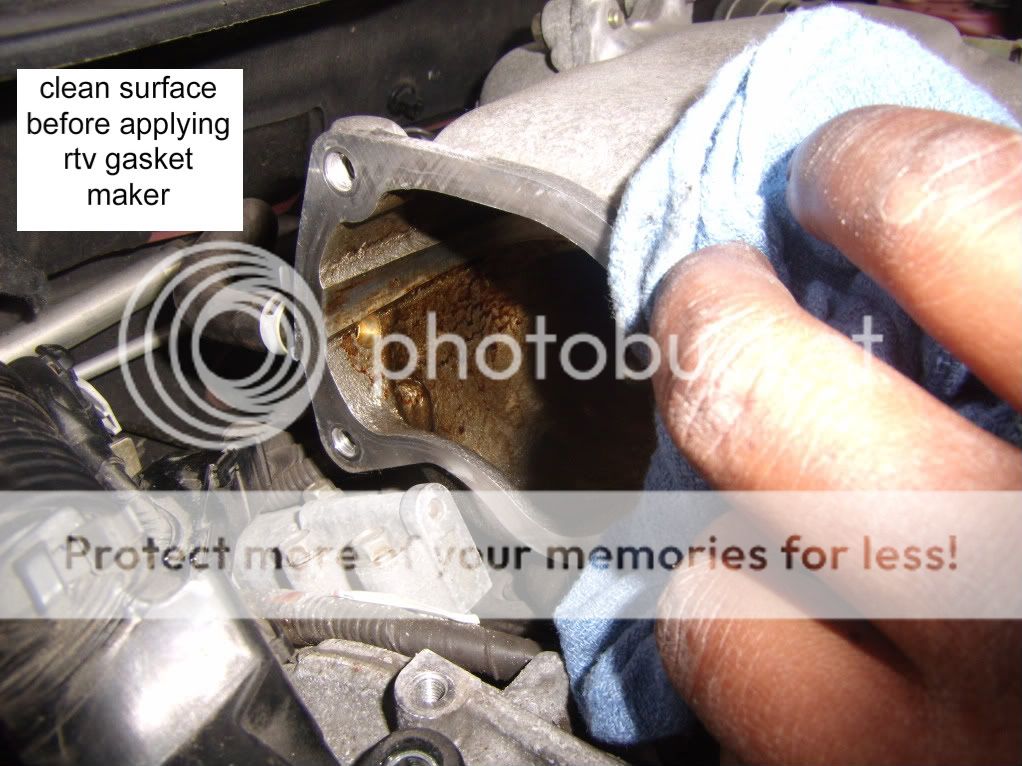
clean oil from V.I.A.S area to ensure rtv gasket maker has a clean surface for sealing
step 9
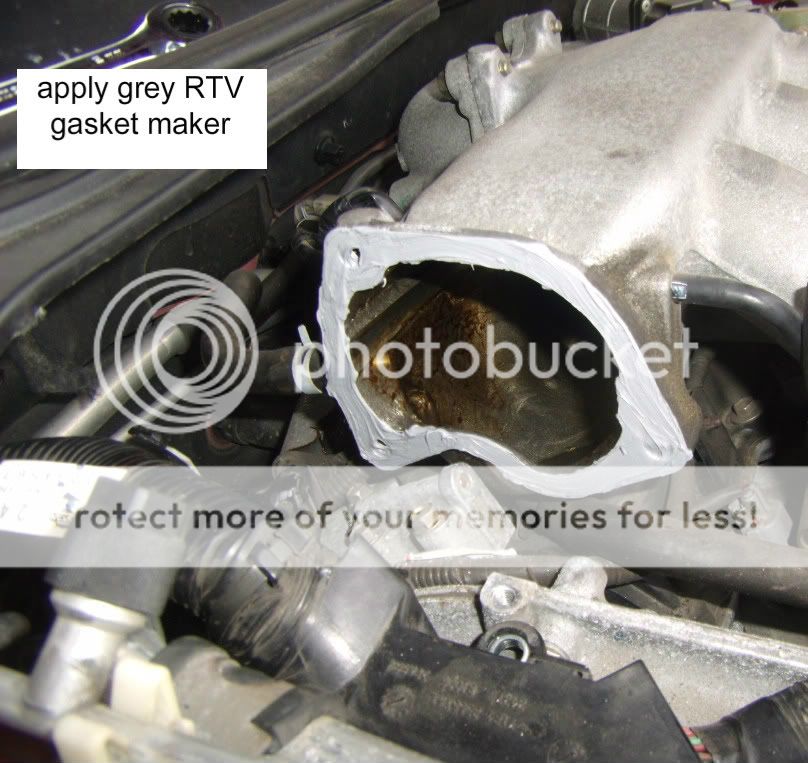
apply rtv gasket maker to mainfold area of where the V.I.A.S was removed. best way is to apply by finger to ensure a leveled amount
step 10
install Bop plate
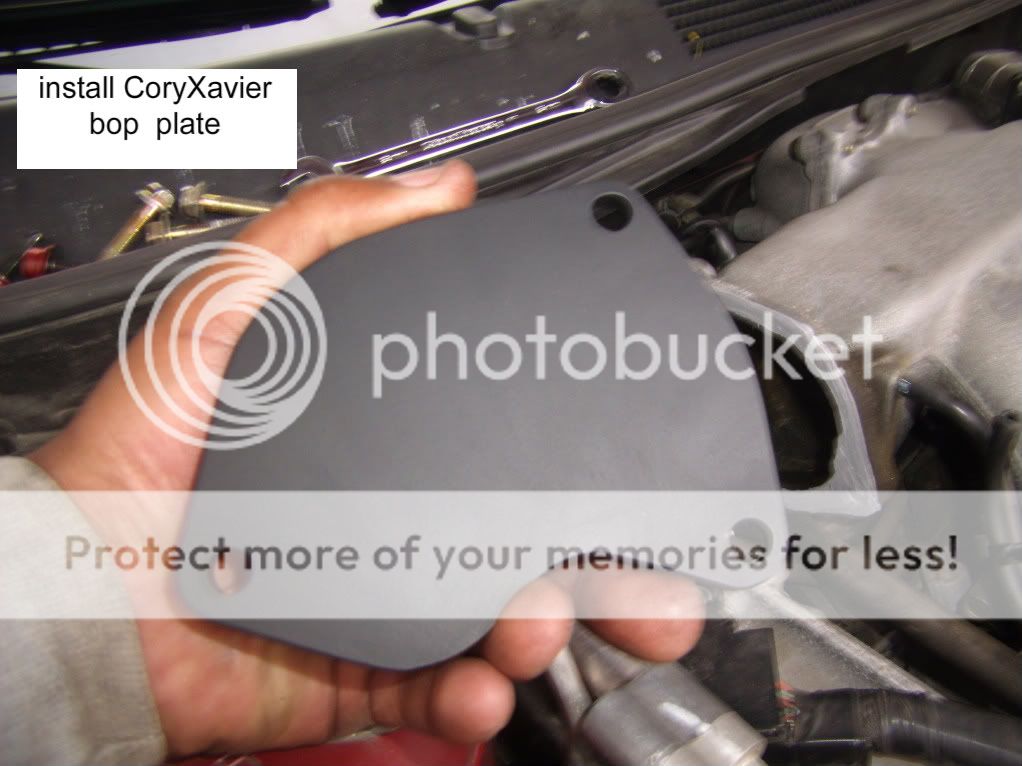
step 11
using the bolts that came with the kit install the bop plate.

step 12
hand tighten bolts and wipe off any excess gasket maker that may have been pressed out

reverse steps
3
2
1
enjoy the new hps from this mod.
now the legals
Lawyers made me do it
I CORYXAVIER MAKE NO WARRANTY, EXPRESS OR IMPLIED, INCLUDING BUT NOT LIMITED TO ANY WARRANTY OF MERCHANTIBILITY OR FITNESS FOR ANY PARTICULAR PURPOSE WITH RESPECT TO THE MARKETING AND SALE OF THE CONTENT. UNDER NO CIRCUMSTANCES SHALL CORYXAVIER BE LIABLE FOR ANY INDIRECT, INCIDENTAL OR CONSEQUENTIAL DAMAGES (INCLUDING LOST PROFITS) INCURRED IN CONNECTION WITH THE USE OF THE INFORMATION OR PRODUCT STATED ABOVE. NEITHER CORYXAVIER NOR PARTNERS SHALL BE LIABLE FOR DAMAGES CAUSED OR ALLEGEDLY CAUSED BY FAILURE OF PERFORMANCE ERROR, OMISSION, INTERRUPTION, DELETION, DEFECT, DELAY IN OPERATION OR TRANSMISSION OR COMMUNICATIONS LINE FAILURE INVOLVING THE CONTENT.
tools needed:
flat head screw driver
rachet
extension
10mm socket
1/2 wrench
12mm gear rachet wrench ( very important you buy this if you dont have it )
ultra grey rtv gasket maker
zip tie
CoryXavier BOP kit ( hardware included )
step 1
remove engine cover
step 2
using 10mm socket , extension and rachet remove bolt holding wire harnes
step 3
using flat head screw driver press clip holding the harness to the metal bracket. be carefully not to break this while doing this. if so it doesnt effect the way the harness is positioned. just a fyi
step 4
remove the 12mm o.e.m bolts holding the V.I.A.S using a 12mm rachet gear wrench. bolt number 3 will be the hardest to remove. please use gloves and have patience for this bolt
step 5
remove V.I.A.S from manifold
step 6
remove air line from V.I.A.S and the valve as shown
step 7
using the blue cap that came with the kit apply as shown to the line the vias was connected to
step 8
clean oil from V.I.A.S area to ensure rtv gasket maker has a clean surface for sealing
step 9
apply rtv gasket maker to mainfold area of where the V.I.A.S was removed. best way is to apply by finger to ensure a leveled amount
step 10
install Bop plate
step 11
using the bolts that came with the kit install the bop plate.
step 12
hand tighten bolts and wipe off any excess gasket maker that may have been pressed out
reverse steps
3
2
1
enjoy the new hps from this mod.
now the legals
Lawyers made me do it
I CORYXAVIER MAKE NO WARRANTY, EXPRESS OR IMPLIED, INCLUDING BUT NOT LIMITED TO ANY WARRANTY OF MERCHANTIBILITY OR FITNESS FOR ANY PARTICULAR PURPOSE WITH RESPECT TO THE MARKETING AND SALE OF THE CONTENT. UNDER NO CIRCUMSTANCES SHALL CORYXAVIER BE LIABLE FOR ANY INDIRECT, INCIDENTAL OR CONSEQUENTIAL DAMAGES (INCLUDING LOST PROFITS) INCURRED IN CONNECTION WITH THE USE OF THE INFORMATION OR PRODUCT STATED ABOVE. NEITHER CORYXAVIER NOR PARTNERS SHALL BE LIABLE FOR DAMAGES CAUSED OR ALLEGEDLY CAUSED BY FAILURE OF PERFORMANCE ERROR, OMISSION, INTERRUPTION, DELETION, DEFECT, DELAY IN OPERATION OR TRANSMISSION OR COMMUNICATIONS LINE FAILURE INVOLVING THE CONTENT.
Last edited by CXJ Performance; Sep 3, 2011 at 08:25 AM.

Senior Member
Joined: May 2010
Posts: 1,625
just installed it today! thanks man. Gotta say i was a little skeptical with what people were saying in terms of HP gains, but i believe it for sure.
remember to do the ecu reset after you instal it. Big boost in butt dyno. low end dries out a little bit but you WILL feel the power shift in 3.75-4 rpm.. guaranteed. Great buy for 20 bucks, Great performance improvement for the money. HP/$ id say its better than spray. i would compare the gain with a CAI.
heres how to reset ecu the fast way
1.turn key to on position wait 3 seconds do not start car
2.do this 5 times within 5 seconds-press gas pedal all the way to floor then relase tottally
3.wait 7 seconds then press gas pedal all the way to floor hold for 10 secs
4.when the check engine/service engine light starts to blink release the gas pedal and turn off ignition and turn back on.
Thanks again Cory
Last edited by twentyeggs; May 16, 2011 at 06:39 PM.


just installed it today! thanks man. Gotta say i was a little skeptical with what people were saying in terms of HP gains, but i believe it for sure.
remember to do the ecu reset after you instal it. Big boost in butt dyno. low end dries out a little bit but you WILL feel the power shift in 3.75-4 rpm.. guaranteed. Great buy for 20 bucks, Great performance improvement for the money. HP/$ id say its better than spray. i would compare the gain with a CAI.
heres how to reset ecu the fast way
1.turn key to on position wait 3 seconds do not start car
2.do this 5 times within 5 seconds-press gas pedal all the way to floor then relase tottally
3.wait 7 seconds then press gas pedal all the way to floor hold for 10 secs
4.when the check engine/service engine light starts to blink release the gas pedal and turn off ignition and turn back on.
Thanks again Cory
remember to do the ecu reset after you instal it. Big boost in butt dyno. low end dries out a little bit but you WILL feel the power shift in 3.75-4 rpm.. guaranteed. Great buy for 20 bucks, Great performance improvement for the money. HP/$ id say its better than spray. i would compare the gain with a CAI.
heres how to reset ecu the fast way
1.turn key to on position wait 3 seconds do not start car
2.do this 5 times within 5 seconds-press gas pedal all the way to floor then relase tottally
3.wait 7 seconds then press gas pedal all the way to floor hold for 10 secs
4.when the check engine/service engine light starts to blink release the gas pedal and turn off ignition and turn back on.
Thanks again Cory
One procedure:
How to reset ECU in 5th and 6th Generation Maxima's
1. Turn ignition switch on and wait about 3 seconds.
Repeat the following steps (2a and 2b) procedures quickly five times within 5 seconds.
2a. Fully depress the accelerator pedal (HARD).
2b. Fully release the accelerator pedal.
3. Wait 7 seconds, fully depress the accelerator pedal and keep it for approx. 10 seconds until the CEL starts blinking. (here is where i think you can get a code from this.)
4. Fully release the accelerator pedal (while the CEL is still blinking)
5. Wait about 10 second.
6. Fully depress the accelerator pedal and keep it for more than 10 seconds.
7. Fully release the accelerator pedal (The CEL light will continue to blink).
8. Turn ignition switch to �OFF� position and now you can start the car. The CEL light should be gone.


Thread
Thread Starter
Forum
Replies
Last Post
-ReLLiK-
4th Generation Classifieds (1995-1999)
0
Sep 8, 2015 12:02 PM