
How to remove 09 tail light assembly?? (STUCK)


Thread Starter
Junior Member
Joined: Apr 2010
Posts: 71
From: Long Island NY
How to remove 09 tail light assembly?? (STUCK)
Jus got some new tail light bulbs and couldnt belive how hard it was to remove the tail light assembly. I have the 09 SV premium package. I removed the 2 small nuts then got stuck? I saw these two rubber nipple looking things. one was black and the other a pink/clear. Dont know if they have anything to do w/ it. Or am I missing a clip somewhere? PLZ HELP! gonna try and post a pic..


Senior Member
Joined: Nov 2010
Posts: 4,020
From: Maryland
Jus got some new tail light bulbs and couldnt belive how hard it was to remove the tail light assembly. I have the 09 SV premium package. I removed the 2 small nuts then got stuck? I saw these two rubber nipple looking things. one was black and the other a pink/clear. Dont know if they have anything to do w/ it. Or am I missing a clip somewhere? PLZ HELP! gonna try and post a pic..
Last edited by Ghozt; Jan 13, 2011 at 04:59 PM.

Senior Member
Joined: Nov 2010
Posts: 4,020
From: Maryland
Pretty sure you can remove the tail light assembly...seen it done in other threads...at this point though maybe using a jack would be easier...


See if this helps...Rear Bulb replacement write-up

Junior Member
Joined: May 2012
Posts: 32
From: Arlington, Texas
Damnit, I should read more often.
***EDIT*** Ahhh, knew it wasn't that easy. Read the write up, I see what's up now. Thanks guys!
Last edited by corbryant; May 29, 2012 at 07:54 PM.

Easy way? use a mallet, hit the rubber nipple on top, then the bottom and repeat. Came right out after a few mild hits.
If the plastic that covers the nipple comes out, install back in the hole before you put the light in.
If the plastic that covers the nipple comes out, install back in the hole before you put the light in.

On the '09s The plastic nipples can be incredibly hard to release. Best way I found is to warm them up with a heat gun and the tail light should slide right out when you push it towards the rear. Worst comes to worst, cut into the nipples and peel them off from the metal pin they hold. They are only about $2 and can be replaced once the taillight is out.

Junior Member
Joined: May 2012
Posts: 32
From: Arlington, Texas
On the '09s The plastic nipples can be incredibly hard to release. Best way I found is to warm them up with a heat gun and the tail light should slide right out when you push it towards the rear. Worst comes to worst, cut into the nipples and peel them off from the metal pin they hold. They are only about $2 and can be replaced once the taillight is out.
Junior Member
Joined: May 2012
Posts: 32
From: Arlington, Texas
Just FY everyone's I, I went back at the taillights the other day and got the right out. Thought I'd share since it is kind of a pain for some people. It literally takes 10 seconds to pop them out this way.
It was 100+ degrees out so after the car sat in the sun, the little plastic sleeves inside the trunk that the pins pop into were nice and soft. I'd think a heat gun or hair dryer would get the same thing done there. I had my dad put his palm flat on the side of the light and the other hand around the inside edge, while he kind of rocked the light back and forth with one hand and pushed towards the rear of the car with his flat palm, I used a pair of pliers to squeeze the very tip of the plastic sleeves, kind of pinching them. Using flat nosed pliers instead of needle noses would word way better. As soon as I pinched the top one, the light popped right out in his hands. Took 10 seconds, max.
It doesn't damage the sleeves at all. And the light popped right back in. I had to take the lights back out today and it's only 65 degrees out, so the sleeves aren't soft like they were the other day. I didn't want to drive to my dad's to get his help so I came up with a pretty good idea. I used the suction cup and arm from an old navigation system windshield mount. Attached it to the side of the taillight, and pulled towards the rear while I used a small piece of wood to push on both studs inside of the trunk. *POP* -- 10 seconds.
It actually made my day. LOL I wasted 3 hours trying to get these things out at one point when I first got the car. I was scared to crack one and didn't know wtf I was doing with it.
Either way, I think even using the suction cup method - you'll still probably need to pinch the very tip of each pin sleeve one time to get the pins started out but maybe not. Oh, last thing - I had a bunch of different suction cups laying around and it seems like the medium sized ones don't like to attach. The small ones and the really large one I tried worked great though.
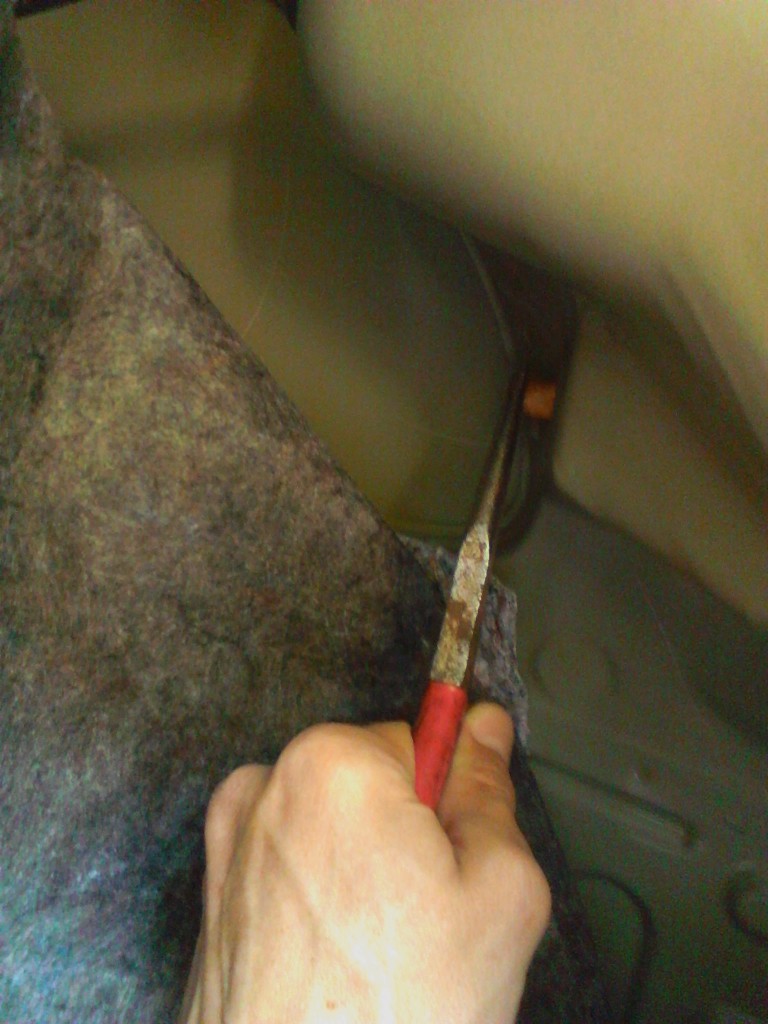
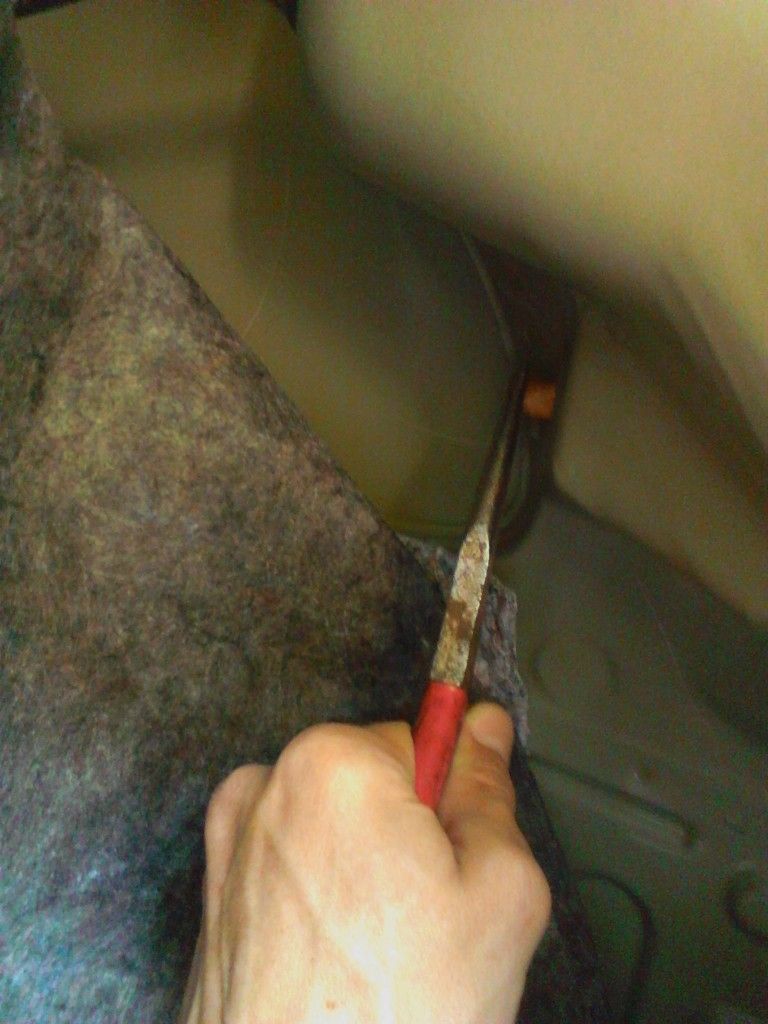
Squeeze these little bad boys (one black sleeve is above this one). I used flat headed, regular wire pliers the first time. Just used needle noses here for the pic. The regular pliers work way better. If you get the very tip of it and pinch it just right, it will pop the pin right out.
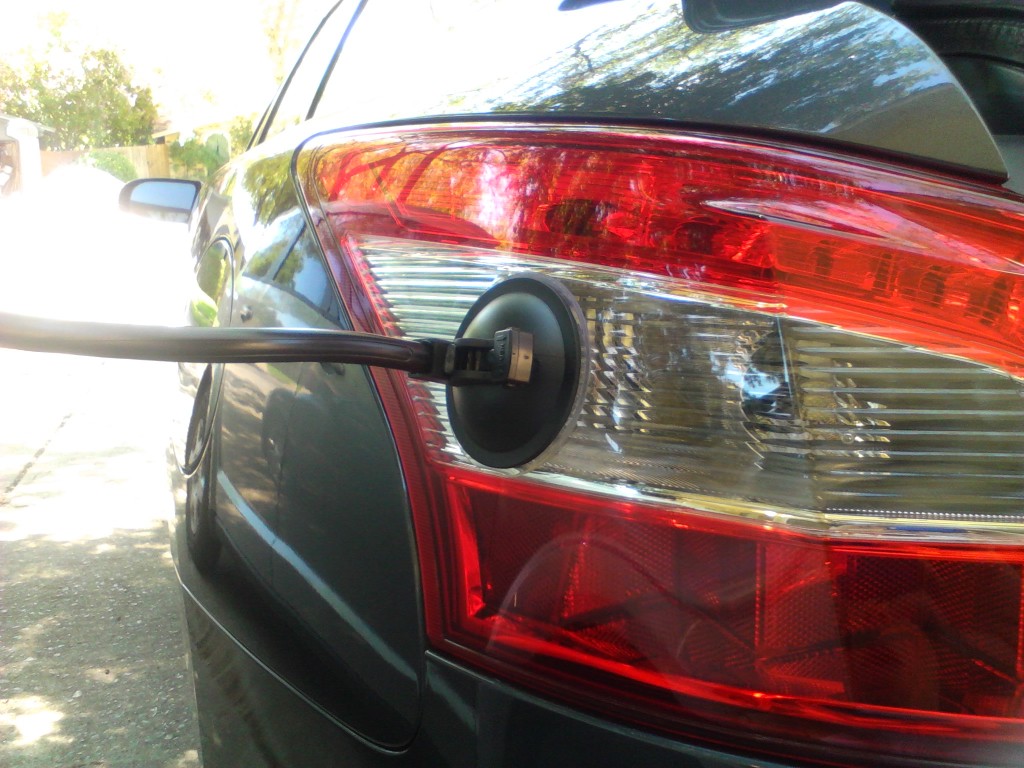
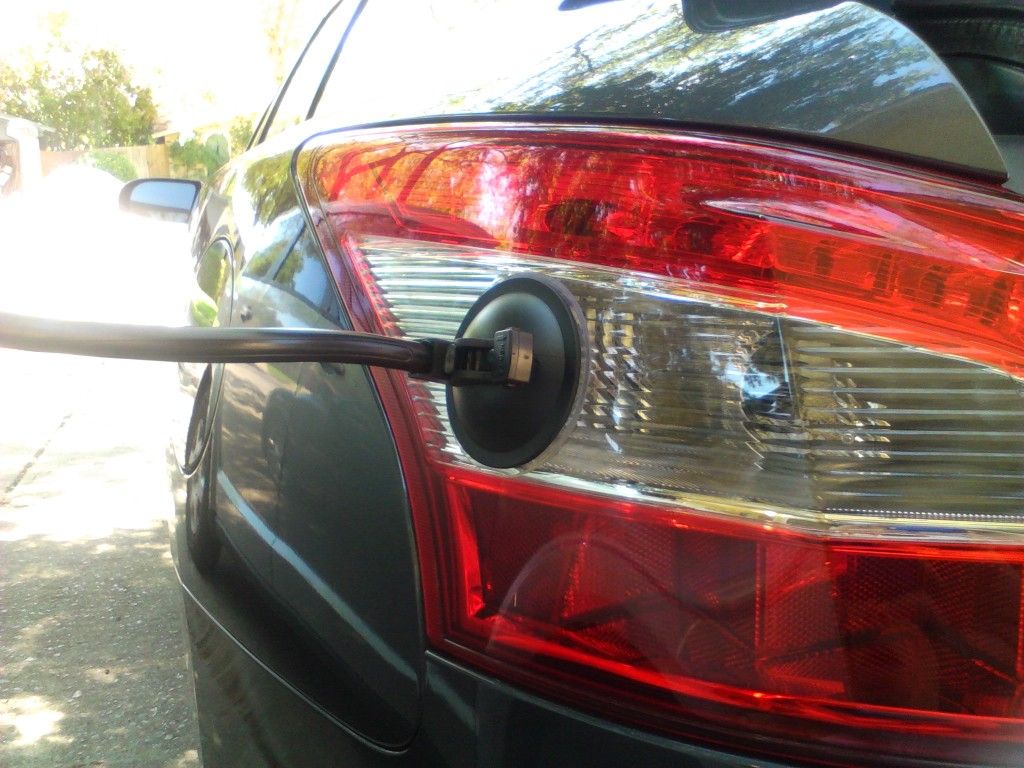
Grab it close to the cup and pull straight back. Be sure to use a piece of wood or something to put even pressure on the studs you removed the nuts from inside of the trunk. Works like a charm!
It was 100+ degrees out so after the car sat in the sun, the little plastic sleeves inside the trunk that the pins pop into were nice and soft. I'd think a heat gun or hair dryer would get the same thing done there. I had my dad put his palm flat on the side of the light and the other hand around the inside edge, while he kind of rocked the light back and forth with one hand and pushed towards the rear of the car with his flat palm, I used a pair of pliers to squeeze the very tip of the plastic sleeves, kind of pinching them. Using flat nosed pliers instead of needle noses would word way better. As soon as I pinched the top one, the light popped right out in his hands. Took 10 seconds, max.
It doesn't damage the sleeves at all. And the light popped right back in. I had to take the lights back out today and it's only 65 degrees out, so the sleeves aren't soft like they were the other day. I didn't want to drive to my dad's to get his help so I came up with a pretty good idea. I used the suction cup and arm from an old navigation system windshield mount. Attached it to the side of the taillight, and pulled towards the rear while I used a small piece of wood to push on both studs inside of the trunk. *POP* -- 10 seconds.
It actually made my day. LOL I wasted 3 hours trying to get these things out at one point when I first got the car. I was scared to crack one and didn't know wtf I was doing with it.
Either way, I think even using the suction cup method - you'll still probably need to pinch the very tip of each pin sleeve one time to get the pins started out but maybe not. Oh, last thing - I had a bunch of different suction cups laying around and it seems like the medium sized ones don't like to attach. The small ones and the really large one I tried worked great though.
Squeeze these little bad boys (one black sleeve is above this one). I used flat headed, regular wire pliers the first time. Just used needle noses here for the pic. The regular pliers work way better. If you get the very tip of it and pinch it just right, it will pop the pin right out.
Grab it close to the cup and pull straight back. Be sure to use a piece of wood or something to put even pressure on the studs you removed the nuts from inside of the trunk. Works like a charm!
Last edited by corbryant; Sep 8, 2012 at 10:43 AM.

Junior Member
Joined: Jan 2013
Posts: 93
From: El Paso, TX
Just FY everyone's I, I went back at the taillights the other day and got the right out. Thought I'd share since it is kind of a pain for some people. It literally takes 10 seconds to pop them out this way.
It was 100+ degrees out so after the car sat in the sun, the little plastic sleeves inside the trunk that the pins pop into were nice and soft. I'd think a heat gun or hair dryer would get the same thing done there. I had my dad put his palm flat on the side of the light and the other hand around the inside edge, while he kind of rocked the light back and forth with one hand and pushed towards the rear of the car with his flat palm, I used a pair of pliers to squeeze the very tip of the plastic sleeves, kind of pinching them. Using flat nosed pliers instead of needle noses would word way better. As soon as I pinched the top one, the light popped right out in his hands. Took 10 seconds, max.
It doesn't damage the sleeves at all. And the light popped right back in. I had to take the lights back out today and it's only 65 degrees out, so the sleeves aren't soft like they were the other day. I didn't want to drive to my dad's to get his help so I came up with a pretty good idea. I used the suction cup and arm from an old navigation system windshield mount. Attached it to the side of the taillight, and pulled towards the rear while I used a small piece of wood to push on both studs inside of the trunk. *POP* -- 10 seconds.
It actually made my day. LOL I wasted 3 hours trying to get these things out at one point when I first got the car. I was scared to crack one and didn't know wtf I was doing with it.
Either way, I think even using the suction cup method - you'll still probably need to pinch the very tip of each pin sleeve one time to get the pins started out but maybe not. Oh, last thing - I had a bunch of different suction cups laying around and it seems like the medium sized ones don't like to attach. The small ones and the really large one I tried worked great though.
Squeeze these little bad boys (one black sleeve is above this one). I used flat headed, regular wire pliers the first time. Just used needle noses here for the pic. The regular pliers work way better. If you get the very tip of it and pinch it just right, it will pop the pin right out.
Grab it close to the cup and pull straight back. Be sure to use a piece of wood or something to put even pressure on the studs you removed the nuts from inside of the trunk. Works like a charm!
Hey guys so getting my 12 tails pretty soon, is it really that hard to take off the OEM rears? I mean I was thinking you just have to pull back that nice piece of carpeting, undo some screws and would come right off? Can anyone please elaborate on how difficult this is to do? 1-10? Thanks guys!
Senior Member
Joined: Nov 2010
Posts: 4,020
From: Maryland
yup its a pain. there are "pressure" clips holding them in and it requires a decent amount of effort to get them off especially the first time.
DO NOT FOLLOW THE DIY ON THIS FORUM FOR REMOVING THEM. COUNTLESS PEOPLE HAVE BROKEN PIECES OFF OF THEIRS BY PRYING FROM THE OUTSIDE.
I have no idea why mods haven't removed the DIY; it is such a joke how many people have damaged their cars with that.
DO NOT FOLLOW THE DIY ON THIS FORUM FOR REMOVING THEM. COUNTLESS PEOPLE HAVE BROKEN PIECES OFF OF THEIRS BY PRYING FROM THE OUTSIDE.
I have no idea why mods haven't removed the DIY; it is such a joke how many people have damaged their cars with that.
Junior Member
Joined: Jan 2013
Posts: 93
From: El Paso, TX
yup its a pain. there are "pressure" clips holding them in and it requires a decent amount of effort to get them off especially the first time.
DO NOT FOLLOW THE DIY ON THIS FORUM FOR REMOVING THEM. COUNTLESS PEOPLE HAVE BROKEN PIECES OFF OF THEIRS BY PRYING FROM THE OUTSIDE.
I have no idea why mods haven't removed the DIY; it is such a joke how many people have damaged their cars with that.
DO NOT FOLLOW THE DIY ON THIS FORUM FOR REMOVING THEM. COUNTLESS PEOPLE HAVE BROKEN PIECES OFF OF THEIRS BY PRYING FROM THE OUTSIDE.
I have no idea why mods haven't removed the DIY; it is such a joke how many people have damaged their cars with that.
Senior Member
Joined: Nov 2010
Posts: 4,020
From: Maryland
nah you dont need to raise the car. the way I took mine out was took off the trunk liner around the tails, undid the 2 nuts on the 2 exposed bolts and removed the wire clip. i hammered on the exposed bolts with a rubber mallet and eventually they popped out. the pic above where the guy used a suction cup on the outside is a great idea - that'd really help.
thanks man - the sequentials were a lot of work took many many hours to plan out and build. lets just say i crash coursed electronics 101 lol. debated making a second set to sell but so far everyone thinks they'd be too expensive, which i dont blame them. a pair of tails is about $400, the parts to build are around $150 and it'd take me at least 20 hours and this is just to build a sequencing circuit and make this all plug and play with the OEM harness without adding additional LEDs. on my set i took more time and retrofitted in more LEDs in the lower reflector area which took a while to get looking right.
thanks man - the sequentials were a lot of work took many many hours to plan out and build. lets just say i crash coursed electronics 101 lol. debated making a second set to sell but so far everyone thinks they'd be too expensive, which i dont blame them. a pair of tails is about $400, the parts to build are around $150 and it'd take me at least 20 hours and this is just to build a sequencing circuit and make this all plug and play with the OEM harness without adding additional LEDs. on my set i took more time and retrofitted in more LEDs in the lower reflector area which took a while to get looking right.
Junior Member
Joined: Jan 2013
Posts: 93
From: El Paso, TX
nah you dont need to raise the car. the way I took mine out was took off the trunk liner around the tails, undid the 2 nuts on the 2 exposed bolts and removed the wire clip. i hammered on the exposed bolts with a rubber mallet and eventually they popped out. the pic above where the guy used a suction cup on the outside is a great idea - that'd really help.
thanks man - the sequentials were a lot of work took many many hours to plan out and build. lets just say i crash coursed electronics 101 lol. debated making a second set to sell but so far everyone thinks they'd be too expensive, which i dont blame them. a pair of tails is about $400, the parts to build are around $150 and it'd take me at least 20 hours and this is just to build a sequencing circuit and make this all plug and play with the OEM harness without adding additional LEDs. on my set i took more time and retrofitted in more LEDs in the lower reflector area which took a while to get looking right.
thanks man - the sequentials were a lot of work took many many hours to plan out and build. lets just say i crash coursed electronics 101 lol. debated making a second set to sell but so far everyone thinks they'd be too expensive, which i dont blame them. a pair of tails is about $400, the parts to build are around $150 and it'd take me at least 20 hours and this is just to build a sequencing circuit and make this all plug and play with the OEM harness without adding additional LEDs. on my set i took more time and retrofitted in more LEDs in the lower reflector area which took a while to get looking right.
Good looking man, thanks for the info on that. I couldnt believe when I read that I might have to jack it up!
As far as the lights, WOW!!! Yea that would be very expensive! You must be very tech savvy to do those kinds of things, I just would pay someone, dont have the time NOR the patience
 ..... What do you think of the LED bulbs that they are making for headlights and what not? (talking about lights) .... ya know instead of going with ballasts and all that for the front, I can go with a LED set of bulbs, hear they are about $100 a set, $50 for fogs? Sorry to get away from main thread!

Thread
Thread Starter
Forum
Replies
Last Post
vingodine
5th Generation Classifieds (2000-2003)
45
May 21, 2016 12:46 PM
Dennis Twohy
1st & 2nd Generation Maxima (1981-1984 and 1985-1988)
0
Oct 1, 2015 06:01 PM
220k+ A32
5th Generation Maxima (2000-2003)
10
Aug 17, 2015 03:57 PM