
Help! Problems installing used Wilwood/2-piece rotors setup


Help! Problems installing used Wilwood/2-piece rotors setup
EDIT: Are all 4th gen hubs the same? I could have sworn they were.
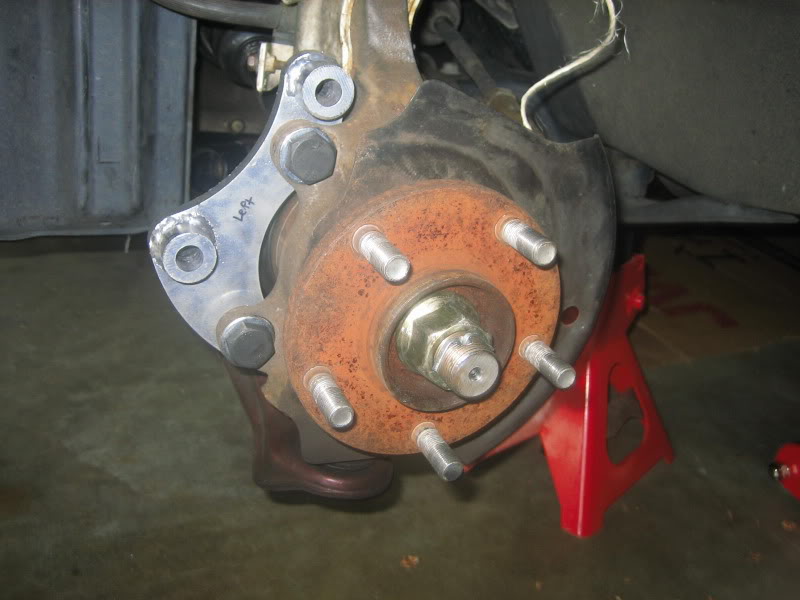
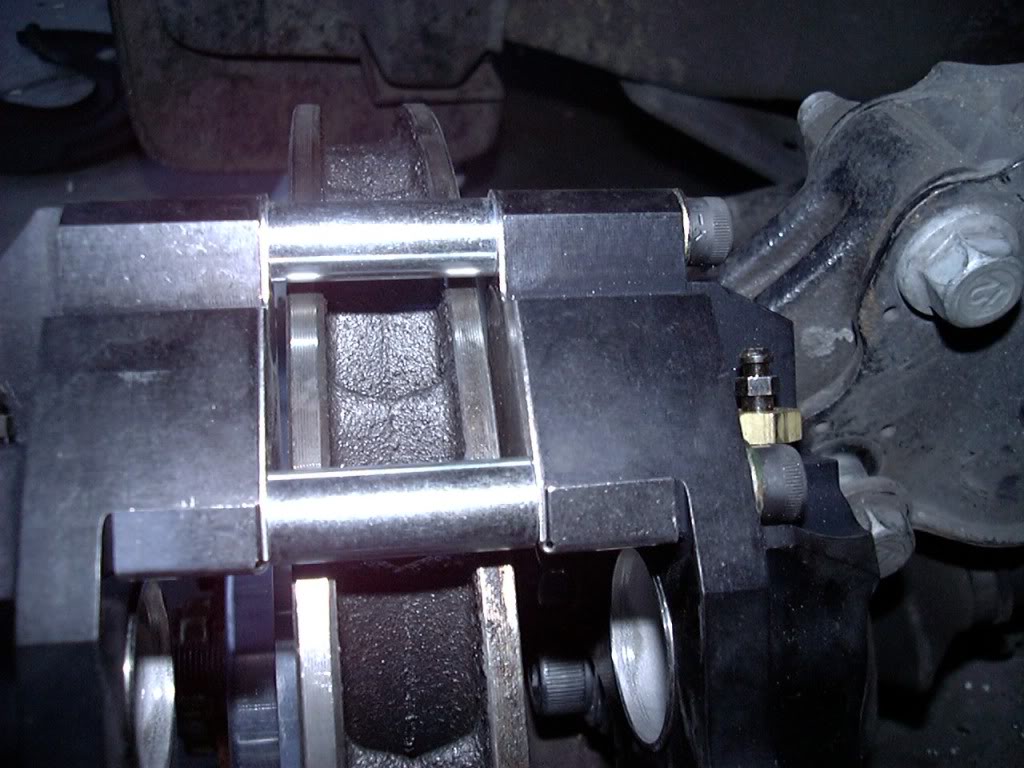
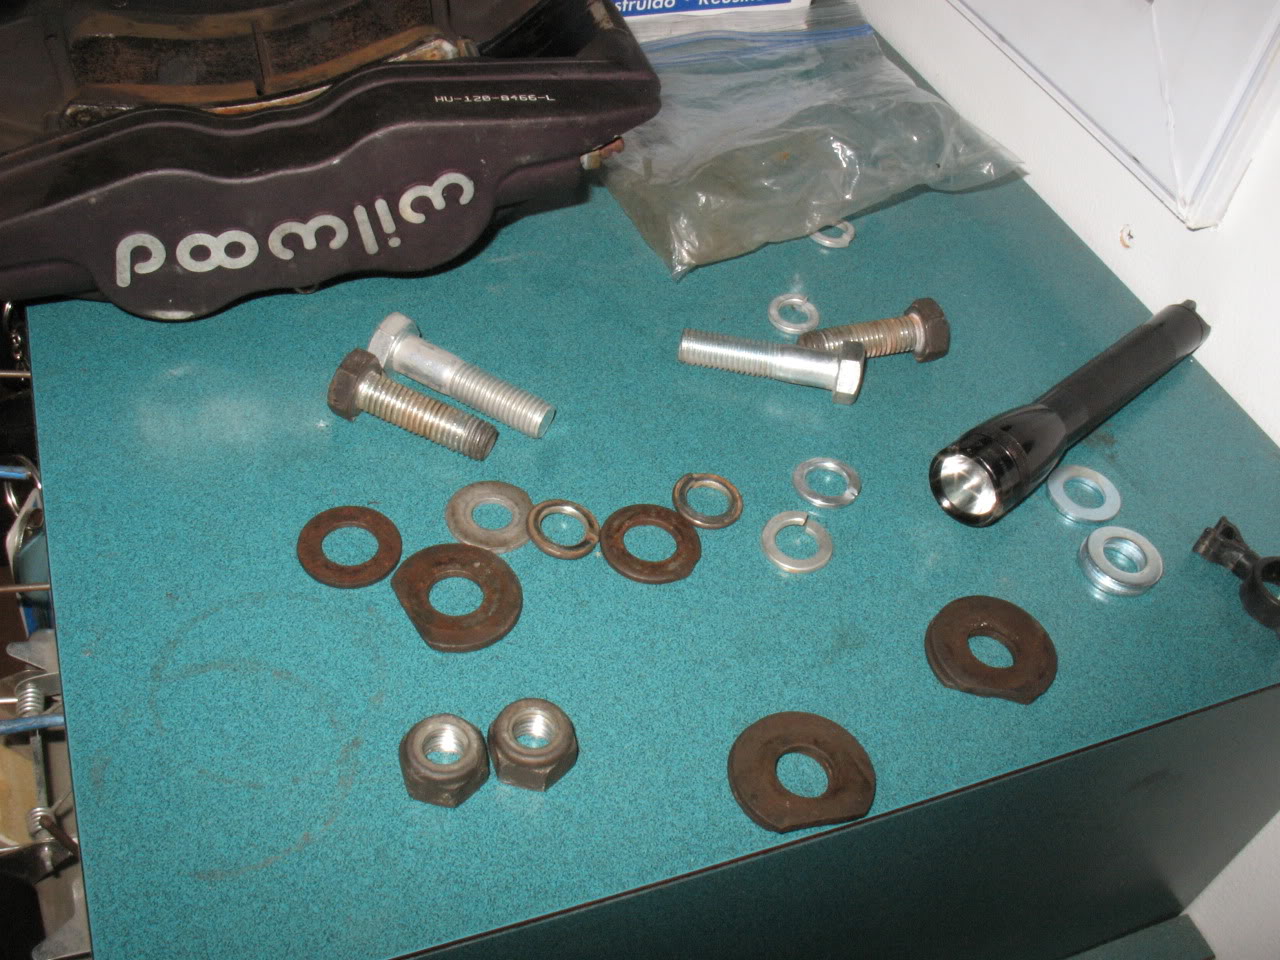
I bought a used set of Wilwood calipers and 12.6" 6th gen 2-piece rotors with an Altima SER dogbone adapter from StillenMaxima (Albert), and the brakes were originally from Irish44j's (Josh's) 5th gen. Albert said he had these on his 4th gen with no problems, but when I went to install them ran into a big problem almost immediately. The rotor isn't centered inside of the caliper, so much so that you can't even install the outboard pad because there is just no room.
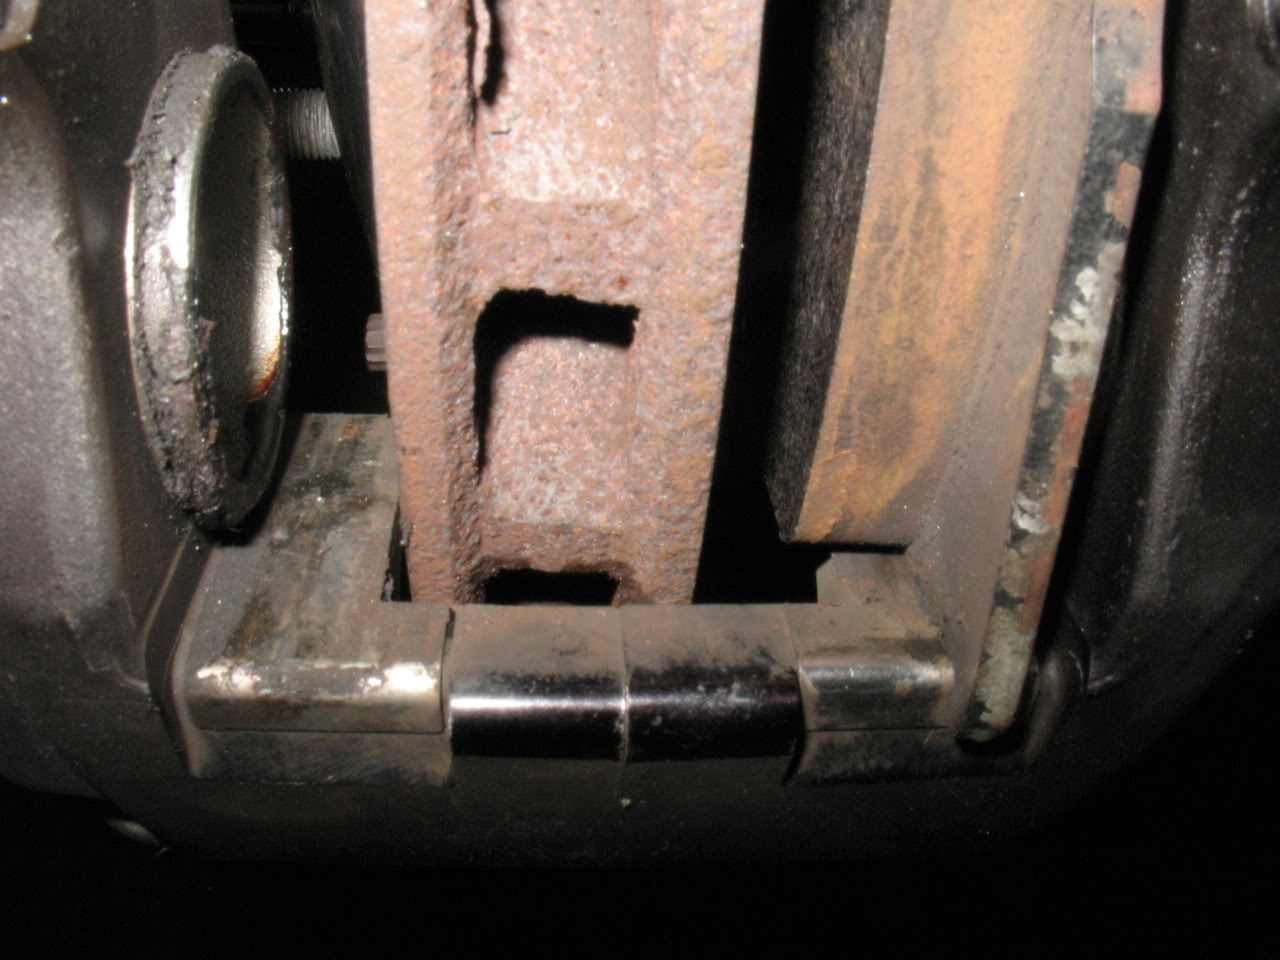
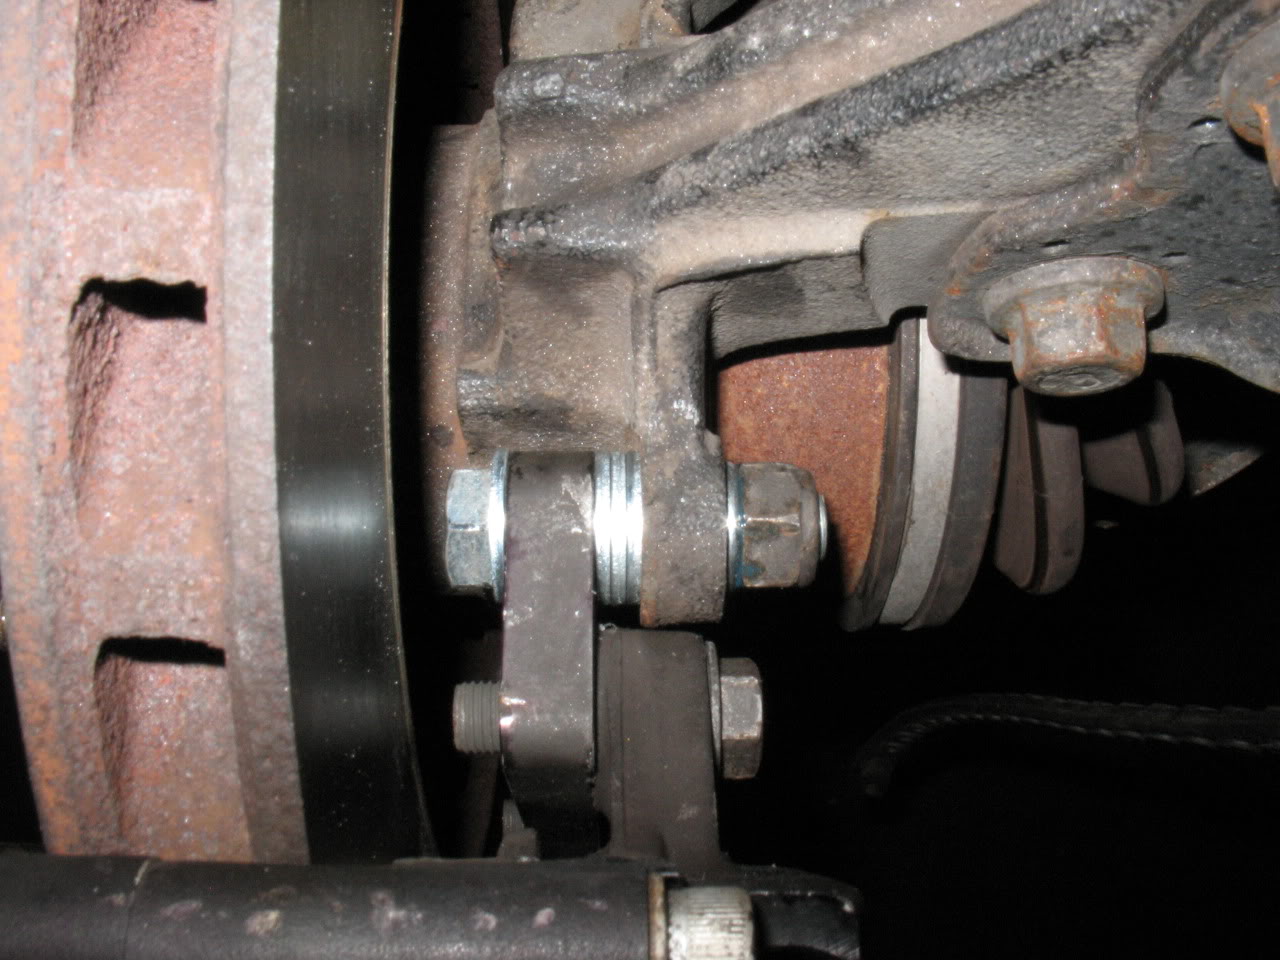
Going over what we had done, we were sure everything was installed properly, so we kept looking until we found what we believe could be the source of the problem. There is a little lip on the inside portion of the hub, and it looks like someone has tired to mill down the inside of the rotor where it meets the hub to get it to fit over the lip. I don't think they were successful. If you look at the pattern of the silver anti-sieze on the hub and back of the rotor you can see the rotor is not coming close to mating up flush with the hub.
So to recap, these brakes were originally for a 5th gen, and were then installed on a 99 Max, and are now trying to be installed on my 96 I30. All 4th gen hubs and brakes are the same AFAIK, so I can only guess the 5th gen hub is slightly different and these were hacked up at some point along the way and I wasn't told before I bought them. Needless to say, I'm kind of unhappy with the situation. If anyone can think of something we're missing or not thinking of, please let me know!
EDIT: I just talked to Josh and he seems to remember using washers on one or more of his many brake setups, but can't remember specifics about getting this one to fit.
I bought a used set of Wilwood calipers and 12.6" 6th gen 2-piece rotors with an Altima SER dogbone adapter from StillenMaxima (Albert), and the brakes were originally from Irish44j's (Josh's) 5th gen. Albert said he had these on his 4th gen with no problems, but when I went to install them ran into a big problem almost immediately. The rotor isn't centered inside of the caliper, so much so that you can't even install the outboard pad because there is just no room.
Going over what we had done, we were sure everything was installed properly, so we kept looking until we found what we believe could be the source of the problem. There is a little lip on the inside portion of the hub, and it looks like someone has tired to mill down the inside of the rotor where it meets the hub to get it to fit over the lip. I don't think they were successful. If you look at the pattern of the silver anti-sieze on the hub and back of the rotor you can see the rotor is not coming close to mating up flush with the hub.
So to recap, these brakes were originally for a 5th gen, and were then installed on a 99 Max, and are now trying to be installed on my 96 I30. All 4th gen hubs and brakes are the same AFAIK, so I can only guess the 5th gen hub is slightly different and these were hacked up at some point along the way and I wasn't told before I bought them. Needless to say, I'm kind of unhappy with the situation. If anyone can think of something we're missing or not thinking of, please let me know!
EDIT: I just talked to Josh and he seems to remember using washers on one or more of his many brake setups, but can't remember specifics about getting this one to fit.
Last edited by 95maxrider; Feb 20, 2012 at 08:41 AM.


Are all four of the 300ZX caliper pistons fully pushed back into the caliper? I recall that on my setup the rotor is slightly offset inside the 300ZX calipers, its not dead centered inside the caliper.

Nick...I don't remember my 5th genhub having that stress riser, really. I don't recall ever having an filament problem with the blehm rotors. But yeah, try to shim or space out the caliper bracket maybe.
Will check in. Once I get home
Will check in. Once I get home
I talked to Albert and he realized he forgot to give me some large washers to space out the caliper, but I think I have a bigger problem than that.
I will post up a picture later, but I think the main problem is that the hub size is different for a 4th and 5th gen. We tried reverse mounting the rotor and it wouldn't sit flush on the hub, there was about 1/4" gap between the two. Given the amount of dirt that we blasted off the back of the rotor to hub surface, I believe Albert may have been running around with the rotors not fully seated on the hub. Since the problem is the hub size in the rotor is too small, I think it's possible to machine it out until it fits the 4th gen hub, which is what it looks like someone already tried to do. Since Josh said he certainly didn't have to do that, I believe Albert might have done it a long time ago and forgot. I'll post up a pic or two later.
Oh, and to make matters even more depressing, one of the new rebuilt rear calipers I installed had a stripped thread in it so it was shooting out brake fluid when we bled the brakes. So out of the four brakes we tried to do today, only one was successful. This car doesn't want to be fixed. I won't even tell you what happened yesterday when Patrick and I tried to install my projector headlights and fogs

Last edited by 95maxrider; Feb 19, 2012 at 02:56 PM.
lol...geez...
well, shouldn't be hard to get the centerbore machined, in any case. The rotors are really lug-centric anyhow, so as long as it clears the hub center, you should be good to go.
well, shouldn't be hard to get the centerbore machined, in any case. The rotors are really lug-centric anyhow, so as long as it clears the hub center, you should be good to go.
Nick! Please do not assume I did anything with out asking me. I don't like that $hit. I never did crap to those rotors or the entire BBK at all. It is not my first BBK set up that I have owned to not know what I'm doing. I am no damn newbie to the BBK crap. Have you thought that your hub might be different than my hubs or the ones on the 5th gen I had them on??? When I threw them on my 98 4th gen they went on with no problem at all.
Nick! Please do not assume I did anything with out asking me. I don't like that $hit. I never did crap to those rotors or the entire BBK at all. It is not my first BBK set up that I have owned to not know what I'm doing. I am no damn newbie to the BBK crap. Have you thought that your hub might be different than my hubs or the ones on the 5th gen I had them on??? When I threw them on my 98 4th gen they went on with no problem at all.
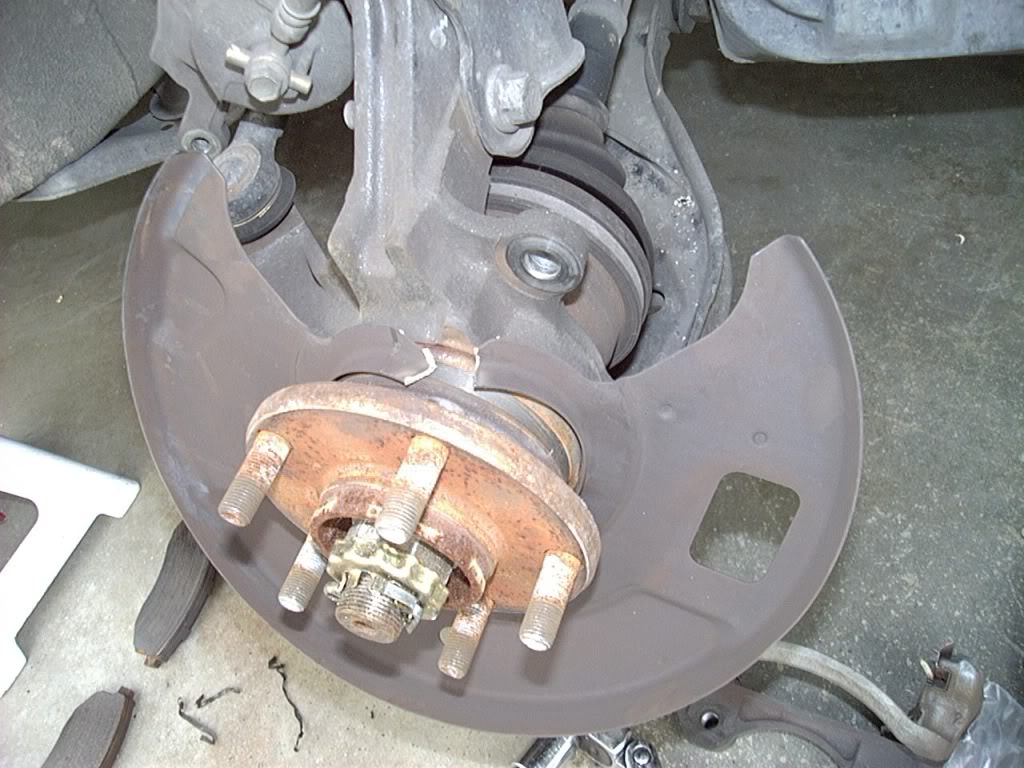
Here are some more of the pictures that illustrate the larger problem. I think it's less that the caliper is offset incorrectly and more that the rotor just doesn't sit on the hub. And I think there's evidence that this isn't the first time. Take a look at these pics:
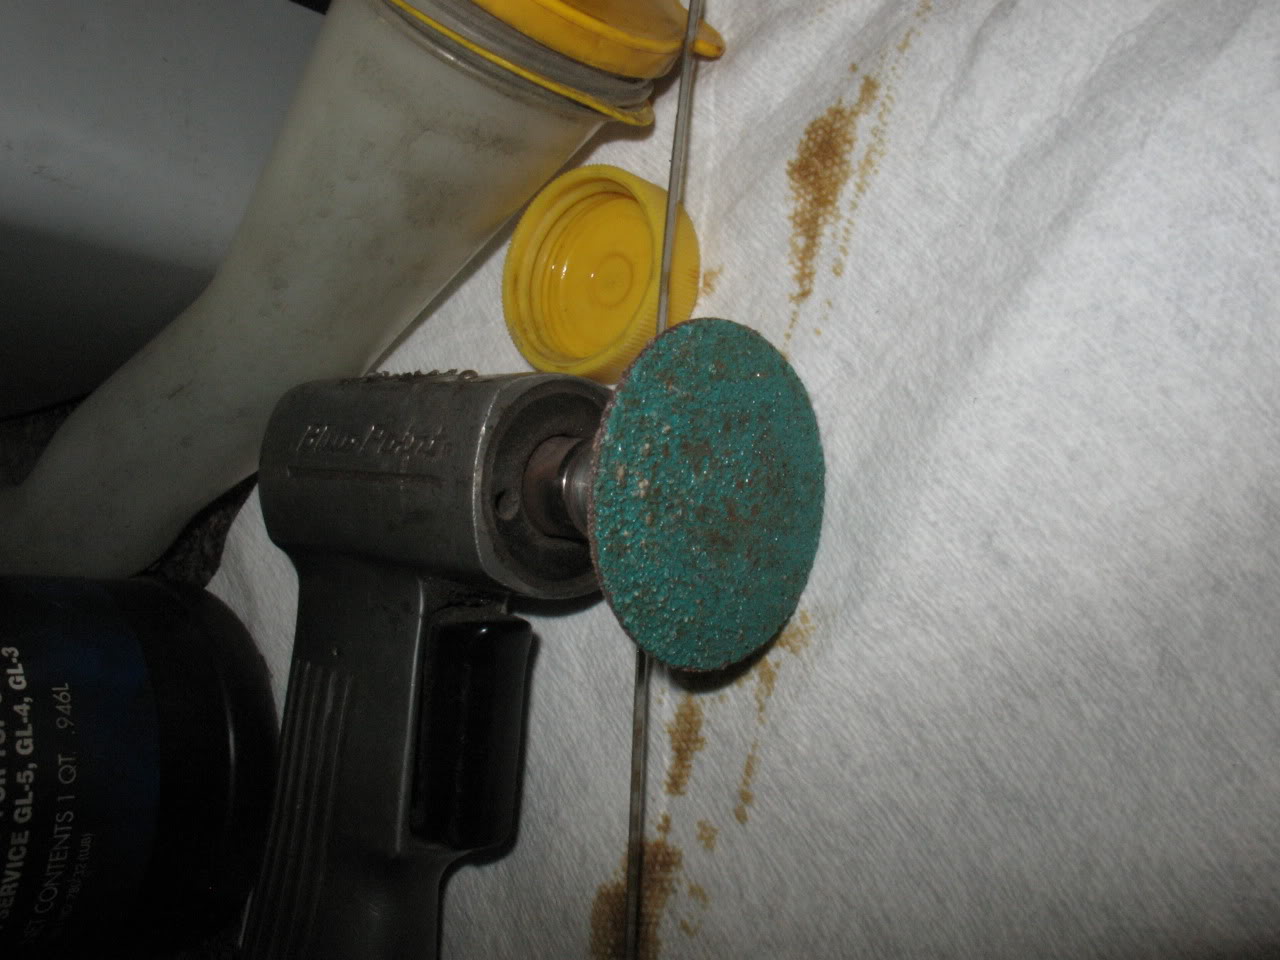
So to mill the rotors down and get them straight/get the rust off, we put them on our machine. Well they wouldn't sit flush on the machine, so we took the sanding wheel to the back of the hub mounting surface, and guess what came off? No, it wasn't rust, it was a caked on layer of dirt:
The only way such a think layer of dirt could accumulate that we could think of was if the rotor wasn't sitting flush on the hub and dirt was able to sneak in behind it.
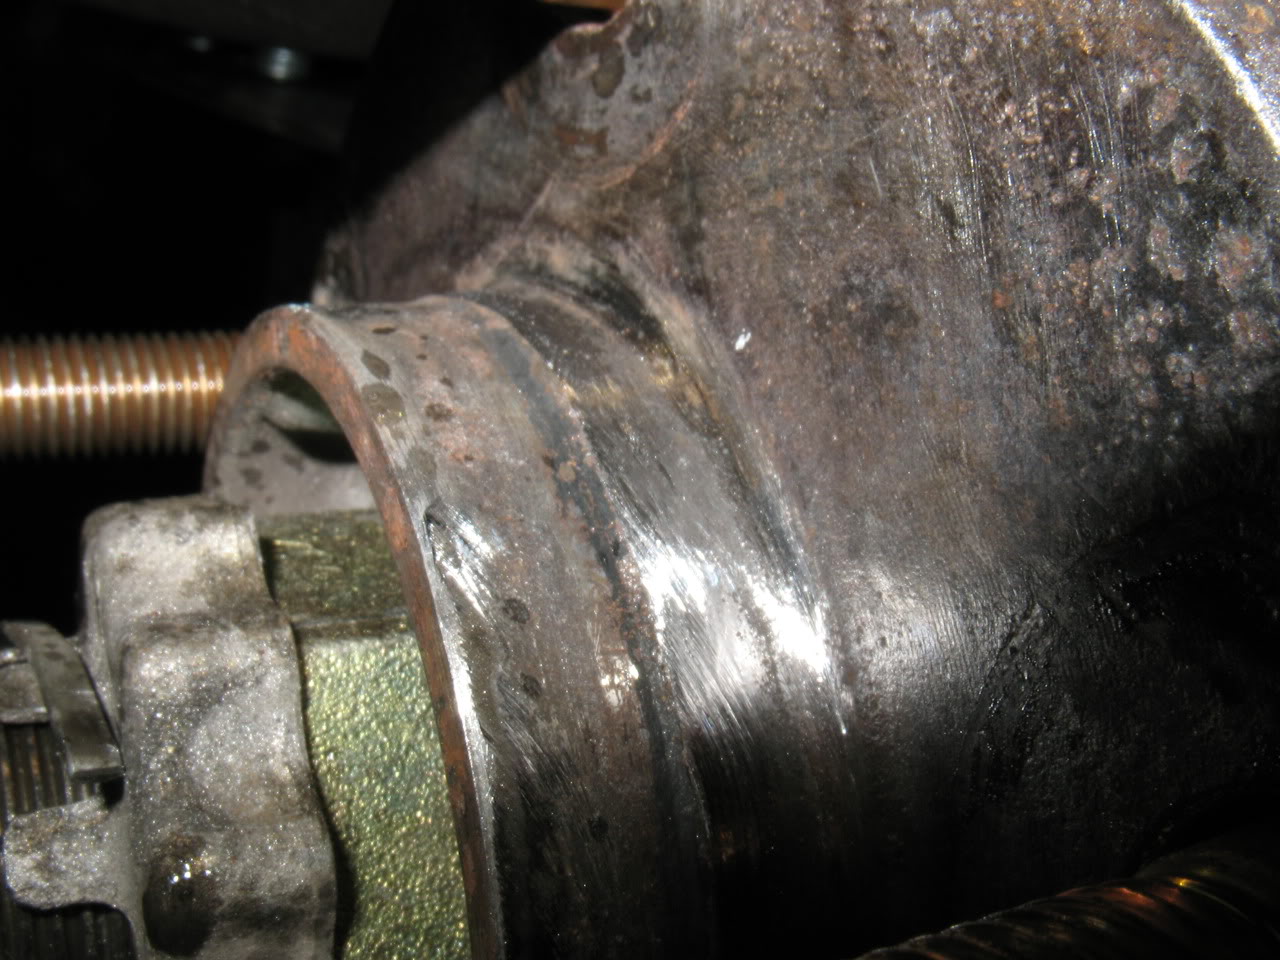
We reverse mounted the rotors to better illustrate how they don't/can't come close to sitting flush on the hubs

Since the cut marks on the inside on the rotors where they are supposed to mount to the hub don't look like they came that way from the factory (the cuts aren't even all the way around), it leads me to believe someone along the way did it. It was wrong for me to think that Albert did it, but I don't think my overall assumption is wrong. Please tell me if you think I'm missing something here.
So I guess my main question is this: are all 4th gen hubs the same? Do I have some weird batch of hubs that I just don't know about? These are unmodified, from the factory hubs. What is going on here?
Originally Posted by Irish44j
lol...geez...
well, shouldn't be hard to get the centerbore machined, in any case. The rotors are really lug-centric anyhow, so as long as it clears the hub center, you should be good to go.
well, shouldn't be hard to get the centerbore machined, in any case. The rotors are really lug-centric anyhow, so as long as it clears the hub center, you should be good to go.
Last edited by 95maxrider; Feb 20, 2012 at 08:48 AM.

Those look like my 2-pc rotors.. I know Josh bought two sets from me if you take a ride in the way-back machine. I'm not sure why you're having a problem with them, as I've never had an issue with them not fitting any of the hubs I tried them on. the IDs of the hats *should* have been machined identical to stock rotor dimensions, and the 4 or 5 I measured when I got the batch all measured the same as a stock rotor.
I've mounted those rotors/hats onto a 3 gen, 4 gen, several 5 gens, S14, and Z32 hubs all without issue.
Also keep in mind those rotors were never sold to mate with a Wilwood caliper. not to say they can't, but I never sold brackets or anything to fit those rotors with Wilwood calipers. shouldn't cause any issues with the rotors not fitting, but that's still not "my" work..
As for your issues, you might pop out your wheel studs and lightly file down the lip on the wheel hub or take a wire wheel to it. it could be built up with a thin layer of rust/dirt and not be wanting to fit due to some of that.
same goes for the inside bore on the rotor hats. you might put one of those flappy-paddle sanding wheels on a drill and smooth out any imperfections there. From the photos, I can't tell if that's silver anti-sieze or galling on the aluminum surface.
Last edited by Matt93SE; Feb 20, 2012 at 10:20 AM.
Nick, as Matt noted the rotors came from him. They fit my car perfectly (and they replaced OEM 6th gen rotors on my 5th gen, which also fit perfectly).
As to the Wilwood kit, it was from fastbrakes.
Here is my link to my original install thread. As you may recall, everything fit perfectly, but I was getting a bad squealing sound initially and took the kit off for the winter since I had just had a new kid and didn't have time to deal with it. (put back on in a couple months). In the end, I just had to do a better job bedding the new pads, and the noise went away, and the whole setup worked fine until I sold the car to Albert.
Nick, I thought I had to maybe use washers to space the caliper outward, but based on my own writeup that isn't the case (I think I was thinking of my z32 setup).
So there you have it.....it bolted right up to my 5th gen, and worked/fit fine the entire time I owned the kit. So any fit issue must have something to do with your hubs, or some other issue. IDK what else to tell you.
the original install (with stock 6th gen rotors)
http://forums.maxima.org/5th-generat...s-install.html
the re-install (with Blehm 2-pc rotors)
http://forums.maxima.org/5th-generat...-baby-too.html
Well I just met up with Albert and he gave me the washers he found installed when he removed them from Josh's 5th gen and installed them on his 4th gen. So yes Josh, you did use washers when you installed this kit on your car. Do you remember why? Are you sure you don't remember grinding down the inside lip of the rotors? Albert was positive that he wasn't the one to dremel/grind down the inside part of the rotor, so I'm really not sure why the inside part of the rotor looks like that.
Matt- The only anti seize you're seeing on the back of the rotor is on the part that goes around the hub; none is on the part that has been ground down. A very small amount did make it to the back of the rotor that is supposed to mate to the hub, but only on 5% of the surface, instead of the 100% you would expect.
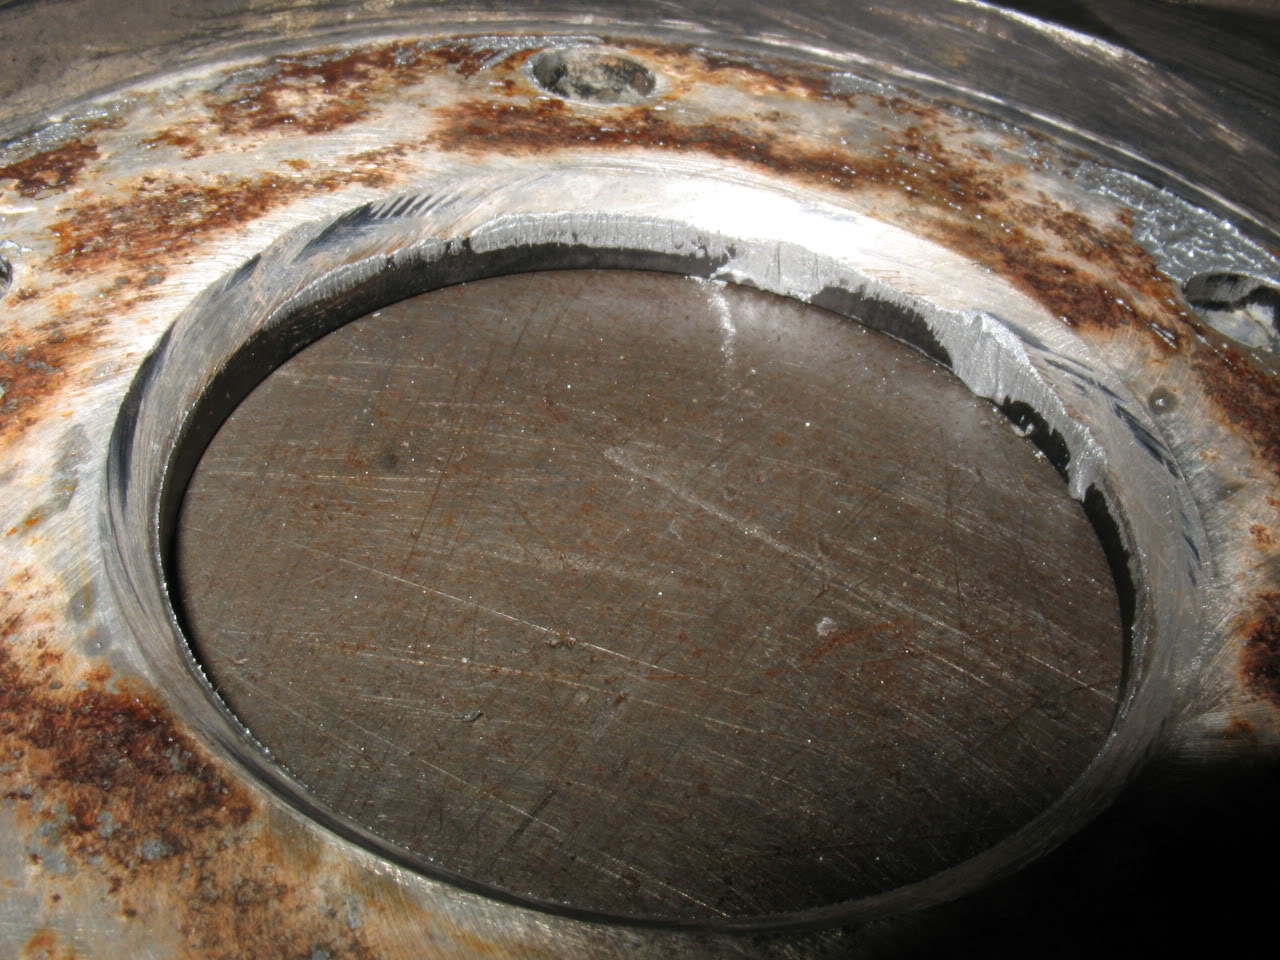
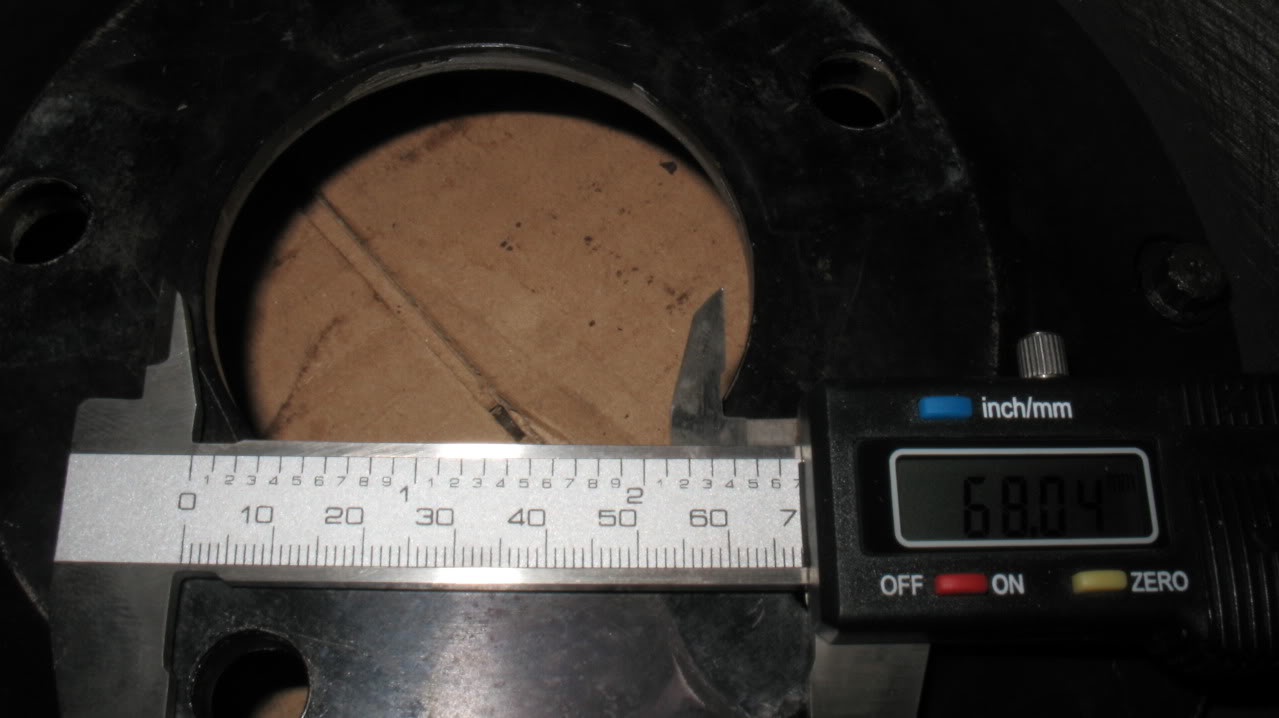
I measured the ID of the rotors and got about 68 mm
Since it's clear that these don't fit over my hubs, the only thing I can think is that either my hubs have some incredible amount of buildup on them preventing them from seating properly (which has never been an issue with my current Q45/Cobra setup) or my hubs are different from every other Maxima hub (which doesn't make sense because my current setup fits perfectly). What am I missing here?
The only things I can think to do at this point are to order a set of new hubs and see what they look like or send these rotors to a machine shop and get them bored out to fit over my hub. I kind of at a loss at this point. And if I do get them bored out, I can't be sure about how that will affect the spacing of everything and if I will need different sized washers, more/less washers, etc......
Matt- The only anti seize you're seeing on the back of the rotor is on the part that goes around the hub; none is on the part that has been ground down. A very small amount did make it to the back of the rotor that is supposed to mate to the hub, but only on 5% of the surface, instead of the 100% you would expect.
I measured the ID of the rotors and got about 68 mm
Since it's clear that these don't fit over my hubs, the only thing I can think is that either my hubs have some incredible amount of buildup on them preventing them from seating properly (which has never been an issue with my current Q45/Cobra setup) or my hubs are different from every other Maxima hub (which doesn't make sense because my current setup fits perfectly). What am I missing here?
The only things I can think to do at this point are to order a set of new hubs and see what they look like or send these rotors to a machine shop and get them bored out to fit over my hub. I kind of at a loss at this point.
And if I do get them bored out, I can't be sure about how that will affect the spacing of everything and if I will need different sized washers, more/less washers, etc......
Last edited by 95maxrider; Feb 20, 2012 at 12:08 PM.
So you've been using the Cobra rotor setup for a while? were you using the centering rings with them?
If not, then you definitely have at least a small amount of surface rust buildup on the center of the hub.
pop out all of your wheel studs, clean the gobs of antisieze off, then use a wire wheel on a grinder to clean up the hub until you have shiny steel around where the rotor fits.
you might even need to take a small file or some emory cloth and run it around there a few times to clean up the surfaces. I have a feeling that will solve your problem.
Forgive me if I've misinterpretted anyof the posts here, but...
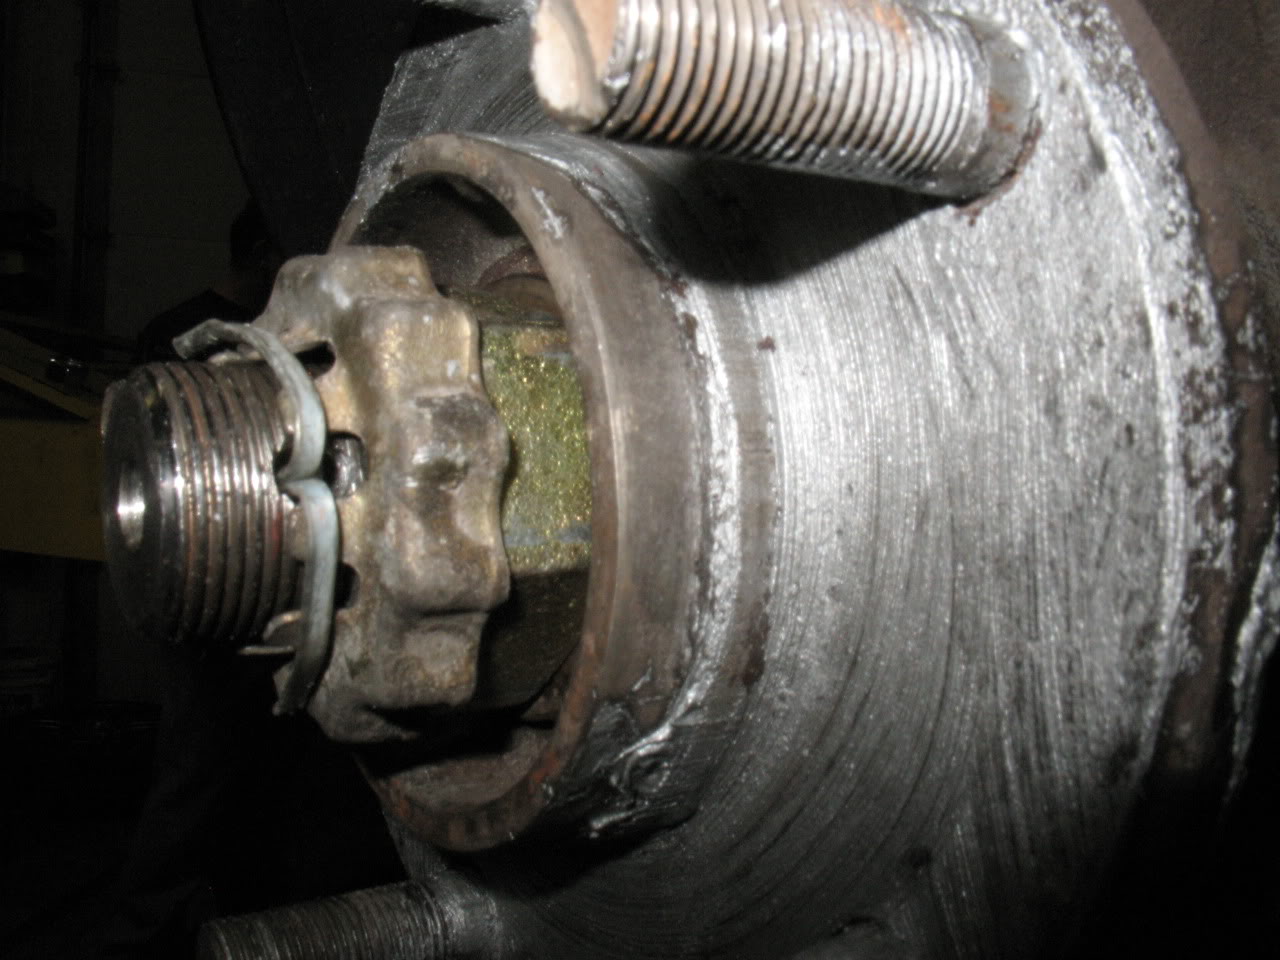
It looks like you have a leftover hubcentric ring seized to your hub (as the 3rd photo in the original post) which seems to be camoflauged by the antiseizing compound I think. I think all Nissan hubs are 66.1mm IIRC which should easily "clear" the 68mm of the hat shown on post#11. I think you'll need to "remove" those hubcentric rings from your hub as I don't think those are "risers" or whatever...
Obviously if the hat doesn't fit flush with the hub your "centering" of the Wilwoods may be off. Were the "spacers/washers" to center the Wilwoods? You may not need them if what I suspect is right...
Once again forgive me if I missed something as it's late for me...
Forgive me if I've misinterpretted anyof the posts here, but...
It looks like you have a leftover hubcentric ring seized to your hub (as the 3rd photo in the original post) which seems to be camoflauged by the antiseizing compound I think. I think all Nissan hubs are 66.1mm IIRC which should easily "clear" the 68mm of the hat shown on post#11. I think you'll need to "remove" those hubcentric rings from your hub as I don't think those are "risers" or whatever...
Obviously if the hat doesn't fit flush with the hub your "centering" of the Wilwoods may be off. Were the "spacers/washers" to center the Wilwoods? You may not need them if what I suspect is right...
Once again forgive me if I missed something as it's late for me...
So if we can agree that I have normal hubs, where does that leave us? And what do we make of the grinding marks on the rotors? Does any of this make sense to anyone?
I'm hoping Albert posts up a picture of how the washers looked when he had this installed on his car. I will see if I can get him to post up the pic.
Well it shows you how long it's been since I've done work on my brakes,LOL. I had a suspicion that my solution was too easy since we had so many veterans already helping on this thread. I'll take a look at them tonight. Time for work... [yawn]
BTW - no need to worry on the washers for now as you have to figure out how to get the hat flush with the hub THEN you center the caliper... All my old photos of my Wilwood and AP install on archived on my old drive somewhere... I'll look for them later.
BTW - no need to worry on the washers for now as you have to figure out how to get the hat flush with the hub THEN you center the caliper... All my old photos of my Wilwood and AP install on archived on my old drive somewhere... I'll look for them later.
Last edited by Chunger; Feb 21, 2012 at 06:38 AM.
As to why..... Obviously I used them to space the caliper out (or in) to line up with the rotor. That seems pretty clear, especially considering your problems with misalignment. There is NO chance I used them to do anything involving the rotor itself. The rotor sat flush on the hub face just like every other rotor I've ever used on every car I've ever owned. This is a fact. I would NOT have driven a car with a rotor not sitting flush (and that would have vibrated like a ****). Using washers to space in or out the caliper alignment isn't an issue, I definitel did that on the z32 setup as well to center it all.
So the solution is to use the washers, space it out correctly, and it should fit once you get the rotor on.
IDK what to tell you. No chance I take a dremel to expensive custom aluminum rotor hats. You see how I do things...I woudln't just put random gashes in it anyhow, if I was doing it I would do it right, at a machine shop. But since you probably have to machine the bore wider anyhow for your hubs, that's a moot point since that grinded area will be machined off.
I can't speak for anything regarding the brakes after I sold the car to Albert, so I won't.
The only things I can think to do at this point are to order a set of new hubs and see what they look like or send these rotors to a machine shop and get them bored out to fit over my hub. I kind of at a loss at this point. And if I do get them bored out, I can't be sure about how that will affect the spacing of everything and if I will need different sized washers, more/less washers, etc......
And if I do get them bored out, I can't be sure about how that will affect the spacing of everything and if I will need different sized washers, more/less washers, etc......Last edited by irish44j; Feb 21, 2012 at 06:52 PM.
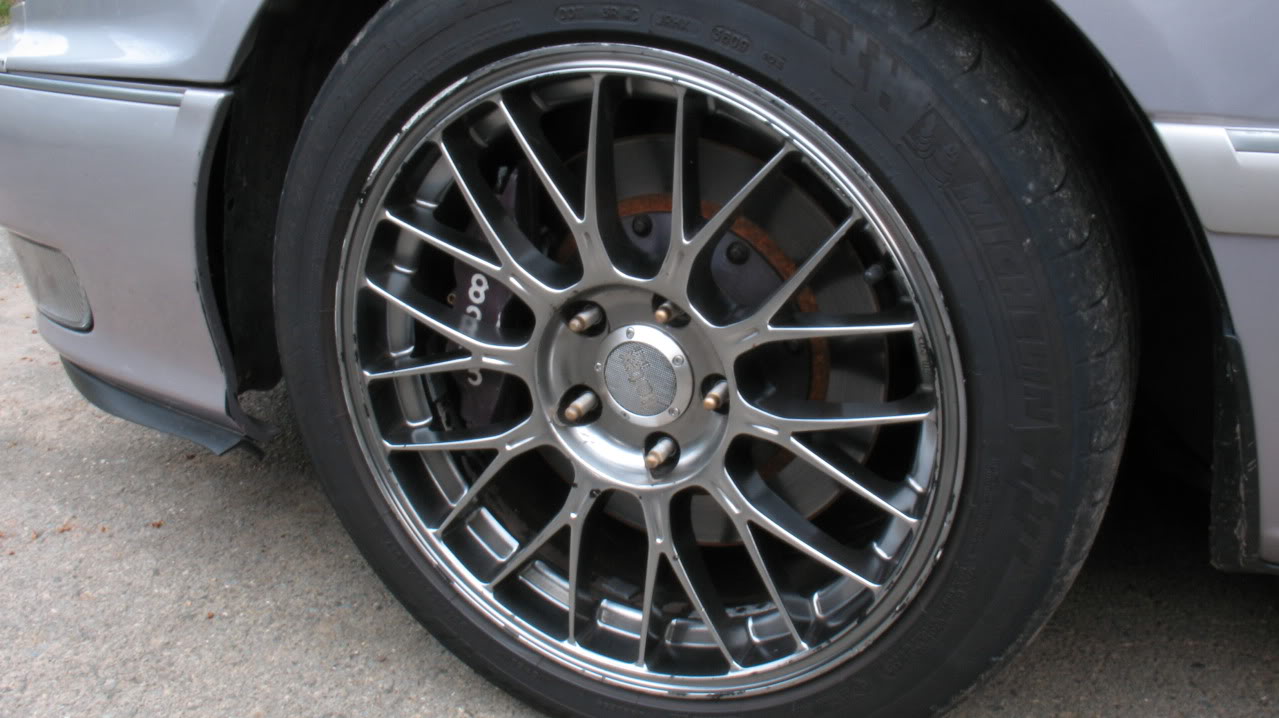
I just dug through 5 years of photos on my backup drive and found one of my front hubs that I took when I installed Matt's rotors the first time (in April 2006, with z32 calipers).
Take a look - no bump-out at the hub bore, as I said when we talked on the phone. The hub bore turns directly into the rotor face.
So either you have some kind of funky hub, or your hub is different from a 5th gen hub, or you have a hubcentric ring jammed on there. This is clearly the cause of the problem you're having.
Last edited by irish44j; Feb 21, 2012 at 05:10 PM.
Found an old pic but I only had a 1.3M camera!
I still think that riser looks bigger on your photo than on mine below. Someone with easy access could measure it for you maybe. You could try seeing if yours is aluminum (hence soft) then you would know it isn't "stock"...
centering:
I still think that riser looks bigger on your photo than on mine below. Someone with easy access could measure it for you maybe. You could try seeing if yours is aluminum (hence soft) then you would know it isn't "stock"...
centering:
Last edited by Chunger; Feb 21, 2012 at 09:02 PM.
By that, do you mean that cheap aftermarket hubs, like a Dorman, are aluminum, while OEM hubs are steel?
I think my plan of attack is going to be to get my hands on a 4th and 5th gen hub as well as a 6th gen rotor and compare them all. That should give me a better idea of what's going on. If I need to bore out the hub, then so be it.
As I mentioned earlier, the dog bone brackets say "Altima SE-R" on them. Does anyone know for sure if 6th gen rotors are identical to Altima SE-R rotors?
Josh- Looking closely at that picture I see what appears to be a dark line going around the hub in the same place my hubs have the riser. It kind of looks like those hubs have the same riser mine do, just less noticeable due to the angle of the photo. Thanks for digging up that picture and for the call last night!
BTW, after doing a quick search online of 4th/5th gen hubs, both appear to have the riser on them.
Last edited by 95maxrider; Feb 22, 2012 at 06:32 AM.
I meant the raised part in case it is a hubcentric ring (though not likely from what Matt says). Hubs should be steel and much harder.
Check if your riser is in good condition (i.e. round without any burrs). If it isn't maybe there is some interference with the aluminum hat.
Clean up your hub of all the antiseize and post another pic if you can.
Worse case is that you need to machine the hat's ID larger (easier than getting another set of hubs I would think in case they are not OE).
BTW those "grinding marks" look more like they may be from scraping by an out of round "hub/riser" which may be steel and harder than the aluminum hats. The countersunk part of the hats is normal (as it is still coated black).
Last edited by Chunger; Feb 22, 2012 at 06:47 AM.
I've said it twice, and I'mma say it again.
1. remove wheel studs from hub.
2. clean all the antisieze crap off your hub. you're mating anodized aluminum to steel- it's not going to adhere like iron rotors, even in the rust belt.
3. take a wire wheel to the hub and clean it up.
4. clean the inside of the rotors (you've done this step)
5. you MIGHT have to take some emory cloth or a flappy sanding disc on a dremel and sand off the rust from the hub.
6. try to fit the rotors again.
until you do that, you're wasting everyone else's time.


 what a read.
Well we had much better luck this weekend. I'll post up pics later, but we we able to get the rotors to finally sit flush on the hub. I ordered a new hub to compare mine with, and they looked identical, so we knew my hubs were normal. First we tried to just use some rough sand paper to get any corrosion off of the hub lip, but that didn't do anything, so we went at it with a sanding disc and had to grind off some material from the hub to get the rotor to sit, but it eventually did.
While I was in there, I replaced both of my rebuilt A1 Cardone rear calipers with new rebuilt WBR calipers since my e-brake had frozen a while ago when it got real cold, and the calipers were the likely culprit, since I had replaced the e-brake cables a year or two ago. Thankfully my e-brake feels much more solid now and actually works. Additionally, we learned that one of my rear calipers had seized and wasn't working. Glad to know I have four working brakes on my car now!
However, after bedding in the (used but still very thick) pads with the 2-piece rotors, my pedal feel is still very squishy. It feels like I still have air in the lines, but I don't. My buddy was speculating that may be because I've gotten used to driving around with a seized rear caliper which made the pedal feel stiff, but the car just doesn't feel like it's stopping as hard as it used to. Albert said the pads are Wilwood, but I'm not sure of which compound they are. I don't know what else could be causing the brakes to feel like this. Any thoughts?
When I sold the car to Albert IIRC the Wilwoods had Hawk HPS in them. They originally came with Wilwood BP-10 pads, and I got the hawks just to compare (they both feel about the same). But I also gave him the lightly-used BP-10s, so I would assume that's what pads you have now.
Good to hear yo ugot it all together though. Did they end up lining up, or did you use washers to space them out?
the wilwoods definitely shouldn't feel spongy. On mine they bit WAY harder than the stock, 6th gen, or z32 setup. I'm thinking you may just need to bed in better, since you have used pads and newly-turned rotors.
When I sold the car to Albert IIRC the Wilwoods had Hawk HPS in them. They originally came with Wilwood BP-10 pads, and I got the hawks just to compare (they both feel about the same). But I also gave him the lightly-used BP-10s, so I would assume that's what pads you have now.
Good to hear yo ugot it all together though. Did they end up lining up, or did you use washers to space them out?
No, they weren't even close to lining up, we had to use three washers to get them even.
BTW, thanks for the help everybody, I couldn't have done it without you!
 Pics coming soon!
You shouldn't have had to use that many washers to line up. that could be part of the problem with the spongy brakes, but it could also be air in the lines still.
a couple of things to check..
1. pull off a wheel, then put some washers over the brake rotor and torque your lugnuts back down so the rotor is firmly in place.
1a. now start the car and have a helper mash on and off the brakes while you watch the calipers. do any of them move in relation to the rotor between no brake and full brake? If so, then something is slightly out of line and you need to check the alignment of all your stuff again.
2. the wilwood calipers often need to be perfectly vertical when they're bled. What Wilwood suggests is that you remove the caliper from the knuckle and somehow hold it vertically (sometimes you can get away with removing just one bolt and tilting it straight up, but I don't think that works with our large rotors.).
Now stick a block of wood or soemthing in there to take up the gap between the pads while the caliper is vertical.
Bleed the brakes again. start on the inside bleeder and do a few pumps, then move to the outside and do a few. then go abck to the inside bleeder and keep bleeding. any air in the lines will go to the inner bleeder screw. and air in the outer half of the caliper gets forced to the outer bleeder.
try that and see what happens.
If I'm not supposed to use that many washers, what am I supposed to do? What other options do I have? Josh said he used washers when he first installed them and he loved the pedal feel, so I'm hoping that's not the problem.
We did bleed both inside/outside bleeders on the calipers, but I can't remember the order. I will try your advice this weekend. Thank you
Since the HD sand paper didn't help the hub we had to use this:
And we were able to do this:
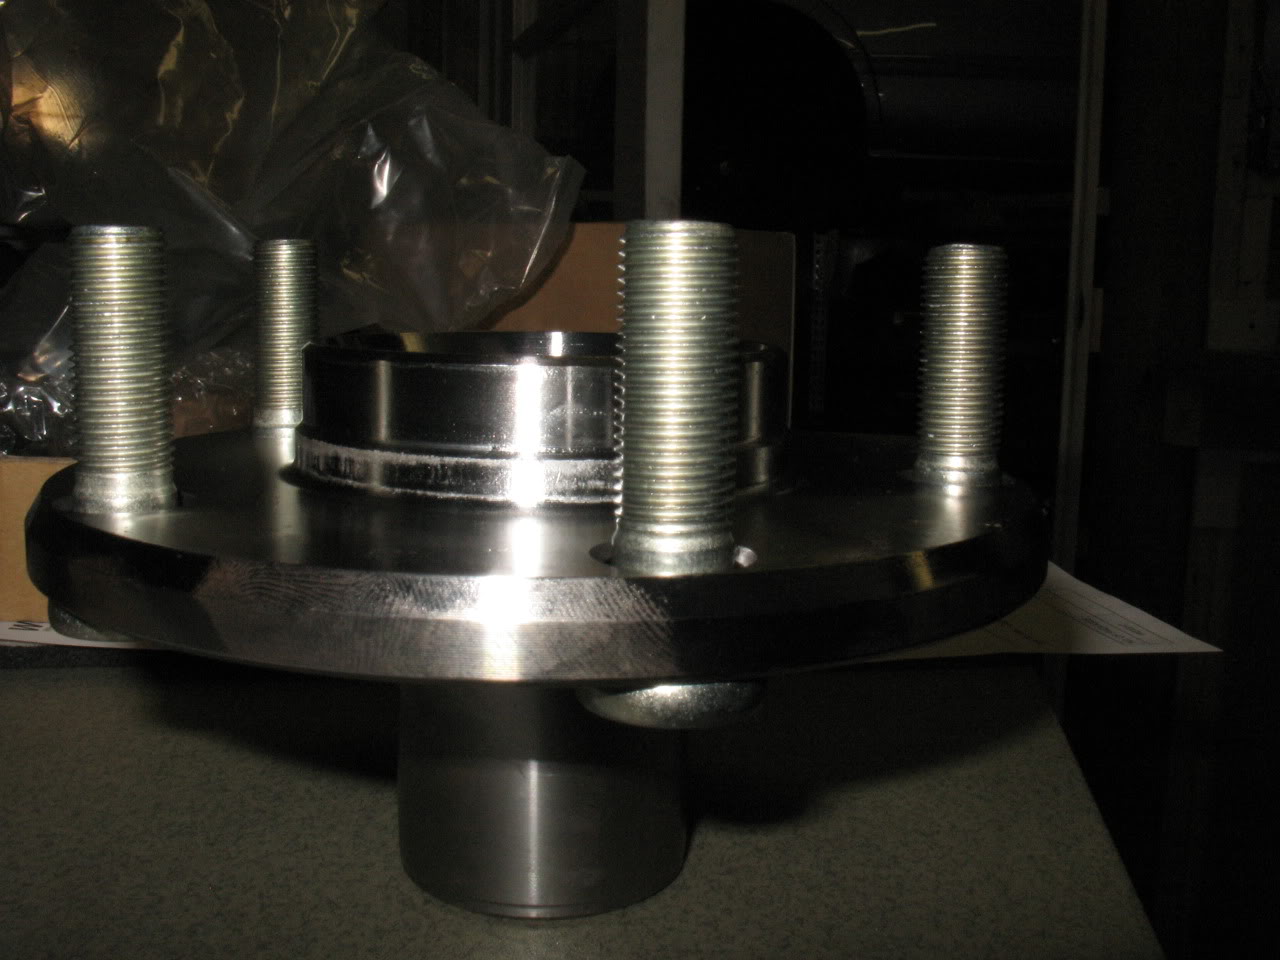
And just to compare, this is what a new hub looks like:
After the ARP studs were in, we tried using the spacers Albert gave but, but they weren't enough, so we had to get longer nuts and bolts to fit the three washers.
And the results:

Also bought these since the kit didn't come with them:
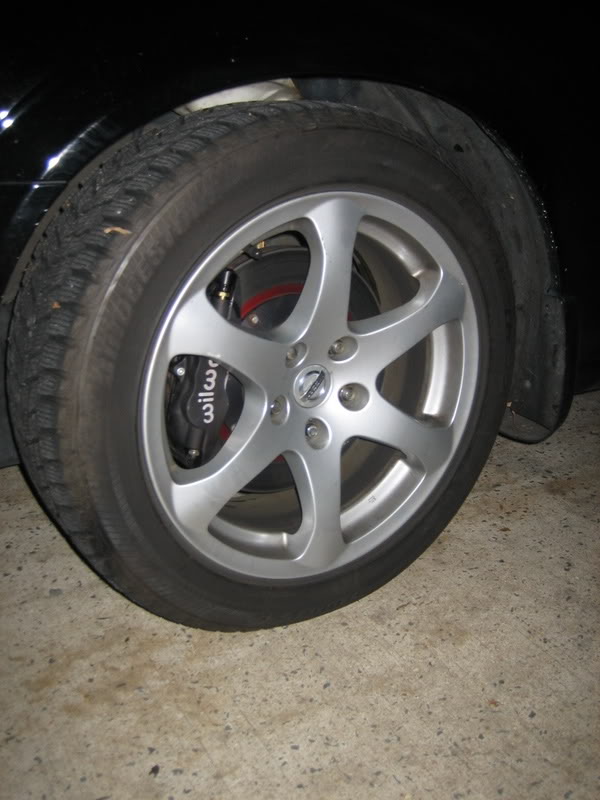
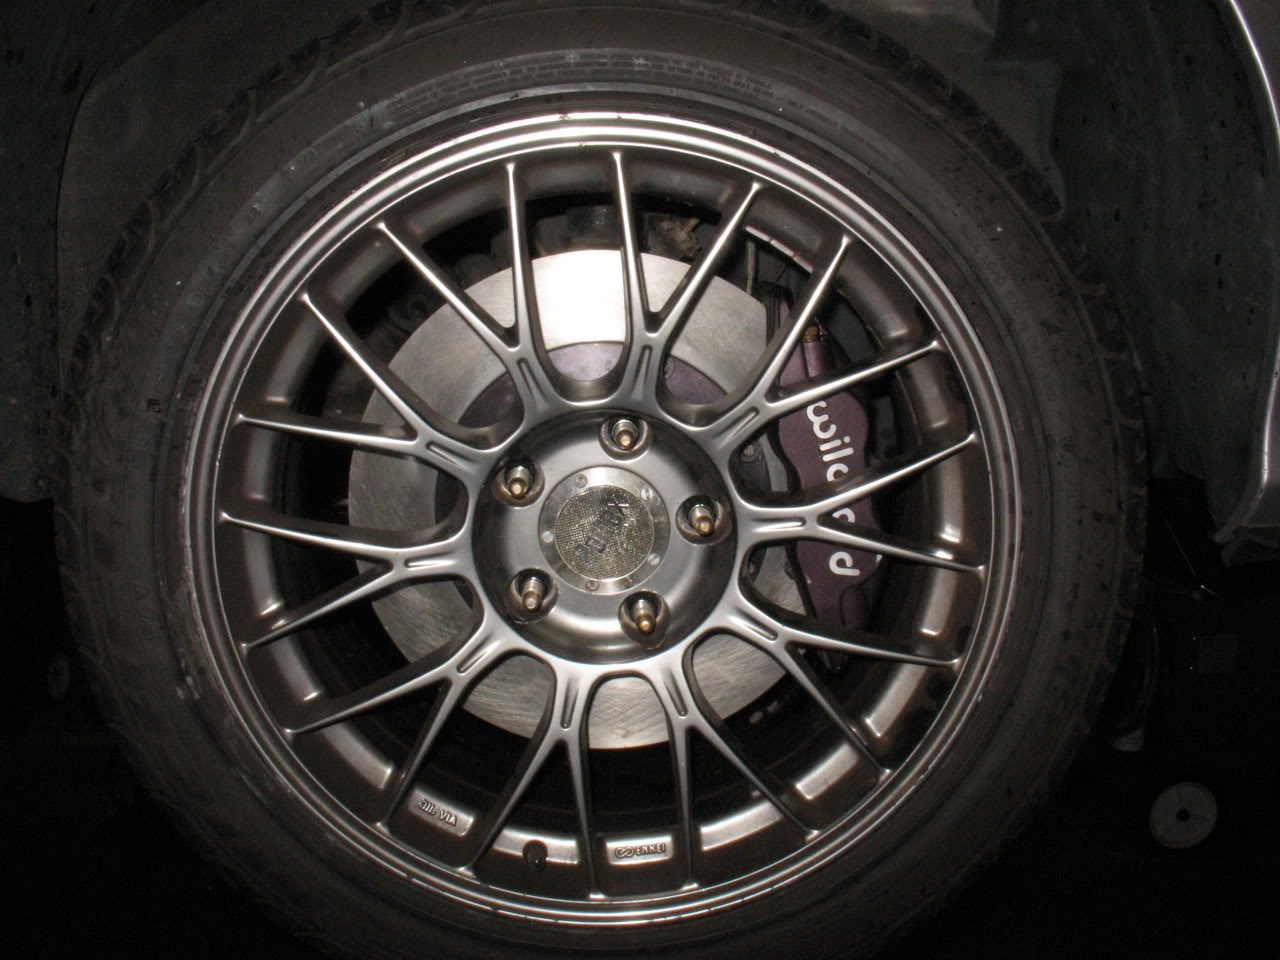
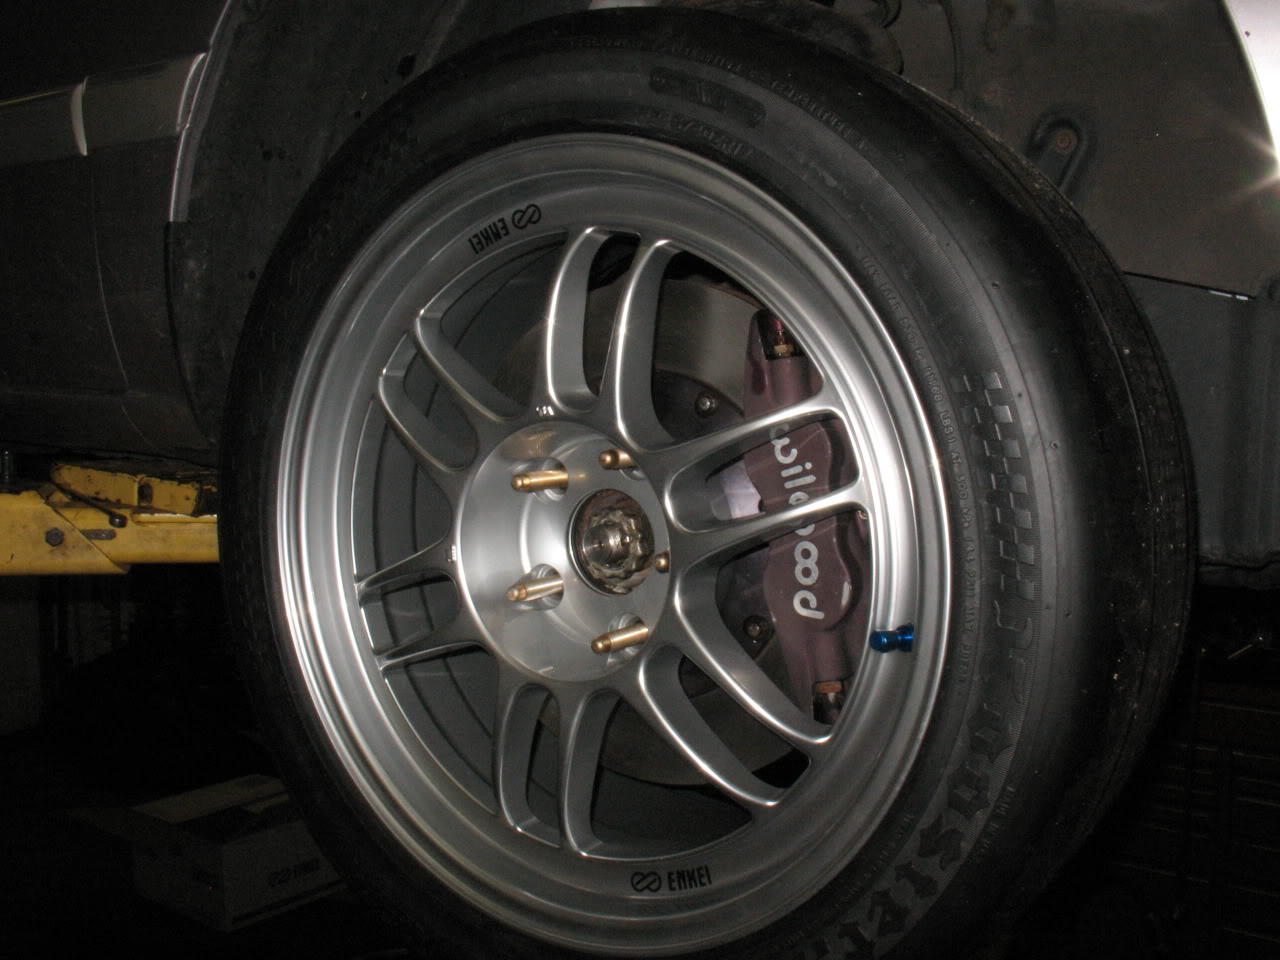
Voila It's VERY tight with the RPM2s....but with the RPF1s.....

.
.
.
.
.
.
.
.
.
.
.
.
.
.
.
Ok, fine:

And we were able to do this:
And just to compare, this is what a new hub looks like:
After the ARP studs were in, we tried using the spacers Albert gave but, but they weren't enough, so we had to get longer nuts and bolts to fit the three washers.
And the results:
Also bought these since the kit didn't come with them:
Voila
It's VERY tight with the RPM2s....but with the RPF1s..... .
.
.
.
.
.
.
.
.
.
.
.
.
.
.
Ok, fine:
Last edited by 95maxrider; Feb 29, 2012 at 05:55 PM.
wierd....I'm 100% certain I didn't have to use three washers there. Maybe the 4th gen spindle is just different from the 5th gen, that's all I can think of. It looks like you're having to space it more outward than I did - are you certain that the rotor is actually seated on the hub face? wierd....
btw, that looks sweet with the Enkeis...
btw, that looks sweet with the Enkeis...
The rotor is definitely flush on the hub now.Yeah, I'm pretty psyched about the new Enkeis and Hoosiers. There is an SCCA ProSolo event at FedEx on 4/14+15 that I really want to go to. Have you ever run ProSolo? I bet your extra HP would really come in handy there with the drag strip-like launch! You should come!
These washers could also just be a little thinner than the ones you were using The rotor is definitely flush on the hub now.
Yeah, I'm pretty psyched about the new Enkeis and Hoosiers. There is an SCCA ProSolo event at FedEx on 4/14+15 that I really want to go to. Have you ever run ProSolo? I bet your extra HP would really come in handy there with the drag strip-like launch! You should come!
The rotor is definitely flush on the hub now.Yeah, I'm pretty psyched about the new Enkeis and Hoosiers. There is an SCCA ProSolo event at FedEx on 4/14+15 that I really want to go to. Have you ever run ProSolo? I bet your extra HP would really come in handy there with the drag strip-like launch! You should come!
I should probably wrap this thread up!
Well we re-bled the brakes like Matt said, but we didn't see any air bubbles come out so we moved to the back and re-bled those just in case. All we got were three tiny bubbles, but nothing that would indicate any real air in the lines. After I pumped up the brakes I could have sworn they feet even spongier than before. I started to wonder WTF is going on here? We checked to see that all the pistons were sliding together and they were. Out of ideas, I decided to just go for a drive and see how it feels.
Lo and behold, I had a normal feeling brake pedal! I'm not sure what did it, but in some sense I don't even care at this point. The pedal feel and ABS modulation/feedback are much improved over the Q45/Cobra setup. It's very firm and reassuring. It's also very clear that my brakes are very biased towards the front, as they are very easy to lock up. However, there just isn't that bite that I was hoping for. They stop well, but I don't think they stop the car any quicker than the previous setup. Sometimes I feel like they even stop worse than before. I'm hoping a rear BBK from FB will solve that. I'm also not sure of the brake pad compound, so maybe that needs to be changed to something more aggressive. I used to run Hawk HPS pads (and still do in the rear) but maybe I should step up to the Hawk DTC 05, which was what was going to come with the new Wilwood kit from FB that I originally ordered. This is still mostly a DD, and temps for auto-x events are low, so I don't need anything crazy, I would just like more initial bite. Any advice would be appreciated!
I started a pretty massive build thread in preparation for the 2012 racing season, so check everything else out!
Last edited by 95maxrider; Mar 16, 2012 at 06:01 AM.

Thread
Thread Starter
Forum
Replies
Last Post
Cant_Get_Ryte
5th Generation Classifieds (2000-2003)
3
Aug 28, 2015 06:41 AM
RealityCheck
4th Generation Maxima (1995-1999)
2
Aug 5, 2015 06:18 AM