
My new system install in progress w/pics
 08-20-2009, 07:46 PM
#1

My new system install in progress w/pics
First I would like to thank Don for the Dyns anyone that needs a miracle worked on timing this man can do it!
Sorry I'm a beginner at documenting these things. This build is taking place at Car Stereo plus in Lynnwood Wa.
System will consist of
116 sq ft Damplifer Pro
40 Sq Ft Scoche Accumat
200 Amp Excessive Amperage alternator
Eclipse CD7200 MKII
Genesis Profile 4 Ultra bridged for front stage
Genesis Profile 2 for rear fill
Genesis Profile Sub Ultra for sub stage
Dynaudio 362 3 ways for front stage mids and highs in kicks and custom door panels for 8" Midbass
CDT CL-6EX coaxials for rear fill (will need it for video in the future)
2 Incriminator Audio Flatlyne 12" 2OHM DVC in IB firing thru rear deck.
We are also replacing interior while everything is ripped out to custom 2 tone leather with perf inserts, door panel inserts and matching suede headliner.
The project Vehicle


 08-20-2009, 07:48 PM
#3


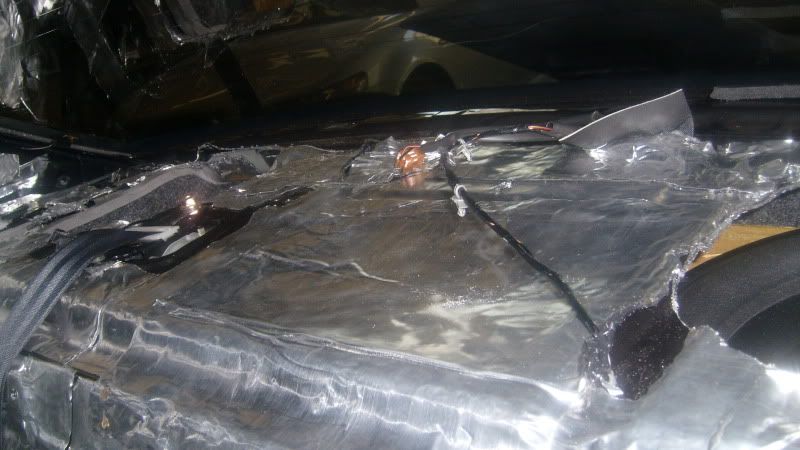
more Damp pro notice the door arent completely plugged up as I am waiting on my lottery gift from Ant to complete the doors.
Rear deck is soundproofed top and bottom
trunk is completely done and closed cell foam applied in trunk.

Pick of the Alti Zsport is putting it in tonite for me they said they would take some pics as if it matters but I wanted some will post later.
08-20-2009, 07:49 PM
#4

bottom baffle with subs completed and hung from rear deck so subs vent thru the rear deck As outlined in Scott Buwaldas' Altima
the trunk scissor style support system had to go to make way for the baffle so I copied Scott again with Hood struts
this baffle will eventually have a Perforated leather beautification panel in front to match the new interior and the Amp rack will be vlack vinyl with the perf accents
The Amp rack will be the seal between the rear seat and the trunk, I was going to use the spare tire well for an amp rack but decided since I will bag this car the spare tire well would be better suited for 2 small air tanks with plexi cover (no heat issues)
Q logic kicks painted to match interior and reinforced with a chitload of accumat hold the 142's and 102's

 08-20-2009, 07:52 PM
#5


Mapping Amp rack placement

seats out and at upholsterer

cabin side of trunk passthru will be covered in Perforated leather to match seats. When I go active this will be the parking place of my bitone
08-20-2009, 07:52 PM
#6

trunk passthru seal and base for amprack test fitted ready for black vinyl to match interior and eventually frame of the plexiglass panels covering air compressors on both sides of trunk.

another pic of the kick panels. Alot of people dont like qforms I think they look awesome a bit flimsey thos so we used ALOT of accumat on them
factory seat covers removed the foam on the back looks good but the seat cushons will be replaced with memory foam


my sons booster seat is also getting a makeover of black leather with grey perf insert to match the new interior. pics of seats completed and installed should be up tomorrow
08-20-2009, 07:53 PM
#7
some pics of the new rear deck made of 1/2" MDF the cutouts are 12" rear deck is wrapped in black vinyl to match the seats and vents covered with grill cloth to keep Power Rangers out of my enclosure. If the vent holes need to be made smaller for tuning the sub response from quasi 5th order/IB to quasi 3rd order enclosure we can produce MDF plugs and wrap those in the contrasting Perforated leather and insert in the 12" holes giving the appearance of a planned 2 tone vent to match the interior.


also notice there is always room for another 12 in this set up with very little modification needed.
also notice there is always room for another 12 in this set up with very little modification needed.
Last edited by phxgold; 08-20-2009 at 08:05 PM.


 08-21-2009, 10:58 AM
#14
Thx for the compliments folks.
I am going to upload some more pics in a bit.
as far as final pics i will have them by sunday but the final pics will be final for this stage.
once this install is done the turbo and bulletproof tranny will be going in as well as the uas air suspension which will be intigrated into the trunk with the air tanks in the spare tire well and compressors on each side in the aft section with plexi windows ,integrated upholstery, and neons. the center console dash kit will be ripped out and custom fabricated to include gagues above the air vents and the auto leveling system for the suspension molded into the area below the headunit. and quite possibly a digital dual zone climate control upgrade. (logostics are still in the works)
08-21-2009, 10:59 AM
#15

Is it easy to get wire inside the door panels on the 5th gen? I am putting some peerless 6.5's in my 4th gen and I don't want to use factory wiring. I assume its probably similar with the 5th so I figured Id ask. I am doing my install this week as well. Very clean install and good job with the deadener.
08-21-2009, 11:42 AM
#16
Is it easy to get wire inside the door panels on the 5th gen? I am putting some peerless 6.5's in my 4th gen and I don't want to use factory wiring. I assume its probably similar with the 5th so I figured Id ask. I am doing my install this week as well. Very clean install and good job with the deadener.
08-21-2009, 11:49 AM
#17
New pics!
trunk amp rack base in place and 2 channel mounted notice the support blocks on either side. Those will support the 2 larger amps bases that will sit at an angle meeting at the base of the first 2 channel forming a pyramid.


cabin side of trunk wall/amp rack with crossovers audio battery and spaghetti!

front seats wrapped and ready to install


trunk amp rack base in place and 2 channel mounted notice the support blocks on either side. Those will support the 2 larger amps bases that will sit at an angle meeting at the base of the first 2 channel forming a pyramid.
cabin side of trunk wall/amp rack with crossovers audio battery and spaghetti!
front seats wrapped and ready to install
Last edited by phxgold; 08-21-2009 at 11:57 AM.


 08-22-2009, 07:41 AM
#22
the alti was 370 I got it from http://www.excessiveamperage.com/
its 200 amp 125 at idle. no core charge completely new alt with underdrive pully and internal regulator. bolts right up.
the guys name is nathan peddicord he is very helpful and quick! I ordered on Friday and he built it shipped it and had it at the shop by wednesday for 370 total!
its 200 amp 125 at idle. no core charge completely new alt with underdrive pully and internal regulator. bolts right up.
the guys name is nathan peddicord he is very helpful and quick! I ordered on Friday and he built it shipped it and had it at the shop by wednesday for 370 total!
08-22-2009, 07:51 AM
#23


 08-23-2009, 09:10 AM
#29
now for the questions and advice needed.
The trunk
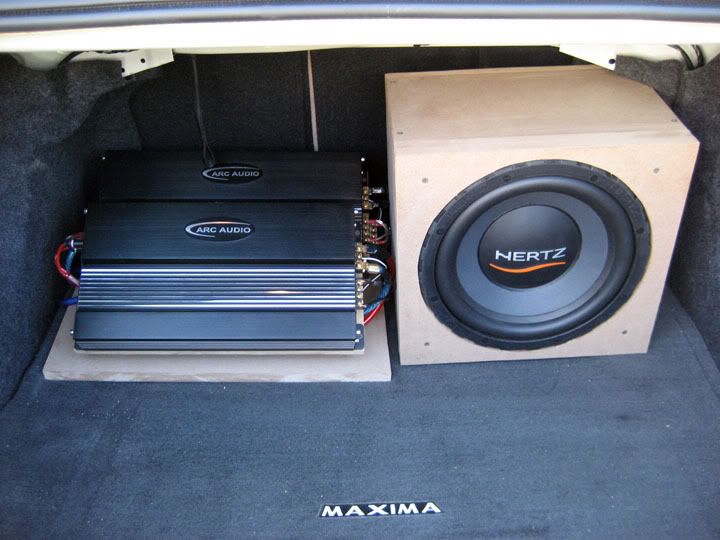
Im not sure I am happy with the amp rack


Now what I am planning is in the aft section of the trunk on each side will be a compressor for air bags, and I am trying to make this as cohesive of an install as possible. we stopped where we are and didnt make any cover for the amp racK at this point because I figured we could save some space from where we are now and come up with a cleaner look. Im thinking of welding in floating amp racks.
if another has any really cool ideas for this let em fly!
restrictions
1)false floor will be buil;t but it will have plexi window into spare tire well which will hold air tanks countersunk into color matched bucket
2)rear cubbies will hold air compressors behind plexi walls.
The trunk
Im not sure I am happy with the amp rack
Now what I am planning is in the aft section of the trunk on each side will be a compressor for air bags, and I am trying to make this as cohesive of an install as possible. we stopped where we are and didnt make any cover for the amp racK at this point because I figured we could save some space from where we are now and come up with a cleaner look. Im thinking of welding in floating amp racks.
if another has any really cool ideas for this let em fly!
restrictions
1)false floor will be buil;t but it will have plexi window into spare tire well which will hold air tanks countersunk into color matched bucket
2)rear cubbies will hold air compressors behind plexi walls.
Last edited by phxgold; 08-23-2009 at 09:13 AM.
08-23-2009, 10:34 AM
#30
yeah, a floating amp rack would look much cleaner instead of seeing a big panel like that. maybe somehow follow the slope of the wheel well, but angled outward a bit to show off the amp.
i'm loving that suede headliner! i had mine covered in a similar tan suede about a month ago as well.
i'm loving that suede headliner! i had mine covered in a similar tan suede about a month ago as well.
08-23-2009, 07:53 PM
#32
the more I look at it the more I cringe lol
what do you think of a simple step with ethe 2 channel on top the oter two larger amps on the bottom with maybe a 30* angle
and just flip the amps over the name plates are held with alen screws so could be flipped sp the heat sink could be on bottom it woyld save space, money, weight, and be alot cleaner looking. whatcha think?
Last edited by phxgold; 08-23-2009 at 08:57 PM.
08-23-2009, 07:57 PM
#33
yeah, a floating amp rack would look much cleaner instead of seeing a big panel like that. maybe somehow follow the slope of the wheel well, but angled outward a bit to show off the amp.
i'm loving that suede headliner! i had mine covered in a similar tan suede about a month ago as well.
i'm loving that suede headliner! i had mine covered in a similar tan suede about a month ago as well.

 08-23-2009, 08:56 PM
#37
08-23-2009, 09:04 PM
#38
i did something similar to my amps. i have the larger 4ch amp on the bottom and the smaller one right on top, at about a 30* angle.
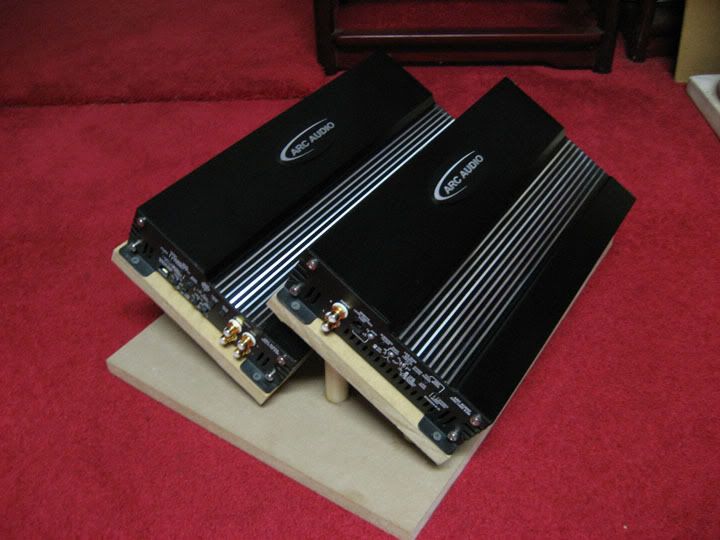
old pics, but you get the idea. i'm sure yours will turn out a ton cleaner!
old pics, but you get the idea. i'm sure yours will turn out a ton cleaner!
