
How to clean and restore plastic headlights by Dave Holmes


How to clean and restore plastic headlights by Dave Holmes
The below is a write-up from Dave Holmes on how to clean/restore your plastic headlights.
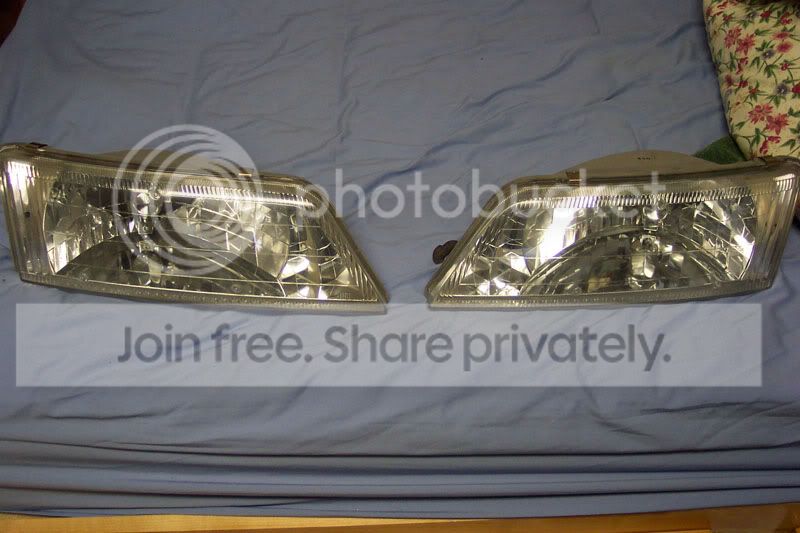
Driver's before, lights on:

Driver's after, lights on:

Driver's before, lights on:

Driver's after, lights on:

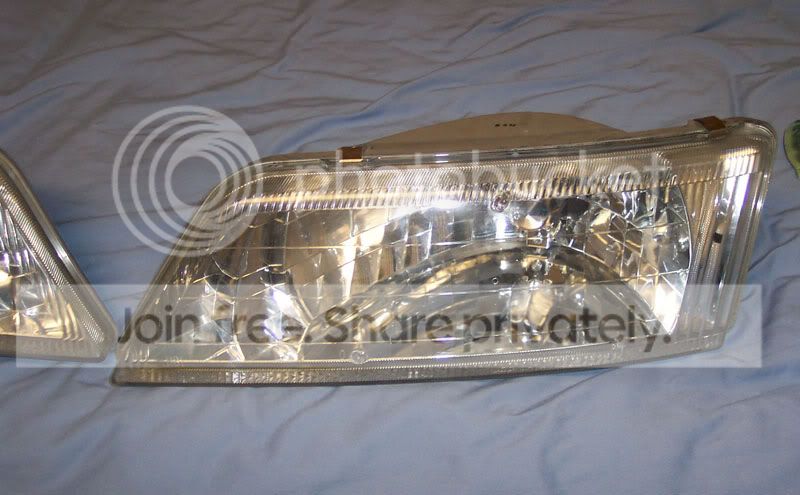
Passenger before, lights on:

Originally Posted by Dave Holmes
The following is the procedure I used to wet-sand and polish my pitted plastic headlights. Others may get varying results because of the many variables that are beyond my control. I tried to "bubba-proof" the write-up so people of varying experience can still achieve good results. I apologize if some of the info seems to be on a basic level, but I don't know other people's experience and expertise. For product selection, there are many good ones out there. I put what I use mainly as a guideline, but others can certainly give similar results. If you have a preference for another, use it. I think the best results are obtained mainly from technique, and not by any one magical product. I personally use Meguiars Professional Line stuff because it gives me outstanding, consistent results everytime. I can also obtain it locally without costing an arm and a leg, and it is what I have the most experience with. 3M products are also very good, as well as some others. Use what you're comfortable with.
Here's some pics of before, during, and after.
Here's some pics of before, during, and after.
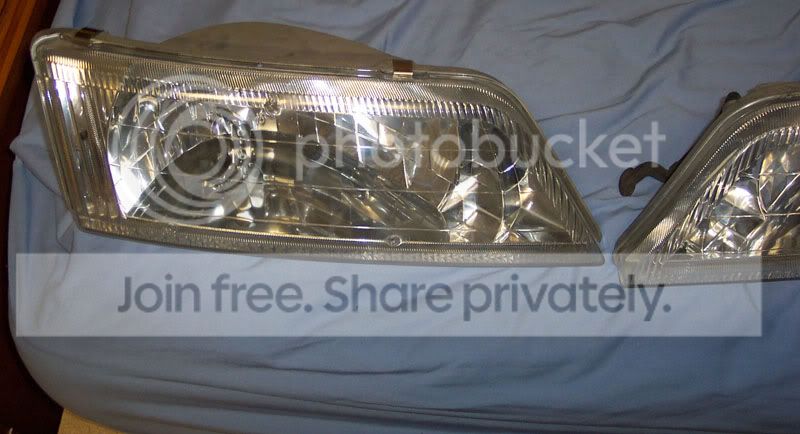
Driver's after, lights on:
Driver's before, lights on:
Driver's after, lights on:
Passenger before, lights on:
Passenger after wet sanding with 2000 grit, lights on:

Passenger lights off (left=sanded&polished, right=sanded):

Passenger after wet sanding and multiple polishing steps:

What they should look like when completed. Notice no yellowing, haze or pits:


Passenger lights off (left=sanded&polished, right=sanded):
Passenger after wet sanding and multiple polishing steps:
What they should look like when completed. Notice no yellowing, haze or pits:
Originally Posted by Dave Holmes
As you can see from the pics, mine were pitted on the upper halves pretty bad. They were yellow prior to starting, but I had removed the yellowing with Mother's Mag and Aluminum Polish before I thought about taking the pics. The pitting resembled sandblasting, and was really noticeable with the lights on depending on viewing angle. I attempted to take the before and after pics from the same angles, distance, lights on/off, etc, but the human factor comes in to play. They're close enough that you can easily see the differences.
I started with 1500 grit 3M Imperial wet/dry sandpaper on a rubber 3M sanding block. The paper had been soaking in a car wash soap (normal mixture) solution overnight. I also used a spray bottle of car wash solution to keep the surface drenched, and rinsed the block/paper in solution very frequently (to keep the paper clean). I did vertical, then horizontal strokes, using slow, deliberate strokes with moderately light pressure. We're not removing rust or paint, just leveling the surface, so there is no reason to scrub. I suggest using light pressure to begin with, and increase pressure only if needed and only after you get a feel for it. This will save you time in the polishing steps so you won't be removing any unnecessary, deep sanding marks from being too aggressive at the start. To check my work, I used 3M Fine Cut Rubbing Compound (part # 03900) on a foam applicator to "polish" the sanding marks every so often to see if the pitting was being removed. When almost all the pitting was removed, I switched to 3M Imperial 2000 grit paper, following the same routine, but decreasing my pressure with every few strokes. When satisfied with the sanding, I did one or 2 passes with the 3M Fine Cut Rubbing Compound on a PC with a 4" cutting pad to remove the bigger sanding marks. I followed with Meg's DACP (#83) on a 4" cutting pad until only light surface marring remained. Meg's Swirl Free Polish (#82) on a 4" polishing pad was next and removed all light marring left from the previous steps. Continue polishing until you have the results you desire, which should by now be as close to flaw-free as you can get it. If it's not, you can repeat the DACP step, and then step back down to SFP again. These polishing steps will take several passes each, so take your time with it. When the surface meets your approval, I suggest applying a sealant like Meg's NXT or Klasse to prevent yellowing (oxidation) from returning. It also makes future cleanings of the lenses much easier. The polishing steps could be done by hand, but it would take longer. If you don't have a PC with various pads (including the handy 4" spot pads), I whole-heartedly recommend one if you're serious about detailing and you have about $200 total to spend on it. That would get you a PC 7336 (or 7424) and a good assortment of pads. Check www.autopia.org for more info on PC's and pad suppliers.
All in all I'd say they look much better. It took about an hour per light, so it wasn't too bad. The main thing is to take your time, use light pressure, and keep the surface drenched while sanding. Did I say take your time? That is probably the key to achieving good results, along with constantly checking your work. I only used one piece of 1500 grit and 2000 grit wet sandpaper per light. I also could have skipped the 3M Rubbing Compound and just used DACP for the main polishing of sanding marks, but I felt the 3M was more aggressive and saved a little time polishing (and I had a bottle from a previous project). There are other polishes that would work (3M's line comes to mind), but they must be actual abrasive polishes, not the stuff like Meg's Deep Crystal Step 2 or Mother's stuff you can buy at Auto Zone. #83 and #82 are both in Meg's Professional line, available at most Paint, Body & Equipment shops (auto paint suppliers) or online. They are my favorite polishes for scratches, swirls, and blemishes on paint, and work equally well on plastics. These 2 together can take care of just about anything my car's paint or headlights ever see, and simply do an outstanding job. They are the backbone of my detailing arsenal.
That's about it for wet sanding headlights. Same would apply for tails, corners, etc.
Dave


Joined: Aug 2000
Posts: 6,344
I used to polish plastic in HS shop class. We used steel wool and then a buffing wheel with plastic polishing compound. I guess 2000 grit is about the same as #0 or #00 steel wool.

didnt do this on my headlights since 3rd gens have glass headlights 
but i did do it to my front bumper lights following the same idea - i used regular car polish i had laying around and it came out great

but i did do it to my front bumper lights following the same idea - i used regular car polish i had laying around and it came out great


Thanks Dave
Following Dave's writeup, I put up a guide as well with pics as well showing just how nice they can come out. My method is a little different from Dave's as I used Novus products in the end.
Have a look
http://forums.nycmaximas.org/showthread.php?t=6432
Have a look
http://forums.nycmaximas.org/showthread.php?t=6432
Well I finally got around to doing this to a spare set of headlamps today that I am prepping for my projector retrofit.
I started with 400 grit wet sand paper, went to 800 grit, then to 1500 and finally 2000 grit. I used a buffing wheel attached to a power drill and used some 3M polishing and scratch remover. The lights were pitted really badly and looked like they were sandblasted (they have seen 6 or 7 canadian winters with a ton of salt/sand). They came out great and could have looked brand new had i spent more time on them.
I started with 400 grit wet sand paper, went to 800 grit, then to 1500 and finally 2000 grit. I used a buffing wheel attached to a power drill and used some 3M polishing and scratch remover. The lights were pitted really badly and looked like they were sandblasted (they have seen 6 or 7 canadian winters with a ton of salt/sand). They came out great and could have looked brand new had i spent more time on them.


is it truly all outside? an not the burn in efect fromthe inside? when i feel the head light from outside it's smooth how can all this foginess be outside? i think i have to open the headlight and if someone tells me this will work i will get this done 


Newbie - Just Registered
Joined: Nov 2008
Posts: 2
I had tried the process that nycmaximas site offered, using 800, 100, 1500 and 2000 grit paper and the 3 levels of Novus polish. The plastic became even foggier (looks more scratched as well). The assemblies remained mounted in the car. Is it ppossible that mosture went to the interior? Feels relatively smooth on exterior; if internal moisture is unlikely, maybe the problem is that I had only used hand to wet sand and buff, and spent a minute or so on each step (each grit and polish level). Should I consider a sanding tool and polishing tool, or simply spend more time on each step?


seriously?? either way i gotta do somethin. mine look like hell. i was almost thinking of just buying new lights. i want the ebay projectors anyway.
btw VIK, i use plastic-x all the time and it keeps coming back. maybe i used it wrong? what process did you use when you polished with the plastic-x?
p.s. at the risk of sounging like a n00b, how does one wetsand. ive never had to do anything like that before
btw VIK, i use plastic-x all the time and it keeps coming back. maybe i used it wrong? what process did you use when you polished with the plastic-x?
p.s. at the risk of sounging like a n00b, how does one wetsand. ive never had to do anything like that before

Haha I think I invented a shortcut by mistake.......but what I did was sanded the lights down with coarse paper then super fine sand paper and then I washed it and then clear-coated the lights, and the results still has some fine lines, but I did it only for the corner lights and the bumper lights because the headlights would probably have too many lines.
The clearcoat fills all the lines and then creates a mirror like surface that really amplified the lights but not very much. But yet again, I am not sure if it will peel or go back to being dull from the sanding, BUT its been two weeks with Washington weather taking a beating on the clearcoat and it still looks good, considering the amount of time I took LOL
But overall if you want something to shine like glass, the original method is still KING!


Newbie - Just Registered
Joined: Jun 2012
Posts: 3
Hi, I am new to the forum, as well as anything car related. I have joined this forum to learn more about how to properly maintain and take really good care of my 2002 Maxima. I have VERY dull headlights and have been shopping around for help. How long does this process last of protecting the headlights? If it would cost about $200+ dollars on supplies, would it be better to buy a pair of $250 new headlights? I would really like to make improvements concerning my car; and I'm starting with these headlights. So any help is appreciated.

Hi, I am new to the forum, as well as anything car related. I have joined this forum to learn more about how to properly maintain and take really good care of my 2002 Maxima. I have VERY dull headlights and have been shopping around for help. How long does this process last of protecting the headlights? If it would cost about $200+ dollars on supplies, would it be better to buy a pair of $250 new headlights? I would really like to make improvements concerning my car; and I'm starting with these headlights. So any help is appreciated.
/thread

Senior Member
Joined: Oct 2011
Posts: 1,524
From: Maine


Newbie - Just Registered
Joined: Jun 2012
Posts: 3
What are all the supplies, tools, and everything else I will need for it as well? How well does it work and how long is it effective? I bought this car from my cousin about 2yrs ago. It's had thousands of trips back to NY, and has been through rough winters. But I don't plan on going to NY like she did with it. Will a kit work well enough with it? >.> Or even the fact that I know nothing? Will I be able to do this myself? I will go click those links now to look what else was posted. Thanks!

What are all the supplies, tools, and everything else I will need for it as well? How well does it work and how long is it effective? I bought this car from my cousin about 2yrs ago. It's had thousands of trips back to NY, and has been through rough winters. But I don't plan on going to NY like she did with it. Will a kit work well enough with it? >.> Or even the fact that I know nothing? Will I be able to do this myself? I will go click those links now to look what else was posted. Thanks!

Thread
Thread Starter
Forum
Replies
Last Post
AaronL
5th Generation Maxima (2000-2003)
15
Nov 15, 2020 11:52 AM
sdotcarter
6th Generation Maxima (2004-2008)
2
Sep 2, 2015 09:53 PM