
Nav/DSR/Radar Detector Hardwiring Guide


Thread Starter
Senior Member
iTrader: (11)
Joined: Jun 2006
Posts: 1,325
From: Cherry Hill, NJ / Hoboken, NJ
Nav/DSR/Radar Detector Hardwiring Guide
Hello folks,
I recently "hardwired" my Garmin navigation and Sirius satellite radio. I had some minor headaches along the way. I wasn't able to find a write-up on it (perhaps my search skills are lacking...) so I figured
that I'd write one. Just reading around in the forums, it seems a lot of people are unclear what is involved in hardwiring.
To start off, what is hardwiring? Just about every radar detector, and most navigation or DSR units that aren't in-dash are relatively simple to hook up. They typically come with a simple suction cup for the
windshield, and a 'cigarette lighter' 12v plug. This is fine for 90% of people.
However, as a Maxima.org member, you're in the 10% of people that demand nothing short of style when it comes to this. Maybe you don't want a cable running down your dashboard. Maybe you want to be able to
use the cigarette lighter. Maybe you have several things to plug in and don't want to clutter your dash with splitters and wires and that crap. Then hardwiring is for you.
Disclaimer: I take no responsiblity for anything that should happen as a result of following this guide. This guide only applies to hardwiring things that draw a small enough current to
run off of the cigarette lighter socket. I do not recommend using this for high-current devices, or if you are planning on using the cigarette lighter to light cigarettes. Make sure that you test all the
equipment you're planning on connecting to make sure that you aren't drawing too much current. If you need to run something really large, I would recommend running a wire from the battery or fusebox or
somewhere else, as the cigarette lighter is not made for very high current devices. That being said, I run my Garmin nav and Sirius radio off of it no problems, and before that, a Valentine 1, XM radio, and
a small LED light.
Ok, to begin, you will need:
Flathead screwdriver
Philips screwdriver
95-99 Nissan Maxima
Wire cutters/strippers
Small amount of wire (16ga copper is what I used)
Electrical tape
Soldering iron (you might not need it depending on what kind of sockets you get, but it's recommended, and it's required if you decide not to use a socket)
Cigarette lighter socket (optional, but recommended)
[You will need one for each thing you plan on plugging in. It's possible to do it without, but the sockets let you swap things a lot easier]
Now, to begin:
First, put your electronic device in its suction cup, and decide where you want to mount it. Make sure that the screen is easily viewable and accessible from the driver's seat, and that you maintain
visibility of the road. If your device requires an external antenna, mount it and run the wire to the device.
Now, shut off the car. Put the emergency brake on. I suggest putting your car in fourth gear, although second or reverse is fine as well. For slushbox, put it in D1. This will give you room to work.
Now, take the flathead screwdriver, and look at the top vents. There is a clip on the top, and a clip on each side. With the flathead, pry the clips open and pull the vents out. Be careful not to scratch
your dashboard. If the soft material of the dash bends a little bit, don't worry about it, it will go back to normal in a minute.
Next, use the flathead to pry off the shifter trim. Again, just go around the edges, prying it out a little bit, until you've got all the clips out and you can remove the whole thing. Once it is off, lift it
up, and look at the bottom. Remove the wire that goes to the back of the cigarette lighter socket. Also, there are several plastic clips holding the pleather boot in. Just unsnap the boot from the trim and
set the trim aside.
Then, using the philips screwdriver, unscrew the one screw in the corner of the ash tray, and remove that.
At this point, get your soldering iron, sockets, and wires ready. You're going to splice into the wire that went to the cigarette lighter socket. Just cut it, strip it, and solder the extra wires on. What I
recommend doing at this stage is taking your sockets. I used two. Connect the red wire to the tip contact at the center, and the black wire to the outer sheath. Tape it up.
Now, using the philips, unscrew the four screws in the corners of the large piece containing the radio. Once they are removed, lift the unit out, and set it a few inches forward. Behind it, run the wires for
your device. What I did was attach the wire to the unit (because I already planned where to put it), and dropped the plug down behind the radio, then put the radio part back on. Make sure you leave enough
slack at the top for the wire to reach your device, plus a few extra inches.
Next, if you've wired up sockets, just plug the plugs into it, and set it in the open area behind the ash tray under the radio. If you decided not to use sockets, take the wire, strip about a quarter inch.
Take the plug for your device, and using a bit of solder, solder the red wire to the pin at the front, and the black wire to the sheath around the edges.
Once that's done, make sure that you still have enough slack wire to reach your device. Then, reassemble the radio console, followed by the ash tray, followed by the shifter trim and original cigarette
lighter socket.
Then, find a way to snake the wires out of the vent/climate control panel. It's not possible to go directly through the vent. As long as your wires aren't too thick, you should be able to just leave them in
the gap between the vent trim and the dash, and it will still clip back on. It takes a bit of time playing with it to make it fit.
Now just connect the wires to your device and you're good to go! One thing to note is that the power is switched by the ignition, if the car is off, your devices lose power, and when the car is on, your
devices get powered up.
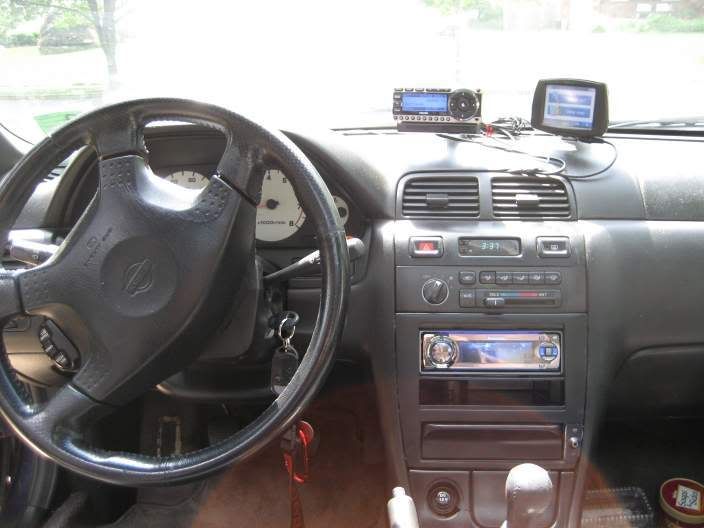
Here's the picture of the final result in my '97 SE
I recently "hardwired" my Garmin navigation and Sirius satellite radio. I had some minor headaches along the way. I wasn't able to find a write-up on it (perhaps my search skills are lacking...) so I figured
that I'd write one. Just reading around in the forums, it seems a lot of people are unclear what is involved in hardwiring.
To start off, what is hardwiring? Just about every radar detector, and most navigation or DSR units that aren't in-dash are relatively simple to hook up. They typically come with a simple suction cup for the
windshield, and a 'cigarette lighter' 12v plug. This is fine for 90% of people.
However, as a Maxima.org member, you're in the 10% of people that demand nothing short of style when it comes to this. Maybe you don't want a cable running down your dashboard. Maybe you want to be able to
use the cigarette lighter. Maybe you have several things to plug in and don't want to clutter your dash with splitters and wires and that crap. Then hardwiring is for you.
Disclaimer: I take no responsiblity for anything that should happen as a result of following this guide. This guide only applies to hardwiring things that draw a small enough current to
run off of the cigarette lighter socket. I do not recommend using this for high-current devices, or if you are planning on using the cigarette lighter to light cigarettes. Make sure that you test all the
equipment you're planning on connecting to make sure that you aren't drawing too much current. If you need to run something really large, I would recommend running a wire from the battery or fusebox or
somewhere else, as the cigarette lighter is not made for very high current devices. That being said, I run my Garmin nav and Sirius radio off of it no problems, and before that, a Valentine 1, XM radio, and
a small LED light.
Ok, to begin, you will need:
Flathead screwdriver
Philips screwdriver
95-99 Nissan Maxima
Wire cutters/strippers
Small amount of wire (16ga copper is what I used)
Electrical tape
Soldering iron (you might not need it depending on what kind of sockets you get, but it's recommended, and it's required if you decide not to use a socket)
Cigarette lighter socket (optional, but recommended)
[You will need one for each thing you plan on plugging in. It's possible to do it without, but the sockets let you swap things a lot easier]
Now, to begin:
First, put your electronic device in its suction cup, and decide where you want to mount it. Make sure that the screen is easily viewable and accessible from the driver's seat, and that you maintain
visibility of the road. If your device requires an external antenna, mount it and run the wire to the device.
Now, shut off the car. Put the emergency brake on. I suggest putting your car in fourth gear, although second or reverse is fine as well. For slushbox, put it in D1. This will give you room to work.
Now, take the flathead screwdriver, and look at the top vents. There is a clip on the top, and a clip on each side. With the flathead, pry the clips open and pull the vents out. Be careful not to scratch
your dashboard. If the soft material of the dash bends a little bit, don't worry about it, it will go back to normal in a minute.
Next, use the flathead to pry off the shifter trim. Again, just go around the edges, prying it out a little bit, until you've got all the clips out and you can remove the whole thing. Once it is off, lift it
up, and look at the bottom. Remove the wire that goes to the back of the cigarette lighter socket. Also, there are several plastic clips holding the pleather boot in. Just unsnap the boot from the trim and
set the trim aside.
Then, using the philips screwdriver, unscrew the one screw in the corner of the ash tray, and remove that.
At this point, get your soldering iron, sockets, and wires ready. You're going to splice into the wire that went to the cigarette lighter socket. Just cut it, strip it, and solder the extra wires on. What I
recommend doing at this stage is taking your sockets. I used two. Connect the red wire to the tip contact at the center, and the black wire to the outer sheath. Tape it up.
Now, using the philips, unscrew the four screws in the corners of the large piece containing the radio. Once they are removed, lift the unit out, and set it a few inches forward. Behind it, run the wires for
your device. What I did was attach the wire to the unit (because I already planned where to put it), and dropped the plug down behind the radio, then put the radio part back on. Make sure you leave enough
slack at the top for the wire to reach your device, plus a few extra inches.
Next, if you've wired up sockets, just plug the plugs into it, and set it in the open area behind the ash tray under the radio. If you decided not to use sockets, take the wire, strip about a quarter inch.
Take the plug for your device, and using a bit of solder, solder the red wire to the pin at the front, and the black wire to the sheath around the edges.
Once that's done, make sure that you still have enough slack wire to reach your device. Then, reassemble the radio console, followed by the ash tray, followed by the shifter trim and original cigarette
lighter socket.
Then, find a way to snake the wires out of the vent/climate control panel. It's not possible to go directly through the vent. As long as your wires aren't too thick, you should be able to just leave them in
the gap between the vent trim and the dash, and it will still clip back on. It takes a bit of time playing with it to make it fit.
Now just connect the wires to your device and you're good to go! One thing to note is that the power is switched by the ignition, if the car is off, your devices lose power, and when the car is on, your
devices get powered up.
Here's the picture of the final result in my '97 SE


Thread Starter
Senior Member
iTrader: (11)
Joined: Jun 2006
Posts: 1,325
From: Cherry Hill, NJ / Hoboken, NJ
Yeah, first I wanted to do through the vents, but it won't work. I guess you could try to figure out a way to run it out of the defroster vents, that would be very slick, but I did the vast majority of the work at 3AM holding a little LED flashlight in my mouth, with no service manual or guide. 

I never actually searched for hardwiring for our cars, but used some common sense and hardwired it just like you mentioned in post 1. Very simple, but at the same time very frustrating when you can't find the right place to wire the cables.
My radar detector is located near the ceiling of the car, right above the rear view mirror. How is it wired(?) through the ceiling and through the A-pillar. I had neons lights under my front dash so it will turn on each time I opened the door but I ripped them out cause they broke.
By the way nalc, wouldn't your car be a major target cause it is right in the wind shield where everyone can see it?
Thread Starter
Senior Member
iTrader: (11)
Joined: Jun 2006
Posts: 1,325
From: Cherry Hill, NJ / Hoboken, NJ
I don't really park in a lot of 'shady' places, and when I do, it's as simple as pulling out the wire, unhooking the suction cup, and putting it in the armrest thing. I've been leaving it up there most of the time for the 6 months I've had it without any problems.
Thread Starter
Senior Member
iTrader: (11)
Joined: Jun 2006
Posts: 1,325
From: Cherry Hill, NJ / Hoboken, NJ
The point is that there is 6" of wire running across the dash, and it's pretty secure and doesn't move around, rather than having a pair of six foot long wires running all over the place and going into a Y-adapter into the cig plug.

Senior Member
Joined: Jan 2006
Posts: 655
From: Silicon Valley
Thread Starter
Senior Member
iTrader: (11)
Joined: Jun 2006
Posts: 1,325
From: Cherry Hill, NJ / Hoboken, NJ
Originally Posted by Fr33way�
I gotcha, more function over form. Have you ever thought about flush mounting the sirius in your stereo trim/ fold down pocket?
Aside from that, it's certainly doable, it would just require a bit of custom fabrication.
I see what you're saying. I had thought about making a bracket to slide the monitor out of the flip down compartment but viewing angle and reception is what made me decide to put it in the center trim. I'm just bitter over having the flip down instead of the slide out compartment so I will eventually fill it up with something LOL.

Thread
Thread Starter
Forum
Replies
Last Post
kjlouis
4th Generation Maxima (1995-1999)
12
Oct 3, 2015 05:29 AM