
OEM Key Fob Remote Start DBALL2Pro and THNISSC


Thread Starter
Member
Joined: Apr 2010
Posts: 208
From: Indianapolis, IN
Directed Smart Start DSM200, DBALL2Pro and THNISS3C
**** READ THIS ****
I can no longer recommend anyone purchase products from Directed. That includes any of their underlying brands; Viper, Autostart, Clifford, AstraStart, Automate, Python, Avital, or Install Essentials.
Directed is taking an anti-enthusiast stance and is terminating all user accounts that are not associated with a dealer of their products as of October 31, 2017. They are also not allowing new user accounts which aren't pre-associated with one of their dealers. This prevents we enthusiasts from programming a DBALL2 or DB3 ourselves. I do not know whether this affects the ability to setup a SmartStart ourselves, but my guess would be that if that is not yet disabled it will be soon. While this is certainly within their rights as a vendor, it is also within my/our rights to recommend against doing business with any company with that attitude.
*IF* you should decide to go with a directed based remote-start system you will need to ensure you buy it pre-programmed from somewhere.
As an alternative, I suggest people look at the Fortin products.
I MESSED UP THE TITLE OF THE THREAD. THE HARNESS IS ACTUALLY THNISS3C.
This is a tutorial on how to get OEM Key Fob Remote Start capability on your 2009-2014 Maxima using a DBALL2Pro and THNISS3C harness. We used to be able to get this working with just the DBALL2 and THNISS3 but times have changed. The company that makes these modules has locked down their flashing service by basically reading your serial number and determining if you ever installed the D2D 3X Lock firmware before a certain date. If you have, they will allow you to flash it again. This is absolutely terrible in my opinion but it is what it is.
ONCE AGAIN YOU CANNOT USE THE DBALL2 and THNISS3 HARNESS TO GET 3X OEM LOCK REMOTE START UNLESS YOU HAD FLASHED THE MODULE FIRMWARE BEFORE 10/1/2014. DEI IS FORCING 2009-2014 MAXIMA OWNERS (and all car owners for that matter) TO BUY THE DBALL2PRO/4X10/5X10/VSS3001 and THNISS3C
I ended up buying the DBALL2Pro and THNISS3C from eBay for around $130 flashed to the 800.NISS3HT v2.20.289d firmware. If you buy on eBay, make sure the seller will flash it free of charge. There are plenty of sellers on there that will do it. The local shop down the street wanted way to much money for the parts and installation. Quoted me over $350. Considering this project took an inexperienced installer around 2 hours, I wasn't paying them $100/hour for labor. I'm sorry, but something really gets to me about people that charge more than a lawyer and never stepped foot in a college classroom. I simply followed all the instruction for the DBALL2PRO installation here: 2009 Nissan Maxima Xpresskit. Do not use the instructions for the THNISS3C as they have not been updated.
Tools Needed:
FIRST THINGS FIRST: REMOVE THE NEGATIVE BATTERY TERMINAL. YOU ARE MESSING WITH BCM AND IGNITION WIRES. DON"T BE A FOOL.
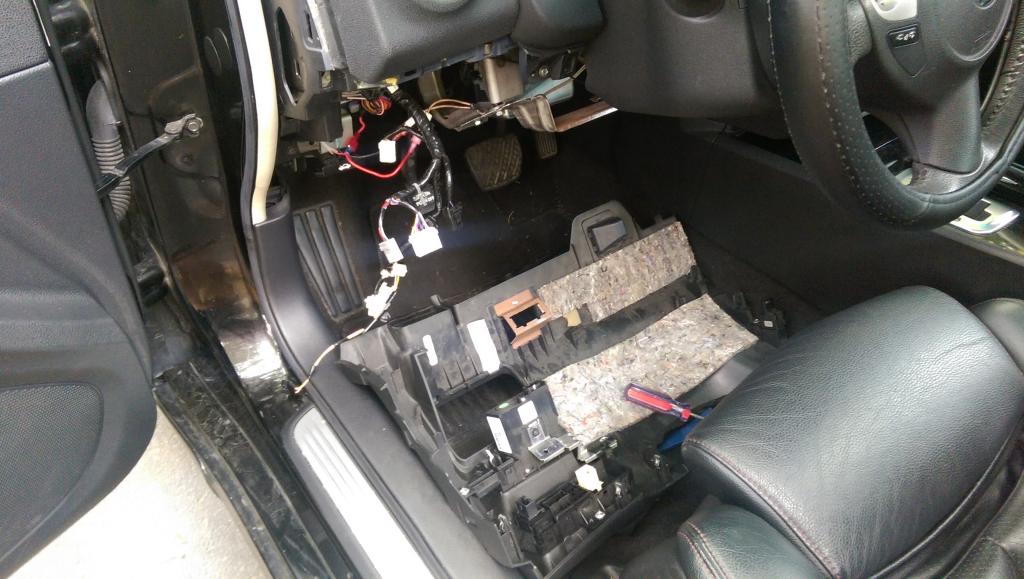
I started off by removing the bottom panel underneath the steering wheel. You simply pry off (GENTLY) the plastic panel on the side of the dash (you can do this with a panel tool or a screwdriver wrapped in a towel) and then remove the fuse panel door located next to the drivers left knee. From there you will see one screw attaching the bottom dash piece. Be careful with this screw as it is easy to drop it back behind the finisher plastic and carpet. Once that is removed just simply pull down on the dash piece and it should remove easily. You will see a set of plugs on the left, the odbII plug/floor light at the bottom middle, and one plug and a tube on the left (interior thermostat). Simply work through the plugs and remove them all. The interior thermostat tube simply pulls away. This installation is a lot easier with this piece removed. Some of the wire anchors are hard to remove but just wiggle them back and forth and try not to break them. They make wire organization a lot cleaner. Don't worry about some of the wires over to the left near the fuse box. Those are my power and ground for my tablet and radar.
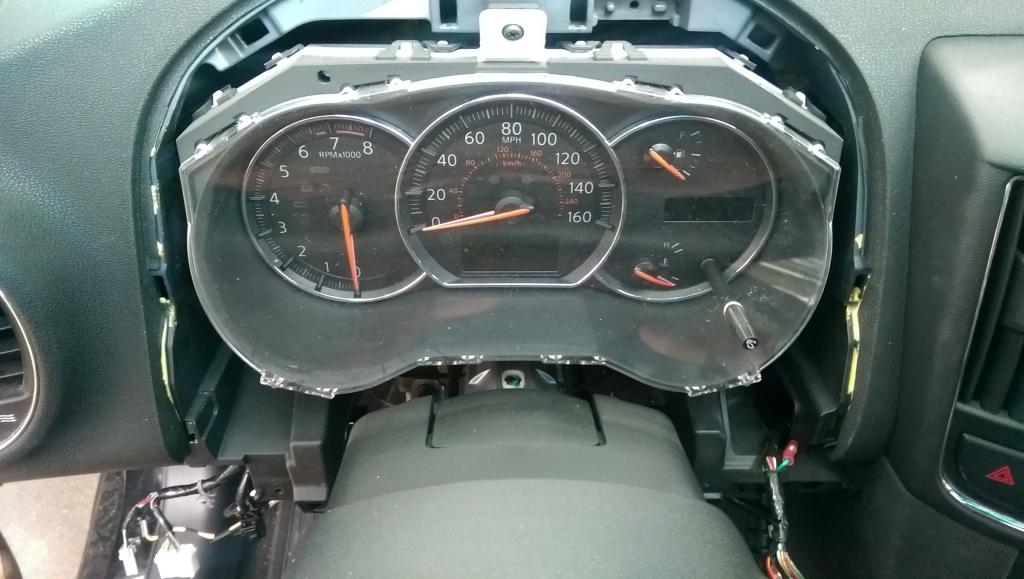
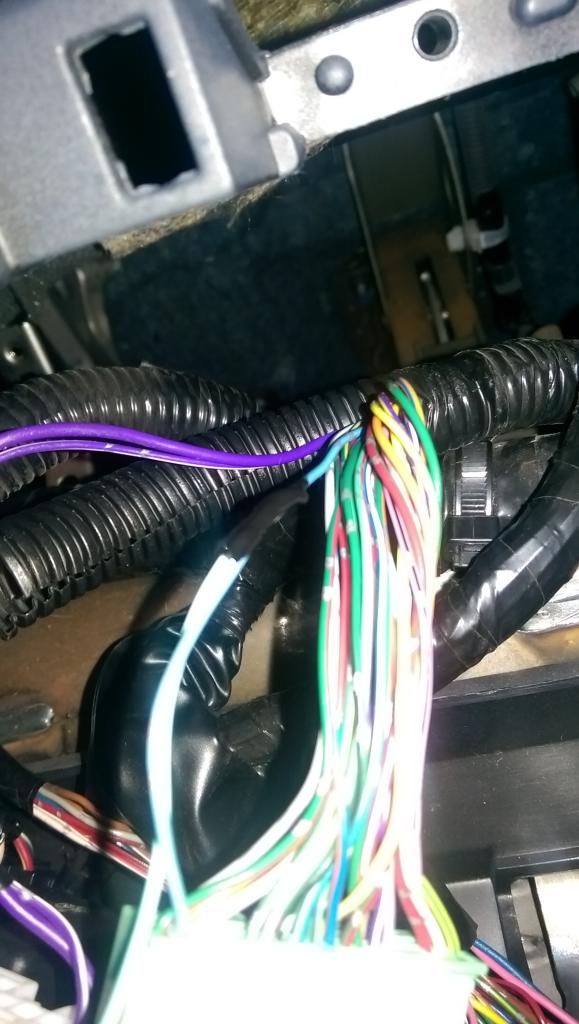
Then I went ahead and removed the instrument bezel panel by simply removing the two screws at the bottom and popping it out. Then I removed the instrument panel by removing the three screws. There is one plug on the back. The BCM is held in by two screws. These screws are in there tight but they will come loose. Just use a good headed Philips and take your time. Do not strip these screws. This was done to get to the push to start wire and the BCM door lock wire. I know some people have said the BCM door lock wire isn't needed but considering nobody has set this up yet, I figured I would get it done anyways.
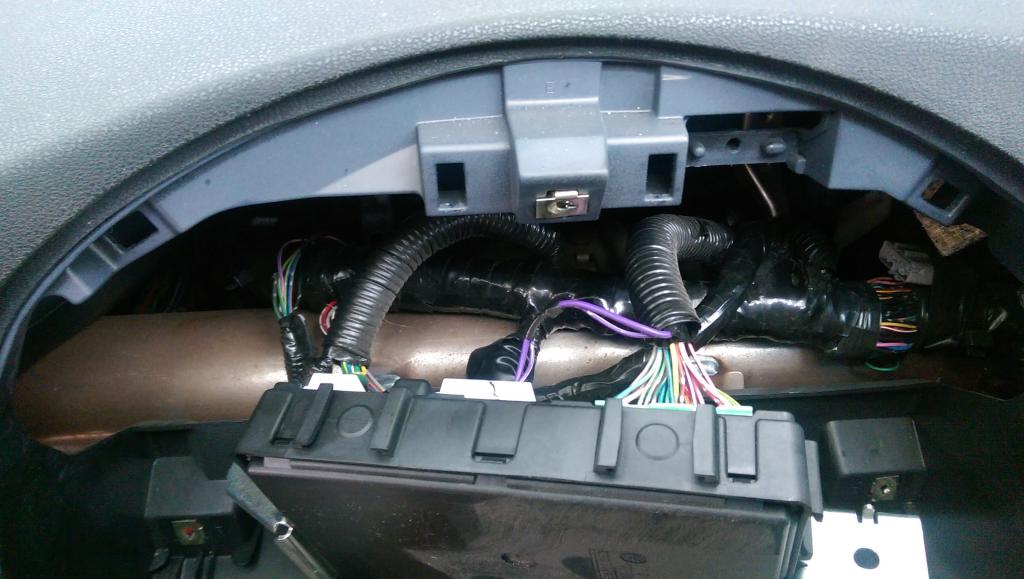
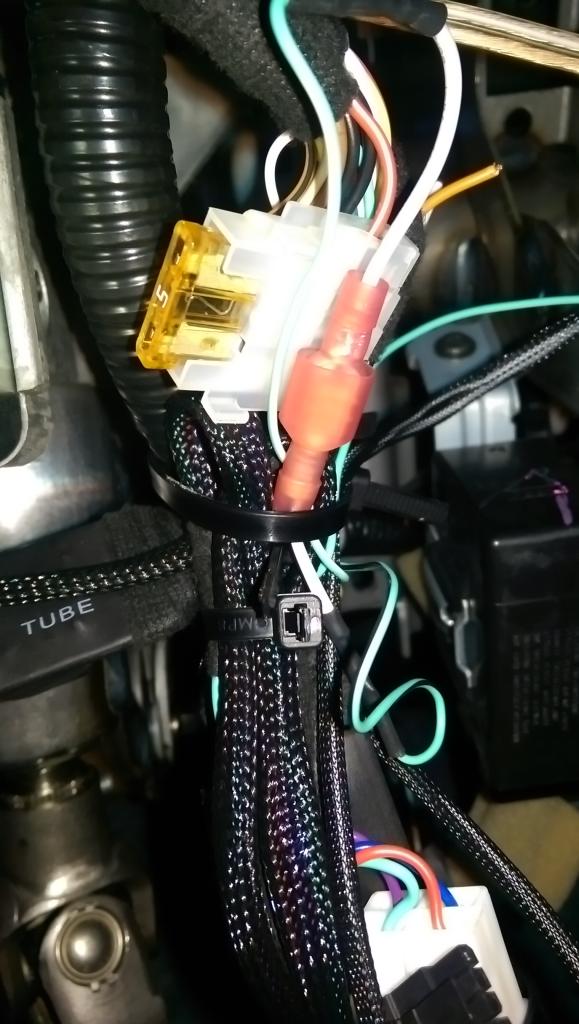
I removed just enough of the factory tape and wire loom to get the wires at each of the plugs. l soldered an extending wire to the brown wire on the push to start button and the light blue wire on the far left of the green BCM plug. I used liquid tape and then taped everything back up. I put quick connectors on the end of both of the wires so I could quickly remove the wires if needed.

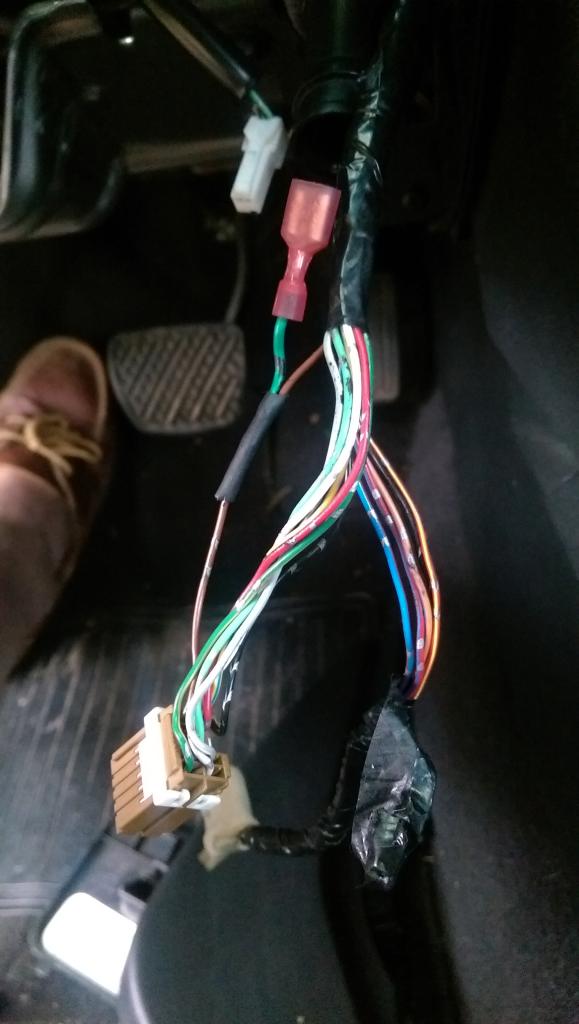
The Push to Start wire from the harness is the Light Blue/White
The BCM Door Lock wire from the harness is the Light Blue/Black
The next thing I did was lay out the wiring harness (THNISS3C) and clean it up. There are a lot of loose wires you won't need. You will only need the light blue/black and light blue/white wire. Zip tie everything and make it look nice. I take pride in keeping installations clean and tidy. Nothing worse than loose wires everywhere. I then mounted the DBALL2Pro unit with 3M high strength tape and some zip ties to the metal support bar under the steering wheel. I plugged everything in except for the white power plug. You will do this at a later step before programming the unit.
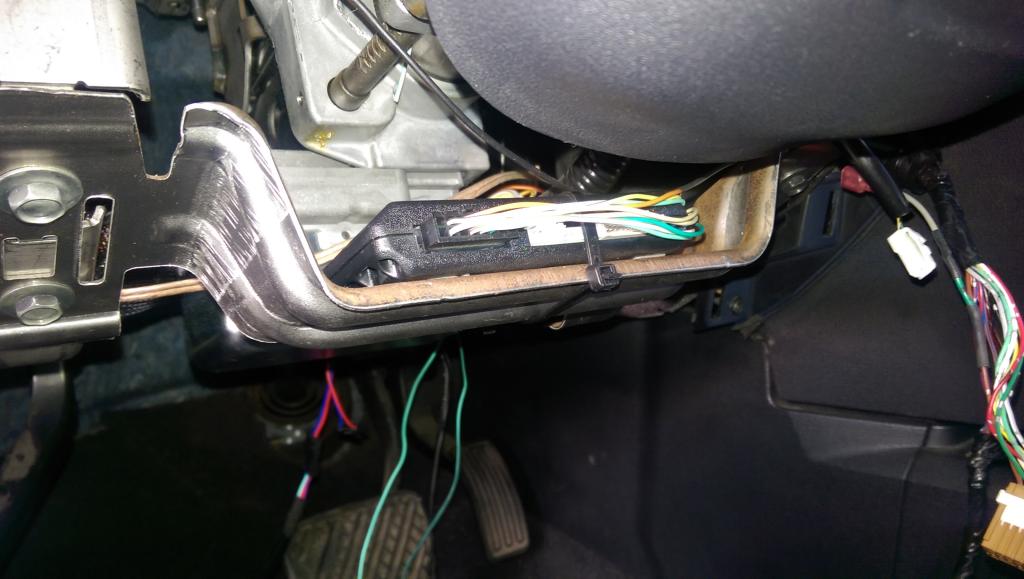
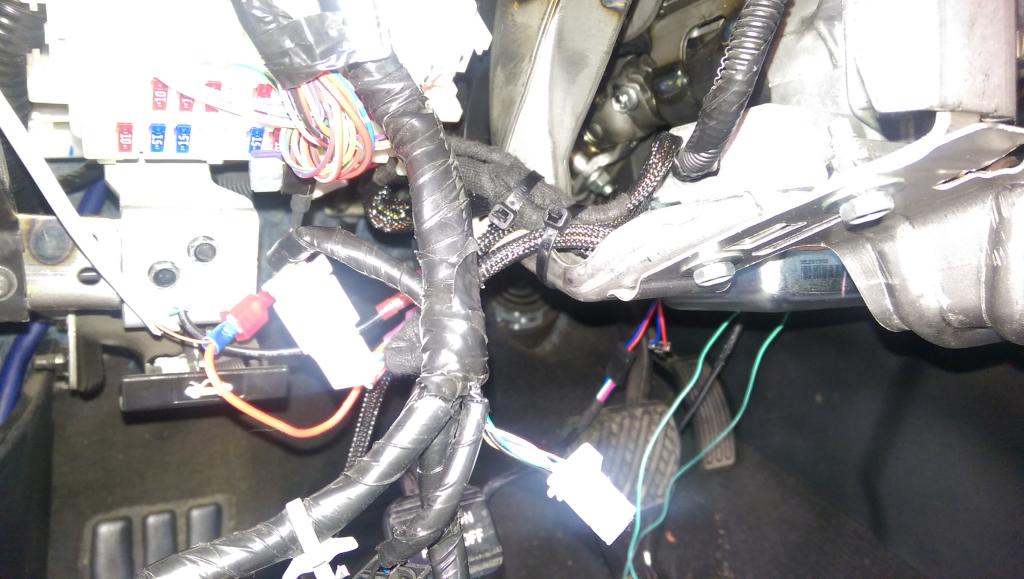
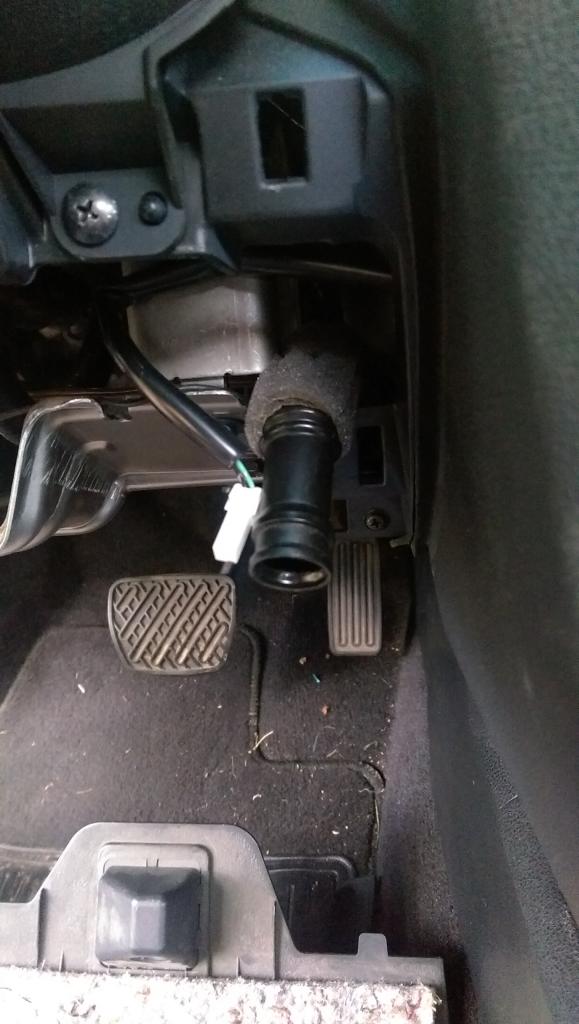
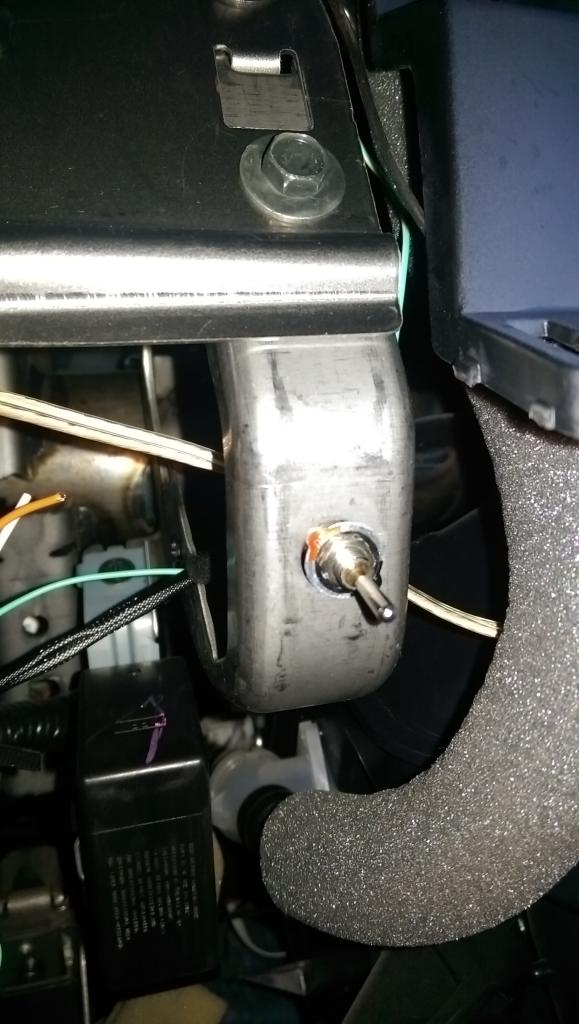
I mounted the override switch to the hole on the metal support tab next to the interior thermostat plug. You will see it if you crawl up under the dash. Clean up the wiring with zip ties. THIS HAS TO BE SET TO ON. IF SET TO OFF, YOUR PARKING LIGHTS WILL JUST FLASH 8 TIMES AND NOTHING WILL HAPPEN.
Plug everything from the harness into the car plugs and re install everything leaving access to the DBALL2Pro unit. Make sure you plug the brake plug into the one below with the wires on the outside, not the inside. I don't remember if it is the B-01 or B-02 because I was dumb enough to remove the stickers.

PROGRAMMING
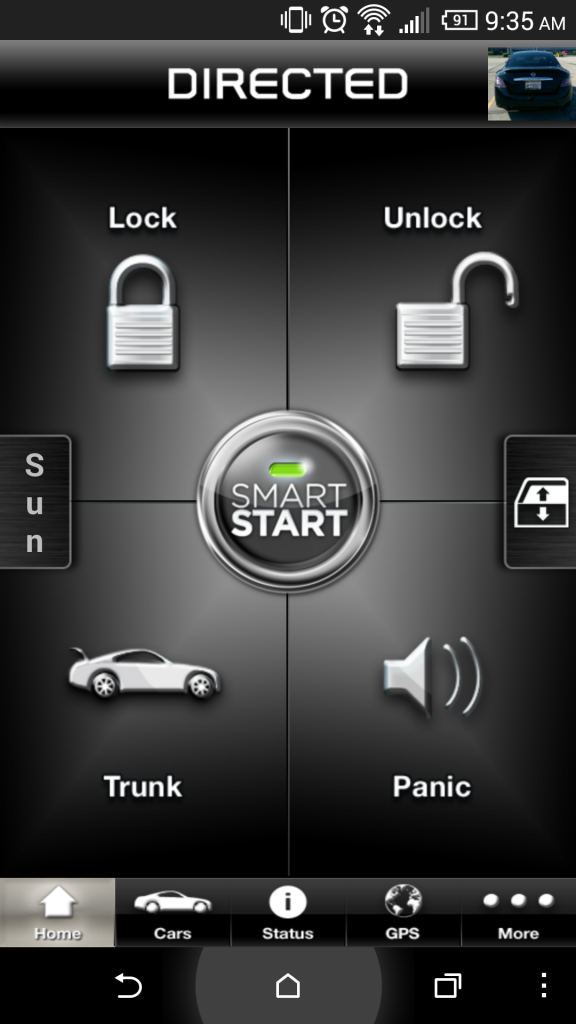
Here is a video of some of the functions. I have not tested the distance capabilities but as far I as can tell, it will work as long as you can lock your car. A new keyfob battery made a huge difference in range.
Let me know if you have any questions and I will try to help. I am not a licensed installer but this really wasn't that difficult.
I have switched over to a Directed Smart Start DSM200. I had to get my DBALL2Pro reflashed to the correct settings. You cannot have 3X OEM Keyfob Remote Start and Smart Start at the same time.
I can no longer recommend anyone purchase products from Directed. That includes any of their underlying brands; Viper, Autostart, Clifford, AstraStart, Automate, Python, Avital, or Install Essentials.
Directed is taking an anti-enthusiast stance and is terminating all user accounts that are not associated with a dealer of their products as of October 31, 2017. They are also not allowing new user accounts which aren't pre-associated with one of their dealers. This prevents we enthusiasts from programming a DBALL2 or DB3 ourselves. I do not know whether this affects the ability to setup a SmartStart ourselves, but my guess would be that if that is not yet disabled it will be soon. While this is certainly within their rights as a vendor, it is also within my/our rights to recommend against doing business with any company with that attitude.
*IF* you should decide to go with a directed based remote-start system you will need to ensure you buy it pre-programmed from somewhere.
As an alternative, I suggest people look at the Fortin products.
I MESSED UP THE TITLE OF THE THREAD. THE HARNESS IS ACTUALLY THNISS3C.
This is a tutorial on how to get OEM Key Fob Remote Start capability on your 2009-2014 Maxima using a DBALL2Pro and THNISS3C harness. We used to be able to get this working with just the DBALL2 and THNISS3 but times have changed. The company that makes these modules has locked down their flashing service by basically reading your serial number and determining if you ever installed the D2D 3X Lock firmware before a certain date. If you have, they will allow you to flash it again. This is absolutely terrible in my opinion but it is what it is.
ONCE AGAIN YOU CANNOT USE THE DBALL2 and THNISS3 HARNESS TO GET 3X OEM LOCK REMOTE START UNLESS YOU HAD FLASHED THE MODULE FIRMWARE BEFORE 10/1/2014. DEI IS FORCING 2009-2014 MAXIMA OWNERS (and all car owners for that matter) TO BUY THE DBALL2PRO/4X10/5X10/VSS3001 and THNISS3C
I ended up buying the DBALL2Pro and THNISS3C from eBay for around $130 flashed to the 800.NISS3HT v2.20.289d firmware. If you buy on eBay, make sure the seller will flash it free of charge. There are plenty of sellers on there that will do it. The local shop down the street wanted way to much money for the parts and installation. Quoted me over $350. Considering this project took an inexperienced installer around 2 hours, I wasn't paying them $100/hour for labor. I'm sorry, but something really gets to me about people that charge more than a lawyer and never stepped foot in a college classroom. I simply followed all the instruction for the DBALL2PRO installation here: 2009 Nissan Maxima Xpresskit. Do not use the instructions for the THNISS3C as they have not been updated.
Tools Needed:
- Screwdriver - Philips and Flat (I use it to remove stubborn clips)
- Something to attach the two loose wires. I use solder and liquid tape because I don't have to cut all the way through the wire. You can also use quick taps or POSI-taps. I tend to stay away from taps for certain reasons.
- Zip Ties and 3M High Strength double sided tape (one of my main gripes about the DBALL2Pro is that is does not come with mounting holes)
- Panel pry tool
- Drill if you intend to mount the override switch somewhere besides where I did
- Electric tape - spend the extra money and get the good kind. This will be for wrapping wires to crucial elements of your electrical system.
- Patience and planning
FIRST THINGS FIRST: REMOVE THE NEGATIVE BATTERY TERMINAL. YOU ARE MESSING WITH BCM AND IGNITION WIRES. DON"T BE A FOOL.
I started off by removing the bottom panel underneath the steering wheel. You simply pry off (GENTLY) the plastic panel on the side of the dash (you can do this with a panel tool or a screwdriver wrapped in a towel) and then remove the fuse panel door located next to the drivers left knee. From there you will see one screw attaching the bottom dash piece. Be careful with this screw as it is easy to drop it back behind the finisher plastic and carpet. Once that is removed just simply pull down on the dash piece and it should remove easily. You will see a set of plugs on the left, the odbII plug/floor light at the bottom middle, and one plug and a tube on the left (interior thermostat). Simply work through the plugs and remove them all. The interior thermostat tube simply pulls away. This installation is a lot easier with this piece removed. Some of the wire anchors are hard to remove but just wiggle them back and forth and try not to break them. They make wire organization a lot cleaner. Don't worry about some of the wires over to the left near the fuse box. Those are my power and ground for my tablet and radar.
Then I went ahead and removed the instrument bezel panel by simply removing the two screws at the bottom and popping it out. Then I removed the instrument panel by removing the three screws. There is one plug on the back. The BCM is held in by two screws. These screws are in there tight but they will come loose. Just use a good headed Philips and take your time. Do not strip these screws. This was done to get to the push to start wire and the BCM door lock wire. I know some people have said the BCM door lock wire isn't needed but considering nobody has set this up yet, I figured I would get it done anyways.
I removed just enough of the factory tape and wire loom to get the wires at each of the plugs. l soldered an extending wire to the brown wire on the push to start button and the light blue wire on the far left of the green BCM plug. I used liquid tape and then taped everything back up. I put quick connectors on the end of both of the wires so I could quickly remove the wires if needed.
The Push to Start wire from the harness is the Light Blue/White
The BCM Door Lock wire from the harness is the Light Blue/Black
The next thing I did was lay out the wiring harness (THNISS3C) and clean it up. There are a lot of loose wires you won't need. You will only need the light blue/black and light blue/white wire. Zip tie everything and make it look nice. I take pride in keeping installations clean and tidy. Nothing worse than loose wires everywhere. I then mounted the DBALL2Pro unit with 3M high strength tape and some zip ties to the metal support bar under the steering wheel. I plugged everything in except for the white power plug. You will do this at a later step before programming the unit.
I mounted the override switch to the hole on the metal support tab next to the interior thermostat plug. You will see it if you crawl up under the dash. Clean up the wiring with zip ties. THIS HAS TO BE SET TO ON. IF SET TO OFF, YOUR PARKING LIGHTS WILL JUST FLASH 8 TIMES AND NOTHING WILL HAPPEN.
Plug everything from the harness into the car plugs and re install everything leaving access to the DBALL2Pro unit. Make sure you plug the brake plug into the one below with the wires on the outside, not the inside. I don't remember if it is the B-01 or B-02 because I was dumb enough to remove the stickers.
PROGRAMMING
- Make sure everything is plugged into the DBALL2Pro except for the white power plug (there will be a black 2 wire plug for the overide switch and another black plug)
- Plug in the white power plug (the car does not have to be on but you will need your keys). The LED turns ON solid Red.
- Make sure you only have one keyfob near the car
- Press the Unlock button on the OEM keyfob. The LED will flash orange
- Insert the OEM keyfob into the key port. The LED will continue to flash orange.
- Press and hold the brake pedal until the LED turns On solid green 3 seconds then goes off
- Remove the OEM keyfob from the port and programming is now done.
Here is a video of some of the functions. I have not tested the distance capabilities but as far I as can tell, it will work as long as you can lock your car. A new keyfob battery made a huge difference in range.
Let me know if you have any questions and I will try to help. I am not a licensed installer but this really wasn't that difficult.
I have switched over to a Directed Smart Start DSM200. I had to get my DBALL2Pro reflashed to the correct settings. You cannot have 3X OEM Keyfob Remote Start and Smart Start at the same time.
Last edited by mjhuffer; Apr 18, 2018 at 09:33 AM.

Thread Starter
Member
Joined: Apr 2010
Posts: 208
From: Indianapolis, IN
Thanks I appreciate it. Figured I could help some people out. Two things to keep in mind. Keep wires away from the steering column and do some research. I choose the 3X OEM Lock Remote Start because I wanted to do the work myself. I'm honestly considering the Smart Start module but I don't know if a shop will touch my work. If you want to get a Smart Start module (be able to start the car from your phone anywhere), the DBALL2Pro will have to be reflashed, you won't be able to use your OEM keyfob anymore, and a dealer will have to activate it meaning they have to do the installation $$$$$$.
Last edited by mjhuffer; Nov 13, 2014 at 09:25 PM.
Thread Starter
Member
Joined: Apr 2010
Posts: 208
From: Indianapolis, IN
So I realized really quickly that the OEM keyfob has it's limitations. I wanted to be able to start my car from my office and gym so I decided to get the Directed Smart Start DSM200. I ended up getting a free year of service.
First off, Directed is one of the worst companies in terms of customer support. I bought my units at a discounted price online through and AUTHORIZED dealer and they still wouldn't help me with anything. They just kept saying go to an authorized dealer. It's my honest opinion there is a good amount of authorized dealers that don't know much more than I do and use the same research techniques I do.
All in all, I had to get the settings in my DBALL2Pro reset to accept D2D at the shop down the street. I'm a repeat customer so I just chucked the guy a 5 spot and it took him 10 min. Once I did that, I installed my Smart Start DSM200 (revision B), by mounting it to the BCM using zip ties. It needs to be as high as possible without metal interference. This location worked perfectly. Well here is where I ran into another problem. The 3 plug harness they give you isn't long enough unless the DSM200 is right next to the DBALL2Pro. So I had to extend the harness. Do not use the long harness with the brown 4 pin plug at the end. You have to use the white 4 pin plug attached to the 3 plug harness. You will see what I am talking about if you purchase the unit.
Once you do that make sure you plug in everything to the dball2pro except for white power plug (14 pin?). Make sure you connect the smart start into the white 4 Pin D2D port next to the 2 Pin port for the over ride switch. Also, make sure the gray wire from the smart start is grounded. YOU DO NOT NEED TO MAKE THE MAIN POWER CONNECTIONS (RED and BLACK). THE DSM200 WILL GET POWER FROM THE D2D port on the DBALL2PRO.
Plug in the main white power harness to the DBALL2Pro and everything should intialize. The light on the DSM200 will flash back and forth until it goes solid. Now it is time to activate. Directed told me an authorized dealer would have to do this but screw them I found a way around it talking to my tint guy (he used to do alarms).
Go to http://www.managesmartstart.com/install/login
Username: dei1
Passoword: dei1
Once you got through all the steps and download the app you should be good to go.
IF ANYONE KNOWS HOW TO GET THE AUX1 and AUX2 TO WORK PLEASE HELP ME. I FIGURED EVERYTHING WOULD BE CONTROLLED THROUGH THE CAN BUS WIRES BUT IT MIGHT HAVE TO BE A DIRECT WIRE SET UP.
Last edited by mjhuffer; Oct 29, 2014 at 07:17 AM.
Thread Starter
Member
Joined: Apr 2010
Posts: 208
From: Indianapolis, IN
So apparently the smart start unit has a separate 5 pin plug that controls the aux that has to be set in direct wire mode. I would love to wire these to the window up and down and the sunroof crack and close. Would anybody have any idea how to do this or if I need a relay or not?
# Wire Color Connection/Description
1 White/Blue (-) RS (Remote Start)/AUX output
2 Brown (-) Factory horn/Alert input
3 Green (-) Lock
4 Blue (-) Unlock
5 Red/White (-) Trunk/AUX output
# Wire Color Connection/Description
1 White/Blue (-) RS (Remote Start)/AUX output
2 Brown (-) Factory horn/Alert input
3 Green (-) Lock
4 Blue (-) Unlock
5 Red/White (-) Trunk/AUX output

Junior Member
Joined: Aug 2014
Posts: 35
You are simply amazing with all the details. Thanks again. So after plenty of searching I cant not for the life of me find the THNISSC on Ebay but plenty of THNISS3 harnesses. Are they the same? Looks like the directed harness THNISS3C is for the Dballpro. Lets hope my research is half as intelligent as this thread or I will be sending **** back. LOL
Last edited by teddyca; Nov 1, 2014 at 11:30 AM.
Thread Starter
Member
Joined: Apr 2010
Posts: 208
From: Indianapolis, IN
No they are not the same at all. The THNISS3C is strictly for the DBALL2Pro which is a digital system. The DBALL2 and DBALL work with the THNISS3. You can use the smartstart system with either combination. You can only use the 3X OEM Lock with the DBALL2Pro and THNISS3C system. The dballs are usually called the brain of the system. Just remember, the brain will have to be flashed to the right settings which you will need a dealer to do. You cannot do it yourself cause you will need a dealer password even if you buy an XKloader2. I went down the way and had a shop that I buy a lot of audio equipment from do it for me.
Thread Starter
Member
Joined: Apr 2010
Posts: 208
From: Indianapolis, IN
I've also figured out how to get the sunroof wired and will be tackling the project next spring. It's getting too cold out here to work on anything and the sun goes down around 6 (darn DST). Might be done modding the car for the winter.
Junior Member
Joined: Aug 2014
Posts: 35
I will tackle that Sunroof mod with you next spring. As for the brain and harness it looks like I am sort of stuck. So I ordered a "DBALL2PRO XPRESS KIT DIRECTED ALL IN ONE REMOTE START IMMOBILIZER BYPASS MODULE " and the "DIRECTED Plug and Play Nissan Harness for the 4X10 & 5X10 Interface Modules THNISS3C" clearly a mistake on my behalf. Also after the purchase I stayed true to my obligation and paid for the module as well as asked if they could flash it, and I got nothing in return. I think this is going to be more work then worth in the end. 
Thread Starter
Member
Joined: Apr 2010
Posts: 208
From: Indianapolis, IN
The 4x10/5x10 is the exact same thing as the DBALL2Pro. You ordered the right brain and harness. Are you going the SmartStart route or the OEM remote start? . Your best best as far as flashing the DBALL2Pro is to go to the directed website and find a dealer near you. Call them, tell them you bought it out of state from an authorized dealer but you need it flashed to a different setting. Ask them if you can simply "rent" a XKloader2 from them. Some places will do it for free if you agree to buy something from them.
WHEN BUYING A DBALL2PRO or 4x10/5x10 ONLINE, MAKE SURE THE SELLER WILL FLASH IT FOR YOU FOR FREE. JUST MAKE SURE YOU KNOW THE SETTINGS YOU WANT. YOU HAVE TO FLASH BOTH THE RIGHT FIRMWARE AND SETTINGS FOR YOUR SETUP. YOU CANNOT SIMPLY BUY AN XKLOADER2 AND DO IT YOURSELF BECAUSE YOU NEED A DEALER PASSWORD.
WHEN BUYING A DBALL2PRO or 4x10/5x10 ONLINE, MAKE SURE THE SELLER WILL FLASH IT FOR YOU FOR FREE. JUST MAKE SURE YOU KNOW THE SETTINGS YOU WANT. YOU HAVE TO FLASH BOTH THE RIGHT FIRMWARE AND SETTINGS FOR YOUR SETUP. YOU CANNOT SIMPLY BUY AN XKLOADER2 AND DO IT YOURSELF BECAUSE YOU NEED A DEALER PASSWORD.
Last edited by mjhuffer; Nov 13, 2014 at 09:23 PM.
Thread Starter
Member
Joined: Apr 2010
Posts: 208
From: Indianapolis, IN
User JayD241 sent me this picture of his BCM screws. I don't know what year he has but I'm sure he can pitch in and say. I don't know if they make a screwdriver head for these type of screws but I see them all the time in bathroom stalls. I have a 2009 and they were standard phillips head screws but they were snug.

EDIT: For those of you with these screws, Dewalt makes a screwdriver bit set for said screws. You might be able to find an offbrand somewhere.
EDIT: For those of you with these screws, Dewalt makes a screwdriver bit set for said screws. You might be able to find an offbrand somewhere.
Last edited by mjhuffer; Feb 9, 2015 at 06:18 PM.

Joined: Apr 2014
Posts: 19
I have DBall2 with 3x Lock which I bought in Sept 2014. The range is just ridiculous. My question is, can I upgrade my current setup to use Smart Start if I purchase the DSM200 module?
Also, I'm in Canada... I checked on eBay and some sellers mention "WORKS IN THE US ONLY". I don't know if this is true for all modules or just the modules they're selling. If someone can shed light on this I would greatly appreciate it.
Also, I'm in Canada... I checked on eBay and some sellers mention "WORKS IN THE US ONLY". I don't know if this is true for all modules or just the modules they're selling. If someone can shed light on this I would greatly appreciate it.
Thread Starter
Member
Joined: Apr 2010
Posts: 208
From: Indianapolis, IN
You can absolutely upgrade to the SmartStart DSM200 or DSM250 module but your DBALL2PRO will have to have it's settings reflashed. You absolutely CANNOT have 3X OEM REMOTE START and SMARTSTART at the same time. The flashing utility will not allow it.

Thread Starter
Member
Joined: Apr 2010
Posts: 208
From: Indianapolis, IN
It is in the settings. It has to be set when you flash the firmware and settings. You won't be able to change it without a XKLoader 2 and dealer password. Did you install yourself or have a dealer do it?

Thread Starter
Member
Joined: Apr 2010
Posts: 208
From: Indianapolis, IN
User JayD241 sent me this picture of his BCM screws. I don't know what year he has but I'm sure he can pitch in and say. I don't know if they make a screwdriver head for these type of screws but I see them all the time in bathroom stalls. I have a 2009 and they were standard phillips head screws but they were snug.
Attachment 19369
Attachment 19369

Thread
Thread Starter
Forum
Replies
Last Post
pktaske
6th Generation Maxima (2004-2008)
0
Sep 4, 2015 08:40 AM
trungg86
4th Generation Maxima (1995-1999)
7
Sep 4, 2015 04:58 AM