Well - I bought another 4th GEN today
 07-28-2016, 07:45 PM
#1
Senior Member
Thread Starter

Join Date: Jan 2011
Location: Central AR
Posts: 3,041
Well - I bought another 4th GEN today
Now this makes the 4th of the 4th gen.
So a buddy asked me "Can't you buy anything but a mid-1990s Maxima?"
Alright - now here we go again.
Today I found a decent 1998 model GLE that is originally from the Texarkana area. So there is no rust. Amazingly for a deep maroon pearl color, there is no faded or chalking paint. So the color is the maroon pearl with tan leather interior. The interior hasn't been cooked from too much heat or sun. Now brace yourself - it has 230,000 miles. Cold A/C, a tight transmission, good running engine, no oil or fluid leaks, and a respectable looking body. I managed to buy it for my target used car allowance amount of $1,500.
So after three other 4th gens each with over 150,000 miles, I've figured out that really doesn't matter if one has 150,000 or 230,000 miles. Its all in how the previous owner cared for it with regard to the import maintenance items. One of my best 4th gens (an I30) had 225,000 miles on it when I bought it back in 2010. Around the same time frame, I bought a 95 SE 5-MT with around 150,000 miles. The I30 had been horribly neglected for years where the SE had reasonable care but it spent most of its life in Ohio. As it turned out both needed the same maintenance items to restore performance to what I call an acceptable level.
Then comes 4th gen III (a 99 model SE 5-MT) with 160,000 miles. It looked like it had received great care when I checked it out. It came from a good home. However, I paid too much just to get another 5-MT. So I got to experience all of the 99 model NATS-ECU horrors along with an engine that had been run hot a few times and a cooling system that had been patched up with stop leak. It took some weeks of nurturing and $$$$ that one to bring it back from the dead. I think should have sent it to the crusher when I found engine was so severely damaged. But I had a lot of money invested in suspension stuff so I managed to turn that one into something good. My plan worked and my oldest son has put over 36,000 miles on it in less than 2 years. I really haven't had to do anything to it but service it since the restoration and engine swap.. So show me a new car that you can drive "problem free" for 36,000 miles and not spend any money on it beyond routine service items. Oh yea -- they do exist but with a huge amount of depreciation that occurs in the 1st two years of ownership.
Over they years I've had a lot of fun buying and restoring used 4th gens at the $1,500 price point. I've learned through experience that they usually all need O2 sensors, hoses, struts, sometimes CV joints, LCAs, belts radiators, alternators, and few other items within the first year of recovery. They all required about the same amount of care to bring them back to be a good performing car again.
So the plan for this 4th gen is to replace my daughter's I30. The I30 survived a t-bone a couple of years ago that should have totaled it out. I managed to get a body shop to pull out the area around the b and c pillar supports so I could replace the doors with donors from a salvage yard. It never was the same car and it felt like it was "dog tracking" down the interstate if you tried to drive it in a straight line. There was some body damage that would have cost over $1,500 to repair and that is without paint. Considering that I paid $250 it when I bought it, we've gotten our money's worth of use and enjoyment from it. It is now closing in on 300,000 miles. I can't find or resolve the A/C electrical issue. It looks bad. However, it has a lot of great parts on it like a new alternator, suspension, great leather seats, tires, O2 and Knock sensors, pulleys, and stuff I replaced when I got it a few years ago. While the motor has a lot of miles, it runs great and it has a new timing chain tensioner that was one of the last of the originals that can be replaced without chancing the guides and all. The transmission is amazingly solid for the mileage. So my plan is to strip all of the parts off (interior included) from the I30 that I could possibly use on the 98 GLE or the 99 SE 5-MT and then send the body to the crusher. I actually want to keep the transmission and some key parts from the engine. We'll see how that goes.
I will post some pics over the weekend. It's just your average 4th gen. Now I have a new project car.


 ...
...
 07-29-2016, 08:09 PM
#4
Senior Member

Join Date: May 2012
Location: Long Island
Posts: 1,566
Inching ever closer to a seventh son of the seventh son story I see! LOL
Well, I guess you'll be able to do everything in your sleep by now! What will you do for a project when you're awake?
Best of Luck!
Well, I guess you'll be able to do everything in your sleep by now! What will you do for a project when you're awake?
Best of Luck!
07-30-2016, 01:52 PM
#5
Senior Member

Join Date: Oct 2012
Location: Portland, Oregon
Posts: 2,979
As strange it may seem to others, it makes all kinds of sense to buy yet another car of the same make and generation. we know the car inside and out, we know which issues to look for, and we have already learned how to make the repairs.
08-09-2016, 06:17 PM
#6
Senior Member
Thread Starter
Join Date: Jan 2011
Location: Central AR
Posts: 3,041
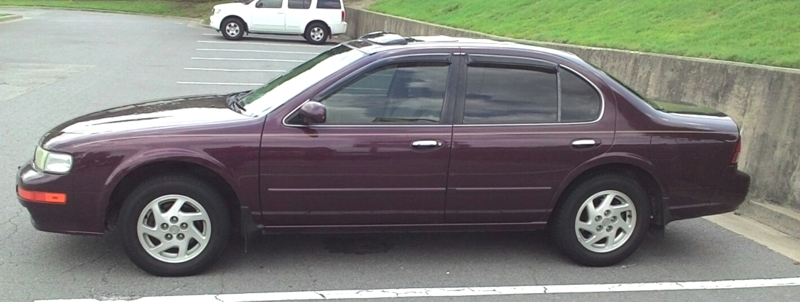
Here's a picture below. At this point, it's just an average looking 4th gen. The paint and body are in good shape.
Last weekend I fixed the intake air sensor code. It turned out that it was unplugged and the sensor contacts were dirty. So after cleaning the connections and a little bit of Permatex dielectric grease the issue has been resolved.
Next I installed a set of NGK copper v-power spark plugs. The old plugs were NGK platinum that appears to have been in the car for well over 100,000 miles. I would say the plugs were the 2nd set. I was pleased to see that all of the old plugs were burning evenly. No need for a compression check since it idles nicely.
I do need to replace the front (left bank) O2 sensor, so I ordered a new set of NTK O2 sensors that will be next weekend's project. Since the Fuel Pressure Regulator seems to be the original, I will replace it and the fuel filter.
08-10-2016, 07:09 AM
#8

Great looking Maxima alright. Wish I could find one rust free up here in the NE. 
I've been searching for a 1995 to 2001 in good body shape. I have a 2000 SE-L 5SP with low miles. The chassis is rusted away so I'd swap the engine, trans, then keep it for parts.
I've been searching for a 1995 to 2001 in good body shape. I have a 2000 SE-L 5SP with low miles. The chassis is rusted away so I'd swap the engine, trans, then keep it for parts.
08-13-2016, 11:45 AM
#9
Senior Member
Thread Starter
Join Date: Jan 2011
Location: Central AR
Posts: 3,041
Today I replaced the O2 sensors with new NTKs from RockAuto. That took care of the left bank O2 sensor code and the ghost Knock Sensor (KS) code that usually comes along with an O2 sensor code. It looks like all O2 sensors were the originals. I can feel the difference. It gives it just a little more pep around town -- like a fresh tune up.

 08-20-2016, 10:46 AM
#12
Senior Member
Thread Starter
Join Date: Jan 2011
Location: Central AR
Posts: 3,041
I picked up 2 fronts for $ 43.99 each with one new rear at $ 46.99 from www.rockauto.com. This is for a Fed Spec car with 3 sensors.
TTL with tax and shipping was $ 140.96
NTK (a.k.a NGK) part numbers for a 98 model Fed Spec.
NTK 24525 - Fronts
NTK 24630 - Rear
The O2 sensors with a set of NGK Copper v-power plugs #BKR5E11 at $1.44 each has it running like a new baby.
TTL with tax and shipping was $ 140.96
NTK (a.k.a NGK) part numbers for a 98 model Fed Spec.
NTK 24525 - Fronts
NTK 24630 - Rear
The O2 sensors with a set of NGK Copper v-power plugs #BKR5E11 at $1.44 each has it running like a new baby.
09-10-2016, 11:29 AM
#13
Senior Member

Join Date: May 2004
Posts: 6,190
I have a 95SE 5-speed in mint condition that I have owned since day 1. DJ2 black emerald, tan leather, sun roof. Transmission rebuilt and clutch replaced as a result of the infamous differential bearing leak.
106,200 miles on it. The bad news is it is not for sale.
106,200 miles on it. The bad news is it is not for sale.

 10-02-2016, 11:10 AM
#15
Senior Member
Thread Starter
Join Date: Jan 2011
Location: Central AR
Posts: 3,041
So far so good. I'm experiencing all of the 4th gen mid-life maintenance issues that I expected to encounter with an eighteen-year-old. Ha!
The original owner must have had all of the service work done at a Nissan dealer. It just doesn't look all mangled up like the 99 models did when I first got them. It looks like this car's first owner did a good job with maintenance at an actual Nissan dealer. I would say the first owner kept the car until it had roughly 185,000 to 200,000 miles. The CV and steering rack boots are all in good condition as if they have been replaced at some point.
No timing chain rattles like the ones I had on the 99 I30 at that mileage or that I'm experiencing on the 99 model SE.
The front struts that appear to have been replaced around 50,000 miles ago. The front struts have the OEM style boots that are perfectly intact.
The rear appear to have been aftermarket with boots that just didn't fit properly. Possibly from the 2nd owner. I can see why they didn't last.
I see from receipts where the 2nd owner took care of the basics like oil changes, brakes, tires, and general maintenance items. However, when they started getting codes from failing O2 sensors + the KS ghost, and a code from a disconnected air temp sensor (the one on air intake snorkel), I think it scared them so they traded the car for something newer. I suspect from the registration information and receipt information that I found in the glovebox, the 2nd owner was a middle aged single female who lived in small rural town.
Wherever she lived, I see signs of mud splatterings under the car from the Red River area that has a lot of red clay. The nearest Nissan dealer would have been 50 to 60 miles away in Texarkana. So she took care of the items that the local tire/brake dealer could handle -- and that was about it.
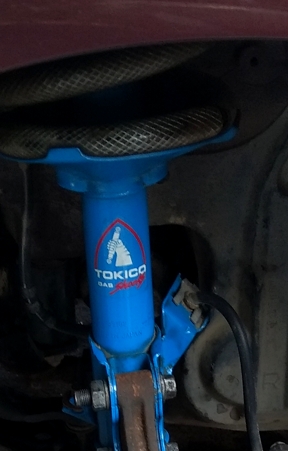
I moved the Tokico blues from the 99 I30 to replace the well worn (brand unknown) rear struts. The Tokico blues have roughly 25,000 miles. That made a big difference in how it handles. I will move the front Tokico in the next weekend or two.
The new NTK O2 sensors cleared up codes. Though I have seen two rounds Evap codes 1448 and 0455. The second time I cleared the codes it seemed to last. I plan to replace the canister soon.
As expected, it needs valve cover gaskets. During that job, I will do the EGR service and bypass the little water hose that runs through the plenum like I did on the 1999 SE. This will be the 6th time for me to go under a VQ30 plenum to replace VC gaskets and perform EGR maintenance. I'm getting all of the parts lined up in advance so it will be a quick operation.
When I was checking it out this weekend, I noticed the crankshaft pulley has some cracks in the rubber insulator. For me, those have a habit of going out during rainy cold weather. So I ordered a new one from tomautoparts on eBay for $26.18. We'll see how it goes. I had a good experience with a low-cost eBay crank pulley a few years ago. The old pulley is still workable and I think I replaced the I30 pulley a few years ago, so I also have that as a spare. I plan to pull the engine (and anything worth saving) from the I30 before I send it to the crusher. I will report back on how that works.
Also, I plan to replace the injectors as part of the VC and EGR service job. At that age and mileage, I know that I'm running on borrowed time. I don't want to go through leaking injector problems ever again.
Now here's the kick on the injector replacement.
I purchased 7 new injectors from an eBay seller for $11 each. Almost two years I refurbished a set of injectors for the 99 model with a kit that I purchased on eBay for approximately $35. The kit worked good and the engine still runs great two years later. So I'm not afraid to try different price scenarios with some careful testing.
I've learned that testing and having another working 4th gen to use as a reference vehicle allows me to take a few risks while trying new things. By having a couple other cars to drive in the event that one of my experiments doesn't work seems to keep peace in the family should I need extra time on a project. If we didn't have spare vehicles car to drive, then I wouldn't be so open to taking risks with alternative parts.
Since the old injectors are working, I can fall back to refurbishing them in the event the new injectors don't work out.
Because the price was so low, I purchased one extra one in the event I need a spare in the future. When I replaced 8 injectors in my VH45DE engine, six years ago, I purchased two extra from the same batch and flow rating, just in case I needed one in the future. As it turned out, I never needed to use the one I have as a backup. As my luck goes, when I purchase an extra part to keep in reserve, I rarely need to use it.
For the $11 injector test, I plan to replace the left bank (front) injectors first and see how it goes. If they work, then I will plan to use them under the plenum. If it doesn't work, then I can refurbish the working injectors from the I30. Even if I do need to make another trip under the plenum at some point in the future, by bypassing the EGR cooling tube, and a trick that I use on the plenum brackets, I can pull the plenum without much effort.
If the $11 injectors work out, it could be good for all of us. So I'm doing this experiment for the club.
Here's a link to the eBay injectors.
http://www.ebay.com/itm/181779965249?_trksid=p2057872.m2749.l2649&ssPageName=STRK%3AMEBIDX%3AIT
This weekend I changed the oil, filter, and ATF. The ATF didn't look bad. However, when I was under the car preparing to remove the ATF drain plug, I found it was barely finger tight. I could literally spin the ATF drain plug off with my fingers. I don't know how it didn't leak. That was pure luck.
I have been thinking about replacing the LCAs, but I don't see an immediate need. So maybe I will do that next year. I would like to install some subframe spacers and poly bushings when I move the struts.
I ordered a replacement electric antenna motor. That will be next weekend's project.
The original owner must have had all of the service work done at a Nissan dealer. It just doesn't look all mangled up like the 99 models did when I first got them. It looks like this car's first owner did a good job with maintenance at an actual Nissan dealer. I would say the first owner kept the car until it had roughly 185,000 to 200,000 miles. The CV and steering rack boots are all in good condition as if they have been replaced at some point.
No timing chain rattles like the ones I had on the 99 I30 at that mileage or that I'm experiencing on the 99 model SE.
The front struts that appear to have been replaced around 50,000 miles ago. The front struts have the OEM style boots that are perfectly intact.
The rear appear to have been aftermarket with boots that just didn't fit properly. Possibly from the 2nd owner. I can see why they didn't last.
I see from receipts where the 2nd owner took care of the basics like oil changes, brakes, tires, and general maintenance items. However, when they started getting codes from failing O2 sensors + the KS ghost, and a code from a disconnected air temp sensor (the one on air intake snorkel), I think it scared them so they traded the car for something newer. I suspect from the registration information and receipt information that I found in the glovebox, the 2nd owner was a middle aged single female who lived in small rural town.
Wherever she lived, I see signs of mud splatterings under the car from the Red River area that has a lot of red clay. The nearest Nissan dealer would have been 50 to 60 miles away in Texarkana. So she took care of the items that the local tire/brake dealer could handle -- and that was about it.
I moved the Tokico blues from the 99 I30 to replace the well worn (brand unknown) rear struts. The Tokico blues have roughly 25,000 miles. That made a big difference in how it handles. I will move the front Tokico in the next weekend or two.
The new NTK O2 sensors cleared up codes. Though I have seen two rounds Evap codes 1448 and 0455. The second time I cleared the codes it seemed to last. I plan to replace the canister soon.
As expected, it needs valve cover gaskets. During that job, I will do the EGR service and bypass the little water hose that runs through the plenum like I did on the 1999 SE. This will be the 6th time for me to go under a VQ30 plenum to replace VC gaskets and perform EGR maintenance. I'm getting all of the parts lined up in advance so it will be a quick operation.
When I was checking it out this weekend, I noticed the crankshaft pulley has some cracks in the rubber insulator. For me, those have a habit of going out during rainy cold weather. So I ordered a new one from tomautoparts on eBay for $26.18. We'll see how it goes. I had a good experience with a low-cost eBay crank pulley a few years ago. The old pulley is still workable and I think I replaced the I30 pulley a few years ago, so I also have that as a spare. I plan to pull the engine (and anything worth saving) from the I30 before I send it to the crusher. I will report back on how that works.
Also, I plan to replace the injectors as part of the VC and EGR service job. At that age and mileage, I know that I'm running on borrowed time. I don't want to go through leaking injector problems ever again.
Now here's the kick on the injector replacement.
I purchased 7 new injectors from an eBay seller for $11 each. Almost two years I refurbished a set of injectors for the 99 model with a kit that I purchased on eBay for approximately $35. The kit worked good and the engine still runs great two years later. So I'm not afraid to try different price scenarios with some careful testing.
I've learned that testing and having another working 4th gen to use as a reference vehicle allows me to take a few risks while trying new things. By having a couple other cars to drive in the event that one of my experiments doesn't work seems to keep peace in the family should I need extra time on a project. If we didn't have spare vehicles car to drive, then I wouldn't be so open to taking risks with alternative parts.
Since the old injectors are working, I can fall back to refurbishing them in the event the new injectors don't work out.
Because the price was so low, I purchased one extra one in the event I need a spare in the future. When I replaced 8 injectors in my VH45DE engine, six years ago, I purchased two extra from the same batch and flow rating, just in case I needed one in the future. As it turned out, I never needed to use the one I have as a backup. As my luck goes, when I purchase an extra part to keep in reserve, I rarely need to use it.
For the $11 injector test, I plan to replace the left bank (front) injectors first and see how it goes. If they work, then I will plan to use them under the plenum. If it doesn't work, then I can refurbish the working injectors from the I30. Even if I do need to make another trip under the plenum at some point in the future, by bypassing the EGR cooling tube, and a trick that I use on the plenum brackets, I can pull the plenum without much effort.
If the $11 injectors work out, it could be good for all of us. So I'm doing this experiment for the club.
Here's a link to the eBay injectors.
http://www.ebay.com/itm/181779965249?_trksid=p2057872.m2749.l2649&ssPageName=STRK%3AMEBIDX%3AIT
This weekend I changed the oil, filter, and ATF. The ATF didn't look bad. However, when I was under the car preparing to remove the ATF drain plug, I found it was barely finger tight. I could literally spin the ATF drain plug off with my fingers. I don't know how it didn't leak. That was pure luck.
I have been thinking about replacing the LCAs, but I don't see an immediate need. So maybe I will do that next year. I would like to install some subframe spacers and poly bushings when I move the struts.
I ordered a replacement electric antenna motor. That will be next weekend's project.
10-02-2016, 07:50 PM
#16
Member

Join Date: Jan 2008
Location: Dallas, TX
Posts: 268
Congrats on the new addition. Looks like a good find.
I may find myself with another 4th gen one of these days. I bought a '95 GXE many years ago with the plan of restoring it and giving it to my mother to replace her '96 Grand Am. But the GXE (purchased for $200) would have been a big repair. It had not been running for a long time (ran without coolant, not sure the extent of the internal damage) and had also met a pole with the drivers rear door / quarter panel. The interior was immaculate, so I swapped a lot of pieces into my '96 SE (center console armrest, glove box, visors, etc.), set aside some other parts as spares (coil packs which are now in the SE, A/C controls that will go in this weekend) and sold the rest for scrap for $350.
I may find myself with another 4th gen one of these days. I bought a '95 GXE many years ago with the plan of restoring it and giving it to my mother to replace her '96 Grand Am. But the GXE (purchased for $200) would have been a big repair. It had not been running for a long time (ran without coolant, not sure the extent of the internal damage) and had also met a pole with the drivers rear door / quarter panel. The interior was immaculate, so I swapped a lot of pieces into my '96 SE (center console armrest, glove box, visors, etc.), set aside some other parts as spares (coil packs which are now in the SE, A/C controls that will go in this weekend) and sold the rest for scrap for $350.
10-07-2016, 09:43 PM
#17
Senior Member
Thread Starter
Join Date: Jan 2011
Location: Central AR
Posts: 3,041
When I was checking it out this weekend, I noticed the crankshaft pulley has some cracks in the rubber insulator. For me, those have a habit of going out during rainy cold weather. So I ordered a new one from tomautoparts on eBay for $26.18. We'll see how it goes. I had a good experience with a low-cost eBay crank pulley a few years ago. The old pulley is still workable and I think I replaced the I30 pulley a few years ago, so I also have that as a spare. I plan to pull the engine (and anything worth saving) from the I30 before I send it to the crusher. I will report back on how that works.
I want to share some pictures of the new pulley I ordered for Max IV compared to an old OEM pulley that I replaced on Max I or Max II some years ago. If this one runs good, may decide to order another one for Max III or just keep it in the parts workshop for the future.
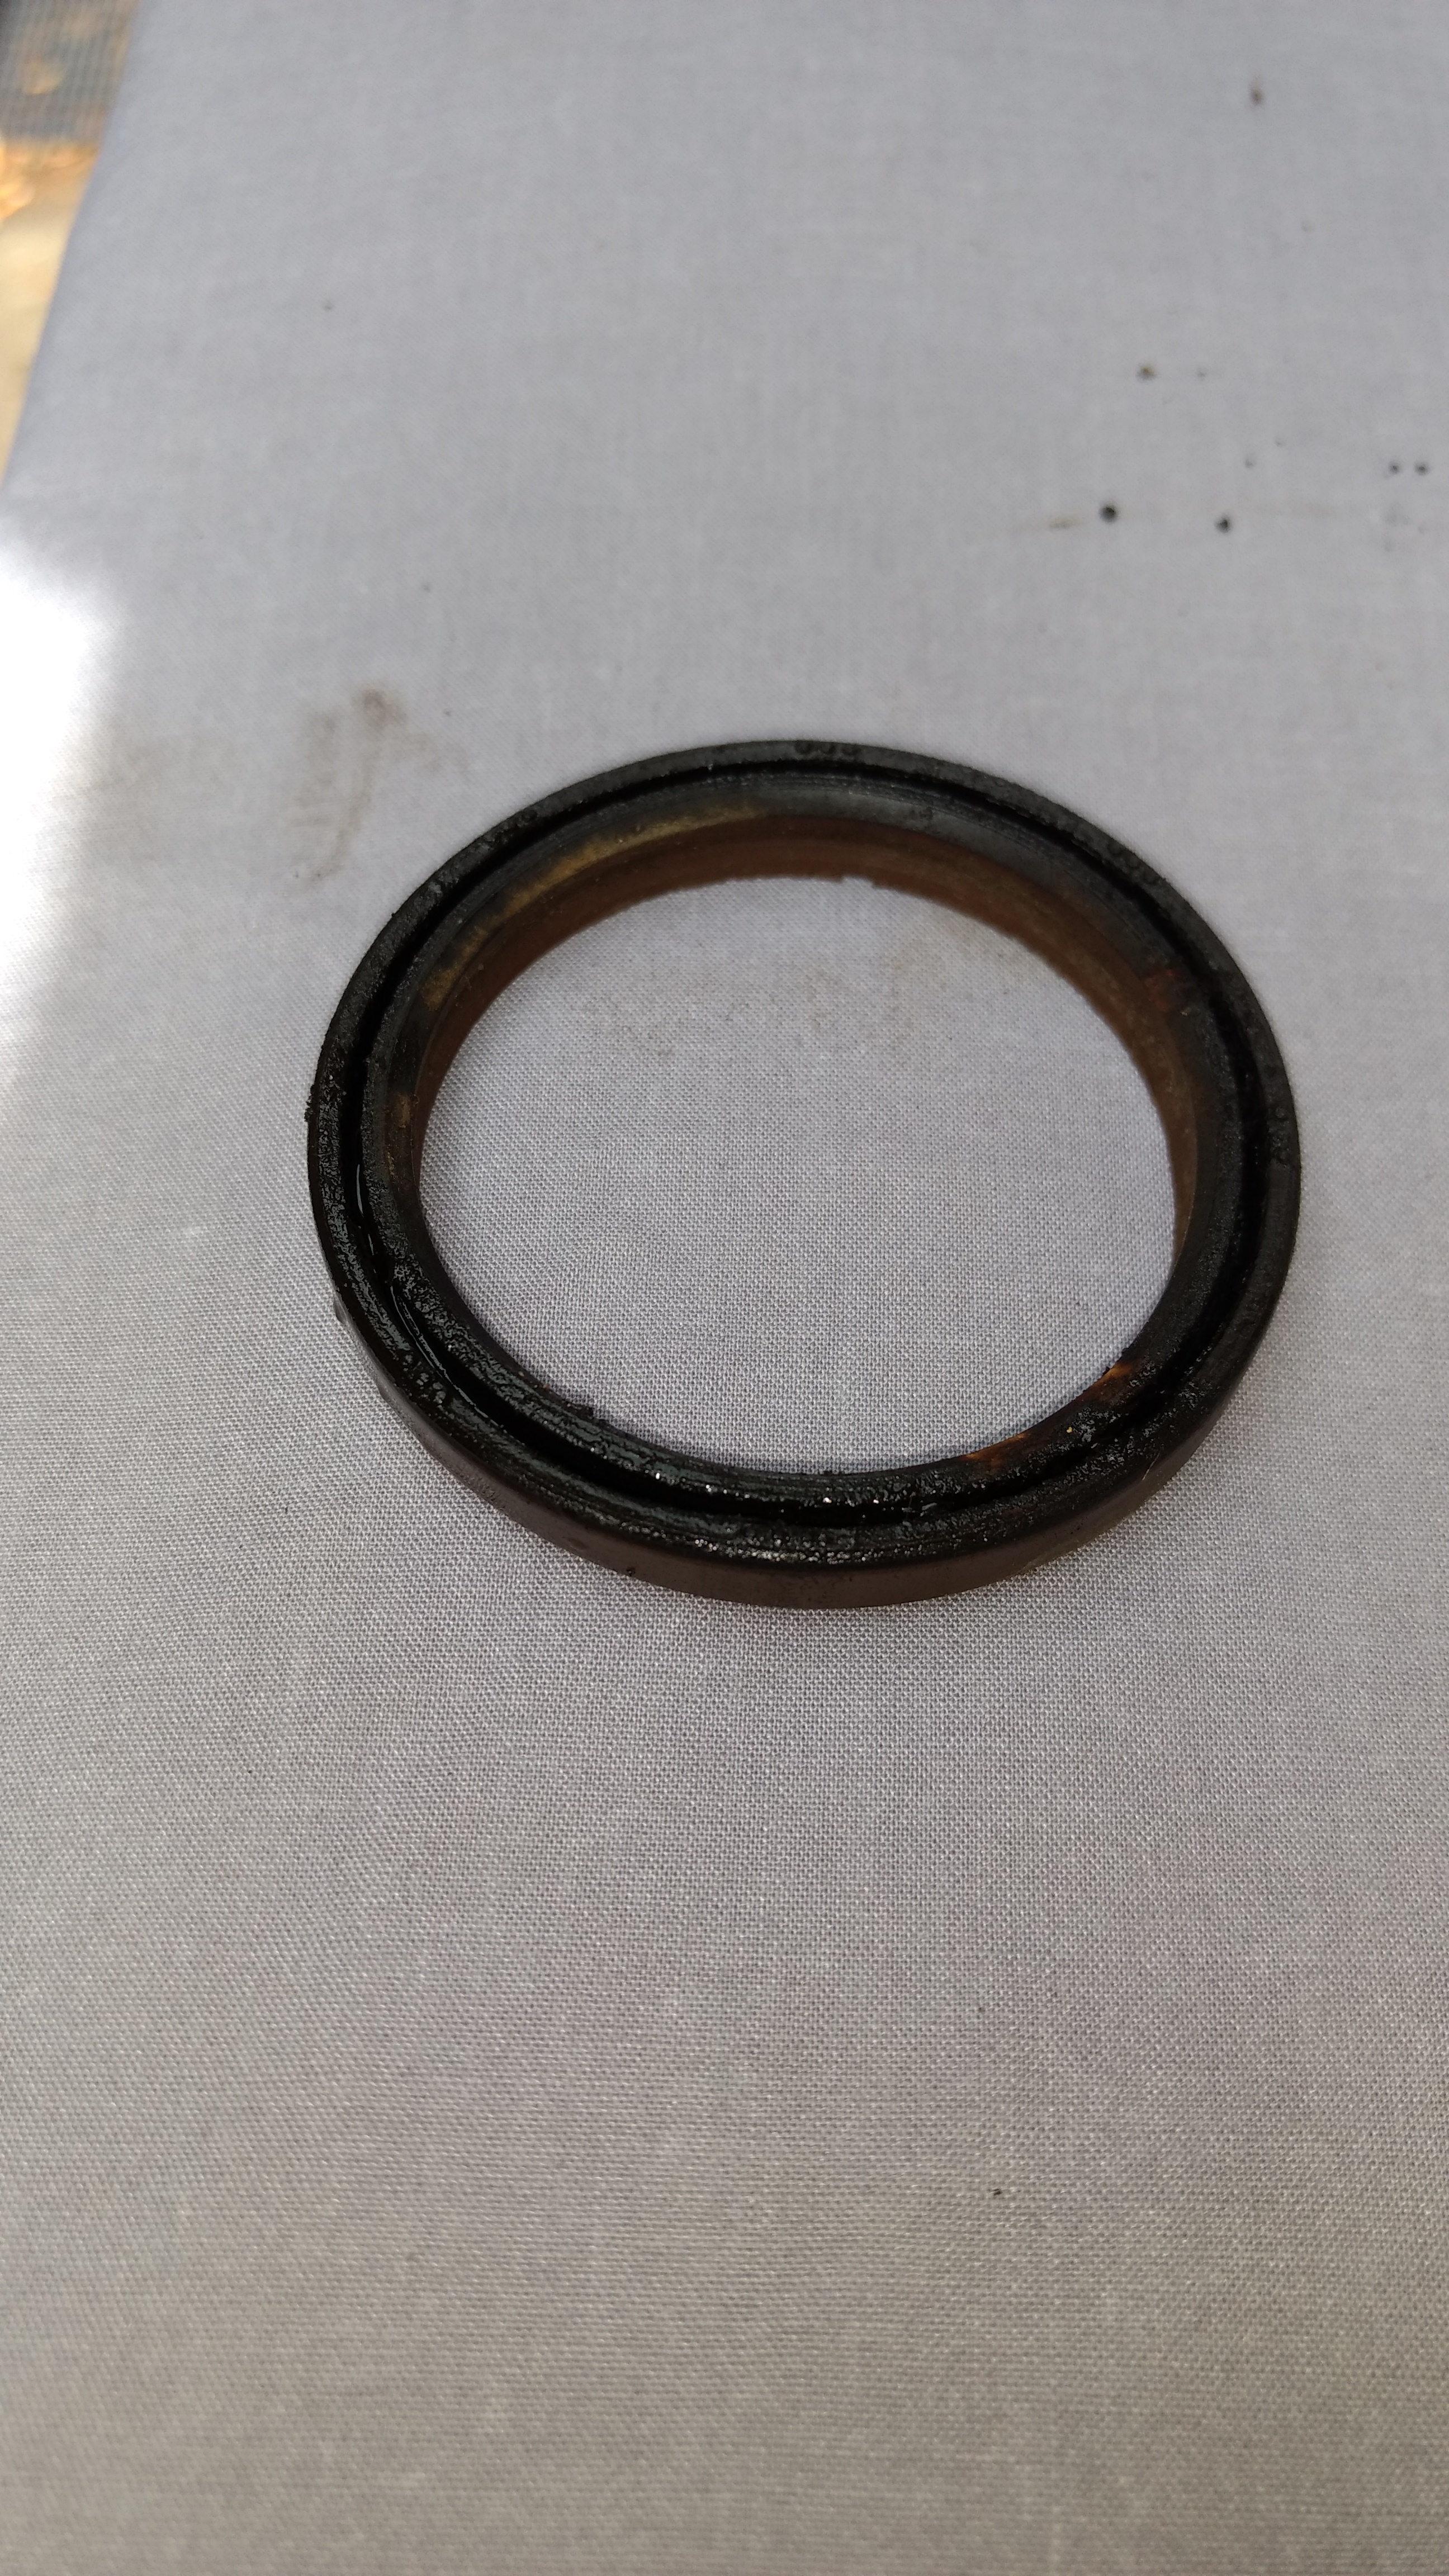
Sooner or later a VQ30 crankshaft pulley will separate like the one in the picture. When it separates, you will hear a belt squealing noise like a bad power steering belt. The noise comes from the outer ring rubbing against the power steering belt. The separation occurs when the rubber insulator that is between the crankshaft part and the outer serpentine belt pulley deteriorates and allows the separation to occur.
New Compared to Old

New

Old

Side-by-Side Comparison 1

Side-by-Side Comparison 2

Side-by-Side Comparison 3

Harmonic Balancer Comparison
The has more smaller balancing holes compared to 4 large holes on the old.

New Compared to Old - Front View

Last edited by CS_AR; 10-07-2016 at 09:50 PM.
10-08-2016, 08:03 PM
#18
Senior Member
Thread Starter
Join Date: Jan 2011
Location: Central AR
Posts: 3,041
Today I moved the tan leather seats from the I30 to Max IV. The existing tan leather seats were dried out and cracked. Also, I had to move the drivers seat rail and motor in the process. That the first time I've swapped a seat rail and motor. It took a couple of hours just to deal with the rail swap.
If you ever need to replace or swap a seat rail and motor, move the seat to the most forward position so that you expose the rear mounting bolts.
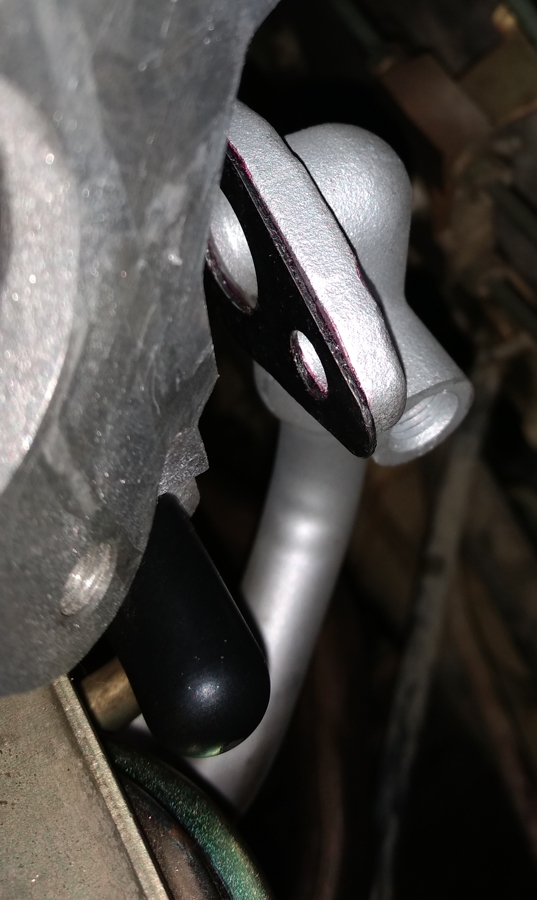
Yesterday, I picked up a hood switch in good condition while visiting the local salvage yard. The boot on the existing switch was missing. The one I picked up from the salvage yard looked fairly new.
If you ever need to replace or swap a seat rail and motor, move the seat to the most forward position so that you expose the rear mounting bolts.
Yesterday, I picked up a hood switch in good condition while visiting the local salvage yard. The boot on the existing switch was missing. The one I picked up from the salvage yard looked fairly new.
10-10-2016, 04:55 PM
#19
Newbie - Just Registered

Join Date: Oct 2016
Posts: 4
Awesome Post thank you. I have a 95 maxima se and love it. It has 299K miles on it and still going strong. Have done regular maint on it and replaced all injectors. Hope to get another 200k out of it.
So far so good. I'm experiencing all of the 4th gen mid-life maintenance issues that I expected to encounter with an eighteen-year-old. Ha!
The original owner must have had all of the service work done at a Nissan dealer. It just doesn't look all mangled up like the 99 models did when I first got them. It looks like this car's first owner did a good job with maintenance at an actual Nissan dealer. I would say the first owner kept the car until it had roughly 185,000 to 200,000 miles. The CV and steering rack boots are all in good condition as if they have been replaced at some point.
No timing chain rattles like the ones I had on the 99 I30 at that mileage or that I'm experiencing on the 99 model SE.
The front struts that appear to have been replaced around 50,000 miles ago. The front struts have the OEM style boots that are perfectly intact.
The rear appear to have been aftermarket with boots that just didn't fit properly. Possibly from the 2nd owner. I can see why they didn't last.
I see from receipts where the 2nd owner took care of the basics like oil changes, brakes, tires, and general maintenance items. However, when they started getting codes from failing O2 sensors + the KS ghost, and a code from a disconnected air temp sensor (the one on air intake snorkel), I think it scared them so they traded the car for something newer. I suspect from the registration information and receipt information that I found in the glovebox, the 2nd owner was a middle aged single female who lived in small rural town.
Wherever she lived, I see signs of mud splatterings under the car from the Red River area that has a lot of red clay. The nearest Nissan dealer would have been 50 to 60 miles away in Texarkana. So she took care of the items that the local tire/brake dealer could handle -- and that was about it.
I moved the Tokico blues from the 99 I30 to replace the well worn (brand unknown) rear struts. The Tokico blues have roughly 25,000 miles. That made a big difference in how it handles. I will move the front Tokico in the next weekend or two.
The new NTK O2 sensors cleared up codes. Though I have seen two rounds Evap codes 1448 and 0455. The second time I cleared the codes it seemed to last. I plan to replace the canister soon.
As expected, it needs valve cover gaskets. During that job, I will do the EGR service and bypass the little water hose that runs through the plenum like I did on the 1999 SE. This will be the 6th time for me to go under a VQ30 plenum to replace VC gaskets and perform EGR maintenance. I'm getting all of the parts lined up in advance so it will be a quick operation.
When I was checking it out this weekend, I noticed the crankshaft pulley has some cracks in the rubber insulator. For me, those have a habit of going out during rainy cold weather. So I ordered a new one from tomautoparts on eBay for $26.18. We'll see how it goes. I had a good experience with a low-cost eBay crank pulley a few years ago. The old pulley is still workable and I think I replaced the I30 pulley a few years ago, so I also have that as a spare. I plan to pull the engine (and anything worth saving) from the I30 before I send it to the crusher. I will report back on how that works.
Also, I plan to replace the injectors as part of the VC and EGR service job. At that age and mileage, I know that I'm running on borrowed time. I don't want to go through leaking injector problems ever again.
Now here's the kick on the injector replacement.
I purchased 7 new injectors from an eBay seller for $11 each. Almost two years I refurbished a set of injectors for the 99 model with a kit that I purchased on eBay for approximately $35. The kit worked good and the engine still runs great two years later. So I'm not afraid to try different price scenarios with some careful testing.
I've learned that testing and having another working 4th gen to use as a reference vehicle allows me to take a few risks while trying new things. By having a couple other cars to drive in the event that one of my experiments doesn't work seems to keep peace in the family should I need extra time on a project. If we didn't have spare vehicles car to drive, then I wouldn't be so open to taking risks with alternative parts.
Since the old injectors are working, I can fall back to refurbishing them in the event the new injectors don't work out.
Because the price was so low, I purchased one extra one in the event I need a spare in the future. When I replaced 8 injectors in my VH45DE engine, six years ago, I purchased two extra from the same batch and flow rating, just in case I needed one in the future. As it turned out, I never needed to use the one I have as a backup. As my luck goes, when I purchase an extra part to keep in reserve, I rarely need to use it.
For the $11 injector test, I plan to replace the left bank (front) injectors first and see how it goes. If they work, then I will plan to use them under the plenum. If it doesn't work, then I can refurbish the working injectors from the I30. Even if I do need to make another trip under the plenum at some point in the future, by bypassing the EGR cooling tube, and a trick that I use on the plenum brackets, I can pull the plenum without much effort.
If the $11 injectors work out, it could be good for all of us. So I'm doing this experiment for the club.
Here's a link to the eBay injectors.
New A46 00 Fuel Injector for 92 99 Nissan Maxima Infiniti I30 96 99 3 0L | eBay
This weekend I changed the oil, filter, and ATF. The ATF didn't look bad. However, when I was under the car preparing to remove the ATF drain plug, I found it was barely finger tight. I could literally spin the ATF drain plug off with my fingers. I don't know how it didn't leak. That was pure luck.
I have been thinking about replacing the LCAs, but I don't see an immediate need. So maybe I will do that next year. I would like to install some subframe spacers and poly bushings when I move the struts.
I ordered a replacement electric antenna motor. That will be next weekend's project.
10-11-2016, 08:08 PM
#20
Senior Member
Thread Starter
Join Date: Jan 2011
Location: Central AR
Posts: 3,041
Last weekend I replaced the crankshaft and belt idler pulley. The eBay pulley is working great.
Pictures from the operation are listed below.
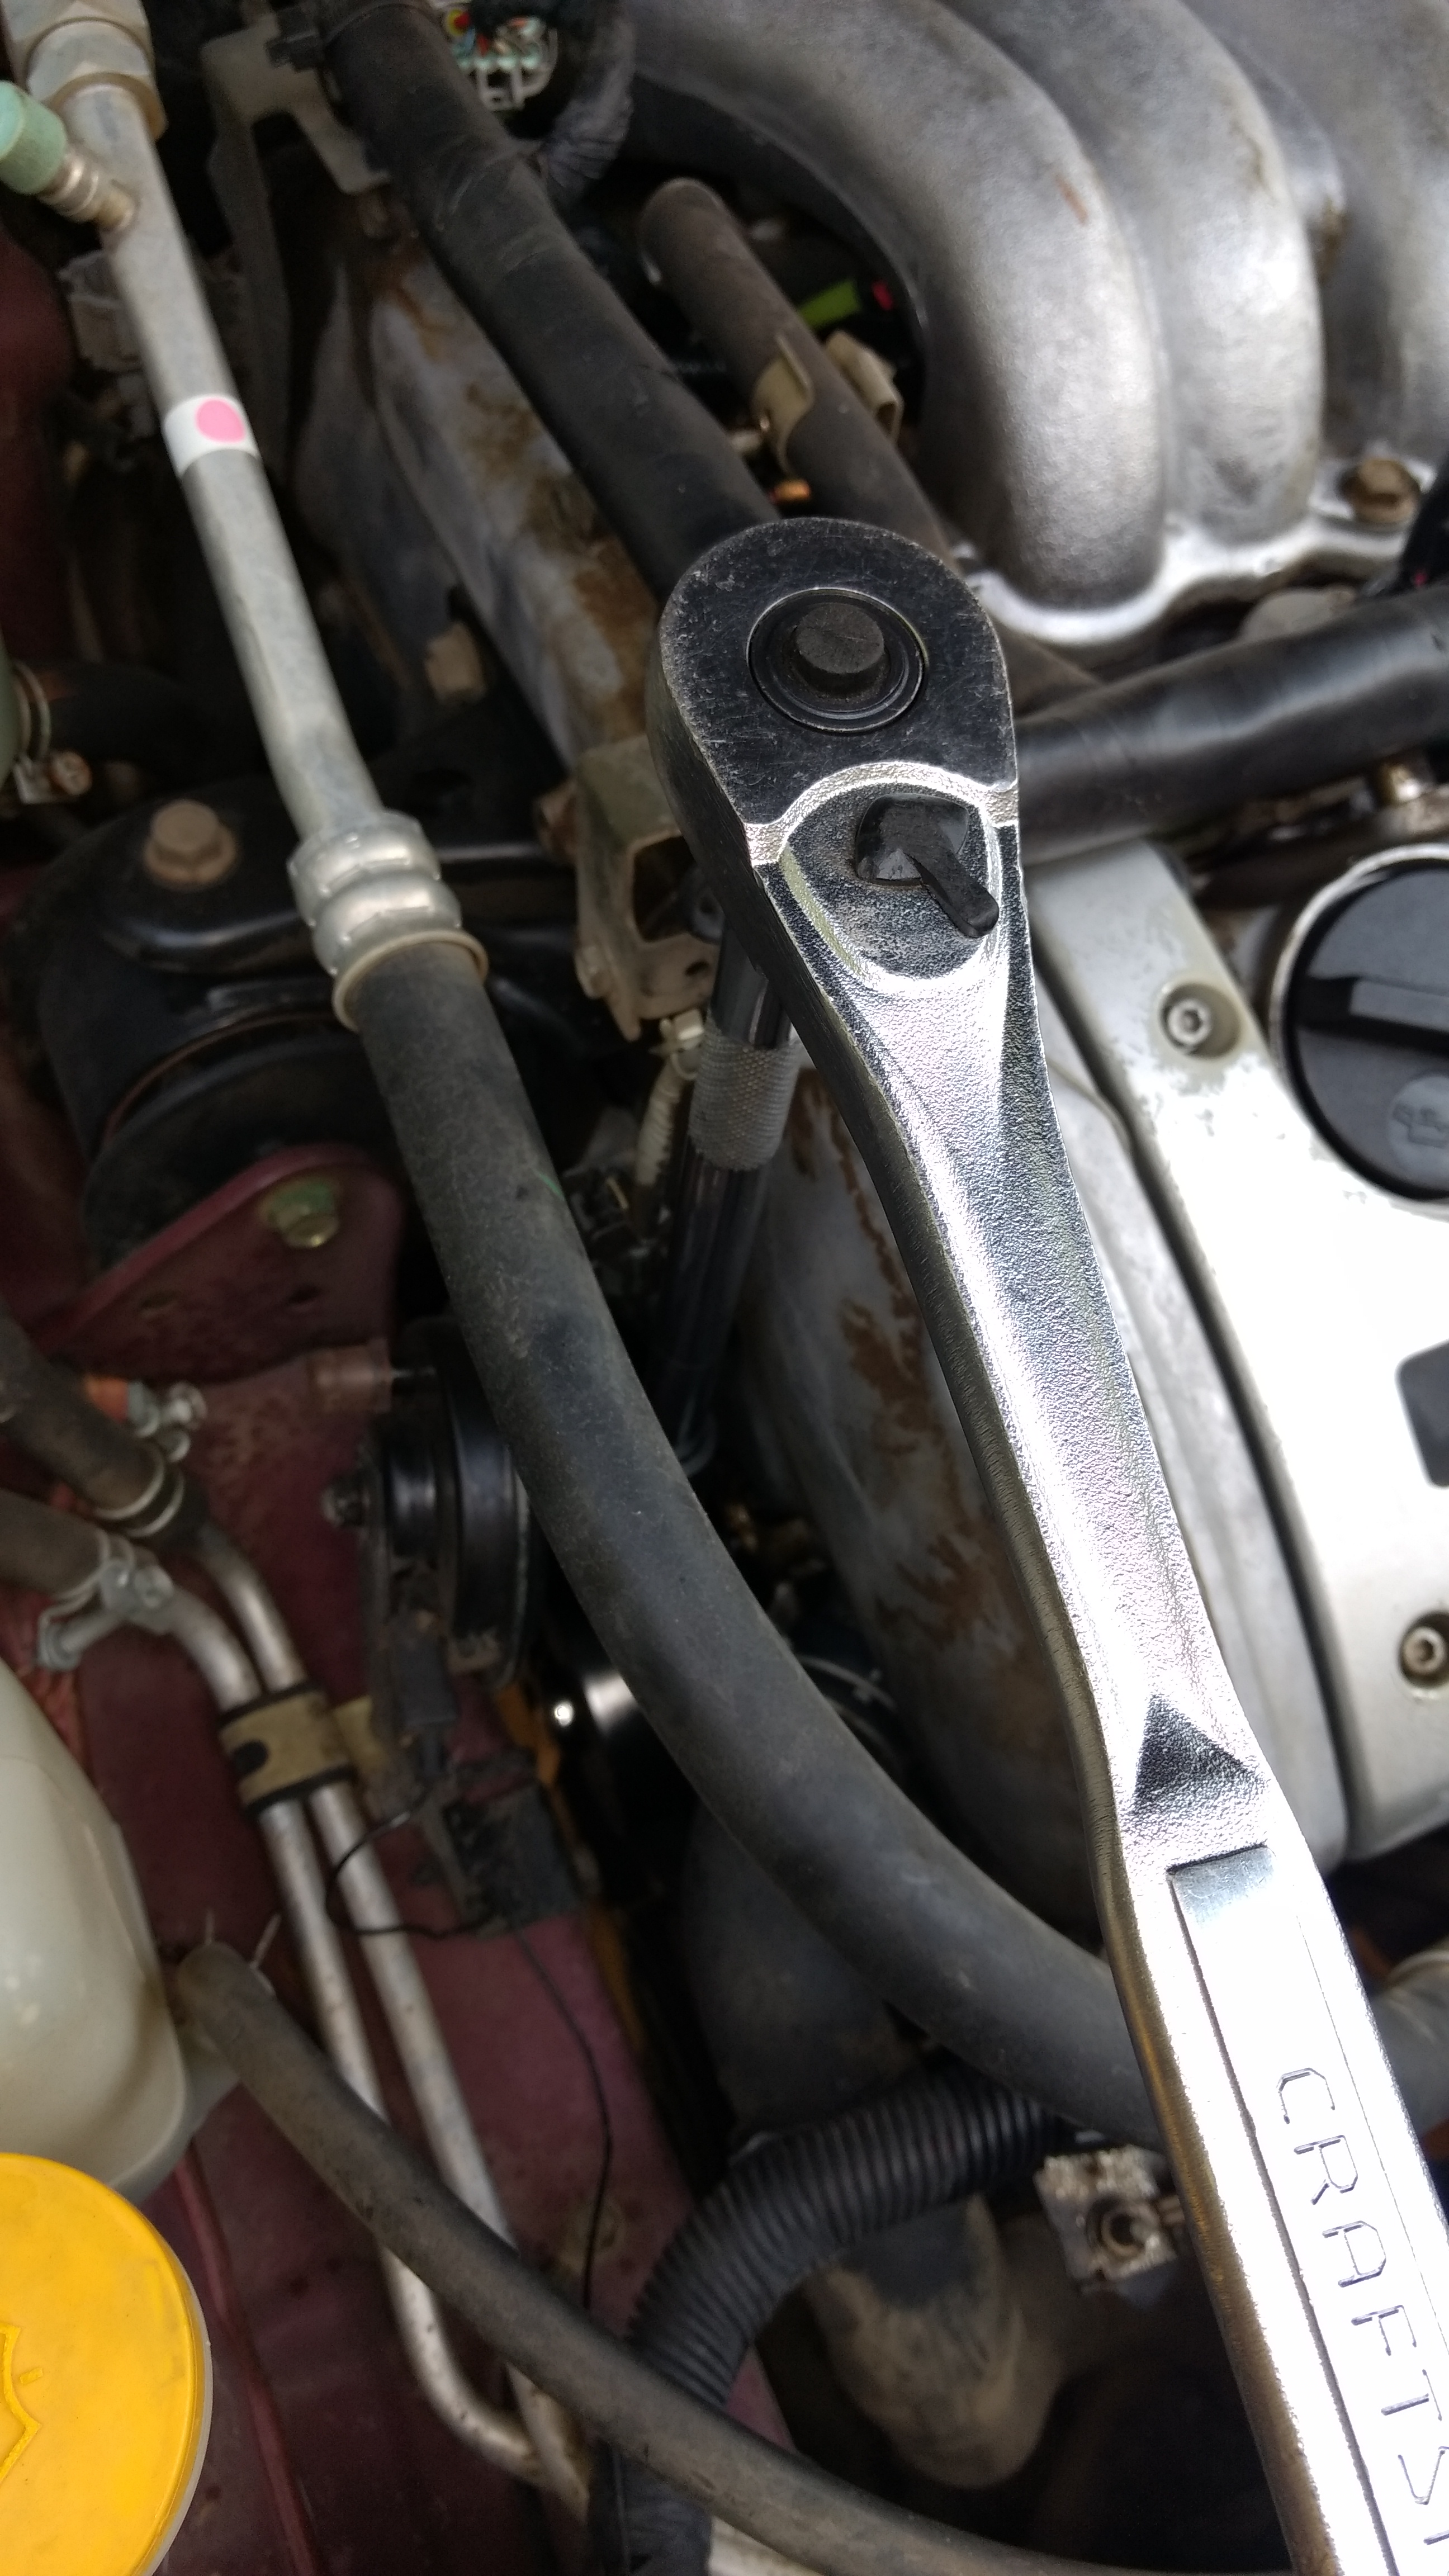
Here's a trick for removing the crankshaft pulley bolt. I use a 1/2 drive ratchet with a cheater bar. I purposely wanted some slack between the ratchet handle and the cheater bar. The slack allows the starter to engage and move the crankshaft just enough to break the bolt loose.
Before I start, I remove the fuel pump fuse and run the starter to make sure there is no fuel in the system that would cause the engine to start while using this procedure.

After removing the crankshart pulley bolt, I sprayed some PB Blaster around the area where the pulley mates with the crankshaft. After that I was able to get the pulley a good shake and it came right out. No special puller needed.
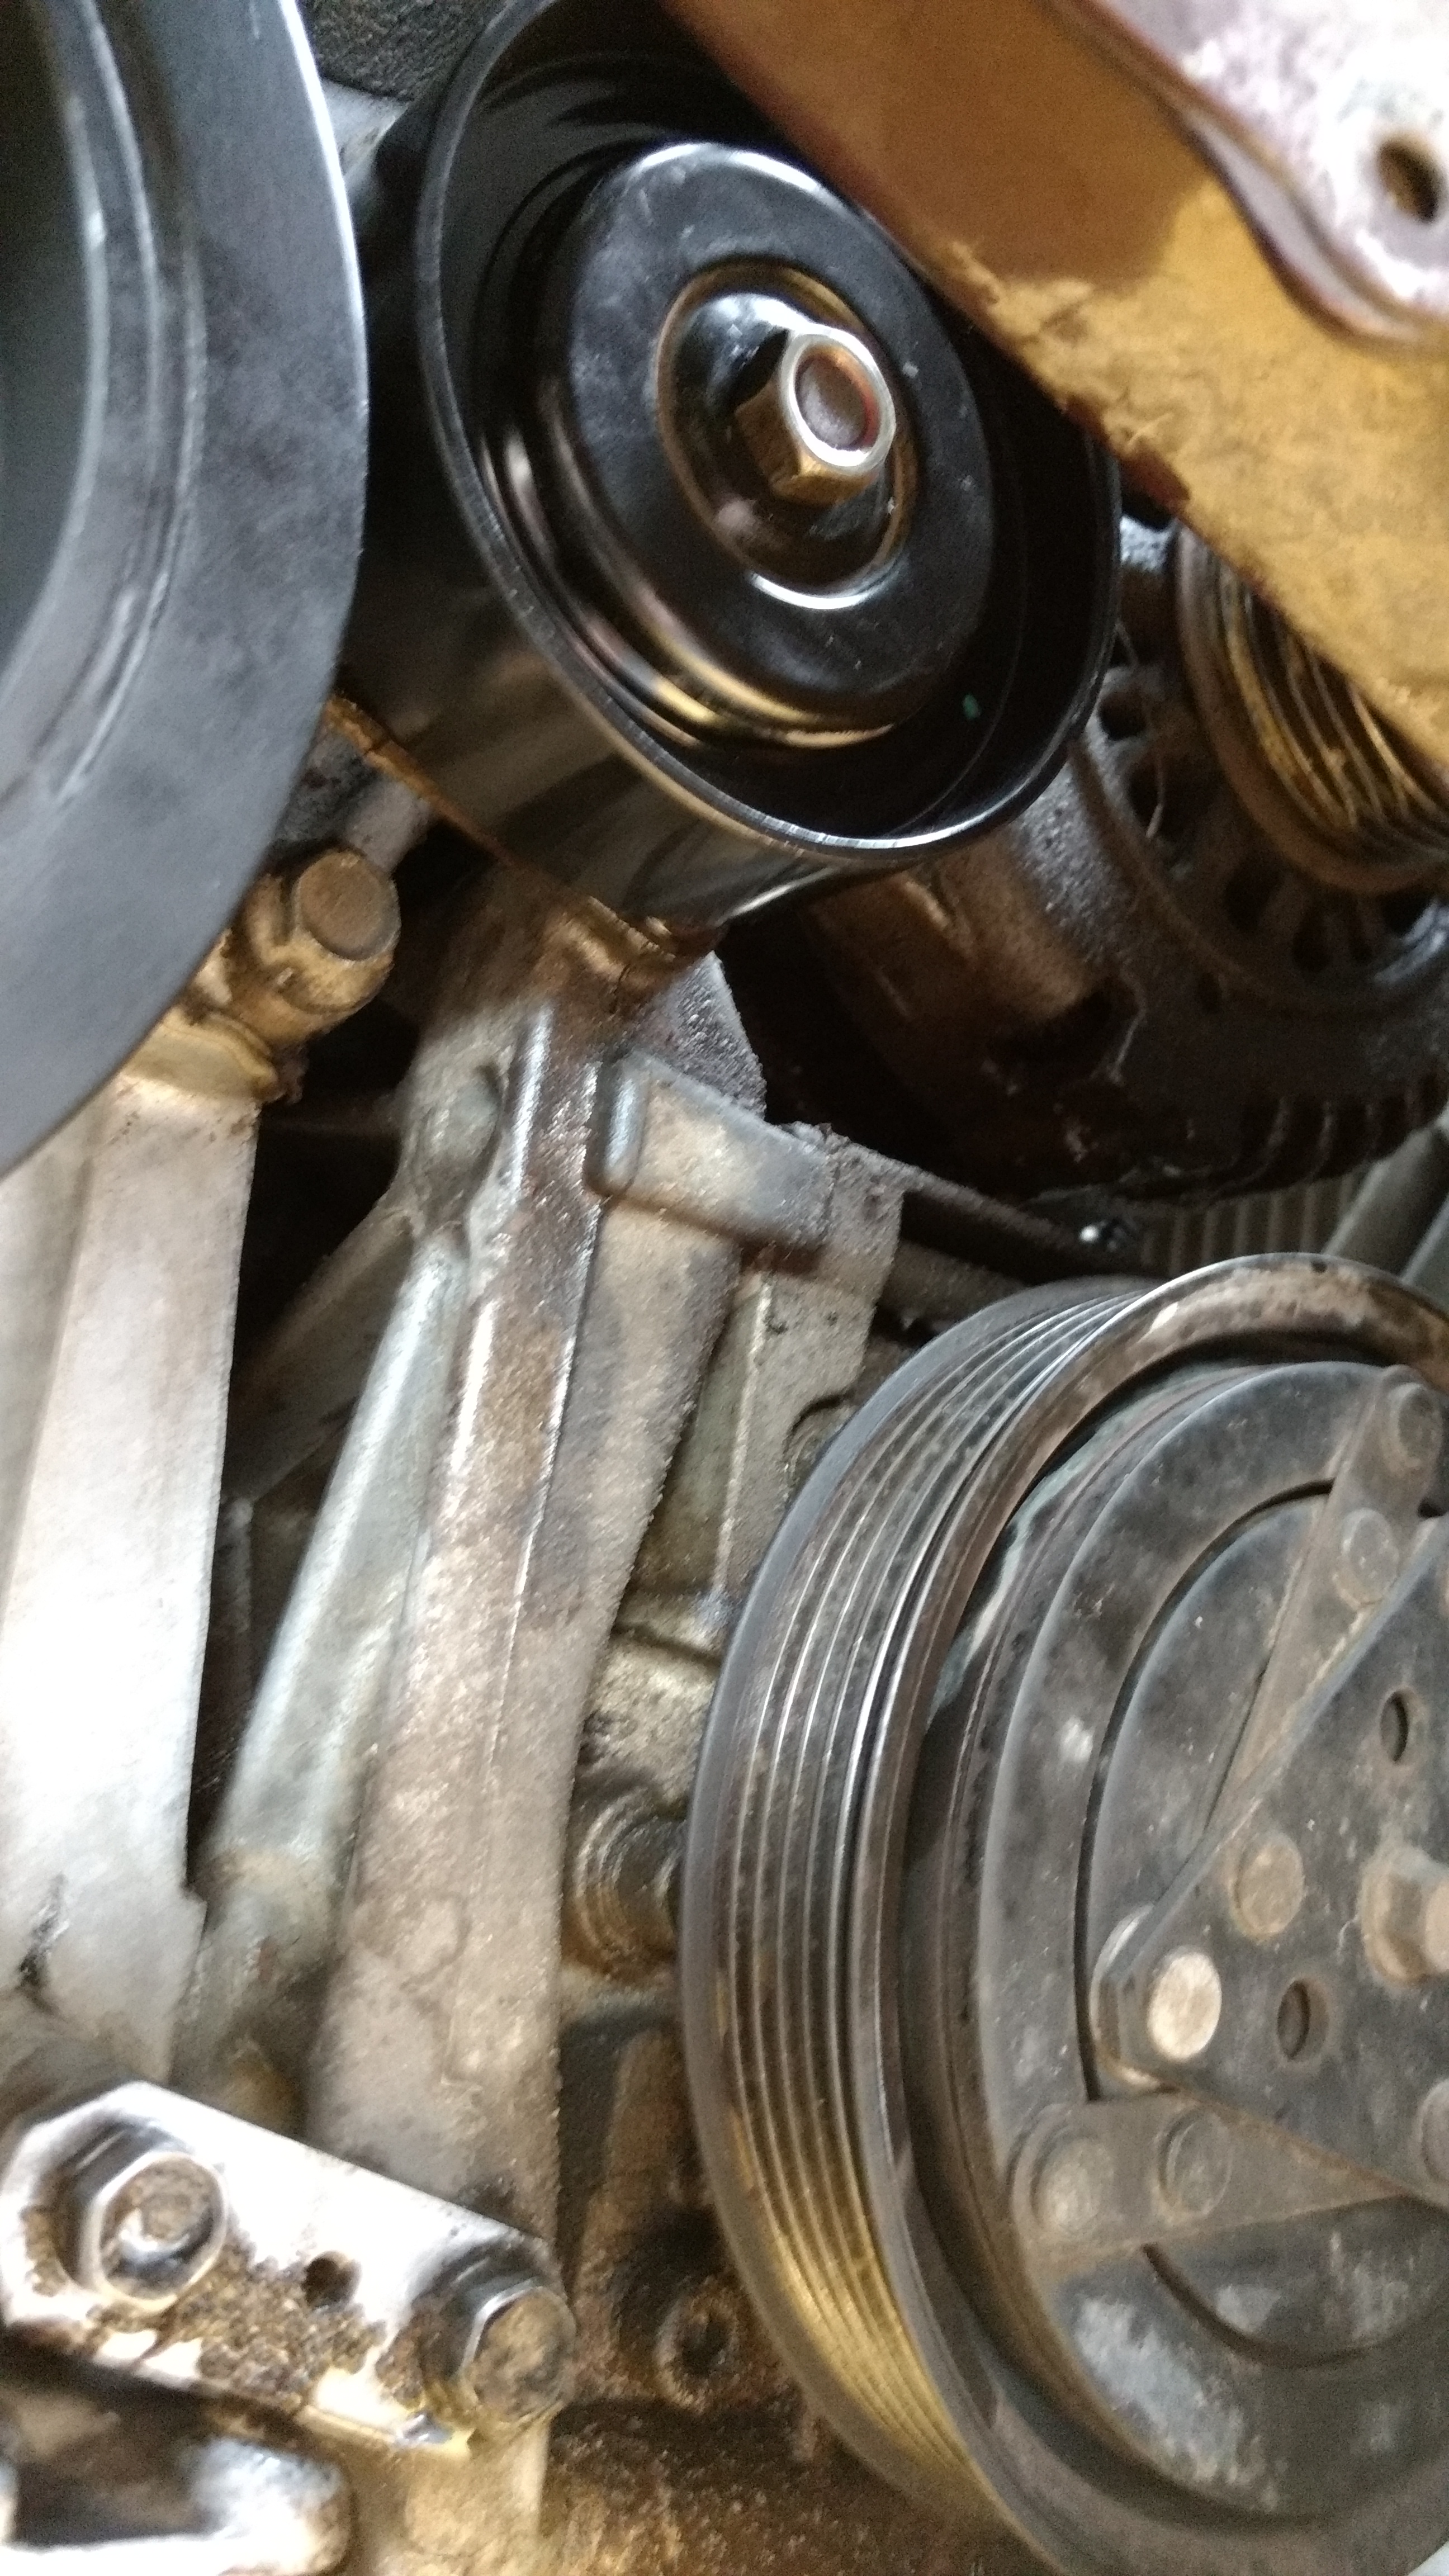
I use a 14 mm gear wrench to loosen the idler pulley bolt. Turn this bolt counterclockwise to loosen.
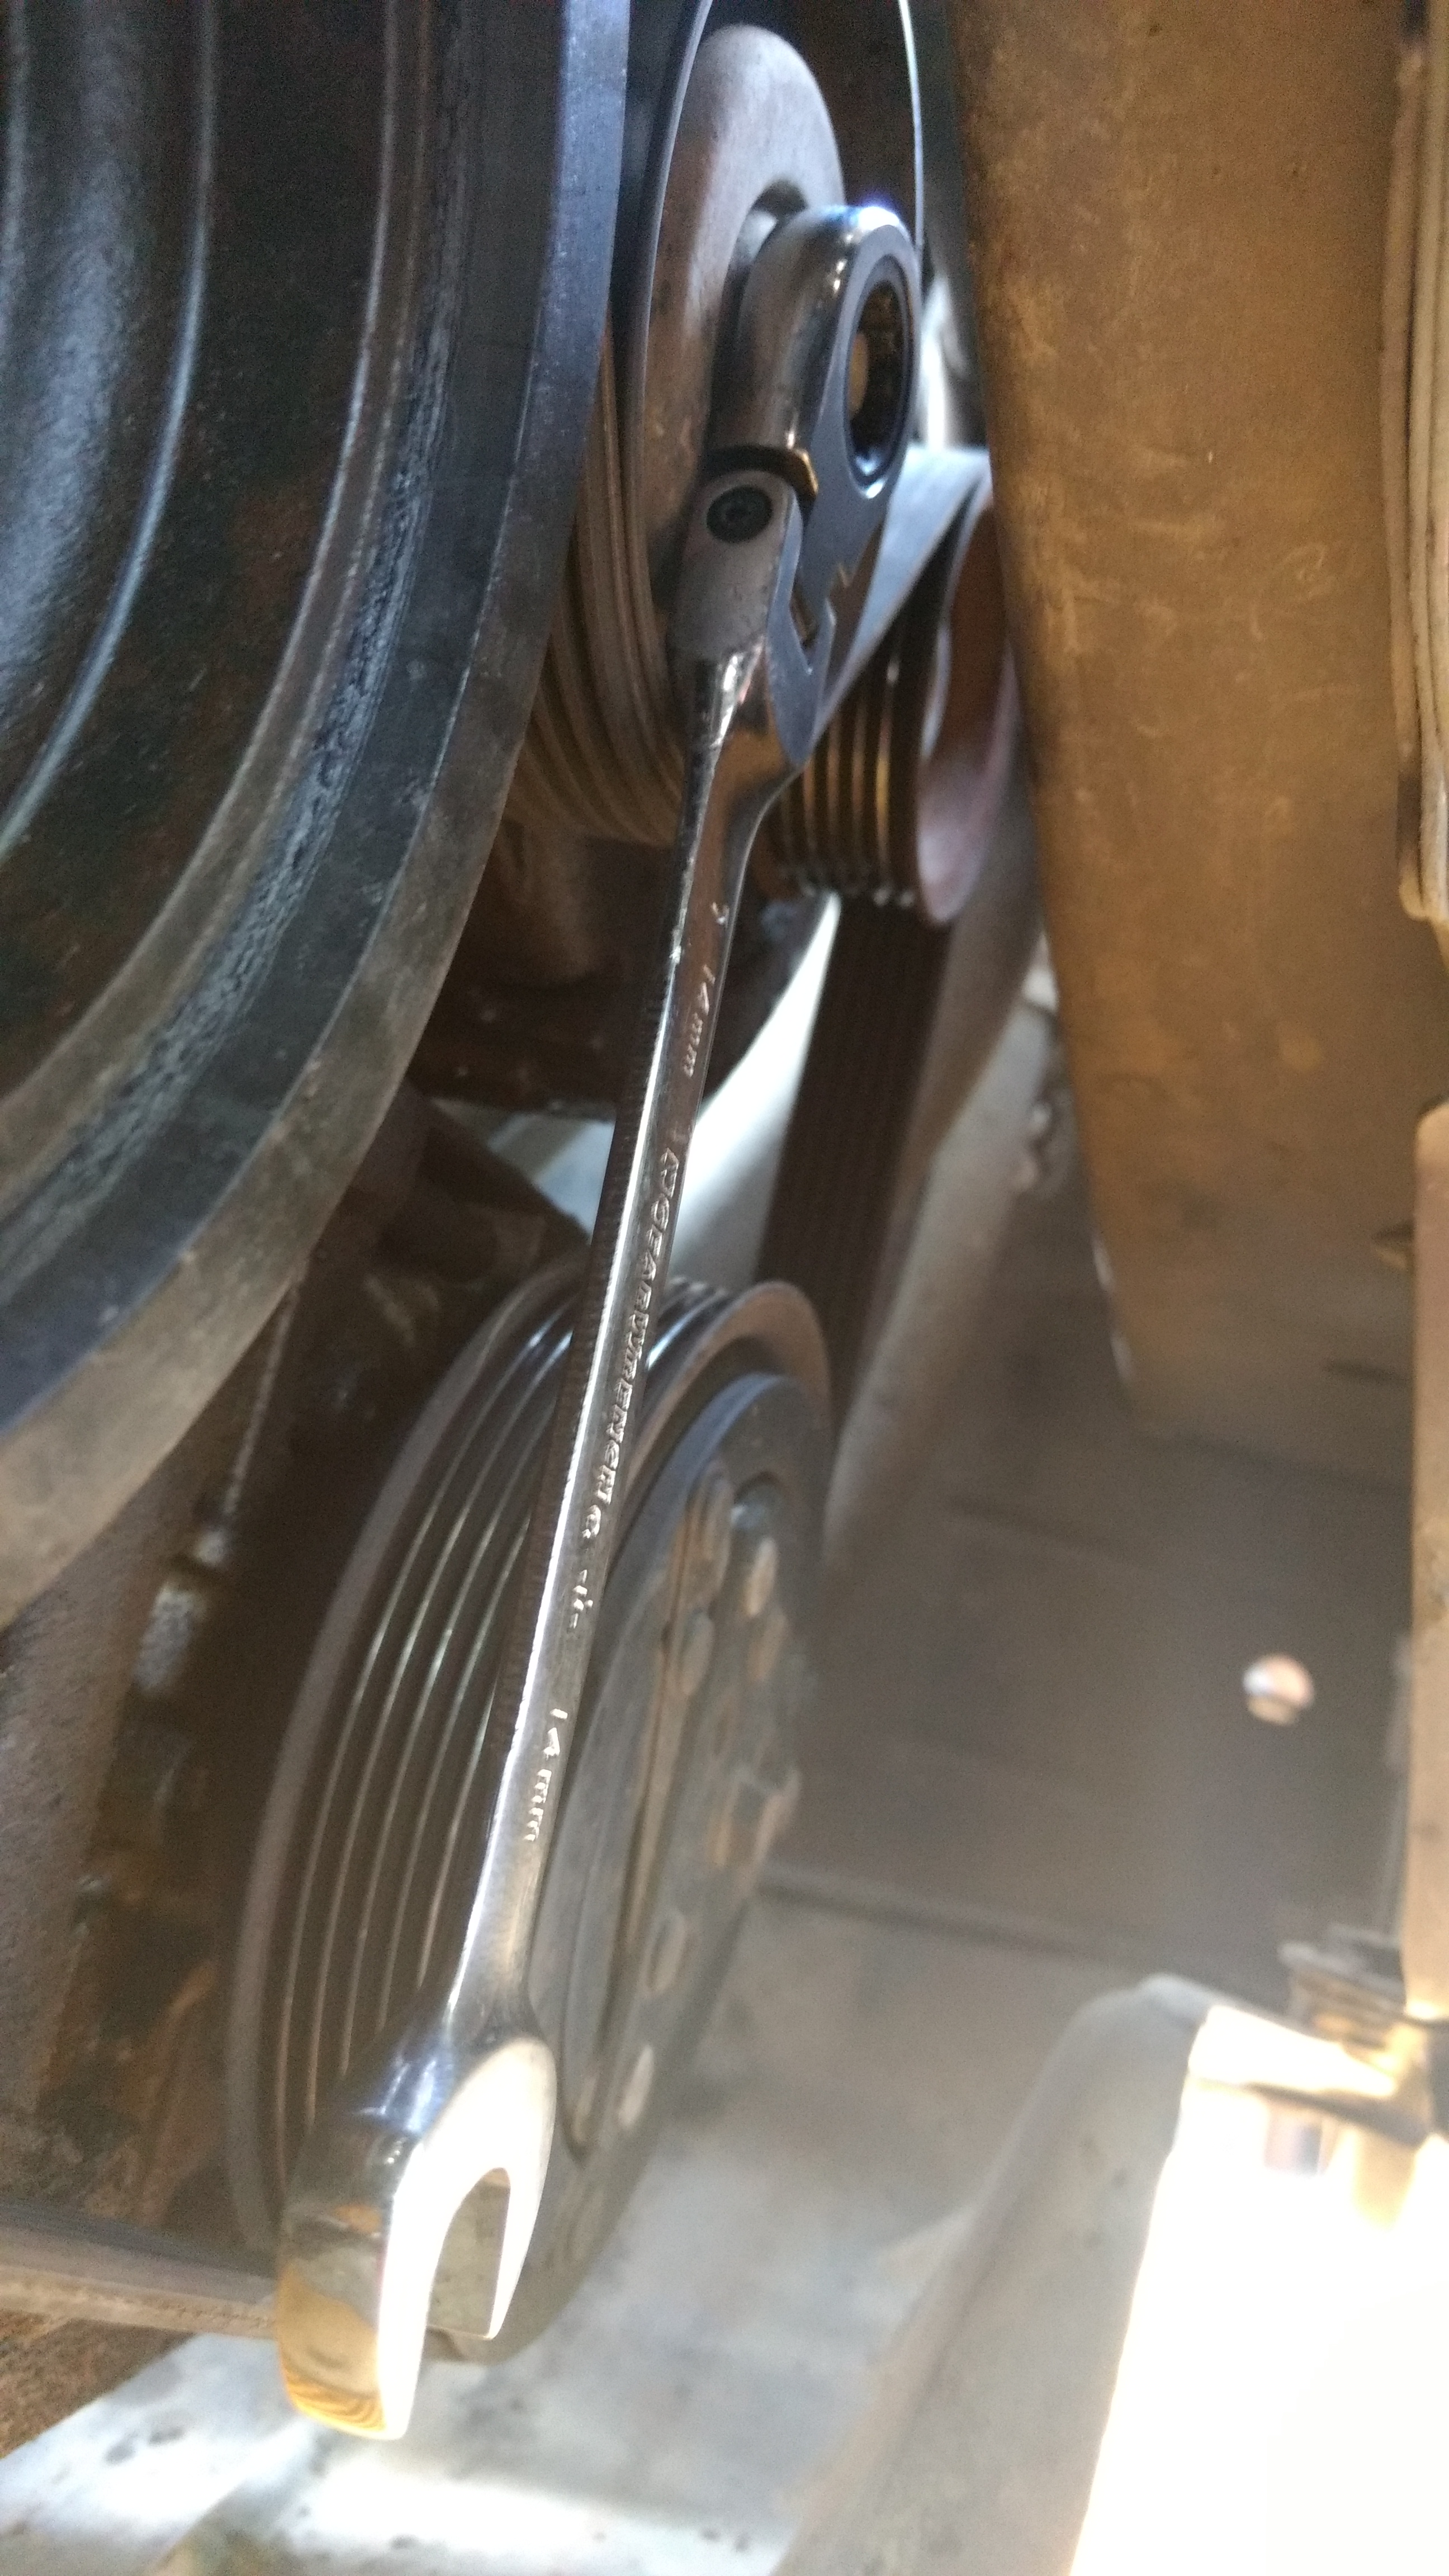
After loosening the idler pulley, then I release tension using this 14mm bolt in this picture.
I use an extension with a 1/2 drive ratchet to reach the tensioner adjustment bolt. Turn this bolt counterclockwise to loosen belt tension.
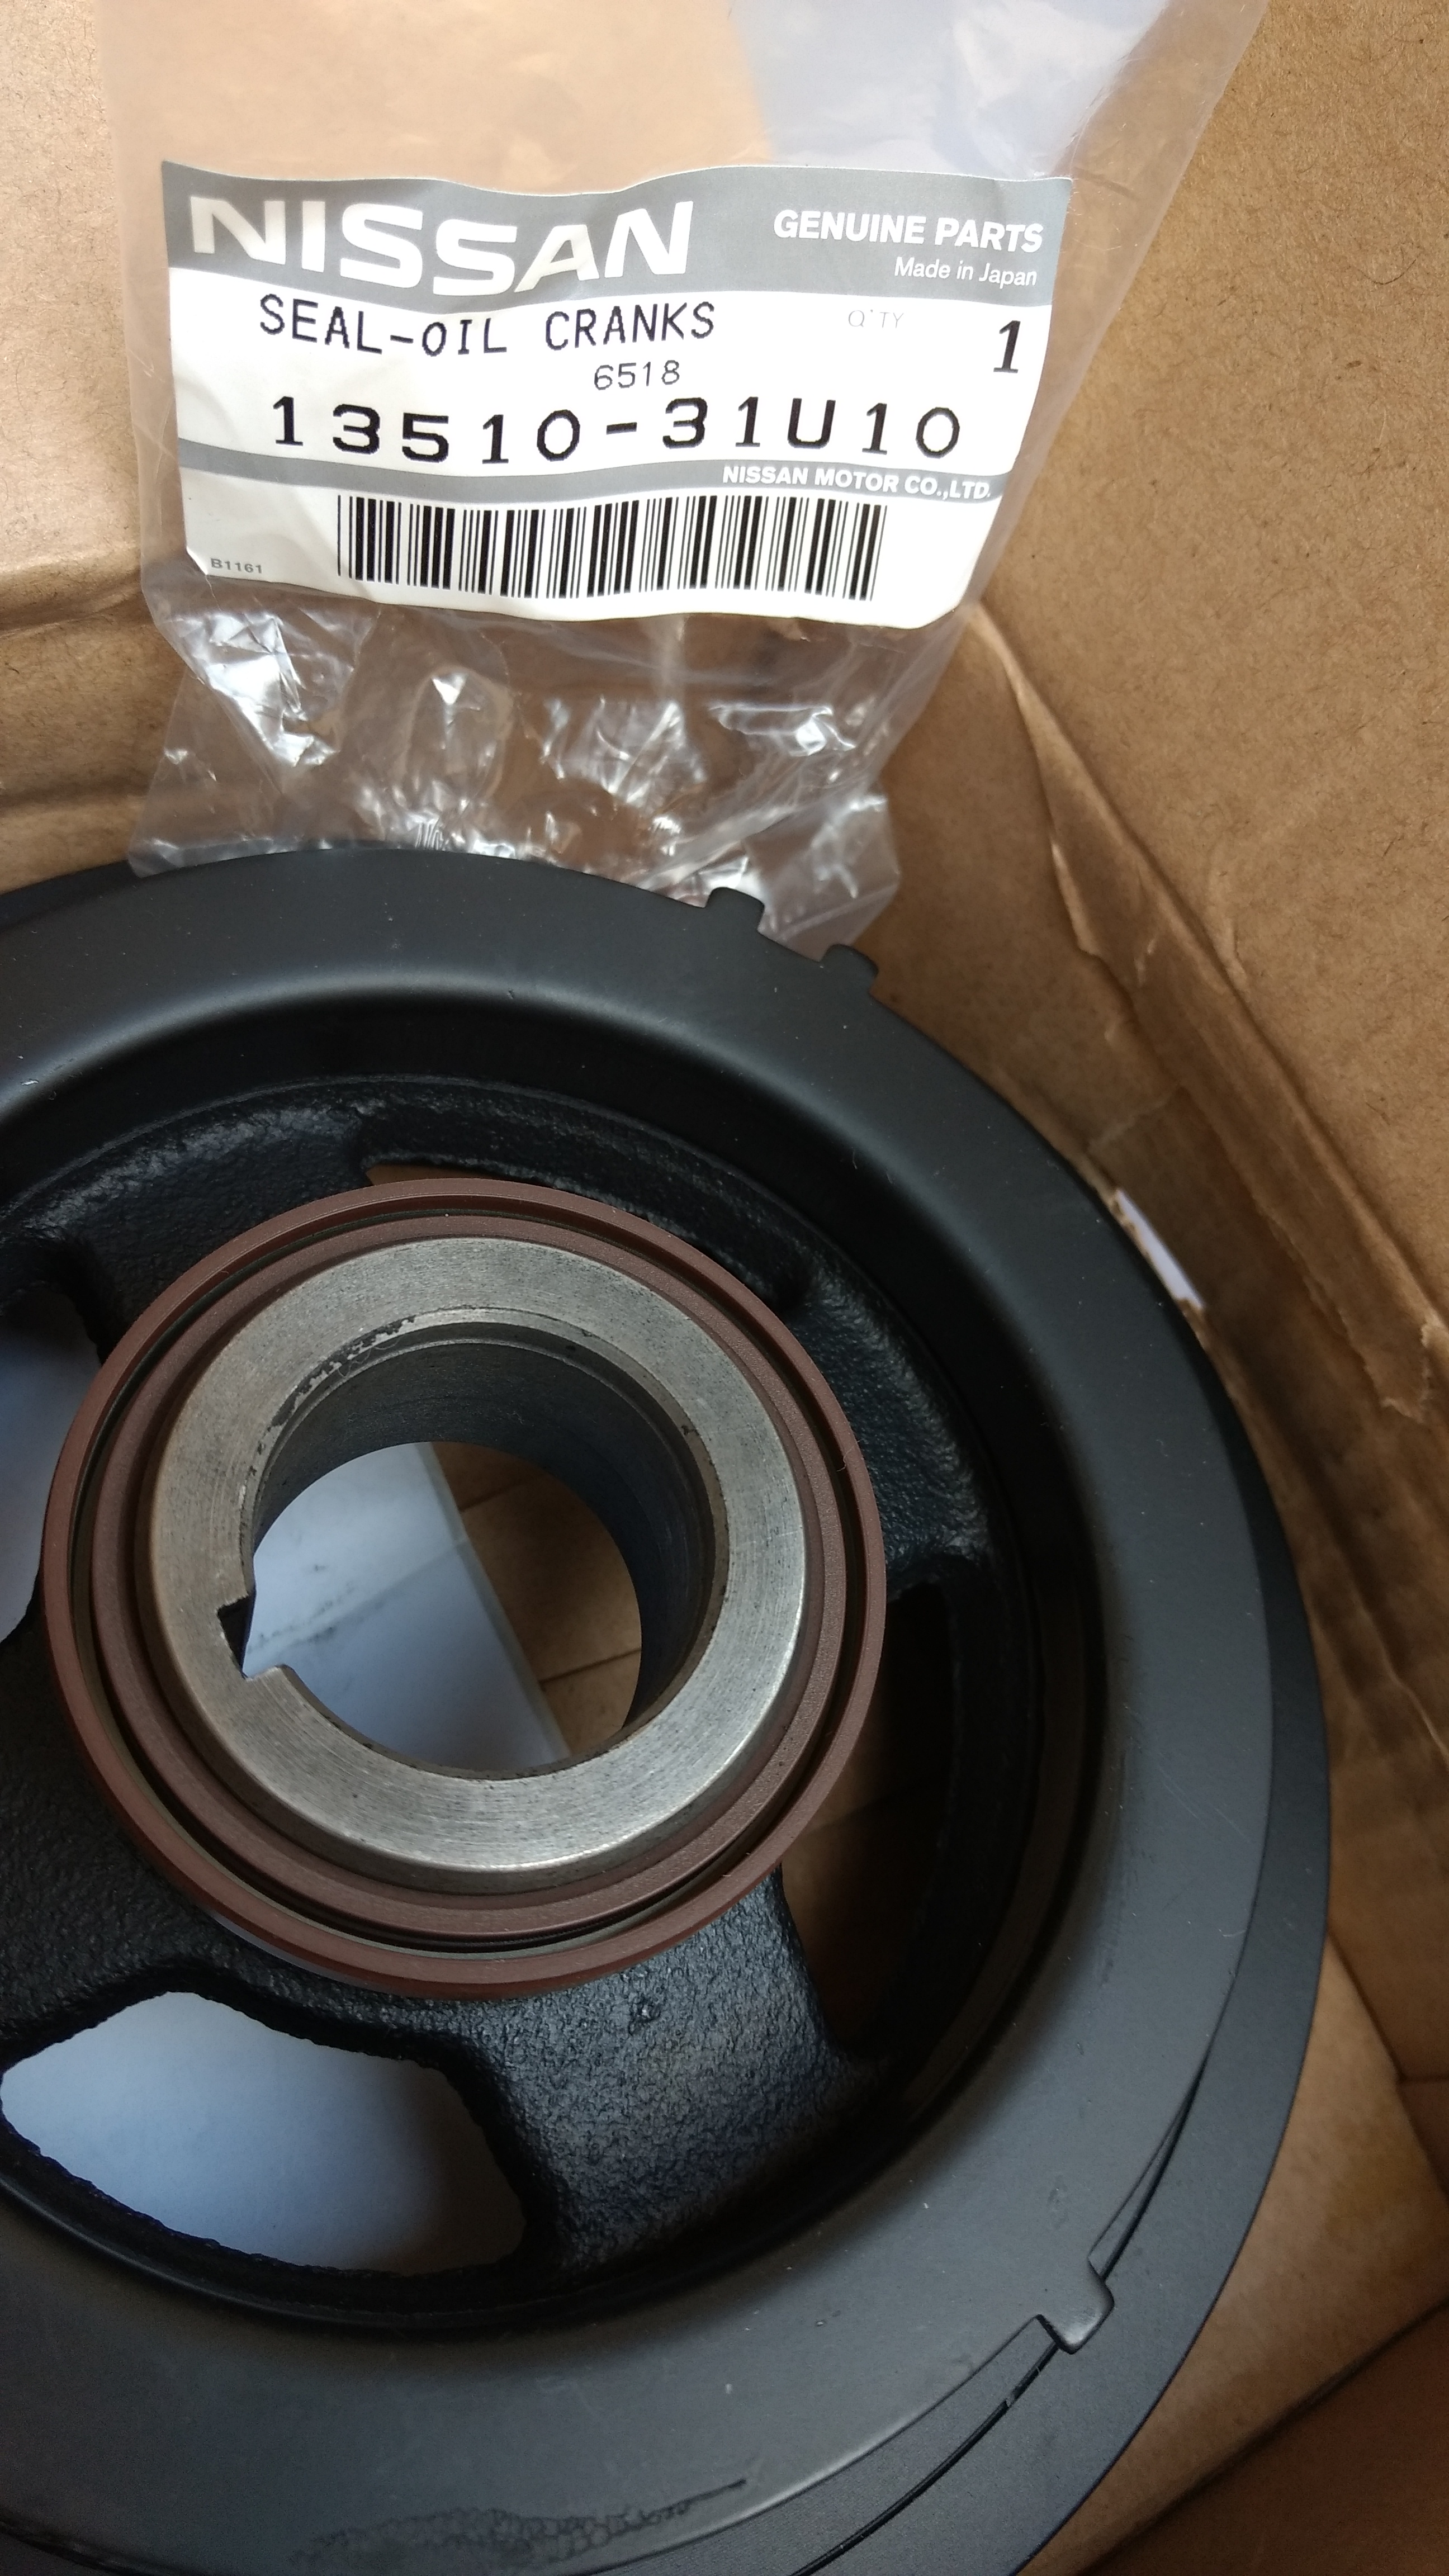
Here's the new pulley with a new Nissan crankshaft seal. It was a perfect fit for the new seal and replacement crankshaft pulley.
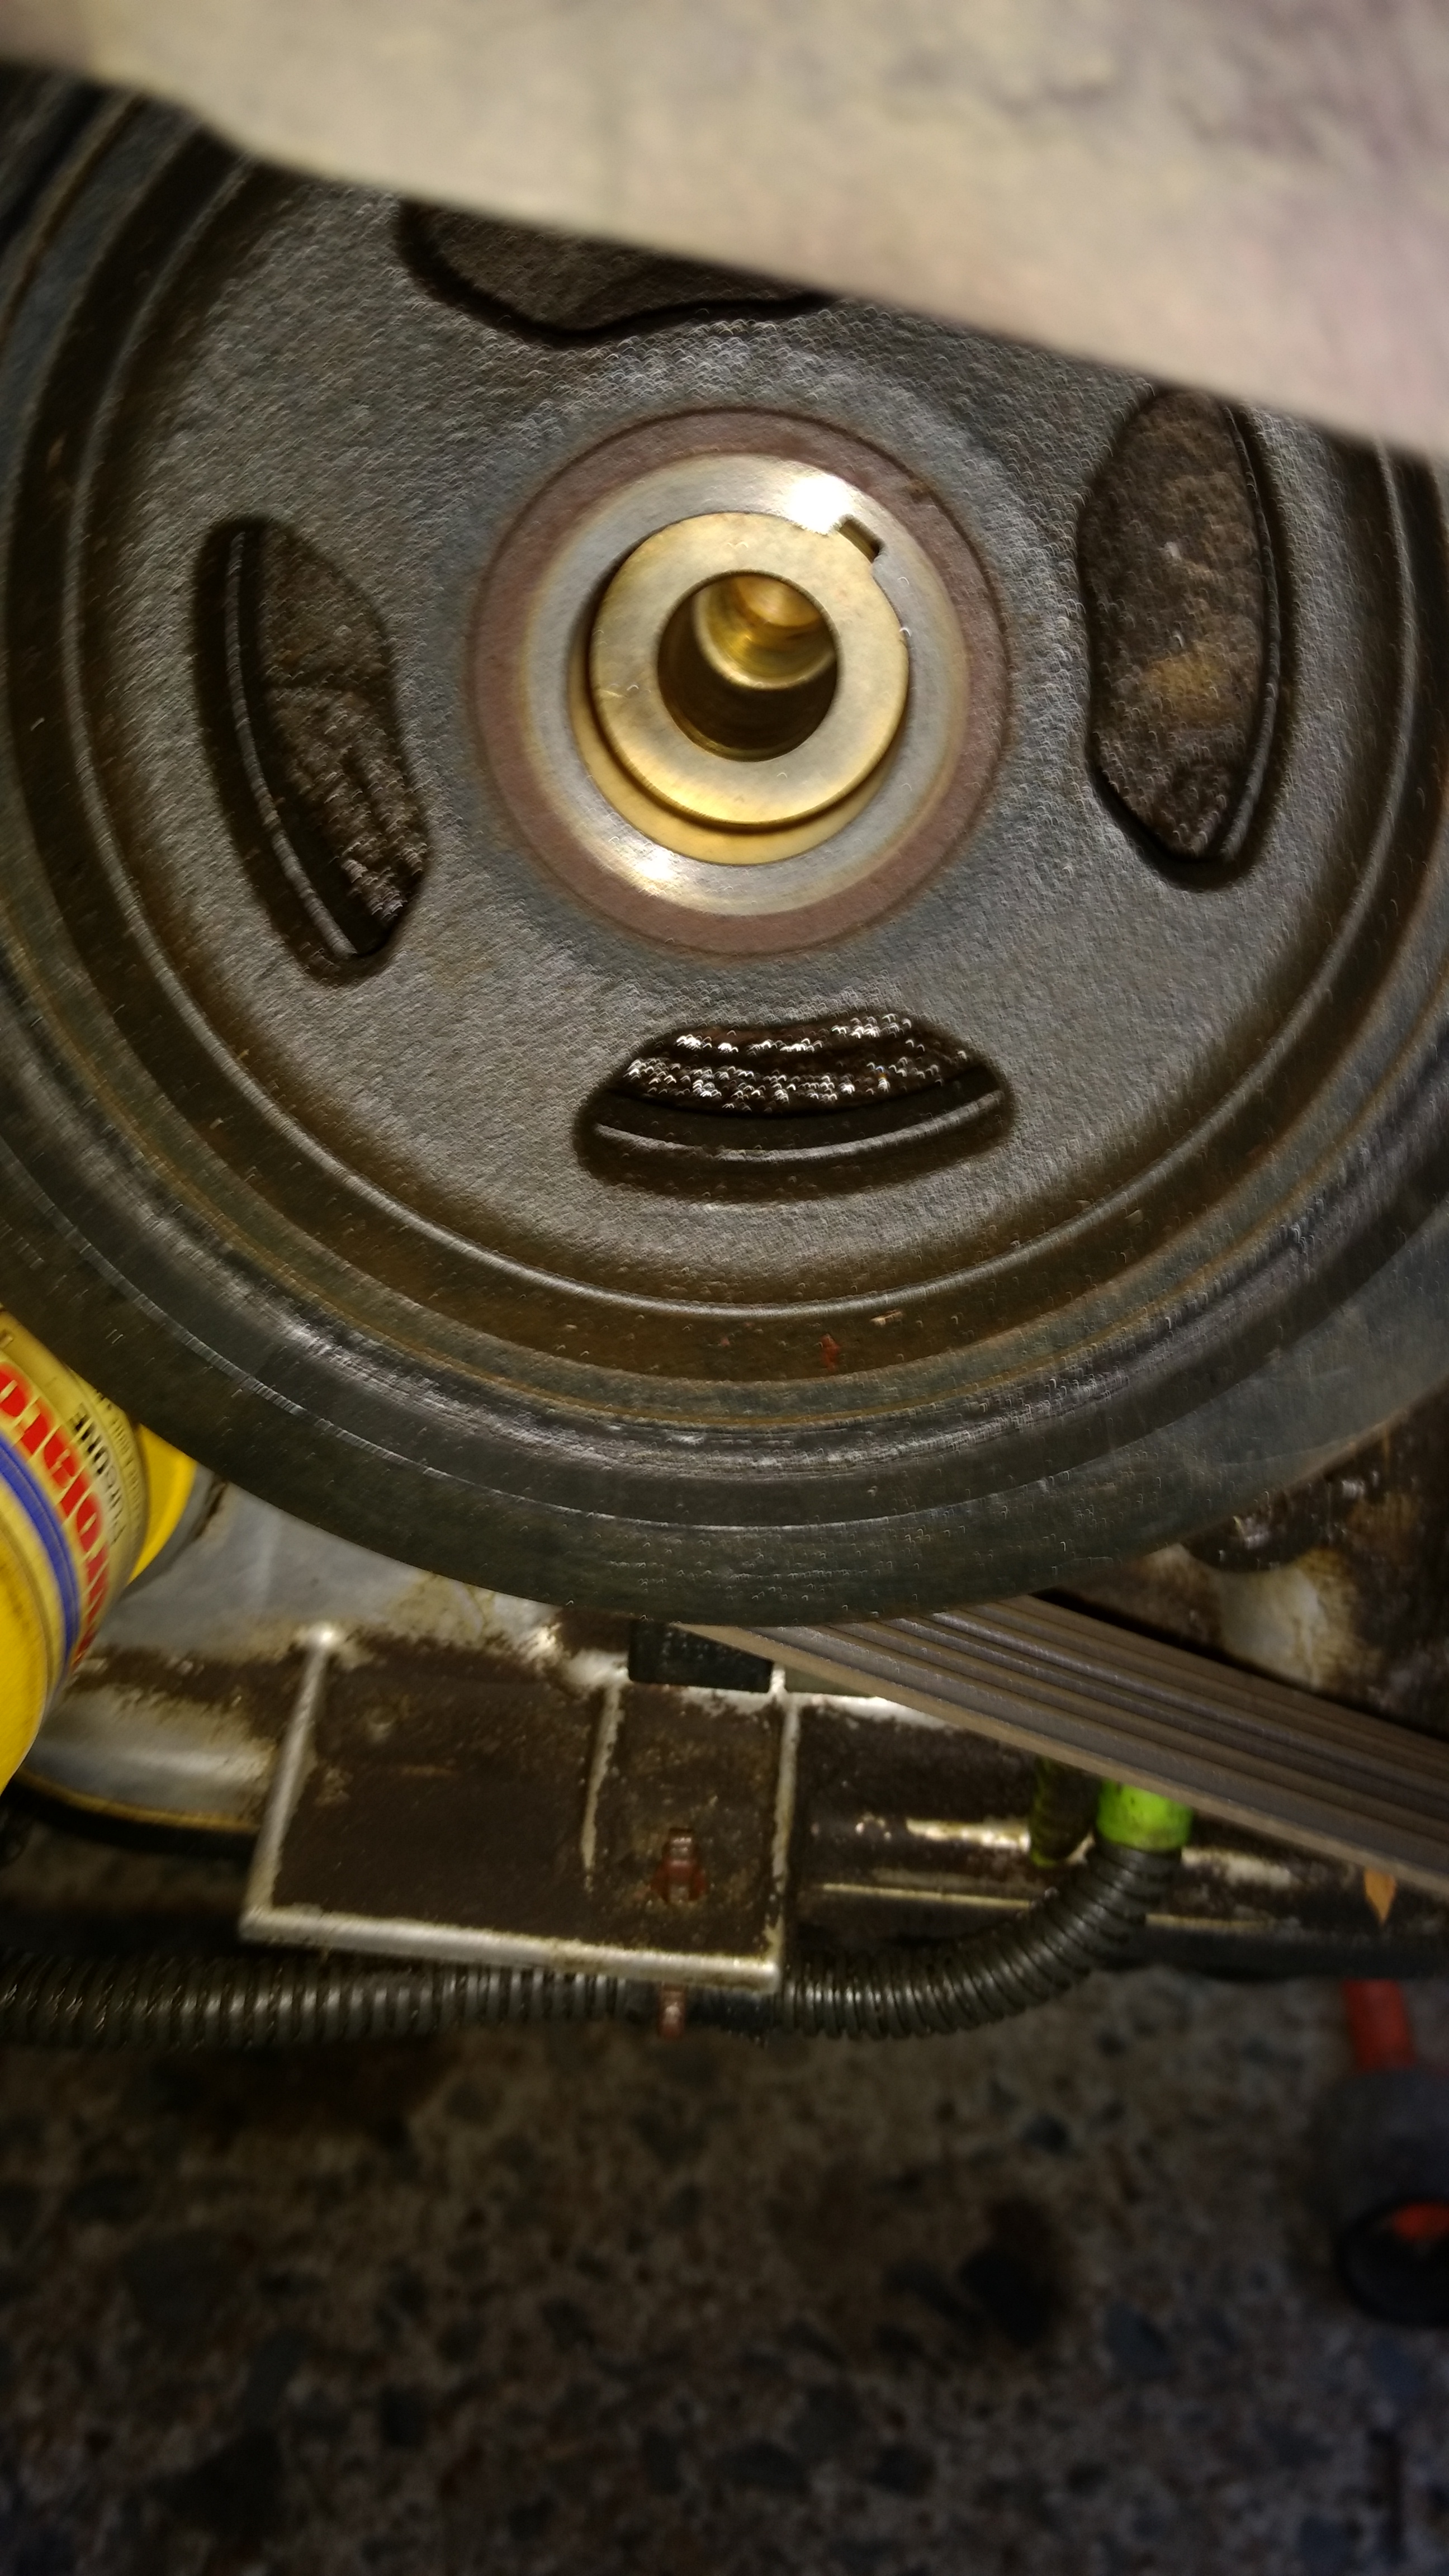
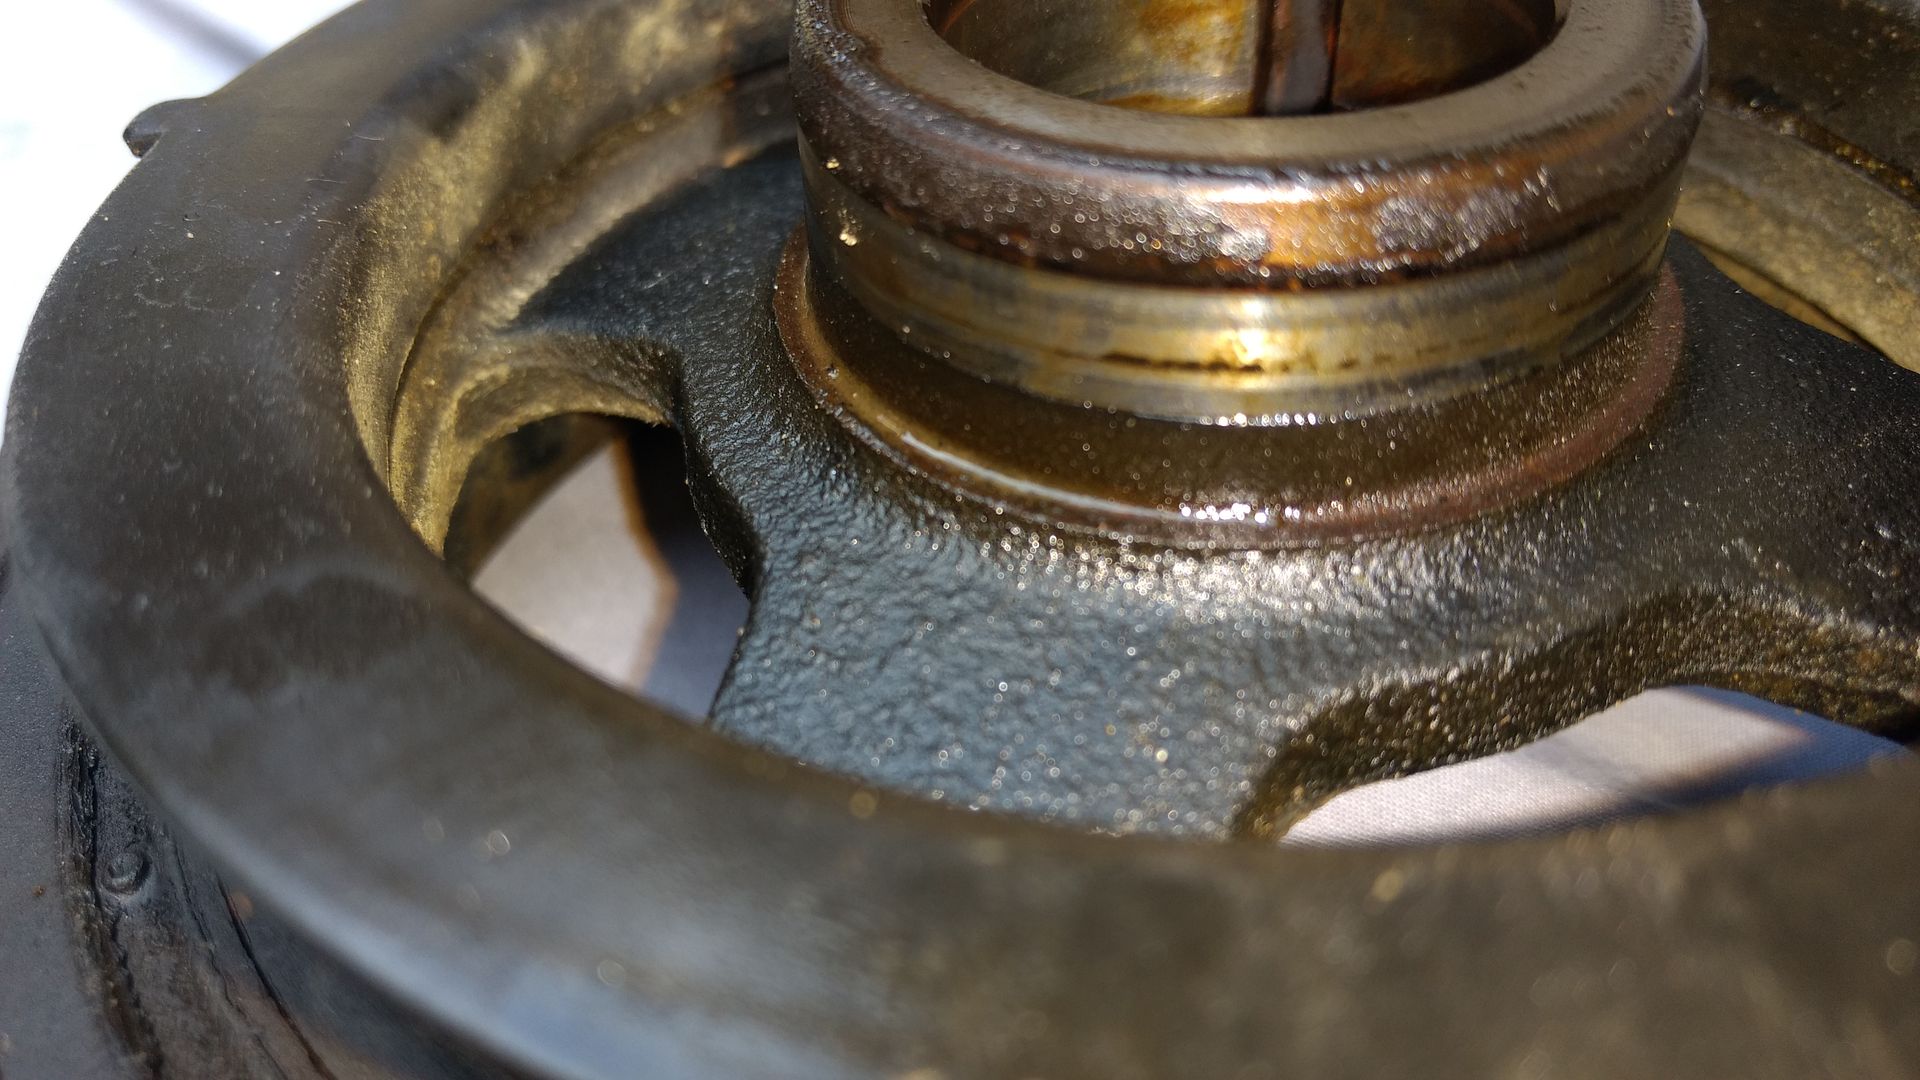
Here's a picture of the old crankshaft pulley. You can see the wear in the area where the seal has been rubbing against it for many years.
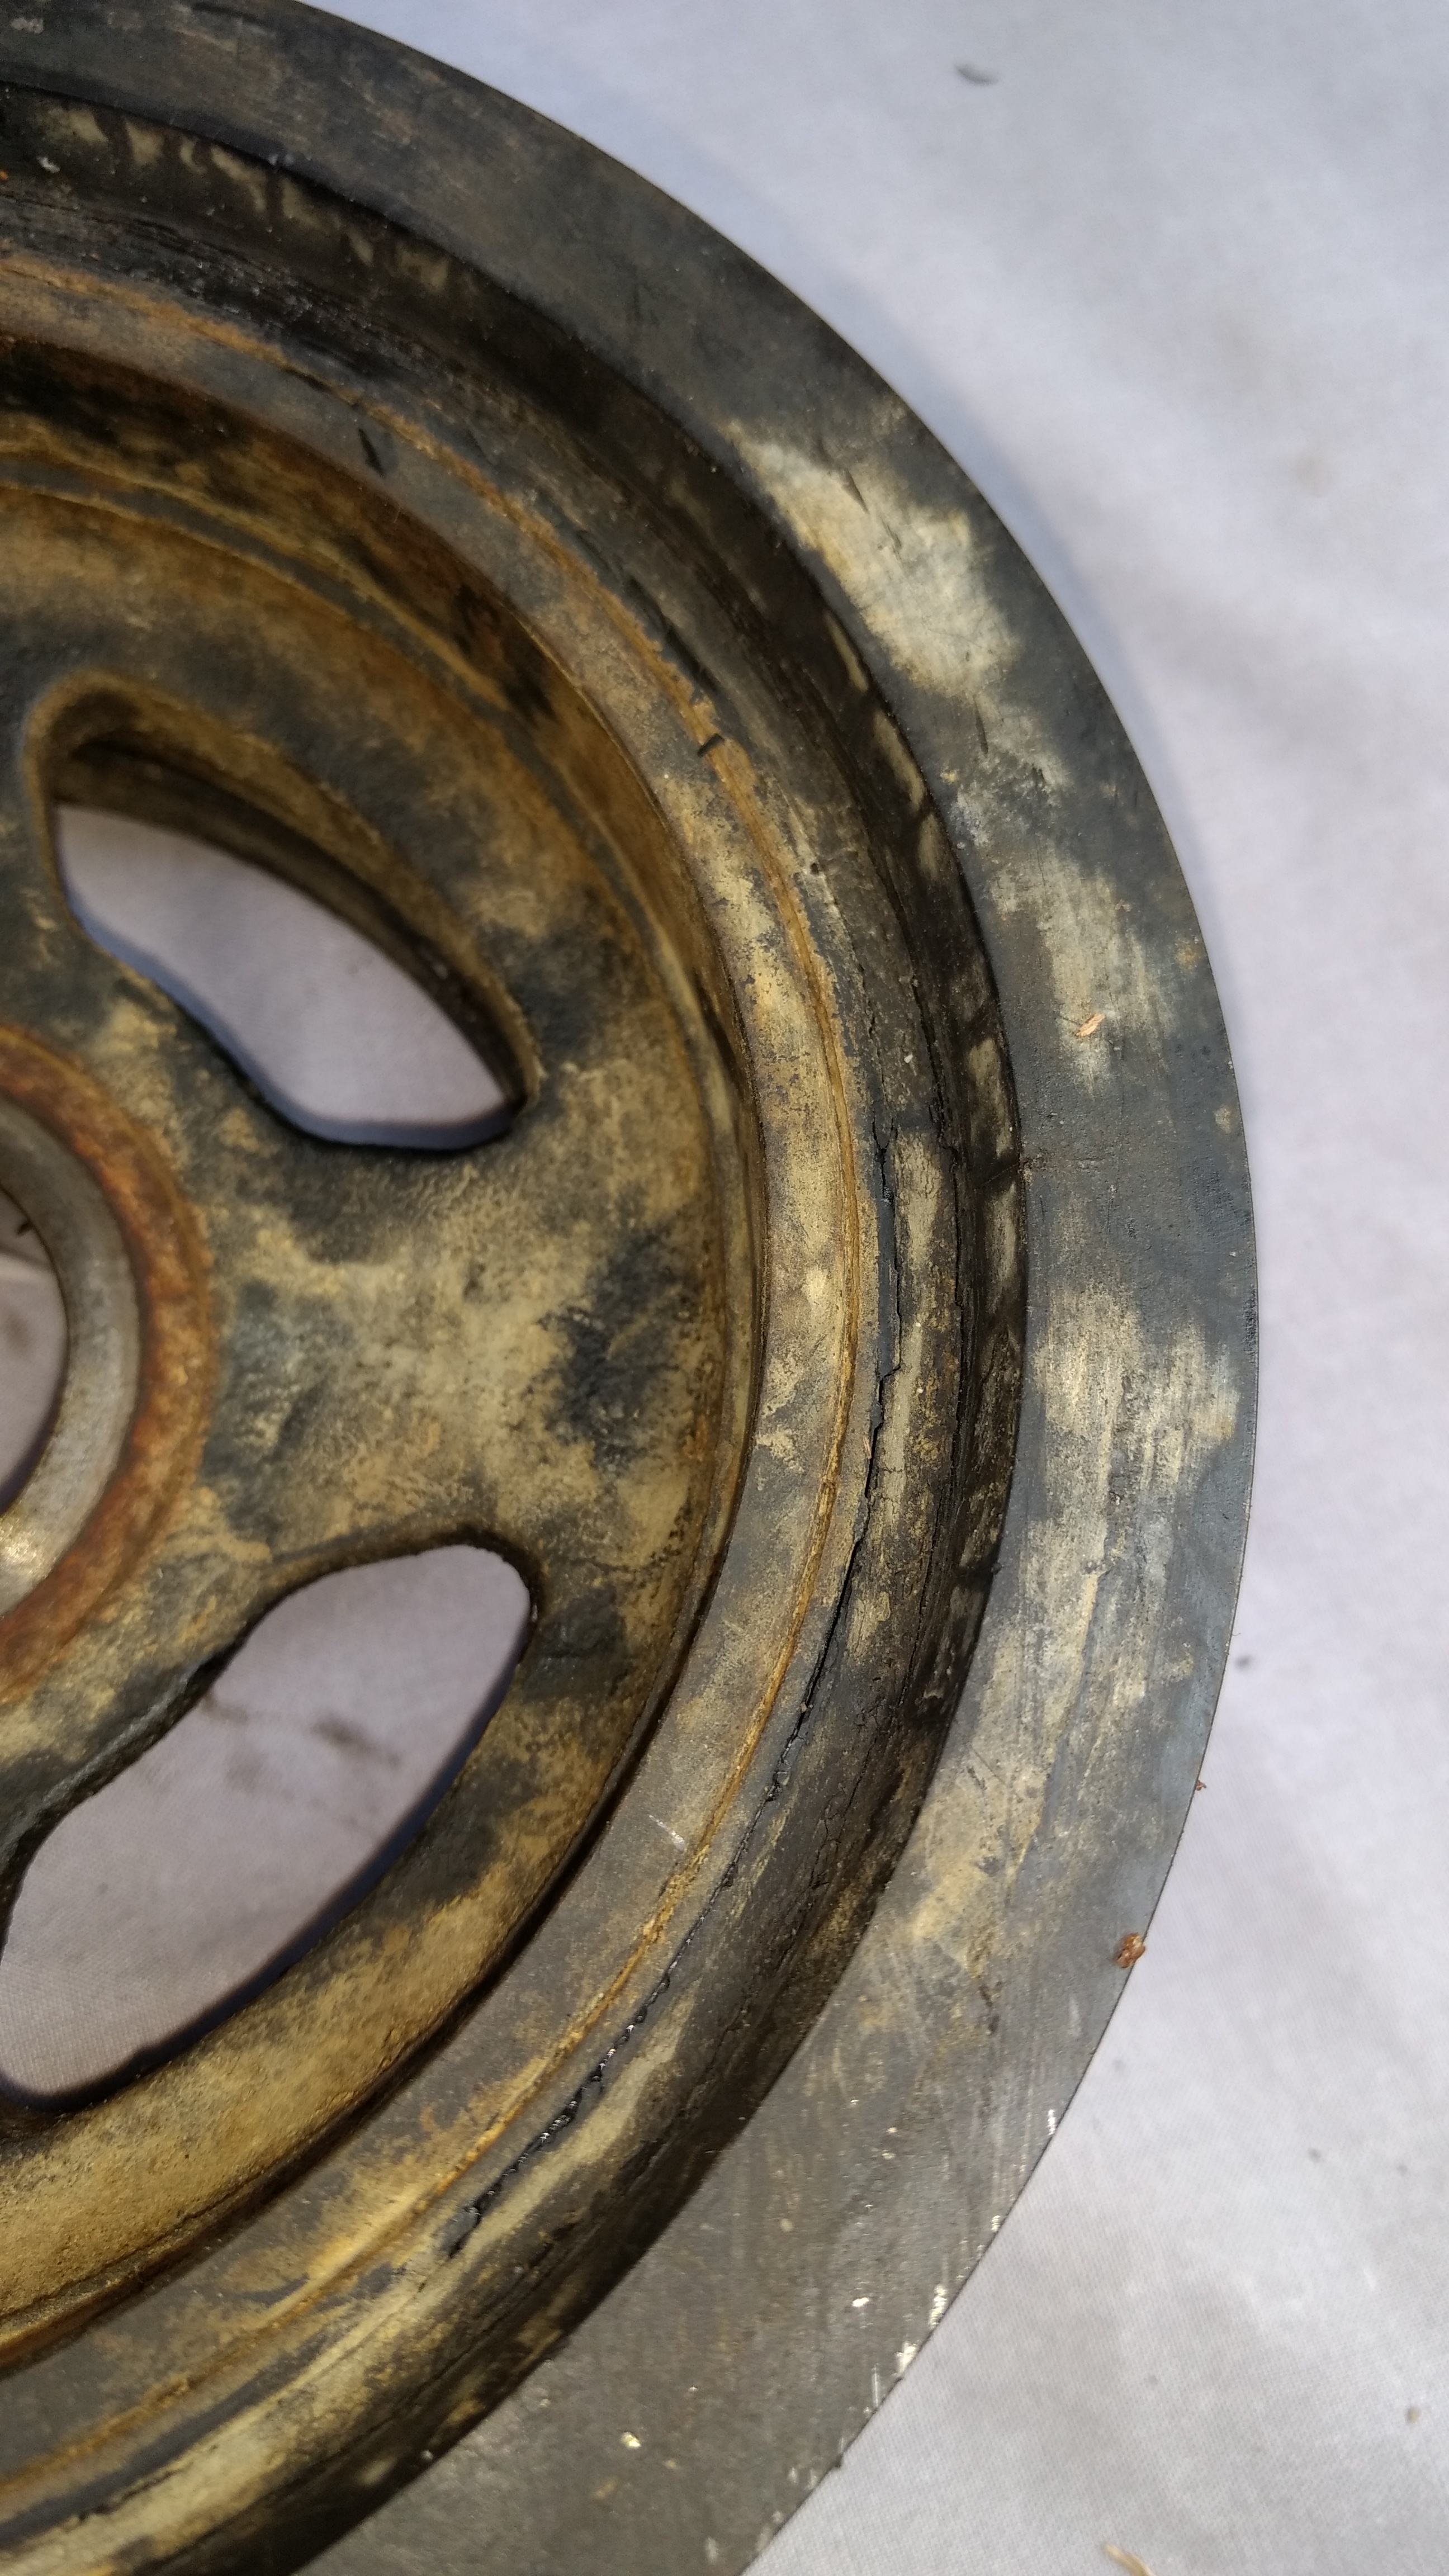
The pulley insulator was all cracked and hardened from 18 years of use. I think it would have failed in the next couple of years.
Here's the back side of the old seal. It was becoming brittle. That with the worn crankshaft pulley were problems looking for a place to happen.
After removing the old seal, I cleaned the TC mating surface. I don't want to think about the sludge that I see on the chain. Eventually, I will be removing the timing cover to clean up the inside and replace the tensioner, guides, and water pump. I'm not hearing any chain slap from a worn tensioner at this time. Looking at the excess RTV that is around the half moon seal leads me to believe the TC was removed a few years ago.
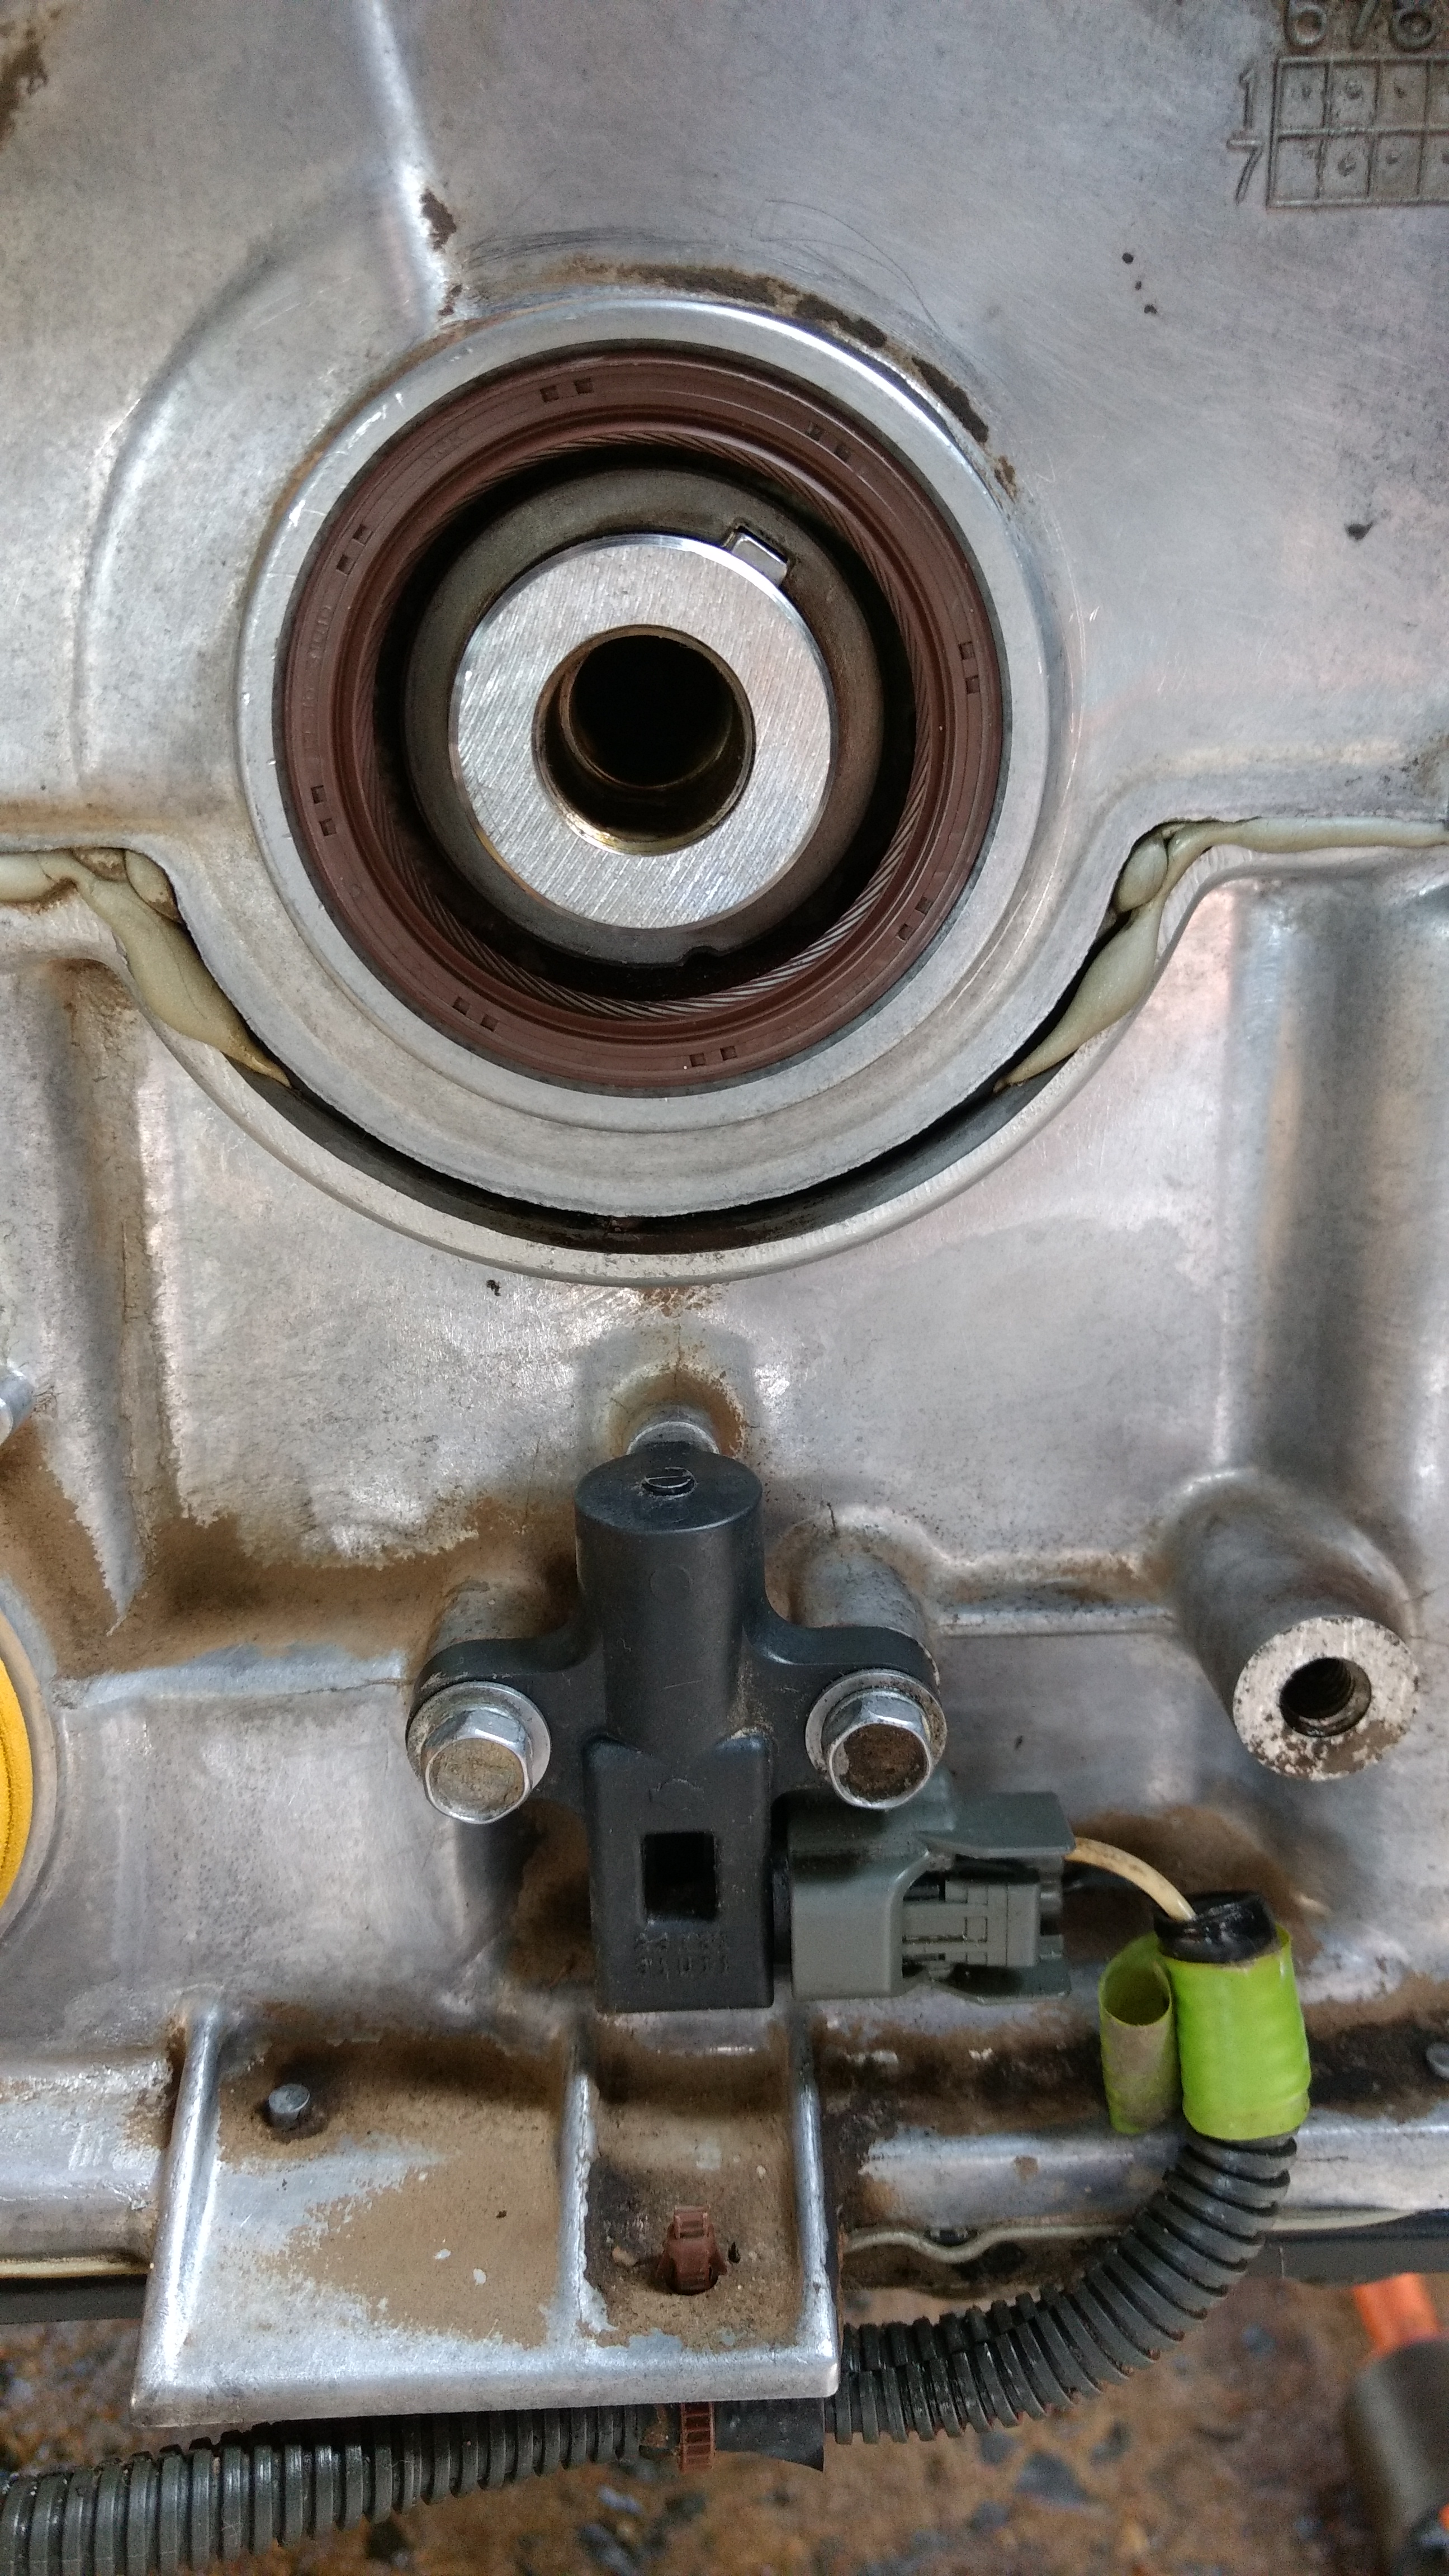
You can see the excess RTV in this picture. It looks like Permatex Ultra Grey. The excess amount just doesn't look like an original factory RTV job.
Ok - I replaced the idler pulley. The old one was working without issue. I just wanted to use new parts for this job.
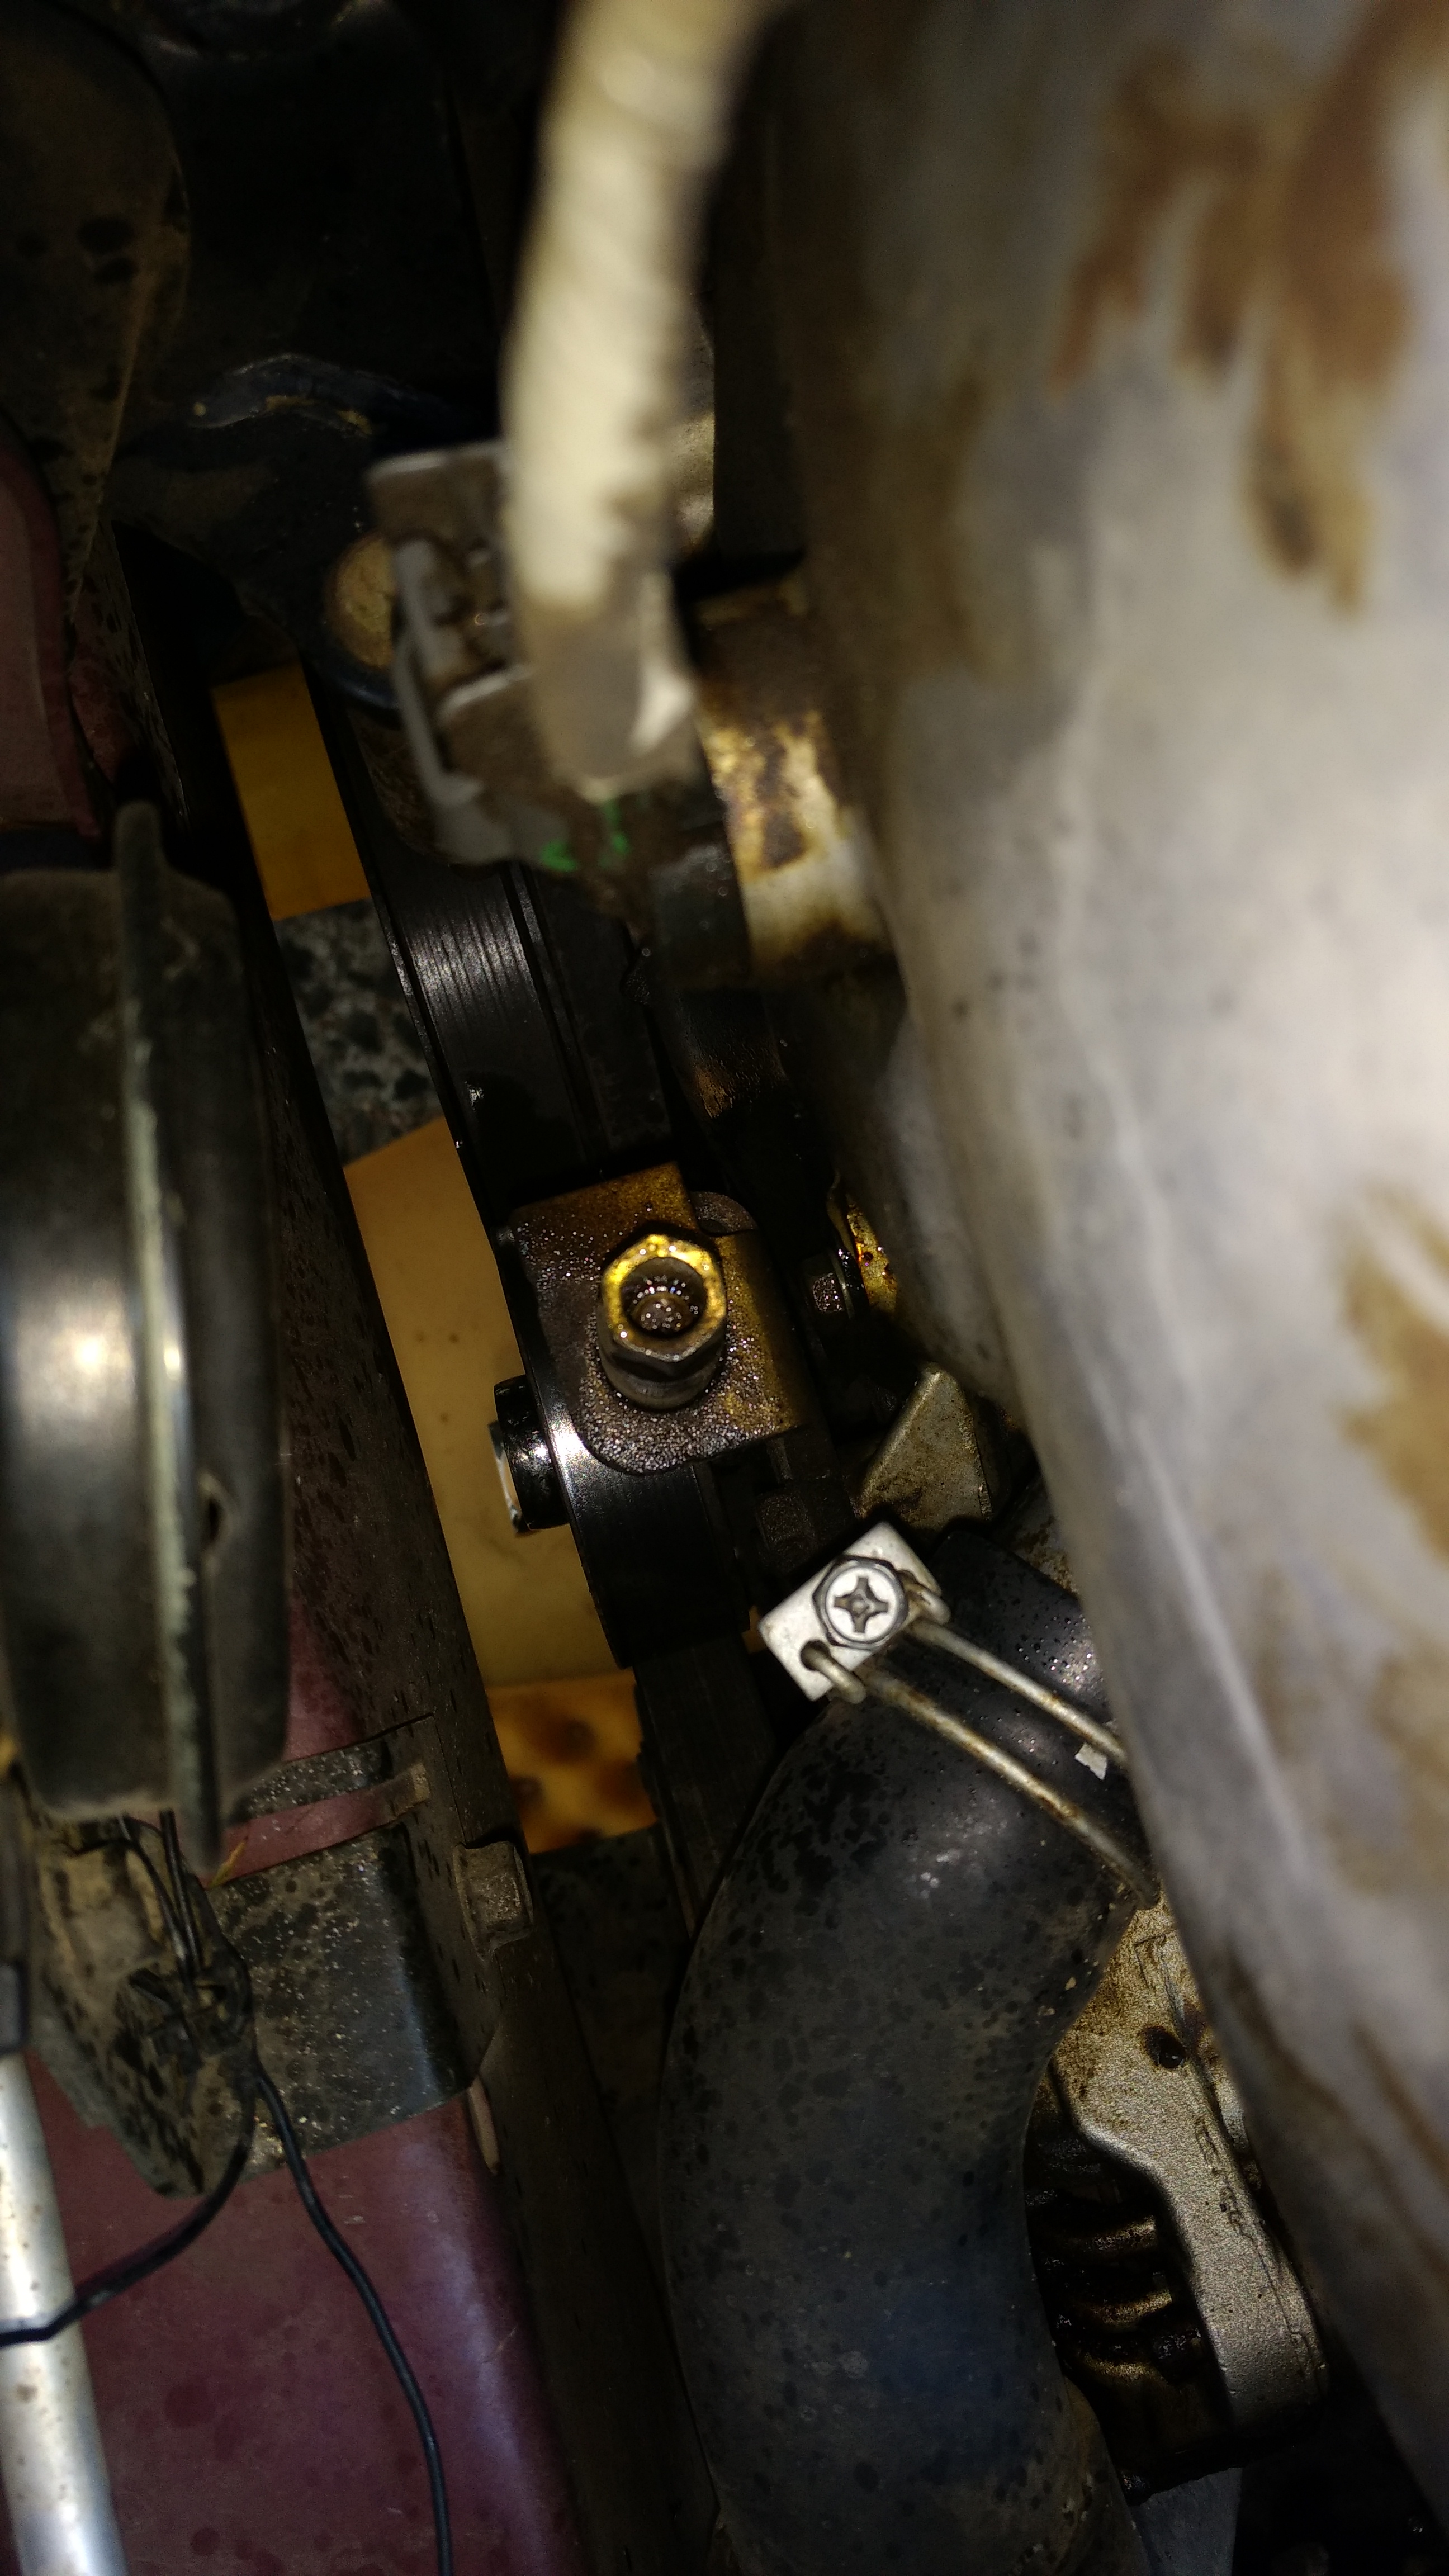
To loosen the power steering pump tension, there is a 14 mm bolt on the rear of the pump that I loosened.
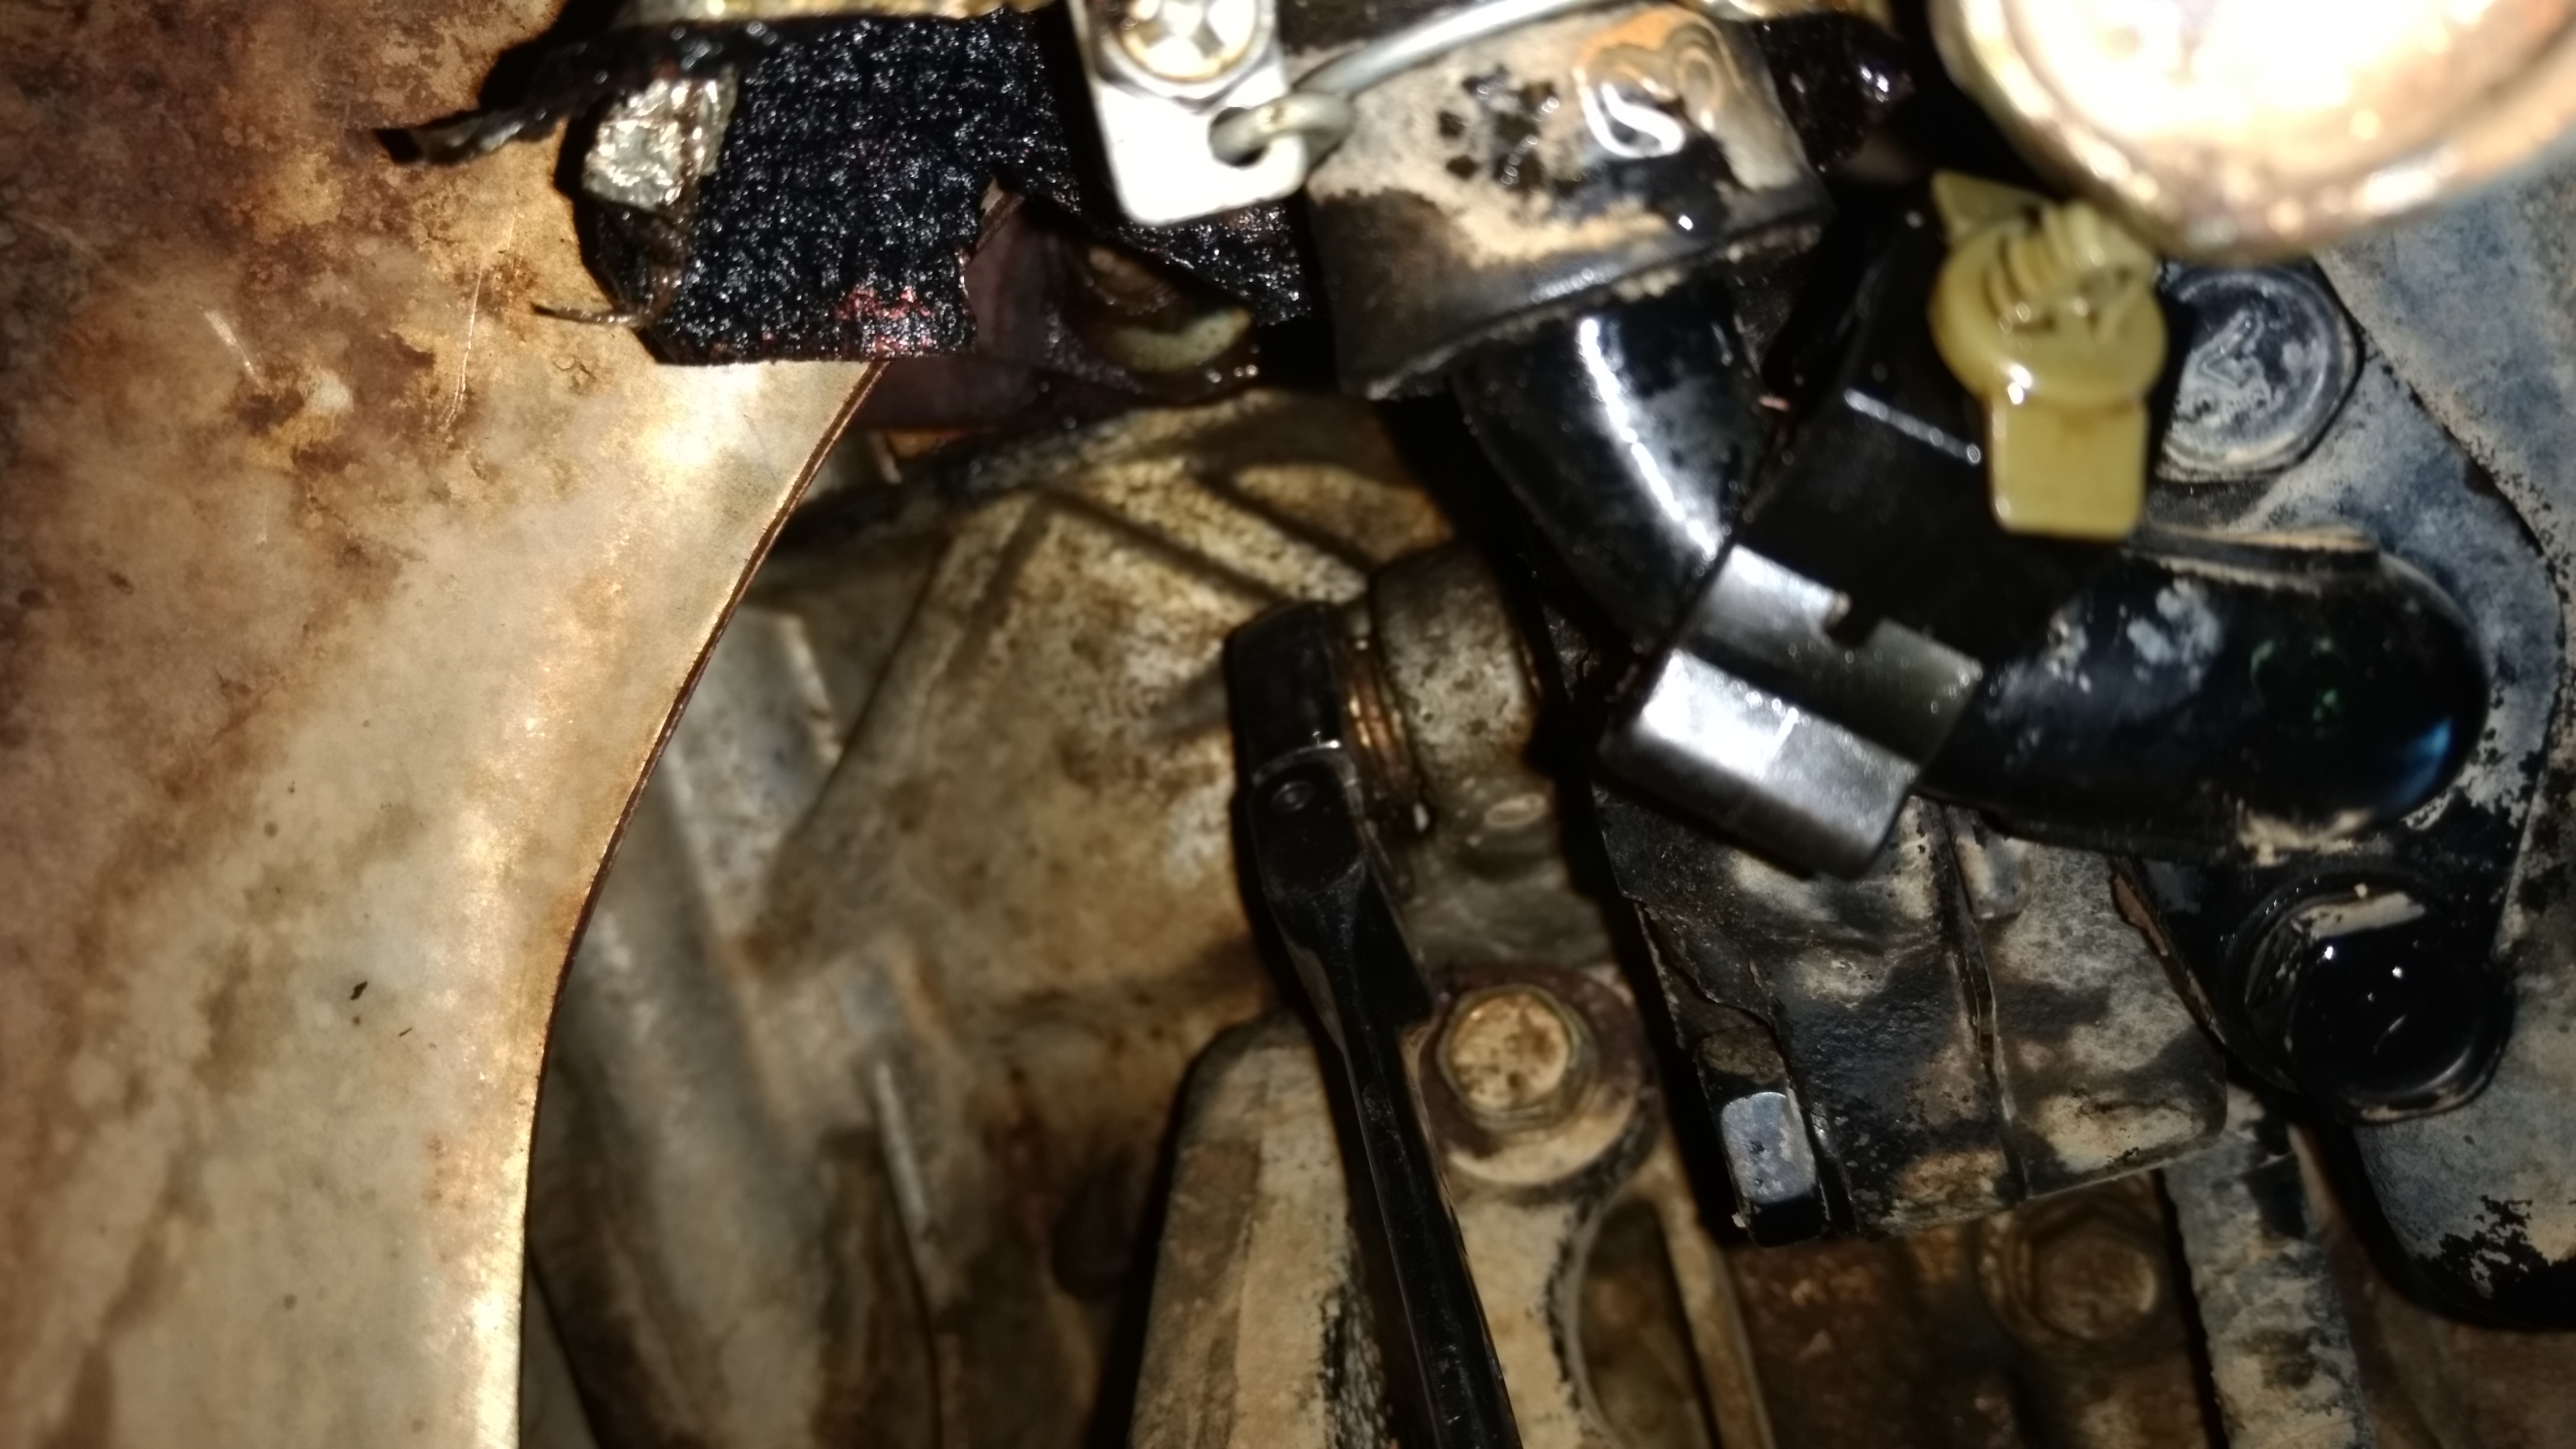
Here's a picture of the PS pump tensioner bolt. Turn this bolt clockwise to loosen belt tension. Remember, you tighten this bolt to loosen the belt.

Pictures from the operation are listed below.
Here's a trick for removing the crankshaft pulley bolt. I use a 1/2 drive ratchet with a cheater bar. I purposely wanted some slack between the ratchet handle and the cheater bar. The slack allows the starter to engage and move the crankshaft just enough to break the bolt loose.
Before I start, I remove the fuel pump fuse and run the starter to make sure there is no fuel in the system that would cause the engine to start while using this procedure.

After removing the crankshart pulley bolt, I sprayed some PB Blaster around the area where the pulley mates with the crankshaft. After that I was able to get the pulley a good shake and it came right out. No special puller needed.

I use a 14 mm gear wrench to loosen the idler pulley bolt. Turn this bolt counterclockwise to loosen.

After loosening the idler pulley, then I release tension using this 14mm bolt in this picture.

I use an extension with a 1/2 drive ratchet to reach the tensioner adjustment bolt. Turn this bolt counterclockwise to loosen belt tension.

Here's the new pulley with a new Nissan crankshaft seal. It was a perfect fit for the new seal and replacement crankshaft pulley.

Here's a picture of the old crankshaft pulley. You can see the wear in the area where the seal has been rubbing against it for many years.

The pulley insulator was all cracked and hardened from 18 years of use. I think it would have failed in the next couple of years.

Here's the back side of the old seal. It was becoming brittle. That with the worn crankshaft pulley were problems looking for a place to happen.

After removing the old seal, I cleaned the TC mating surface. I don't want to think about the sludge that I see on the chain. Eventually, I will be removing the timing cover to clean up the inside and replace the tensioner, guides, and water pump. I'm not hearing any chain slap from a worn tensioner at this time. Looking at the excess RTV that is around the half moon seal leads me to believe the TC was removed a few years ago.

You can see the excess RTV in this picture. It looks like Permatex Ultra Grey. The excess amount just doesn't look like an original factory RTV job.
Ok - I replaced the idler pulley. The old one was working without issue. I just wanted to use new parts for this job.

To loosen the power steering pump tension, there is a 14 mm bolt on the rear of the pump that I loosened.

Here's a picture of the PS pump tensioner bolt. Turn this bolt clockwise to loosen belt tension. Remember, you tighten this bolt to loosen the belt.

Last edited by CS_AR; 10-15-2016 at 11:47 PM.
10-15-2016, 07:58 PM
#21
Senior Member
Thread Starter
Join Date: Jan 2011
Location: Central AR
Posts: 3,041
Today I swapped in Tokico blues and related strut hardware from the I30. So the strut relocation project is now complete. I've had the blues since 2011 -- so they are five years old. It drives and handles better now. It has a nice responsive feel. I think the blues may be at 1/2 life after 5 years and 40,000 miles. Maybe they will last another 35,000 to 40,000 miles. I'm sure they will easily last another 2 to 3 years. If not, then I've been enjoying them for a long time. I can't complain.
Here's a picture.
I know that need to replace the LCAs, end links, bushings, and tie rod ends. I usually replace those items after I take care of engine refresh items like oil leaks and injectors.
Here's a picture.

I know that need to replace the LCAs, end links, bushings, and tie rod ends. I usually replace those items after I take care of engine refresh items like oil leaks and injectors.
Last edited by CS_AR; 10-17-2016 at 08:23 AM.
11-02-2016, 05:42 AM
#22
Senior Member
Thread Starter
Join Date: Jan 2011
Location: Central AR
Posts: 3,041
Quick update from last weekend's maintenance.
1) Cleaned and replaced the left bank (Front) Valve Cover gasket. I used the usual blue FelPro gasket that I've been using for years on the other 4th gens. It took some time and soaking in carb cleaner to get the VC squeaky clean before installation.
2) Replaced the Vapor Canister Purge Valve with Dorman 911-508 that I bought on Amazon. I didn't like the looks of the older purge valve when I took it off to replace the vacuum canister a few weeks ago. The old valve was really dirty and I was concerned about its health after I attempted to clean it. I decided to replace it when an evap code popped up a few days after I replaced the canister. The car seems to like it. Right now it runs great and no codes. Though I'm surprised at the cost for this part considering the simplicity of it and that it is made of plastic.
New Products Used During Valve Cover Installation
I've been looking for a better way to condition the new gasket "top side" area and to provide even coverage where it mates to the Valve Cover. The problem is the gasket likes to drop from the VC during installation if some type of adhesive is not used. Many people use a drop or two of RTV to hold the gasket place before attempting installation. I have used a drop or two of Super Glue in the high point area where the gasket likes to break loose. So I was looking for something specifically for this purpose. I found it.
I applied a thin coat only on the gasket ridge that mates up with the VC body in the grooved area. I only used enough to make the gasket ridge a little bit tacky so it would stick for installation.
Permatex makes a product named Ultra Rubber Gasket Sealant & Dressing
Here's the product info below.
Formulated specially for rubber gaskets, it conditions gaskets for longer life and seals potential leak paths. It also functions to hold gaskets in place during installation. The non-hardening, soft-setting formula makes gasket re-positioning quick and easy. Provides outstanding oil and fluid resistance. Temperature range -65°F to 400°F (-54°C to 204°C). - See more at:
https://www.permatex.com/products/ga...lant-dressing/
The product worked great for its intended purpose. I will be using it again on the right bank (Rear) VC.
Observations about the old leaking gasket.
The old gasket was leaking in the corner area where the FSM recommends using a small amount of RTV. Whoever installed the last gasket used Permatex Ultra Grey in the corners.
Some years ago I thought Ultra Gray was the ultimate RTV and used it everywhere. So I'm guilty of using grey on gasket corners. Unfortunately, I experienced leaks a few years later in that exactly the area where I used Grey.
Later on I learned that Permatex Black is the more appropriate product for the corner RTV application. The VC jobs where I used Black have held up best over the years. No leaky corner joints when I used a small amount of Black in the corners.
Don't get me wrong about Grey, I use it for aluminum metal-to-metal surfaces with great results.
Meanwhile I've collected all of the hoses, gaskets, o-rings and other parts that I need for a full hose replacement, EGR service, under UIM, and injector refresh job.
Last edited by CS_AR; 11-02-2016 at 10:06 AM.
11-04-2016, 11:45 AM
#23
Senior Member
Thread Starter
Join Date: Jan 2011
Location: Central AR
Posts: 3,041
Today I pulled the intake plenum in roughly 2 hours. A record timing for me.
I'm going to stop for lunch. Then on to replacing hoses, VC gasket, injectors, and refreshing the EGR system.
PhotoBucket has been down since last night. I will have some good pictures once it returns and I can upload today's work.
I'm going to stop for lunch. Then on to replacing hoses, VC gasket, injectors, and refreshing the EGR system.
PhotoBucket has been down since last night. I will have some good pictures once it returns and I can upload today's work.
11-05-2016, 10:06 PM
#24
Senior Member
Thread Starter
Join Date: Jan 2011
Location: Central AR
Posts: 3,041
For the past three 4th gens, when I did a midlife refresh I would pull the hood to give me plenty of working room. For the 4th's midlife refresh, I'm working in a bit of a hurry. Also, with no garage room I'm working outside while the weather is nice.
I got the idea about disconnecting the hood shocks tilting the hood up from another poster. So I went looking for a hood support that would allow me to raise the hood to maximum height without risk of breaking the windshield. I found this Lisle 45900 Hood Prop on Amazon for $28 and change.
Here's how it looks with the hood fully open. It made all the difference on this under UIM and heater hose job.
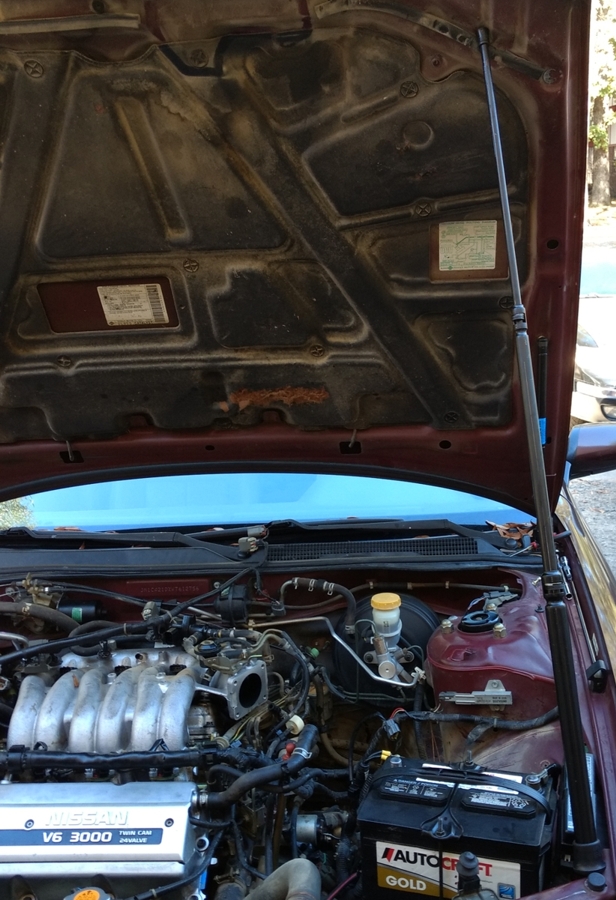

Last edited by CS_AR; 11-05-2016 at 10:28 PM.
11-11-2016, 05:54 PM
#25
Senior Member
Thread Starter
Join Date: Jan 2011
Location: Central AR
Posts: 3,041
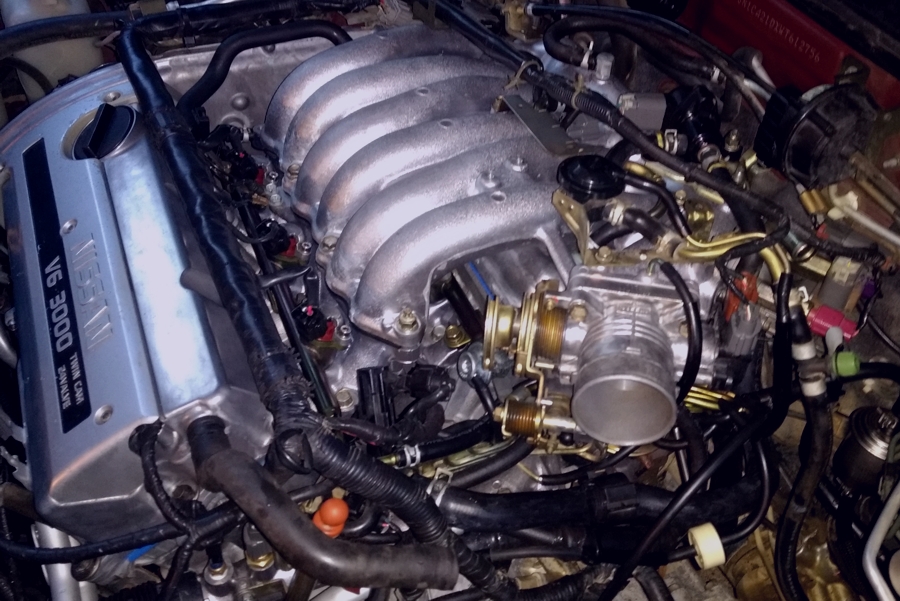
Today I installed new radiator and heater hose, vacuum hoses, fuel lines, fuel filter, cleaned the IACV and throttle body. I am bypassing the UIM coolant lines. The new lines will run from the coolant supply pipes through the throttle body.
I've discovered it is much easier to bypass the UIM coolant lines on a 98 compared to a 99 where the EGR has coolant lines. That benefit makes up for all of the additional vacuum lines that a 98 has compared to a 99. Ha!
Changed the TPS screws to use hex head cap screws instead of Philips. Removed and sanded the battery grounding cable that connects to the block.
I cracked open the old Fram fuel filter that came with the car. That filter was the worst that I've ever seen. It looked like the upper part of filter was literally deteriorating. It had to be seriously restricting fuel flow. I will post some pictures this weekend.
You can see from the picture that a new Nissan filter has been installed along with new Nissan fuel line hose. I picked up a roll of Nissan high pressure fuel hose and cut it to size instead of buying individual hoses. I ordered different types of Nissan hose clamps from https://conceptzperformance.com/
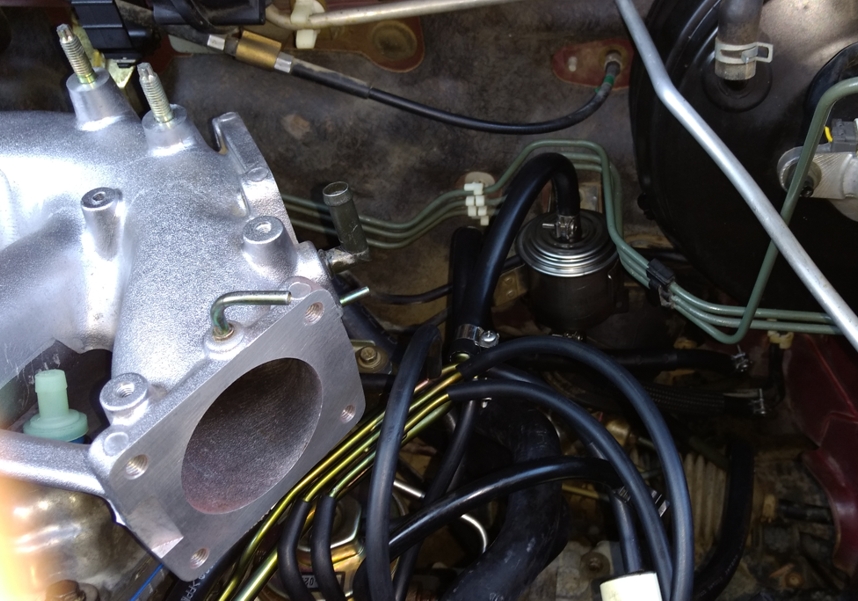
Tomorrow I will finish installing the throttle body, IACV, top of UIM hoses, ECTS, CTS, and finish putting it together. Check for fuel leaks and hopefully it will run. After that I will flush the cooling system with distilled water, then add a 50/50 mix of Zerex G05/distilled water with a bottle of Redline water wetter.
After a few days of work, its starting to get "The Look"

Also I tried a new product named Locktite Hi-Tack Gasket Stick to hold the gasket in place on the EGR tube while I installed the UIM. It makes it easy to mate the EGR tube with the UIM when the gasket is held in place before installation. If you've ever installed a UIM, you'll know what pain it can be to work with the EGR tube gasket.

Last edited by CS_AR; 11-11-2016 at 07:57 PM.
11-12-2016, 04:29 PM
#26
Senior Member
Thread Starter
Join Date: Jan 2011
Location: Central AR
Posts: 3,041
Stopping for tonight with hose hook up and coolant fill.
Tomorrow
1) Compression Test
2) Power on fuel pump to check for leaks
3) Install the rest of the intake system
4) Finish bolting down the wiring harness, securing vacuum hoses, check electrical connections
5) Start Up
Tomorrow
1) Compression Test
2) Power on fuel pump to check for leaks
3) Install the rest of the intake system
4) Finish bolting down the wiring harness, securing vacuum hoses, check electrical connections
5) Start Up
 11-13-2016, 10:05 AM
#27
Member
Join Date: Jan 2008
Location: Dallas, TX
Posts: 268
I'm going to stop reading your thread because I'm growing increasingly jealous of all those clean, shiny engine parts. Not to mention the progress you've made in this short time.
Keep up the good work! Maybe I will gain the motivation to at least replace my leaking cam sensor o-ring today.
Keep up the good work! Maybe I will gain the motivation to at least replace my leaking cam sensor o-ring today.
11-13-2016, 11:23 AM
#28
Senior Member
Thread Starter
Join Date: Jan 2011
Location: Central AR
Posts: 3,041
I'm going to stop reading your thread because I'm growing increasingly jealous of all those clean, shiny engine parts. Not to mention the progress you've made in this short time.
Keep up the good work! Maybe I will gain the motivation to at least replace my leaking cam sensor o-ring today.
Keep up the good work! Maybe I will gain the motivation to at least replace my leaking cam sensor o-ring today.
This morning I finished up the hose installation and testing. It just started right up and runs like a new car. I really didn't expect this much of a difference. Almost unreal.
Since the IACV was cleaned I had to fine adjust the idle down from 700 to 675 RPM.

Here's a picture of the water pipes after installation and running for about an hour. No leaks.

I stopped for lunch here today. This afternoon I will zip-tie the wiring harness to the mounting brackets and finish the coolant system flush and refill with anti-freeze mix.

Thread
Thread Starter
Forum
Replies
Last Post
ShunDoe
4th Generation Maxima (1995-1999)
45
03-08-2016 07:52 PM