
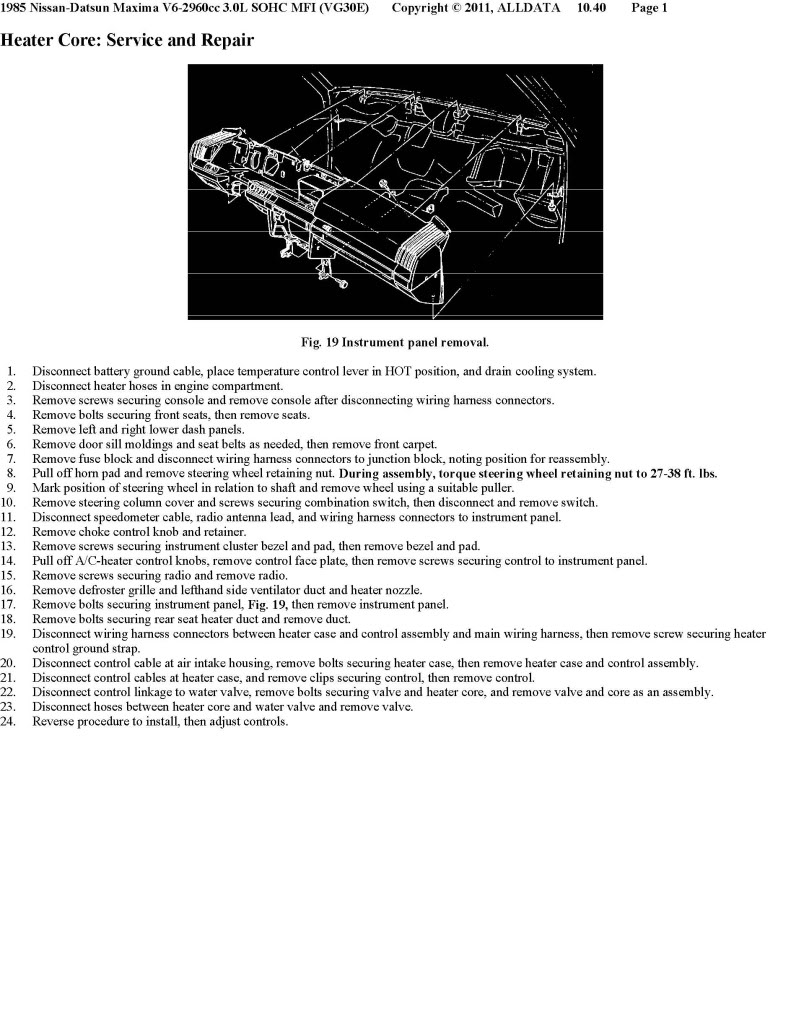
Heater Core Replacement...


Thread Starter
Supporting Maxima.org Member

Joined: Nov 2000
Posts: 399
From: Bay City, MI
Heater Core Replacement...
Heater core is leaking and I gotta replace it this weekend. Bypassing it isn't an option with Michigan weather. I have the part (managed to find a new Nissan one to the tune of $200+  ) and about to get rolling. Anyone know how much of the dash needs to come out? I searched here and about the only thing I found was something to this effect: "It's usually a PITA and you'll need a 12-pack. Oh, and I haven't done it on this particular car."
FSM has remarkably little info on the heater core..just covers mainly the auto A/C system and gives no guidance on what needs to be removed. Anyone do this before? I did the heater core on my '06 Grand Prix a year or two ago and while not fun, newer GM cars are made for quick and easy assembly so while a lot had to be removed, it was mainly big, easy to remove pieces.
) and about to get rolling. Anyone know how much of the dash needs to come out? I searched here and about the only thing I found was something to this effect: "It's usually a PITA and you'll need a 12-pack. Oh, and I haven't done it on this particular car." FSM has remarkably little info on the heater core..just covers mainly the auto A/C system and gives no guidance on what needs to be removed. Anyone do this before? I did the heater core on my '06 Grand Prix a year or two ago and while not fun, newer GM cars are made for quick and easy assembly so while a lot had to be removed, it was mainly big, easy to remove pieces.
Thread Starter
Supporting Maxima.org Member
Joined: Nov 2000
Posts: 399
From: Bay City, MI
Front seats, console, stereo/clock, glove box, big trim piece around stereo/dash switches removed along with left/middle air vents/cluster surround out. Several into the 12-pack.
Steering wheel and surround? Carpet? There's close to a dozen things between the seat brackets, door sills, footwell trim, b-pillars and behind-and-under-the console crap that needs to be removed before the even the front carpet can be folded over. I can see the top screw of the heater unit but don't have any open passage of getting to it yet.
Alright...the top hard plastic trim piece of the dash that has the defroster grille and warning lights...there's screw locations listed on FSM but I'm not seeing those. Any help on where those are?

Senior Member
Joined: Apr 2012
Posts: 325
From: Southern New Jersey
Front seats, console, stereo/clock, glove box, big trim piece around stereo/dash switches removed along with left/middle air vents/cluster surround out. Several into the 12-pack.
Steering wheel and surround? Carpet? There's close to a dozen things between the seat brackets, door sills, footwell trim, b-pillars and behind-and-under-the console crap that needs to be removed before the even the front carpet can be folded over. I can see the top screw of the heater unit but don't have any open passage of getting to it yet.
Alright...the top hard plastic trim piece of the dash that has the defroster grille and warning lights...there's screw locations listed on FSM but I'm not seeing those. Any help on where those are?
Steering wheel and surround? Carpet? There's close to a dozen things between the seat brackets, door sills, footwell trim, b-pillars and behind-and-under-the console crap that needs to be removed before the even the front carpet can be folded over. I can see the top screw of the heater unit but don't have any open passage of getting to it yet.
Alright...the top hard plastic trim piece of the dash that has the defroster grille and warning lights...there's screw locations listed on FSM but I'm not seeing those. Any help on where those are?
Thread Starter
Supporting Maxima.org Member
Joined: Nov 2000
Posts: 399
From: Bay City, MI
The upper-most dash trim piece is a b*tch to get out. 2 screws...one on the far passenger side behind a blank next to the side window defogger with 2 tabs. One of which will break when removing the blank. And a second screw facing towards the ground behind the door chime "speaker" grille right next to cluster hood. Held in place with a bunch of clips, of which 1 broke the surrounding windshield defogger trim area while removing. Still haven't removed the climate control unit...held in place by two screws, one of which is basically stripped as it appears someone has been in this area before me. So now I need to figure out a way to remove the stripped screw...and will probably involve the Dremel.
The padded area is easy enough to remove except for the passenger side air vent. Ended up breaking a tab that held the vent to the pad in some way...I'll glue it tomorrow or whenever I get to it. There were a couple idiot lights that were burned out so I gotta get bulbs to replace those tomorrow. I have the distinct feeling the car won't be fully back together when I head to work on Monday. But as long as it's together enough to drive, I can work with that.
The padded area is easy enough to remove except for the passenger side air vent. Ended up breaking a tab that held the vent to the pad in some way...I'll glue it tomorrow or whenever I get to it. There were a couple idiot lights that were burned out so I gotta get bulbs to replace those tomorrow. I have the distinct feeling the car won't be fully back together when I head to work on Monday. But as long as it's together enough to drive, I can work with that.

Thread
Thread Starter
Forum
Replies
Last Post
BPuff57
Advanced Suspension, Chassis, and Braking
33
Apr 16, 2020 05:15 AM
RWCreative
4th Generation Maxima (1995-1999)
9
Sep 21, 2015 11:01 AM