
HOW TO: Replace VG camshaft position sensor


Thread Starter
Member
Joined: Oct 2007
Posts: 76
From: Cape Town, South Africa
HOW TO: Replace VG camshaft position sensor
I had to replace my cmps the other day, so I thought I put up how I did it. It is a easy job I would say. I got a new sensor from a place that remanufacture distributors for 605ZAR( about 55 USD). I don't know yet if one can fix the sensor itself, it is sealed with a hard glue. Will open it up at later stage.
Ok so here goes:
1. Remove the distributor cap. Held with 3 screws.
2. Mark on the distributor body where the rotor is pointing. Also mark roughly where the bolt is that holds the distributor in place.
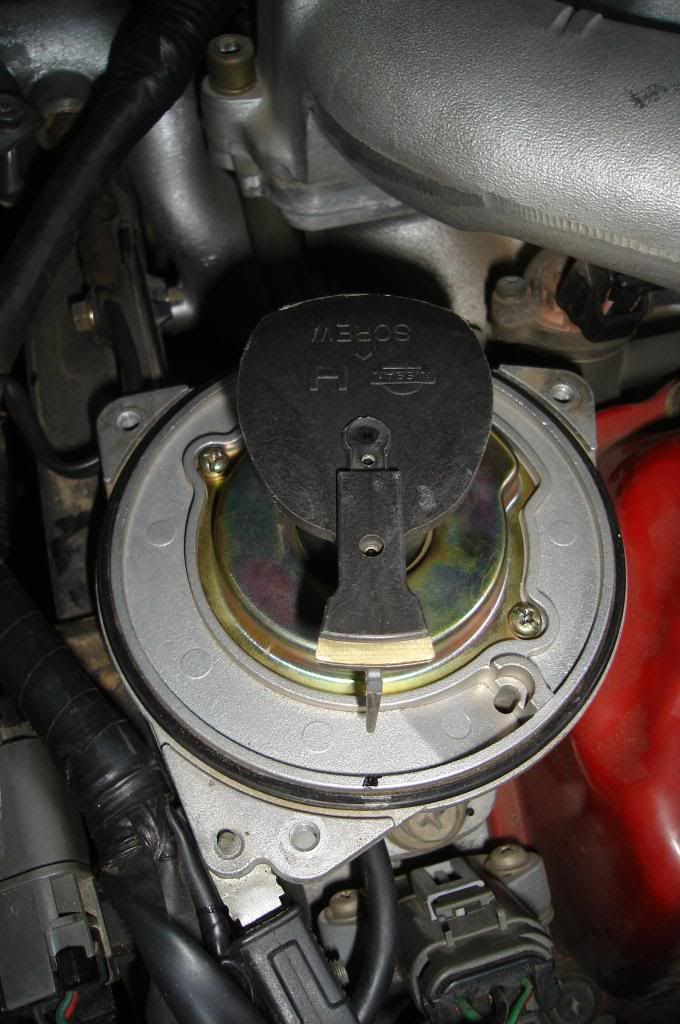
3. Remove the rotor.
4. The remove the cover plate that sit under the rotor. held by 2 screws.

5. Remove the top piece of the centre shaft. It is held with a single screw. Mine was hard to get loose so be careful not to hurt the screw.

6. Now carefully remove the slotted disc. NOTE it has a top and bottom. If inserted wrong the slot the indicates cyclinder 1 would be in wrong place.
7. Remove the plate that holds down the cmps. 3 screws.
8. Remove the bolt that holds down the distributor.
9. Unplug the wire connection to the distributor. 1 ground and one plug of 4 wires.
10. Now slightly turn and wigle the distributor as you pull it upwards. It sit a bit tight for a nice seal to the oil.
11. On the bottom is the plug for the cmps. It is held inplace by a small plate and 2 screws.

12. Remove the plug. It sit tight so wigle it a bit.

13. Now the cmps just go out the top.
Ok now it is stripped down.
Also make sure the the slotted plate is good condition.
Now lets put everything back together.
14. First put in the new cmps. Put the plug in at the bottom and screw back the small plate that keep the plug in
15. Insert the plate that holds down the cmps.
16. Insert the slotted plate right way up.
17. Insert alignment washer and top shaft piece and screw it down.
18. Insert cover plate and screw it down.
19. Insert rotor.
20. Place the distributor back in the engine. Note that as the distributor slots back in the rotor will turn a bit,thus you need to rotor the about 20-30 degrees clockwise past the mark you made to have it on the mark once the distributor is back in the engine.
21. Insert the bolt that holds the distributor. Now the marking of the bolt and the marking of the rotor position should be about right. If it is the timing should be the same as before you started.
22. Plug back the wires.
23. Put the distributor cap back on.
Hope i didn't miss something.
Ok so here goes:
1. Remove the distributor cap. Held with 3 screws.
2. Mark on the distributor body where the rotor is pointing. Also mark roughly where the bolt is that holds the distributor in place.
3. Remove the rotor.
4. The remove the cover plate that sit under the rotor. held by 2 screws.
5. Remove the top piece of the centre shaft. It is held with a single screw. Mine was hard to get loose so be careful not to hurt the screw.
6. Now carefully remove the slotted disc. NOTE it has a top and bottom. If inserted wrong the slot the indicates cyclinder 1 would be in wrong place.
7. Remove the plate that holds down the cmps. 3 screws.
8. Remove the bolt that holds down the distributor.
9. Unplug the wire connection to the distributor. 1 ground and one plug of 4 wires.
10. Now slightly turn and wigle the distributor as you pull it upwards. It sit a bit tight for a nice seal to the oil.
11. On the bottom is the plug for the cmps. It is held inplace by a small plate and 2 screws.
12. Remove the plug. It sit tight so wigle it a bit.
13. Now the cmps just go out the top.
Ok now it is stripped down.
Also make sure the the slotted plate is good condition.
Now lets put everything back together.
14. First put in the new cmps. Put the plug in at the bottom and screw back the small plate that keep the plug in
15. Insert the plate that holds down the cmps.
16. Insert the slotted plate right way up.
17. Insert alignment washer and top shaft piece and screw it down.
18. Insert cover plate and screw it down.
19. Insert rotor.
20. Place the distributor back in the engine. Note that as the distributor slots back in the rotor will turn a bit,thus you need to rotor the about 20-30 degrees clockwise past the mark you made to have it on the mark once the distributor is back in the engine.
21. Insert the bolt that holds the distributor. Now the marking of the bolt and the marking of the rotor position should be about right. If it is the timing should be the same as before you started.
22. Plug back the wires.
23. Put the distributor cap back on.
Hope i didn't miss something.

Banned
Joined: Apr 2008
Posts: 1,159
From: Ontario, Canada
Thanks for these excellent photos - i'm putting this into my archive.
How on earth does your stuff look so clean? My upper intake is all faded looking. Must be the Canadian winters.
If you could take a snapshot of your engine bay one day.
(Oh god - cape town - that's why....I just noticed. You could have bought a 94 GXE and left it outside in a shed and it probably would stay in mint condition. Now I know where I'm going to pick up my backup 3rd gen. How much do you think shipping would be?)
Thread Starter
Member
Joined: Oct 2007
Posts: 76
From: Cape Town, South Africa
Not totally. After I replace the cmps the car felt more alive. There is still slightly something almost feeling like a missfire but it is light and only under heavy load. The more the load the more I can feel it. and it seems the worst at around 2800-3000rpm
Although it looks clean for you it is not as clean as I would like it to be.

Thanks for these excellent photos - i'm putting this into my archive.
How on earth does your stuff look so clean? My upper intake is all faded looking. Must be the Canadian winters.
If you could take a snapshot of your engine bay one day.
(Oh god - cape town - that's why....I just noticed. You could have bought a 94 GXE and left it outside in a shed and it probably would stay in mint condition. Now I know where I'm going to pick up my backup 3rd gen. How much do you think shipping would be?)
How on earth does your stuff look so clean? My upper intake is all faded looking. Must be the Canadian winters.
If you could take a snapshot of your engine bay one day.
(Oh god - cape town - that's why....I just noticed. You could have bought a 94 GXE and left it outside in a shed and it probably would stay in mint condition. Now I know where I'm going to pick up my backup 3rd gen. How much do you think shipping would be?)
Last edited by whattingh; Oct 26, 2008 at 10:50 PM.

Thread Starter
Member
Joined: Oct 2007
Posts: 76
From: Cape Town, South Africa
and manual 
The pickup was bad. Was not getting the 120degree signal at all. Did try to clean the optical but did nothing. Can also not nicely clean it as there is a metal plate that cover them with small slots for the light to go through. I'm planning to try and take the old one apart and see what went wrong, the optical of the wave forming circuit.
The pickup was bad. Was not getting the 120degree signal at all. Did try to clean the optical but did nothing. Can also not nicely clean it as there is a metal plate that cover them with small slots for the light to go through. I'm planning to try and take the old one apart and see what went wrong, the optical of the wave forming circuit.

Senior Member
Joined: Dec 2004
Posts: 4,323
From: EU Scandinavia
Thread Starter
Member
Joined: Oct 2007
Posts: 76
From: Cape Town, South Africa
New distributor cap and plugs(ngk copper bkr6-11e). I cleaned the MAF about a month ago, and measured the output as i rev'ed it a bit. The output signal go's up. The spark wires is one of my suspect, but do not have money now to replace them.
Also something weird i ad discovered was when I had the dist cap off with the front cyclinders plug wires still connect and distributor out, I got what sounded like a spark jumping somewhere when I turn the distributor by hand. Now I did not see and sparks jump but it was in the day. Time to do the same at night.
The car has 215000km's and think it might be the original plug wires.
Last edited by whattingh; Oct 26, 2008 at 11:56 PM. Reason: typo's
Senior Member
Joined: Dec 2004
Posts: 4,323
From: EU Scandinavia
My original Nissan electron sooth hose - so called wire. See http://www.cardomain.com/ride/748507/12 ... the price for this set is lots of work + 20$. How one can afford NOT to do it?

Thread Starter
Member
Joined: Oct 2007
Posts: 76
From: Cape Town, South Africa
I am amazed how sturdy the VGE is!
My original Nissan electron sooth hose - so called wire. See http://www.cardomain.com/ride/748507/12 ... the price for this set is lots of work + 20$. How one can afford NOT to do it?
My original Nissan electron sooth hose - so called wire. See http://www.cardomain.com/ride/748507/12 ... the price for this set is lots of work + 20$. How one can afford NOT to do it?
The problem is not big. It is very light. Also my clutch I think is on it's cause it started to shudders not to long ago.
Last edited by whattingh; Oct 27, 2008 at 12:39 AM.
Senior Member
Joined: Dec 2004
Posts: 4,323
From: EU Scandinavia
Bad wires easily may consume 1-2 liters extra per 100km - that is not light. Calculate savings...

Thread Starter
Member
Joined: Oct 2007
Posts: 76
From: Cape Town, South Africa

Newbie - Just Registered
Joined: May 2013
Posts: 1
Thanks for posting this and with great photos! I went to try to replace mine but got stuck at the disk between the top shaft piece and the sensor. How did you get that disk piece off, or did you have it? I'm sorry I don't know the actual names of the parts, but I hope you understand what I mean. Let me know if you don't.
Thanks!
Thanks!

Member
Joined: Jun 2008
Posts: 177
From: florence, al
Originally Posted by IanGG
Thanks for posting this and with great photos! I went to try to replace mine but got stuck at the disk between the top shaft piece and the sensor. How did you get that disk piece off, or did you have it? I'm sorry I don't know the actual names of the parts, but I hope you understand what I mean. Let me know if you don't.
Thanks!
Thanks!

Thread
Thread Starter
Forum
Replies
Last Post
Rage Maximus
4th Generation Maxima (1995-1999)
3
Sep 3, 2015 12:26 PM