
new battery terminal and wires


new battery terminal and wires
Just bought one of those nice battery terminals (this, to replace the cheap-o one I have that doesn't want to hold my starter wire, anymore), and remebered there are the two wires (14g, maybe?) that go to the connector, then the terminal.
as far as everyone knows, I can cut the ends off, and terminate them into the new terminal, yeah?
don't wanna screw something up permanently, and fixing it if it breaks something is more work than I want to do for this...
as far as everyone knows, I can cut the ends off, and terminate them into the new terminal, yeah?
don't wanna screw something up permanently, and fixing it if it breaks something is more work than I want to do for this...

Senior Member
Joined: Nov 2004
Posts: 333
From: Austin, TX
meh, I am adding an amp to the audio system, and decided I didn't want an ugly terminal. I currently have the normal replacement terminal, but it doesn't want to hold tight, anymore.


Senior Member
Joined: Jan 2006
Posts: 162
From: Massachusetts
If your adding an amp you might want to buy a dry cell battery like the yellow top Optima. It has terminals on the top and sides which makes it easy to keep the factory hookups on top and attach the amp wiring on the side. Depending on the power of the amp you may want to upgrade the power wire from the alternator to like 4 guage and also add a 4 guage ground from the battery to the chassis. Another good investment to help from beating up the battery and alternator is a capacitor.
Senior Member
Joined: Jan 2006
Posts: 162
From: Massachusetts
The real value of a capacitor is in four characteristics:
1. Unlike a battery, they can store a charge at or very near the alternator's output voltage.
2. They can instantly start to deliver current with a sudden demand; there's no delay like the alternator's requirement to mechanically switch "on".
3. They have a very low internal resistance compared to a battery, so with a very high current flow, they won't suffer the instantaneous "IR" voltage drop that a battery will.
4. They're easy to place very close to an amplifier, which helps negate voltage drop due to the resistance in a power wire.
Capacitors are useful devices in a car audio power supply (which is why all car audio amplifiers include built-in capacitors). It's never going to hurt to have reserve power available to an amplifier, and they're very efficient, so they don't add much additional load to an alternator (compared to a second battery).
The limitations of capacitors are that they can't create power, only store it; and, in relative terms, they can't store very much. Larger capacitors store more power, but also have higher internal resistance, which negates much of their value. So they're not going to make a subwoofer system's bass output noticeably louder; and they're not going to help an overloaded alternator. They might, however, give you a tighter, cleaner transient response. I think they have much more value in a SQ system compared to a SPL system.
Capacitors get a bad rap, mainly due to manufacturers and salespeople who promise benefits that they can't deliver. They do have a place in car audio systems, as long as they're not expected to "improve bass output, save your alternator, and stop dimming headlights".

Senior Member
Joined: Nov 2006
Posts: 539
Senior Member
Joined: Jan 2006
Posts: 162
From: Massachusetts
Look, I never said it was going to fix anything. Benstoked started a thread regarding new battery terminals. I just gave him some options because he is talking about installing an amp. I don't know why, but you come into the thread and said "a capacitor will do the opposite". Opposite of what? External capacitors matched to the system helps save your battery and alternator from large drains of power being sucked from them when the bass hits. The best thing to do is get a larger output alternator, but having a matched capacitor doesn't hurt anything.
Senior Member
Joined: Nov 2004
Posts: 333
From: Austin, TX
Okay, so here's what I did... Since my cables and terminals had been shot for a while (most of the terminals had been eaten away by corrosion)...
BUY THIS CABLE ----> http://www.oreillyauto.com/EW3/Produ...¤tPage=0
(Nice 4 gauge copper)
Next
BUY THIS TERMINAL -----> http://www.oreillyauto.com/EW3/Produ...¤tPage=0
Once you have these you can go about making your own custom cables... To accomplish this is pretty straight forward....
MEASURE the distance from your POSITIVE TERMINAL (on your battery) to your STARTER. And the NEGATIVE TERMINAL (on your battery) to the GROUNDING POINT on the ENGINE BLOCK (located under your intake)
CUT OFF the terminal ends that come with the CABLE.
STRIP back the shielding around the copper on the CABLE.
CRIMP in pliers the CABLE to the NEW TERMINAL that you purchased separately.
SOLDER on the TERMINAL to the CABLE to make sure there's a good connection.
Use HEAT SHRINK or ELECTRICAL TAPE to cover over your SOLDERED joint.
REMOVE old CABLES from battery/starter and battery/grounding point.
INSTALL new ones!
And you should have something similar to these....
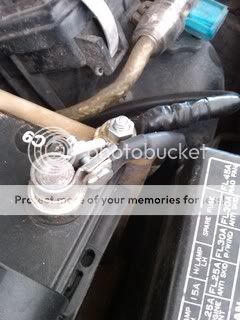
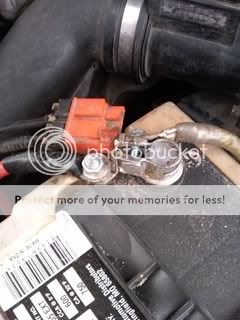
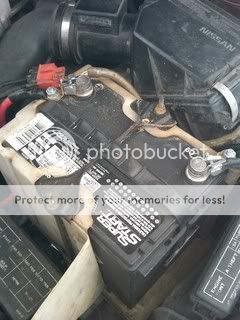
Hope this helps in your attempts!
BUY THIS CABLE ----> http://www.oreillyauto.com/EW3/Produ...¤tPage=0
(Nice 4 gauge copper)
Next
BUY THIS TERMINAL -----> http://www.oreillyauto.com/EW3/Produ...¤tPage=0
Once you have these you can go about making your own custom cables... To accomplish this is pretty straight forward....
MEASURE the distance from your POSITIVE TERMINAL (on your battery) to your STARTER. And the NEGATIVE TERMINAL (on your battery) to the GROUNDING POINT on the ENGINE BLOCK (located under your intake)
CUT OFF the terminal ends that come with the CABLE.
STRIP back the shielding around the copper on the CABLE.
CRIMP in pliers the CABLE to the NEW TERMINAL that you purchased separately.
SOLDER on the TERMINAL to the CABLE to make sure there's a good connection.
Use HEAT SHRINK or ELECTRICAL TAPE to cover over your SOLDERED joint.
REMOVE old CABLES from battery/starter and battery/grounding point.
INSTALL new ones!
And you should have something similar to these....
Hope this helps in your attempts!
Last edited by kringle03; Jul 9, 2009 at 05:45 PM.

Senior Member
Joined: Apr 2008
Posts: 1,355
From: Surrey, B.C
Okay, so here's what I did... Since my cables and terminals had been shot for a while (most of the terminals had been eaten away by corrosion)...
BUY THIS CABLE ----> http://www.oreillyauto.com/EW3/Produ...¤tPage=0
(Nice 4 gauge copper)
Next
BUY THIS TERMINAL -----> http://www.oreillyauto.com/EW3/Produ...¤tPage=0
Once you have these you can go about making your own custom cables... To accomplish this is pretty straight forward....
MEASURE the distance from your POSITIVE TERMINAL (on your battery) to your STARTER. And the NEGATIVE TERMINAL (on your battery) to the GROUNDING POINT on the ENGINE BLOCK (located under your intake)
CUT OFF the terminal ends that come with the CABLE.
STRIP back the shielding around the copper on the CABLE.
CRIMP in pliers the CABLE to the NEW TERMINAL that you purchased separately.
SOLDER on the TERMINAL to the CABLE to make sure there's a good connection.
Use HEAT SHRINK or ELECTRICAL TAPE to cover over your SOLDERED joint.
REMOVE old CABLES from battery/starter and battery/grounding point.
INSTALL new ones!
And you should have something similar to these....


Hope this helps in your attempts!
BUY THIS CABLE ----> http://www.oreillyauto.com/EW3/Produ...¤tPage=0
(Nice 4 gauge copper)
Next
BUY THIS TERMINAL -----> http://www.oreillyauto.com/EW3/Produ...¤tPage=0
Once you have these you can go about making your own custom cables... To accomplish this is pretty straight forward....
MEASURE the distance from your POSITIVE TERMINAL (on your battery) to your STARTER. And the NEGATIVE TERMINAL (on your battery) to the GROUNDING POINT on the ENGINE BLOCK (located under your intake)
CUT OFF the terminal ends that come with the CABLE.
STRIP back the shielding around the copper on the CABLE.
CRIMP in pliers the CABLE to the NEW TERMINAL that you purchased separately.
SOLDER on the TERMINAL to the CABLE to make sure there's a good connection.
Use HEAT SHRINK or ELECTRICAL TAPE to cover over your SOLDERED joint.
REMOVE old CABLES from battery/starter and battery/grounding point.
INSTALL new ones!
And you should have something similar to these....
Hope this helps in your attempts!


Thread
Thread Starter
Forum
Replies
Last Post
My Coffee
New Member Introductions
15
Jun 6, 2017 02:01 PM
bigfrank
4th Generation Maxima (1995-1999)
2
Oct 1, 2015 12:51 PM