
Stillen kit


Stillen kit
My kit is here now and I'm a little confused on how to put this thing on.
it came yesterday and the front and rear lips are bent a bit. How can I fix it for it to go back into it's original shape? And how long would it take?
Also, Once everything is shaped the way it's supposed to, how do I attach it?
it came yesterday and the front and rear lips are bent a bit. How can I fix it for it to go back into it's original shape? And how long would it take?
Also, Once everything is shaped the way it's supposed to, how do I attach it?

You need to lay them out in the sun to get the bends out of them, they normally fold them like that for shipping. Unfortunately you may not have much sun/heat with it being winter. A few hours in the sun it will go back to it's proper shape.
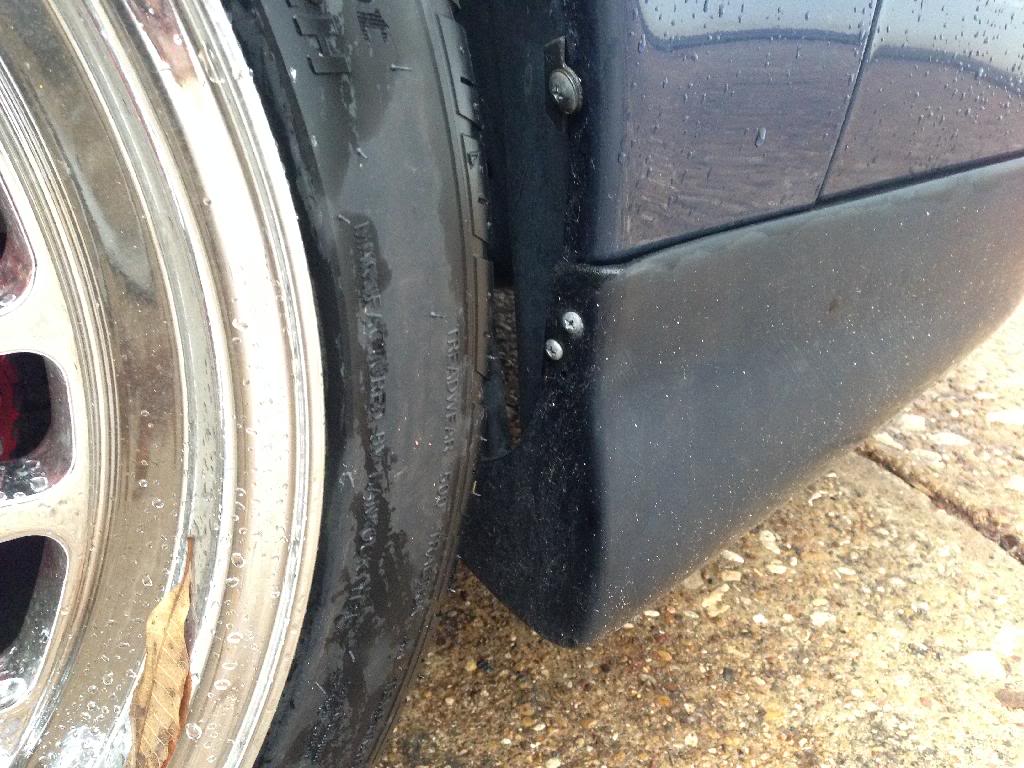
If you look on the backside of the front and rear pieces, you will notice a maybe 1" wide section along the entire perimeter, this is where your double sided tape goes. The perimeter also has a bit of a lip that fits right into the creased body line on the front and rear bumpers. You need to make sure to press that lip into the crease and line it up properly otherwise your double sided tape will want to slide down the bumper and cause the front and rear pieces to sag. The lip fitting into the crease sort of causes the piece to "hang" rather than merely grip the side of the bumper with sheer force.
The front piece also gas a known problem area around the fog light areas where the tape doesn't always want to hold. I put a couple of screws there on mine.
The front and rear lips go on with double sided tape and and a couple of screws on the femder well lip. Same goes for the sides, and if you want you can use double sided tape the length of it but I've never bothered.
Make sure to use 3M tape and not the generic crap they send with the kit
Last edited by James92SE; Dec 13, 2013 at 02:47 PM.

If your not on a budget take it to a body shop and have them install it so it looks seemless and blends nicely with the rockers etc. They are a pretty heavy kit unlike fiberglass it's much nicer and a much better product than fiberglass but being that it's heavy i definately wouldn't trust the double sided tape. Atleast not just the double sided tape alone because im sure the test of time will reak havoc on it besides if your getting it painted to blend nicely with the rest of your car you may aswell just let a body shop do the whole job instead of just the paint but i guess it all boils down to how picky you are.
I wholeheartedly disagree. Filling in the seams looks terrible IMO and almost always cracks anyway. The Stillen kit properly installed holds up just fine as many of us here who have had the kits a decade and more can attest to
Im not disagreeing with you james and dont want you to think i was knocking the way you or anyone else installs their kit. Each to their own. With the proper seam sealer that has some flexibility to it isnt as prone to cracking but yes i agree there are alot of times they will crack. I just found in my own opinion that having it seemless makes it look more like its a part of the car especially the rockers but again thats just my own opinion and each to their own and being that you've obviously had your kit on for over 10 years with no issues i cant have anything bad to say about your installation methods. Just merely stating an option and opinion.

I would say, in regards to installation of the kit, the rear was the biggest PITA for me. I ended up drilling two holes where it becomes part of the tag section. I had to install two bolts there to help support that monster. Also had to fabricate two brackets which extended from the underside of the rear piece (bolted) and then attached the other side to the bottom of the stock bumper (bolted) to support the left/right corners where there is nothing but tape holding it. Without those brackets I made, that thing would not have stayed and I would have never trusted it to stay in place.
That was my experience.
Only other issue was that the front passenger door would scrape the top of the side skirt when opening/shutting the door. To this day I'm not sure that was a slight warp in the side skirt or A door hinge issue.
That was my experience.
Only other issue was that the front passenger door would scrape the top of the side skirt when opening/shutting the door. To this day I'm not sure that was a slight warp in the side skirt or A door hinge issue.
Actually, I used two nuts/bolts. IIRC, just about 10-12mm, nothing huge. License plate hid them.
Yup, ya gotta lose the flaps. But, car looks better with the kit.
Of course, having said that, I'm changing my styling up a bit. Call it old age, but really, I've always been fascinated by the aggressive and slopped look the car gains with the Stillen kit MINUS the rear piece. Plus, only makes sense you'll have better performance and gas mileage by doing away with that rear scoop. That rear piece catches SO much under car air, its GOT to be acting like a little parachute back there!! LOL!!
I'm also going spoiler-less. I honestly think the 2nd and 3rd gen Maximas are the only two generations that can go without a spoiler and still look good and aggressive.
And how did you get the bolts to hold the kit?
The kit covers the bottom 1/2 of the tag indention. I just drilled small holes in the Stillen kit and through the rubber bumper. I'd have to look, but I recall there is a plastic flap behind the tag that's part of the stock bumper. With the Stillen kit in place and holes drilled, I could pull both the kit and that "flap" of the bumper out just far enough to get a nut behind it. Then put bolt through and tightened. The bolt was naturally shallow.
In regards to te brackets I fabbed, just measured the distance between the bottoms of the oem bumper vs bottom of Stillen. Made metal brackets that length and bent to fit perfect. Put the holes and bolts at the very underside of the kit so that it was not visible. As best I know, no one else has had to fab such brackets. Maybe I didn't, but it was piece of mind.
In regards to te brackets I fabbed, just measured the distance between the bottoms of the oem bumper vs bottom of Stillen. Made metal brackets that length and bent to fit perfect. Put the holes and bolts at the very underside of the kit so that it was not visible. As best I know, no one else has had to fab such brackets. Maybe I didn't, but it was piece of mind.
I would say, in regards to installation of the kit, the rear was the biggest PITA for me. I ended up drilling two holes where it becomes part of the tag section. I had to install two bolts there to help support that monster. Also had to fabricate two brackets which extended from the underside of the rear piece (bolted) and then attached the other side to the bottom of the stock bumper (bolted) to support the left/right corners where there is nothing but tape holding it. Without those brackets I made, that thing would not have stayed and I would have never trusted it to stay in place.
That was my experience.
Only other issue was that the front passenger door would scrape the top of the side skirt when opening/shutting the door. To this day I'm not sure that was a slight warp in the side skirt or A door hinge issue.
That was my experience.
Only other issue was that the front passenger door would scrape the top of the side skirt when opening/shutting the door. To this day I'm not sure that was a slight warp in the side skirt or A door hinge issue.
I just drilled self tapping screws through the rear plate section into the stock bumper. They've held fine all these years but you have to be really careful not to over tighten them otherwise they will just permanently loosen. Chris Gregg's method with using nuts on the backside is by far superior and if I did it again I would go that route
I just drilled self tapping screws through the rear plate section into the stock bumper. They've held fine all these years but you have to be really careful not to over tighten them otherwise they will just permanently loosen. Chris Gregg's method with using nuts on the backside is by far superior and if I did it again I would go that route
Heat gun doesn't work actually, I tried that to get out the waves on the underside of the front lip on the corners and after about half an hour straightening them out with the heat gun it just went right back to the waves lol.
Here are some pics to describe what I meant in my posts:
And here is the area where I put two screws in the fog light area. I don't have the screws in now but you can see where they were:
Here are some pics to describe what I meant in my posts:

And here is the area where I put two screws in the fog light area. I don't have the screws in now but you can see where they were:

I spread my screw out on the inner wheel well for the front lip to assist it from trying to twist.
Couldn't get my images as it stopped raining as the sun was going down. Lower bumper is painted black as well. Then there's the fact I don't have a flash on my 3G iPhone. I'll get the pics tomorrow.
Couldn't get my images as it stopped raining as the sun was going down. Lower bumper is painted black as well. Then there's the fact I don't have a flash on my 3G iPhone. I'll get the pics tomorrow.
Heat gun doesn't work actually, I tried that to get out the waves on the underside of the front lip on the corners and after about half an hour straightening them out with the heat gun it just went right back to the waves lol.
Here are some pics to describe what I meant in my posts:
And here is the area where I put two screws in the fog light area. I don't have the screws in now but you can see where they were:
Here are some pics to describe what I meant in my posts:
And here is the area where I put two screws in the fog light area. I don't have the screws in now but you can see where they were:
Now a question for all : If heat guns don't work, and it's 10 degrees outside how can i get these to fold back? Could i keep them inside my house?
You could. But given the nature of poly, you are really better off waiting till a good 80 degree sun shining day in spring. Or make a run down south to NM or FL.
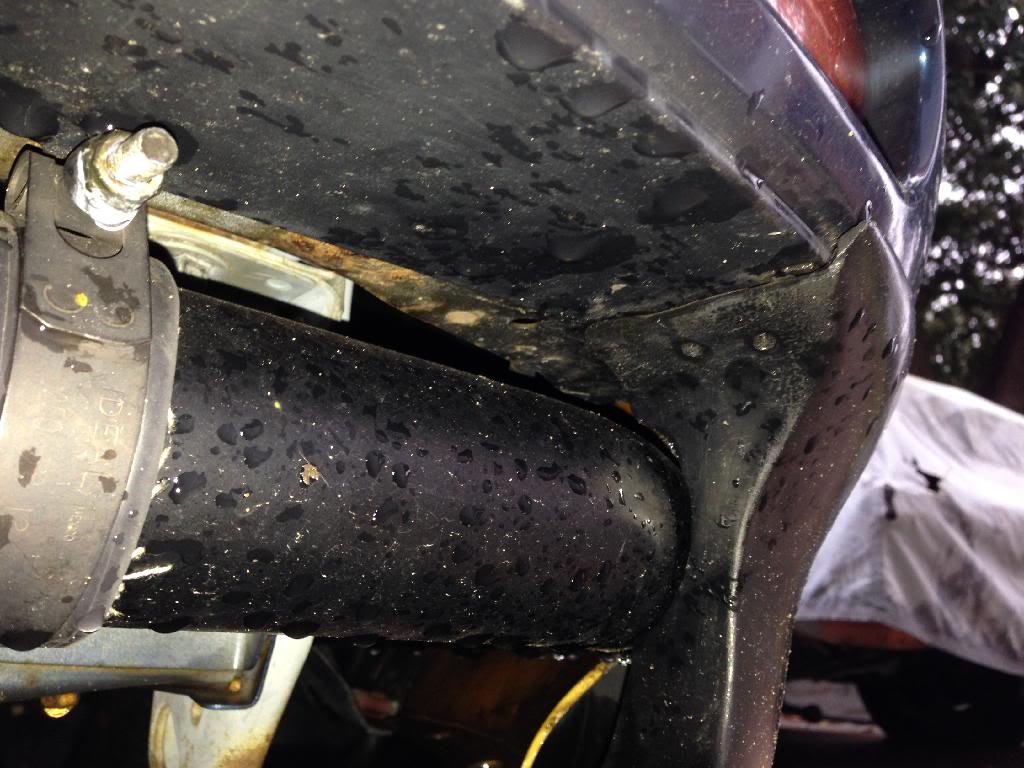
Here are the images of the rear. You can see the hole on the driver's side. You can see the opening where I reached behind the bumper cover for to install the nut. Or maybe I slipped the bolt behind the cover - hmmmm - cant racall.

This one is of the front underside, like James showed. I did essentially the same thing.

This is of the front wheel well. Not a great image, but can see where I put a rivet lower on the well to help keep the kit from twisting going down the road. IMO, just helped stabilize it.

Yes, yes, yes......I know! I need a paint job. BAD!!
Here are the images of the rear. You can see the hole on the driver's side. You can see the opening where I reached behind the bumper cover for to install the nut. Or maybe I slipped the bolt behind the cover - hmmmm - cant racall.
This one is of the front underside, like James showed. I did essentially the same thing.
This is of the front wheel well. Not a great image, but can see where I put a rivet lower on the well to help keep the kit from twisting going down the road. IMO, just helped stabilize it.
Yes, yes, yes......I know! I need a paint job. BAD!!
Last edited by Chris Gregg; Dec 15, 2013 at 02:29 PM.
The car was sent down to a local shop to get painted, and the custom shop told me they could put it on for what seemed like a great price. I showed them the pictures you guys showed me and mentioned the 3m tape and screws, because at first they were talking about molding it. Hoping to get it back sometime after new years!


No wonder they were able to do it so cheap, holy crap! They didn't even so much as mask off the fender wells or even at least pull the skirts off to be painted separately - buuut thats where most of the costs end up coming from, masking, R&I and prep time, and its also how places like Maaco can do such cheap paintjobs, no prep, no pulling, minimal masking, just pay n spray, baby!
Whole car pics? I assume thats the final color? I want to see how she looks in blue!
Whole car pics? I assume thats the final color? I want to see how she looks in blue!


Honestly it looks more like they painted over the seam given that they painted over themounting hardware. As long as they can't move around and break the paint, it'll probably be no big deal and makes it look like the rocker is meant to be shaped like that.
That's not just paint, they actually "filled" it with something. The Stillen kit creates a fairly significant "lip" around the edges and the transition would not be filled completely smooth like that from just paint. It seriously looks like caulking to me

Like i had previously mentioned the seemless can look nice as if it's meant to be a part of the car but i agree it could have been sanded a little better as so to not be as noticeable as it is but as long as he's happy with it that's all that counts. Im sure when we see the car as a whole that wont be a focal point though. Looks like a pretty funky colour though definately a head turner lol I agree with the previous post of seeing pics. of the whole car. That would be great.


And, interestingly, you can see on his kit the spots I unsuccessfully tried to correct with the heat gun on my kit. Look at the front angle, directly at the bottom of each corner (about right in front of each tow hook). The Stillen kit tends to bow downward at those spots. Most people don't notice but it's always bugged me about mine.
And, interestingly, you can see on his kit the spots I unsuccessfully tried to correct with the heat gun on my kit. Look at the front angle, directly at the bottom of each corner (about right in front of each tow hook). The Stillen kit tends to bow downward at those spots. Most people don't notice but it's always bugged me about mine.
Last edited by ac max 92; Jan 19, 2014 at 02:53 PM.


As for the fogs, they just came in a few days ago and should go on the car next weekend. And what exactly is the lower mesh for the grill? I don't think mine came with one.
Last edited by CarlW; Jan 19, 2014 at 10:19 PM.
No they don't come with it. I just had to get a sheet of grill mesh which is sold in a couple different sizes then had it put in custom. The holes had to be cut to put the fog lights in. It looks nice if done right and fills in the open gap where the front lip goes on. If i get some time i will take a couple pics. of mine for you so you can see what i mean. You may like it or may not. Everyone has their own opinion but i've gotten positive feedback and haven't gotten any negative feedback yet anyway. I'll try and get a couple pics. before you do your install of the fog lights to see what you think. By the way i like your rear light conversion. Are those from the skyline?
Last edited by ac max 92; Jan 20, 2014 at 10:43 AM.
No they don't come with it. I just had to get a sheet of grill mesh which is sold in a couple different sizes then had it put in custom. The holes had to be cut to put the fog lights in. It looks nice if done right and fills in the open gap where the front lip goes on. If i get some time i will take a couple pics. of mine for you so you can see what i mean. You may like it or may not. Everyone has their own opinion but i've gotten positive feedback and haven't gotten any negative feedback yet anyway. I'll try and get a couple pics. before you do your install of the fog lights to see what you think. By the way i like your rear light conversion. Are those from the skyline?