Make Your Own Red And Clears 95/96
 05-25-2005, 06:31 PM
#1
Guest
Posts: n/a
Make Your Own Red And Clears 95/96
IF YOU OWN A 1995 OR 1996 MAXIMA YOU ARE IN LUCK. IF YOU DONT WANT TO SPEND 300 DOLLARS FOR A SET OF RED AND CLEARS.
THINGS YOU WILL NEED:
-OUTTER 1ST GEN EURO LIGHTS
-YOUR STOCK OUTTER TAIL LIGHTS
-SILICONE
-CLEAR CEILING PLASTIC
-DUCK TAPE
-TESTORS CANDY RED
-TESTORS CLEAR
-MASKING TAPE
-DREMEL
-CUT OFF WHEELS
WHAT YOU ARE GOING TO DO IS REMOVE THE LENES FROM THE STOCK LIGHTS AND THE EURO LIGHTS
THEN YOU ARE GOING TO PAINT THE LOWER HALF OF THE CLEAR EURO LIGHT LENS AND THEN PUT THE RED AND CLEAR LENS THAT YOU MADE ON THE STOCK HOUSING AND THERE YOU GO YOU HAVE RED AND CLEARS
***I KNOW THIS WOULD BE BETTER WITH PICTURES BUT I DID IT AWHILE AGO AND NEVER TOOK ALOT OF PICTURES****
REMOVE YOUR STOCK TAIL LIGHTS FROM YOUR CAR
REMOVE THE LENS FROM THE HOUSING ON THE STOCK LIGHTS USING A HEAT GUN
ALSO REMOVE THE CLEAR LENS FROM THE EURO LIGHTS
AFTER REMOVING ALL LENES FROM THE STOCK LIGHT AND THE EURO LIGHTS,
USE A DREMEL WITH A CUT OFF WHEEL AND CUT OUT A PIECE OF CLEAR PLASTIC TO GO OVER THE UPPER HALF OF THE STOCK TAIL LIGHT HOUSING.
USE SILICONE TO GLUE IT TO THE HOUSING USE DUCK TAPE TO HOLD IT DOWN WHILE IT DRIES
CLEAN AND PAINT THE INSIDE OF THE CLEAR EURO LIGHT LENS 3 TO 4 COATS SHOULD DO IT CLEAR OVER THE RED
AFTER THE SILICONE DRIED REMOVE THE DUCK TAPE AND REHEAT THE GLUE ON THE STOCK HOUSING AND ATTACH THE PAINTED RED AND CLEAR TO THE STOCK HOUSING
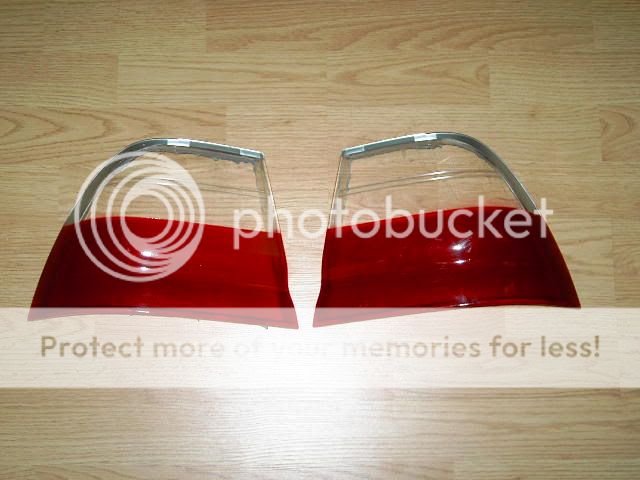
this is a picture of the painted red and clear euro light lens

this is a picture of the stock housing with the stock red and orange lens removed, the upper half of this is where the clear plastic goes

this is a picture of the clear plastic you'll need
THINGS YOU WILL NEED:
-OUTTER 1ST GEN EURO LIGHTS
-YOUR STOCK OUTTER TAIL LIGHTS
-SILICONE
-CLEAR CEILING PLASTIC
-DUCK TAPE
-TESTORS CANDY RED
-TESTORS CLEAR
-MASKING TAPE
-DREMEL
-CUT OFF WHEELS
WHAT YOU ARE GOING TO DO IS REMOVE THE LENES FROM THE STOCK LIGHTS AND THE EURO LIGHTS
THEN YOU ARE GOING TO PAINT THE LOWER HALF OF THE CLEAR EURO LIGHT LENS AND THEN PUT THE RED AND CLEAR LENS THAT YOU MADE ON THE STOCK HOUSING AND THERE YOU GO YOU HAVE RED AND CLEARS
***I KNOW THIS WOULD BE BETTER WITH PICTURES BUT I DID IT AWHILE AGO AND NEVER TOOK ALOT OF PICTURES****
REMOVE YOUR STOCK TAIL LIGHTS FROM YOUR CAR
REMOVE THE LENS FROM THE HOUSING ON THE STOCK LIGHTS USING A HEAT GUN
ALSO REMOVE THE CLEAR LENS FROM THE EURO LIGHTS
AFTER REMOVING ALL LENES FROM THE STOCK LIGHT AND THE EURO LIGHTS,
USE A DREMEL WITH A CUT OFF WHEEL AND CUT OUT A PIECE OF CLEAR PLASTIC TO GO OVER THE UPPER HALF OF THE STOCK TAIL LIGHT HOUSING.
USE SILICONE TO GLUE IT TO THE HOUSING USE DUCK TAPE TO HOLD IT DOWN WHILE IT DRIES
CLEAN AND PAINT THE INSIDE OF THE CLEAR EURO LIGHT LENS 3 TO 4 COATS SHOULD DO IT CLEAR OVER THE RED
AFTER THE SILICONE DRIED REMOVE THE DUCK TAPE AND REHEAT THE GLUE ON THE STOCK HOUSING AND ATTACH THE PAINTED RED AND CLEAR TO THE STOCK HOUSING
this is a picture of the painted red and clear euro light lens
this is a picture of the stock housing with the stock red and orange lens removed, the upper half of this is where the clear plastic goes
this is a picture of the clear plastic you'll need

")

 05-25-2005, 06:38 PM
#5
"AFTER REMOVING ALL LENES FROM THE STOCK LIGHT AND THE EURO LIGHTS,
USE A DREMEL WITH A CUT OFF WHEEL AND CUT OUT A PIECE OF CLEAR PLASTIC TO GO OVER THE UPPER HALF OF THE STOCK TAIL LIGHT HOUSING."
please tell me more about this part. do you need two sets of lights?
USE A DREMEL WITH A CUT OFF WHEEL AND CUT OUT A PIECE OF CLEAR PLASTIC TO GO OVER THE UPPER HALF OF THE STOCK TAIL LIGHT HOUSING."
please tell me more about this part. do you need two sets of lights?


 05-26-2005, 01:04 AM
#26

Drivinmax.....
First of all I'd like to commend your nobleness to share the process with us. Second, its true....this has been done before by an orger named Jackiss2888. The only thing is this guy tried to charge everyone $250 for doing what you volutarily shared to us for free. I'm not sure how his business venture panned out if it did but if its any consolation, yours look really good and we can't wait to see the end result.
Sidenote: If the lenses you've used are off of a 1st gen Altezza, there would be a black border around the outter tail lenses as seen here (this person painted it to match his car). Therefore, the inner and outter lenses would differ in a way as seen here. If yours doesn't look like this, let us know what eurotails you have used.
05-26-2005, 02:52 AM
#27

Originally Posted by JOMAN
therealgoon9 the pic in yoru sig is photo chopped right?!?!?! cause that would look like a nice maxi!
lol, no he swapped in subaru wrx tails..a whole custom job..nice too.
05-26-2005, 04:23 AM
#28

Originally Posted by drivinmax
IF YOU OWN A 1995 OR 1996 MAXIMA YOU ARE IN LUCK. IF YOU DONT WANT TO SPEND 300 DOLLARS FOR A SET OF RED AND CLEARS.
THINGS YOU WILL NEED:
-OUTTER 1ST GEN EURO LIGHTS
-YOUR STOCK OUTTER TAIL LIGHTS
-SILICONE
-CLEAR CEILING PLASTIC
-DUCK TAPE
-TESTORS CANDY RED
-TESTORS CLEAR
-MASKING TAPE
-DREMEL
-CUT OFF WHEELS
WHAT YOU ARE GOING TO DO IS REMOVE THE LENES FROM THE STOCK LIGHTS AND THE EURO LIGHTS
THEN YOU ARE GOING TO PAINT THE LOWER HALF OF THE CLEAR EURO LIGHT LENS AND THEN PUT THE RED AND CLEAR LENS THAT YOU MADE ON THE STOCK HOUSING AND THERE YOU GO YOU HAVE RED AND CLEARS
***I KNOW THIS WOULD BE BETTER WITH PICTURES BUT I DID IT AWHILE AGO AND NEVER TOOK ALOT OF PICTURES****
REMOVE YOUR STOCK TAIL LIGHTS FROM YOUR CAR
REMOVE THE LENS FROM THE HOUSING ON THE STOCK LIGHTS USING A HEAT GUN
ALSO REMOVE THE CLEAR LENS FROM THE EURO LIGHTS
AFTER REMOVING ALL LENES FROM THE STOCK LIGHT AND THE EURO LIGHTS,
USE A DREMEL WITH A CUT OFF WHEEL AND CUT OUT A PIECE OF CLEAR PLASTIC TO GO OVER THE UPPER HALF OF THE STOCK TAIL LIGHT HOUSING.
USE SILICONE TO GLUE IT TO THE HOUSING USE DUCK TAPE TO HOLD IT DOWN WHILE IT DRIES
CLEAN AND PAINT THE INSIDE OF THE CLEAR EURO LIGHT LENS 3 TO 4 COATS SHOULD DO IT CLEAR OVER THE RED
AFTER THE SILICONE DRIED REMOVE THE DUCK TAPE AND REHEAT THE GLUE ON THE STOCK HOUSING AND ATTACH THE PAINTED RED AND CLEAR TO THE STOCK HOUSING

this is a picture of the painted red and clear euro light lens

this is a picture of the stock housing with the stock red and orange lens removed, the upper half of this is where the clear plastic goes

this is a picture of the clear plastic you'll need
THINGS YOU WILL NEED:
-OUTTER 1ST GEN EURO LIGHTS
-YOUR STOCK OUTTER TAIL LIGHTS
-SILICONE
-CLEAR CEILING PLASTIC
-DUCK TAPE
-TESTORS CANDY RED
-TESTORS CLEAR
-MASKING TAPE
-DREMEL
-CUT OFF WHEELS
WHAT YOU ARE GOING TO DO IS REMOVE THE LENES FROM THE STOCK LIGHTS AND THE EURO LIGHTS
THEN YOU ARE GOING TO PAINT THE LOWER HALF OF THE CLEAR EURO LIGHT LENS AND THEN PUT THE RED AND CLEAR LENS THAT YOU MADE ON THE STOCK HOUSING AND THERE YOU GO YOU HAVE RED AND CLEARS
***I KNOW THIS WOULD BE BETTER WITH PICTURES BUT I DID IT AWHILE AGO AND NEVER TOOK ALOT OF PICTURES****
REMOVE YOUR STOCK TAIL LIGHTS FROM YOUR CAR
REMOVE THE LENS FROM THE HOUSING ON THE STOCK LIGHTS USING A HEAT GUN
ALSO REMOVE THE CLEAR LENS FROM THE EURO LIGHTS
AFTER REMOVING ALL LENES FROM THE STOCK LIGHT AND THE EURO LIGHTS,
USE A DREMEL WITH A CUT OFF WHEEL AND CUT OUT A PIECE OF CLEAR PLASTIC TO GO OVER THE UPPER HALF OF THE STOCK TAIL LIGHT HOUSING.
USE SILICONE TO GLUE IT TO THE HOUSING USE DUCK TAPE TO HOLD IT DOWN WHILE IT DRIES
CLEAN AND PAINT THE INSIDE OF THE CLEAR EURO LIGHT LENS 3 TO 4 COATS SHOULD DO IT CLEAR OVER THE RED
AFTER THE SILICONE DRIED REMOVE THE DUCK TAPE AND REHEAT THE GLUE ON THE STOCK HOUSING AND ATTACH THE PAINTED RED AND CLEAR TO THE STOCK HOUSING
this is a picture of the painted red and clear euro light lens
this is a picture of the stock housing with the stock red and orange lens removed, the upper half of this is where the clear plastic goes
this is a picture of the clear plastic you'll need
why dont you just do a bunch and sell them. or offer the service for a fee
 05-26-2005, 04:53 AM
#29
Senior Member

Join Date: Apr 2005
Posts: 821
Originally Posted by drivinmax
IF YOU OWN A 1995 OR 1996 MAXIMA YOU ARE IN LUCK. IF YOU DONT WANT TO SPEND 300 DOLLARS FOR A SET OF RED AND CLEARS.
-Dexter.
05-26-2005, 05:15 AM
#30
The only thing photochoipped is the paint. Tails. shavings, kit, lights. are all fo real.
I'm just chimming in because I know the trouble involved in working with plastic. 
As followed below
http://forums.maxima.org/showthread.php?t=405915
Originally Posted by JOMAN
therealgoon9 the pic in yoru sig is photo chopped right?!?!?! cause that would look like a nice maxi!
As followed below
http://forums.maxima.org/showthread.php?t=405915
05-26-2005, 06:52 AM
#31

Dr-Max....about your question to the tails...I was talking to DrivinMax yesterday and that picture that you show...the tan maxima with the red/clears....those are ACTUALLY a pair that drivinmax did...that is a friend of his' car. So basically that is a picture of a FINISHED product. http://memimage.cardomain.net/member...80_58_full.jpg
05-26-2005, 09:24 AM
#33

Originally Posted by JOMAN
therealgoon9 the pic in yoru sig is photo chopped right?!?!?! cause that would look like a nice maxi!
Youve seen shavedmax right?


http://www.cardomain.com/memberpage/210618/1


 05-26-2005, 01:42 PM
#39
Originally Posted by Dexter
why spend 300 dollars on red/clears when you could buy altrezzas and skyline 'em for less than half of that (w/o skylining it would be about less than 1/3 of that)?
-Dexter.
-Dexter.
