
Front end rebuild


Thread Starter
Senior Member
Joined: Dec 2005
Posts: 299
Front end rebuild
for your edutainment, I'm going to document my front end rebuild.
All started with a squeak from the drivers wheel. not road speed related, not brake related. If you spin the wheel by hand it squeaks. Sounded like rubbing a cork on glass. I'm thinking wheel bearing.
Inspection showed normal wear for 140Kish miles but I gotta believe that bushings like this are affecting the handling of the car.
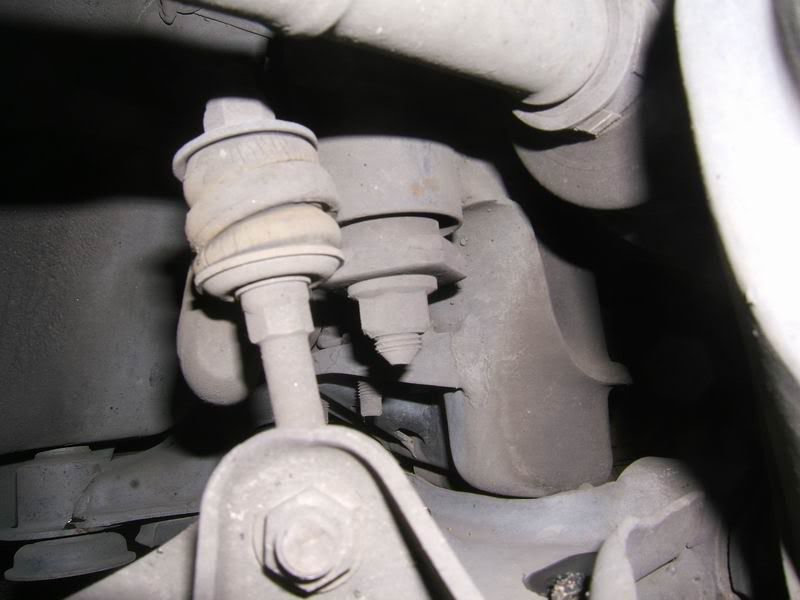
seeing as I'm going in I might as well do the LCAs, sway bar bushings, tie rods.
Then again I got to take the family down south next month so I should also do the hoses, belts.
while I'm at it should check the ground wires cause a lot of folk have problems there.
Aw hell, I'll just go and replace the FSTB because the old one didn't exist.
Wish me luck, I'll send more pics
All started with a squeak from the drivers wheel. not road speed related, not brake related. If you spin the wheel by hand it squeaks. Sounded like rubbing a cork on glass. I'm thinking wheel bearing.
Inspection showed normal wear for 140Kish miles but I gotta believe that bushings like this are affecting the handling of the car.
seeing as I'm going in I might as well do the LCAs, sway bar bushings, tie rods.
Then again I got to take the family down south next month so I should also do the hoses, belts.
while I'm at it should check the ground wires cause a lot of folk have problems there.
Aw hell, I'll just go and replace the FSTB because the old one didn't exist.
Wish me luck, I'll send more pics
Thread Starter
Senior Member
Joined: Dec 2005
Posts: 299
Started off well. Needed a 3ft breaker bar to get the wheel nuts off
http://i63.photobucket.com/albums/h1...breakerbar.jpg
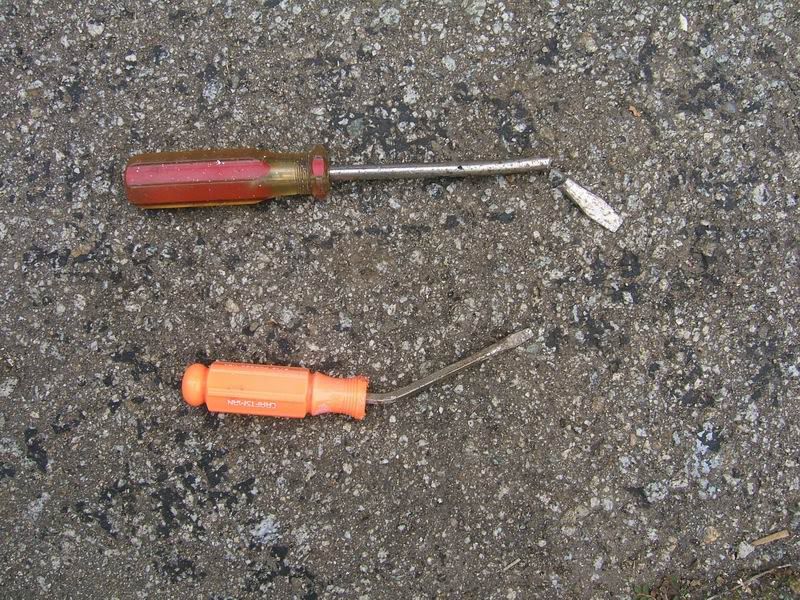
took me a while to find the right sacrificial screwdriver to lock the rotors down as I didn't have an assistant to hold the brakes.
http://i63.photobucket.com/albums/h1...breakerbar.jpg
took me a while to find the right sacrificial screwdriver to lock the rotors down as I didn't have an assistant to hold the brakes.
Thread Starter
Senior Member
Joined: Dec 2005
Posts: 299
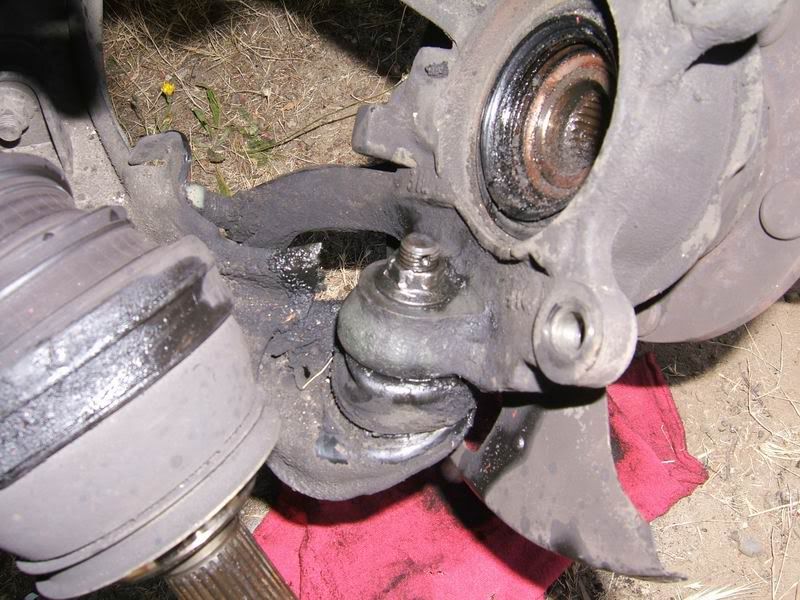
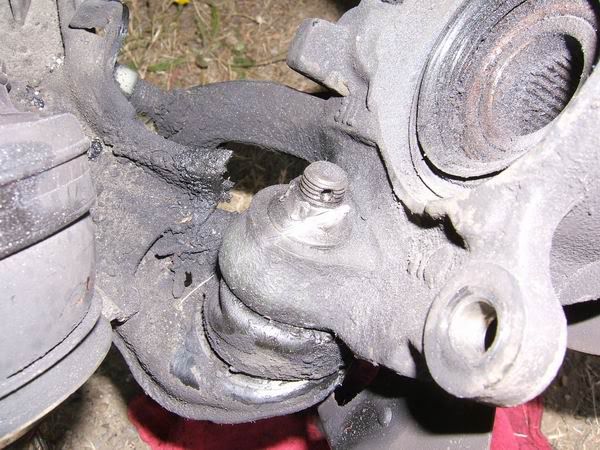
I'm guessing this is how you torque the ball joint nut down when re-assembling
But now I'm stuck. I just rounded off the nut on the ball joint, DOH!
Any ideas? whats the best way to get this nut off? I got a dremel. I'm gonna see what bits I got
But now I'm stuck. I just rounded off the nut on the ball joint, DOH!
Any ideas? whats the best way to get this nut off? I got a dremel. I'm gonna see what bits I got


I would use a dremel or die grinder and use a diagonal cut as deep as you can get it. Then take a cold chisel and a heavy metal hammer (2lb sledge is good) and drive at that cut like you mean it. Once the nut cracks thru it should spin off pretty easily.
Dave
Dave

Thread Starter
Senior Member
Joined: Dec 2005
Posts: 299
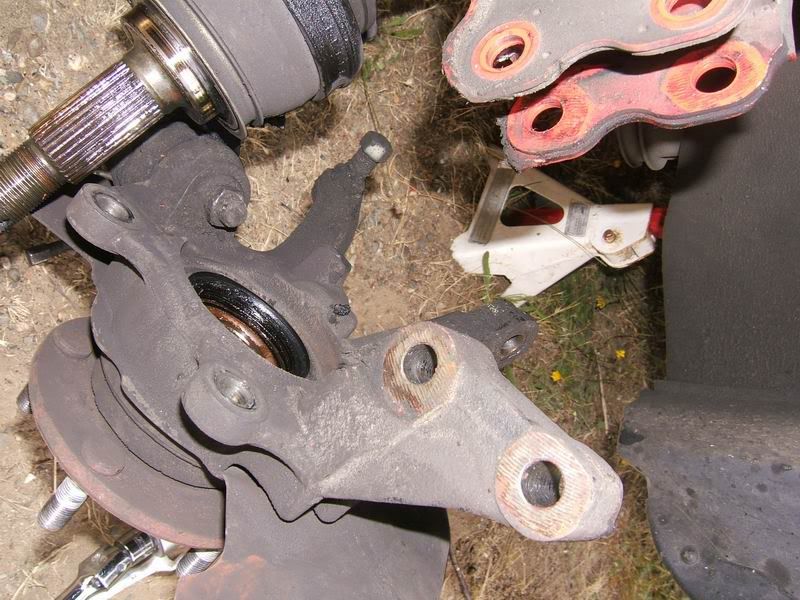
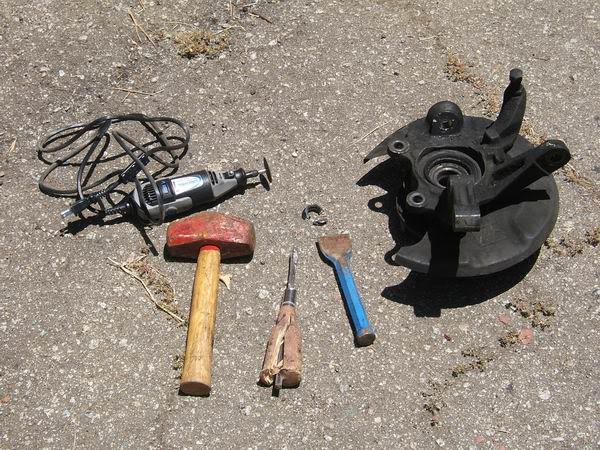
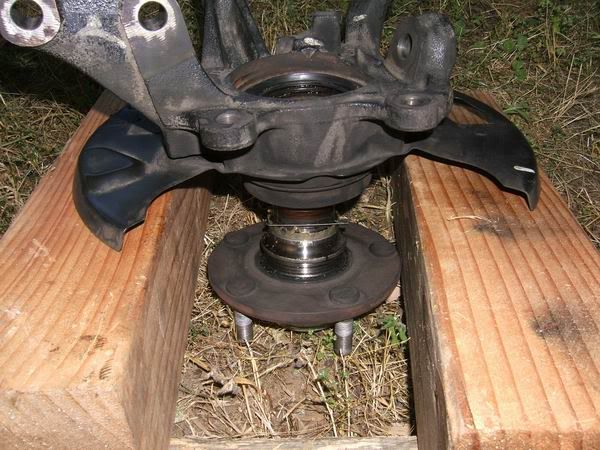
OK, the other knuckle was a breeze.
After cleaning up the knuckles I go to removing the bearings starting with removing the hub from the knuckle. Using Motorvate's method of bolting a 30mm socket onto the hub and banging it out with a hammer. Like he said, 20 taps and it popped out.
But getting the races out proved to be much harder. I fabricated tools as below using a thick 1-1/4" (inner hole size) washer that was the purrfect size and some 3" electrical pipe fittings which also fitted up real nice.
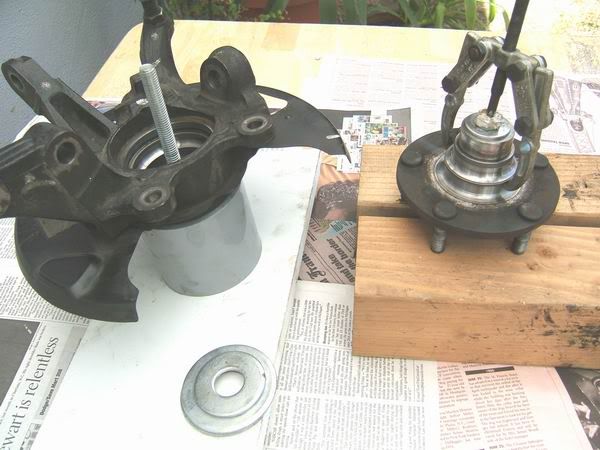
But bolting the thing up as tight as I could the races would just not budge. I think it's because it's not drifting the race exactly on center. It's impossible to get everything dead center and so as soon as you tighten the nut, the whole caboodle skews off to one side and the race digs into the shaft. Just a theory anyway. So I'm stuck.
Unless any of you guys have an idea I think I gotta find a machine shop with a press.
After cleaning up the knuckles I go to removing the bearings starting with removing the hub from the knuckle. Using Motorvate's method of bolting a 30mm socket onto the hub and banging it out with a hammer. Like he said, 20 taps and it popped out.
But getting the races out proved to be much harder. I fabricated tools as below using a thick 1-1/4" (inner hole size) washer that was the purrfect size and some 3" electrical pipe fittings which also fitted up real nice.
But bolting the thing up as tight as I could the races would just not budge. I think it's because it's not drifting the race exactly on center. It's impossible to get everything dead center and so as soon as you tighten the nut, the whole caboodle skews off to one side and the race digs into the shaft. Just a theory anyway. So I'm stuck.
Unless any of you guys have an idea I think I gotta find a machine shop with a press.
Originally Posted by xlr8r
Good luck with this, I need to do this also.
On that picture above, could you take that whole thing to a machine shop and have someone do the work or do you have to take it apart more?
Thread Starter
Senior Member
Joined: Dec 2005
Posts: 299
I found a machine shop that would remove the races and put on the new ones. I'm sure they could do the hub removal as well - that's easy. The guy had gone home already so I didn't get a quote but I'll be off to see him at the crack of dawn tomorrow.
Thread Starter
Senior Member
Joined: Dec 2005
Posts: 299
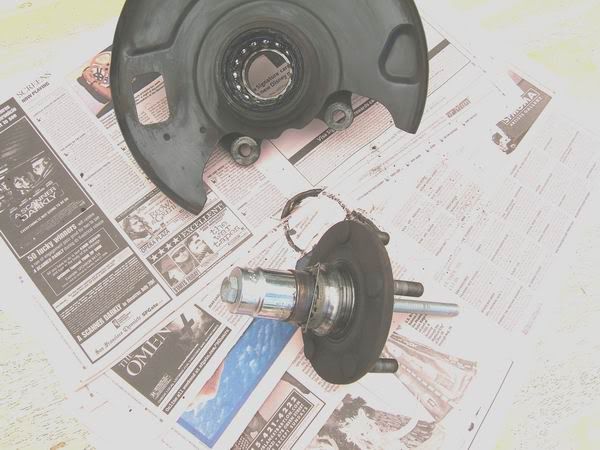
the original problem!
Here's why the drivers wheel was squeaking. The seal had come out of the knuckle and was stuck to the hub. When I pulled the hub out of the drivers side knuckle, the outer seal came with it. Not right!
You can all tell me now that I could have fixed this for $0 and be back on the road by now but I'm still holding out for some handling improvement!

You can all tell me now that I could have fixed this for $0 and be back on the road by now but I'm still holding out for some handling improvement!
Thread Starter
Senior Member
Joined: Dec 2005
Posts: 299
Call me AR but I routinely replace every bit of rubber that comes my way on a job. They're usually cheap (these seals are $10 or so each which is expensive) but it lets me sleep better. I'd hate to have to repeat a job for a lousy seal.
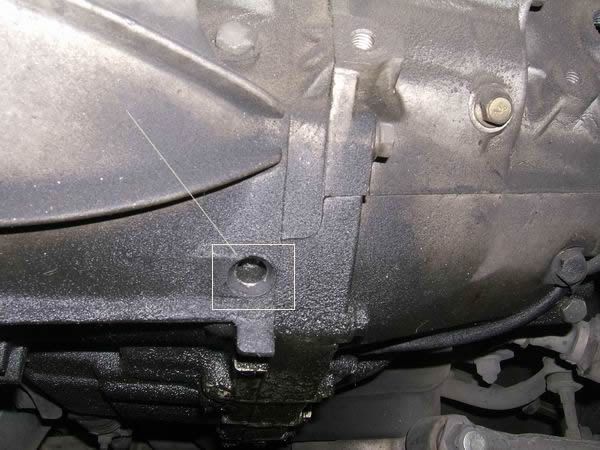

That's a manual tranny. You don't have the drain plug circled. The drain plug proper is a short 12mm bolt that is all the way toward the rear of the tranny and faces the middle of the car. The black shifter support bar partway covers it, so you'll need to use a wrench.
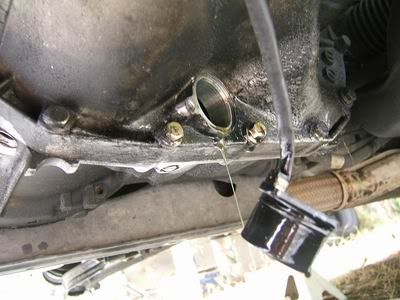
Also worth noting, that if you can't use the drain plug, the second best drain point is the position sensor, which is at the end of the black wire seen in the picture. Just be sure to use at least two thin prying tools (flathead screwdrivers) to pry from both sides, since it tends to be very fragile. And when that sensor pops out, the oil comes rushing out.
Dave
Thread Starter
Senior Member
Joined: Dec 2005
Posts: 299
Yeah the position sensor is the way to go. A 10mm scerw, fast drain and it doesn't spray all over the subframe.
CV's came out with a slight assistance from foot operated prybar. But this is what I saw:
I checked the vertical play in the CV at the tranny before I removed and it was 0.5mm tops - more in-out than up-down. I hope I don't have the tranny bearing shim problem and that new seals will fix this. Any thoughts anyone?
Thread Starter
Senior Member
Joined: Dec 2005
Posts: 299
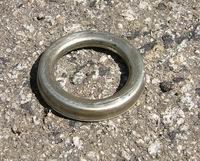
As I was pulling the pass side CV out, this thing fell to the floor. I think it's a cover ring to the tranny seal on the pass side. It seems to fit there so thats where I'll put it unless anyone knows this is wrong?
Sway bar is easy, all 14mms the old bushings looked OK at first but then I saw one was split and the new ones were MUCH tighter! Nice!
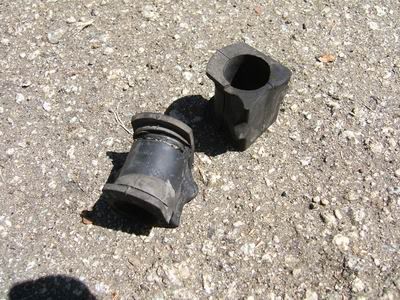
Sway bar is easy, all 14mms the old bushings looked OK at first but then I saw one was split and the new ones were MUCH tighter! Nice!
Thread Starter
Senior Member
Joined: Dec 2005
Posts: 299
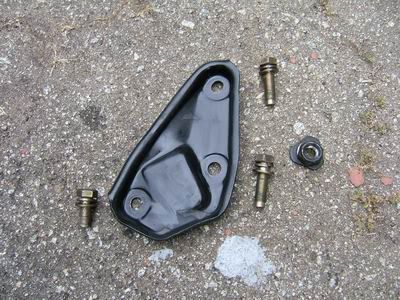
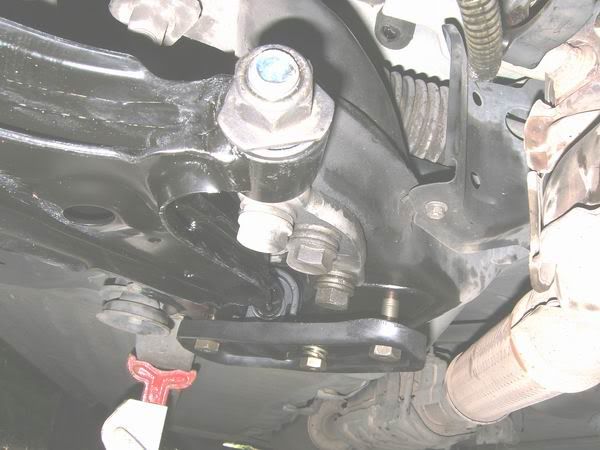
Looking good to complete this job today. LCA's came out easy: 1x 27mm pivot bolt, 3x 22mm rear mount plate. I note that one of the 22mm bolts is shorter than the other. The short one goes on the outside of the vehicle as indicated below:
Thread Starter
Senior Member
Joined: Dec 2005
Posts: 299
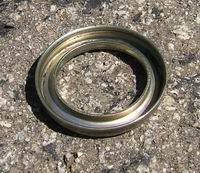
@#*!%*#!^@)!
*** ***** ** **** **. ******** ** **** ****** *****!
Grrr. Well I found out where that mystery part above came from. It's a "dust cover" from the pass side CV. I saw the one no my new CV was bent flat against the shaft due to poor shipping. At the store the only other one they had *also* had a bent ring. Pah!
Then I goes to put the tie rod ends on while wifey does the parts store run for me. The cheap Chinese parts have such crappy threads I can only get them on half way. That would make me drive pigeon-toed and take out the Maypops on the way to the tire shop.
Just goes to show. Always check ALL your parts don't assume if the L's OK then the R is too.
..and buy quality parts!
Thread Starter
Senior Member
Joined: Dec 2005
Posts: 299
I think I see why 2 bolts are longer. So's you can crimp down the bushing evenly by doing a couple of turns on each nut in rotation. Chiltern recommends a particular sequence - any point to that? there's only 3.
BTW, if I do something stupid you will say right?
"like forget to resize the img. oops"
BTW, if I do something stupid you will say right?
"like forget to resize the img. oops"
All the fun of a front end rebuild. I spend a weekend doing pretty much what you were doing. Got stuck with the ball joint nut but fortunately I was replaling everything so I pulled it all off and tosed in the garbage can.
An obvious statement but dont forget to use some anti-seize incase you have to take everything apart later, it makes it much easier.
there is no specific sequence for the bolts just tighten them down and tq them with the suspension loaded (Jack stand under control arm works best).
the short bolt should be closes to the front of the car.
An obvious statement but dont forget to use some anti-seize incase you have to take everything apart later, it makes it much easier.
Originally Posted by xlr8r
I think I see why 2 bolts are longer. So's you can crimp down the bushing evenly by doing a couple of turns on each nut in rotation. Chiltern recommends a particular sequence - any point to that? there's only 3.
BTW, if I do something stupid you will say right?
"like forget to resize the img. oops"
BTW, if I do something stupid you will say right?
"like forget to resize the img. oops"
there is no specific sequence for the bolts just tighten them down and tq them with the suspension loaded (Jack stand under control arm works best).
the short bolt should be closes to the front of the car.
Thread Starter
Senior Member
Joined: Dec 2005
Posts: 299
Well she's back on her own 4 tires with everything replaced except the steering tie rods. I'll have to get them one evening this week but the parts store can't get them til wednesday. I'll be talking to the internet place I got these parts tomorrow but I guess I got what I paid for.
One thought. When I was torquing up the LCA pivots, I ended up with a different bias left vs right, i.e. before I bolted the knuckles on, looking from in front of the car, the left LCA was at 8 o'clock and the right LCA was at 5 o'clock. Obviously it all cancels out when the wheels hit the deck but does this present any substantial preload in cornering?
One thought. When I was torquing up the LCA pivots, I ended up with a different bias left vs right, i.e. before I bolted the knuckles on, looking from in front of the car, the left LCA was at 8 o'clock and the right LCA was at 5 o'clock. Obviously it all cancels out when the wheels hit the deck but does this present any substantial preload in cornering?
Thread Starter
Senior Member
Joined: Dec 2005
Posts: 299
I read a thread that told how some guy got his 300lb mate to pound them out. Took 1/2hr with a club hammer.
That convinced me the extra $25 for a complete LCA assembly was a steal.
Anyway, just did a test drive. She moves, turns and stops. Halleluia!!!!
Off for new tires and an alignment. I'll tot up the final damage tonight.
Thanks for the support guys!
That convinced me the extra $25 for a complete LCA assembly was a steal.
Anyway, just did a test drive. She moves, turns and stops. Halleluia!!!!
Off for new tires and an alignment. I'll tot up the final damage tonight.
Thanks for the support guys!
Thread Starter
Senior Member
Joined: Dec 2005
Posts: 299
That last job had a sting in the tail. $95 for an alignment - jeez. When you consider that all they do is adjust the toe-in, thats $50 a nut. Sheet, I'm in the wrong business. But think how much I saved. OK it took me probably close to 20hrs coz I'm a slow poke and keep checking everything so I'm guessing a pro would charge $1000 at least (more based on the alignment) Then don't forget the mark-up on parts so I probably saved about $2000 doing this myself. Here's the final parts list:
Wheel bearing install 95
Idler pulley assy 40
Acc & ps belts 25
Hood gas supports 50
FSTB 50
Thermostat 30
Radiator hoses, top & bottom 35
4 qts anti freeze 12
Oil filter 7
4 qts engine oil 12
5 qts GL-4 gear oil 29
1 transmission oil seal 16
4 bearing oil seals 40
Sway bar linkage 30
Sway bar bushings 8
2 CV drive axles 175
2 wheel bearings 60
2 Lower control Arms 115
4 Yoko Avid HS4 mounted 500
Wheel alignment 95
Grand total: $1425
Was it worth it HOT DAMN YES!!!!
The car feels like the car I originally got. Super stable and flat in the curves. You get into a turn and you can just keep piling it on and the hood stays flat with the horizon. Very nice indeed.
Gear changes are much smoother. I really think that split sway bar bushing was causing a lot of problems but you just don't notice them gradually decaying.
At speed on the freeway she was smooth and wanted to go much faster than I was prepared to at the time, what with all the tourists and cops around here right now.
Just one minor thing. When I hit the gas hard in second as it hits the power band it feels like the wheels are bouncing on the road a little, almost like the tires need balancing (they shouldn't) I turned up my shocks from 2-4 and it seemed to get better a bit. I'll have to re-tune the shocks now but it kinda makes sense. There should be quite a lot of extra damping now all those rubbers are tight. Anyone come across this before?

Thread Starter
Senior Member
Joined: Dec 2005
Posts: 299
Nope. You can see the pic in thread#3 that it all just comes apart like one of those lindt chocolate oranges.
You only need to remove the boot if you're replacing it.
While I'm bumping this thread, anyone experienced a rapid wheel bounce in 2nd with hard gas? Is it my adjustible shocks setting? Or did I assemble something wrong?
Happy 4th guys!
You only need to remove the boot if you're replacing it.
While I'm bumping this thread, anyone experienced a rapid wheel bounce in 2nd with hard gas? Is it my adjustible shocks setting? Or did I assemble something wrong?
Happy 4th guys!
Some ideas-
http://forums.maxima.org/showthread.php?t=304099
http://forums.maxima.org/showthread....ight=wheel+hop
Here is thread where I filled my mounts, but not because of wheel hop. I get very little wheel hop now even with worn struts.
http://forums.maxima.org/showthread....ighlight=jerks
I kind of wish I had my old mounts back because my car seems a little too touchy now, it's very difficult to get a smooth shift without making someones head bob a little.
Thread Starter
Senior Member
Joined: Dec 2005
Posts: 299
Yeah I was afraid of that. I suspected my mounts were shot from the get go. And why not, if every other piece of rubber is deteriorating why not the mounts.
It makes sense. The wheels aren't spinning - I'm just hitting the power band with 75%+ throttle and the back torque is rotating the engine. Hence, adjusting the shocks will change the damping and shift the resonance to a different bounce rate. Everything was so soggy before it just sucked all the whiplash up.
My shocks are only about 3yrs old (35Kmiles?!? - odo went out at 95K) so should have some life left unless they had the cr@p beaten out of them from the worn bushings.
Hmmm, maybe I'm only half done. Dang!
Have you tried adjusting your rear shocks, assuming they are all adjustable. That might help keep your weight from shifting to the back so quickly.
Your tires may need to wear a little since they are brand new.
Your tires may need to wear a little since they are brand new.
Thread Starter
Senior Member
Joined: Dec 2005
Posts: 299
well 400miles on this job and everything is settling in nice except this steering vibration at 2500rpm which is most noticeable in low gears. I also hear a the exhaust noise get louder right at 2500rpm in any gear.
Could a slight blow in the exhaust cause the engine to vibrate specifically at 2500rpm? I'm only feeling it in the steering and every other rpm is OK.
Or is it my engine mounts?
I think I'm going to swap the mounts out one at a time starting with the easy one in the front.
Any suggestions would be most appreciated.

Thread
Thread Starter
Forum
Replies
Last Post
6spd4dsc
5th Generation Classifieds (2000-2003)
4
Mar 4, 2016 05:19 PM