
my five dollar license plate light bracket


my five dollar license plate light bracket
OK, so my license plate bracket was nothing more than a handful of rusted metal, no actually it was nonexistent, with just the two lamps hanging from the pigtail. So I decide to post a WTB in the for sale section and nothing, no response. As I didn’t want to pay 40 bucks plus shipping for new and with no response to my WTB posting, I decided to make my own. If you want to give it a go, here are the steps I took.
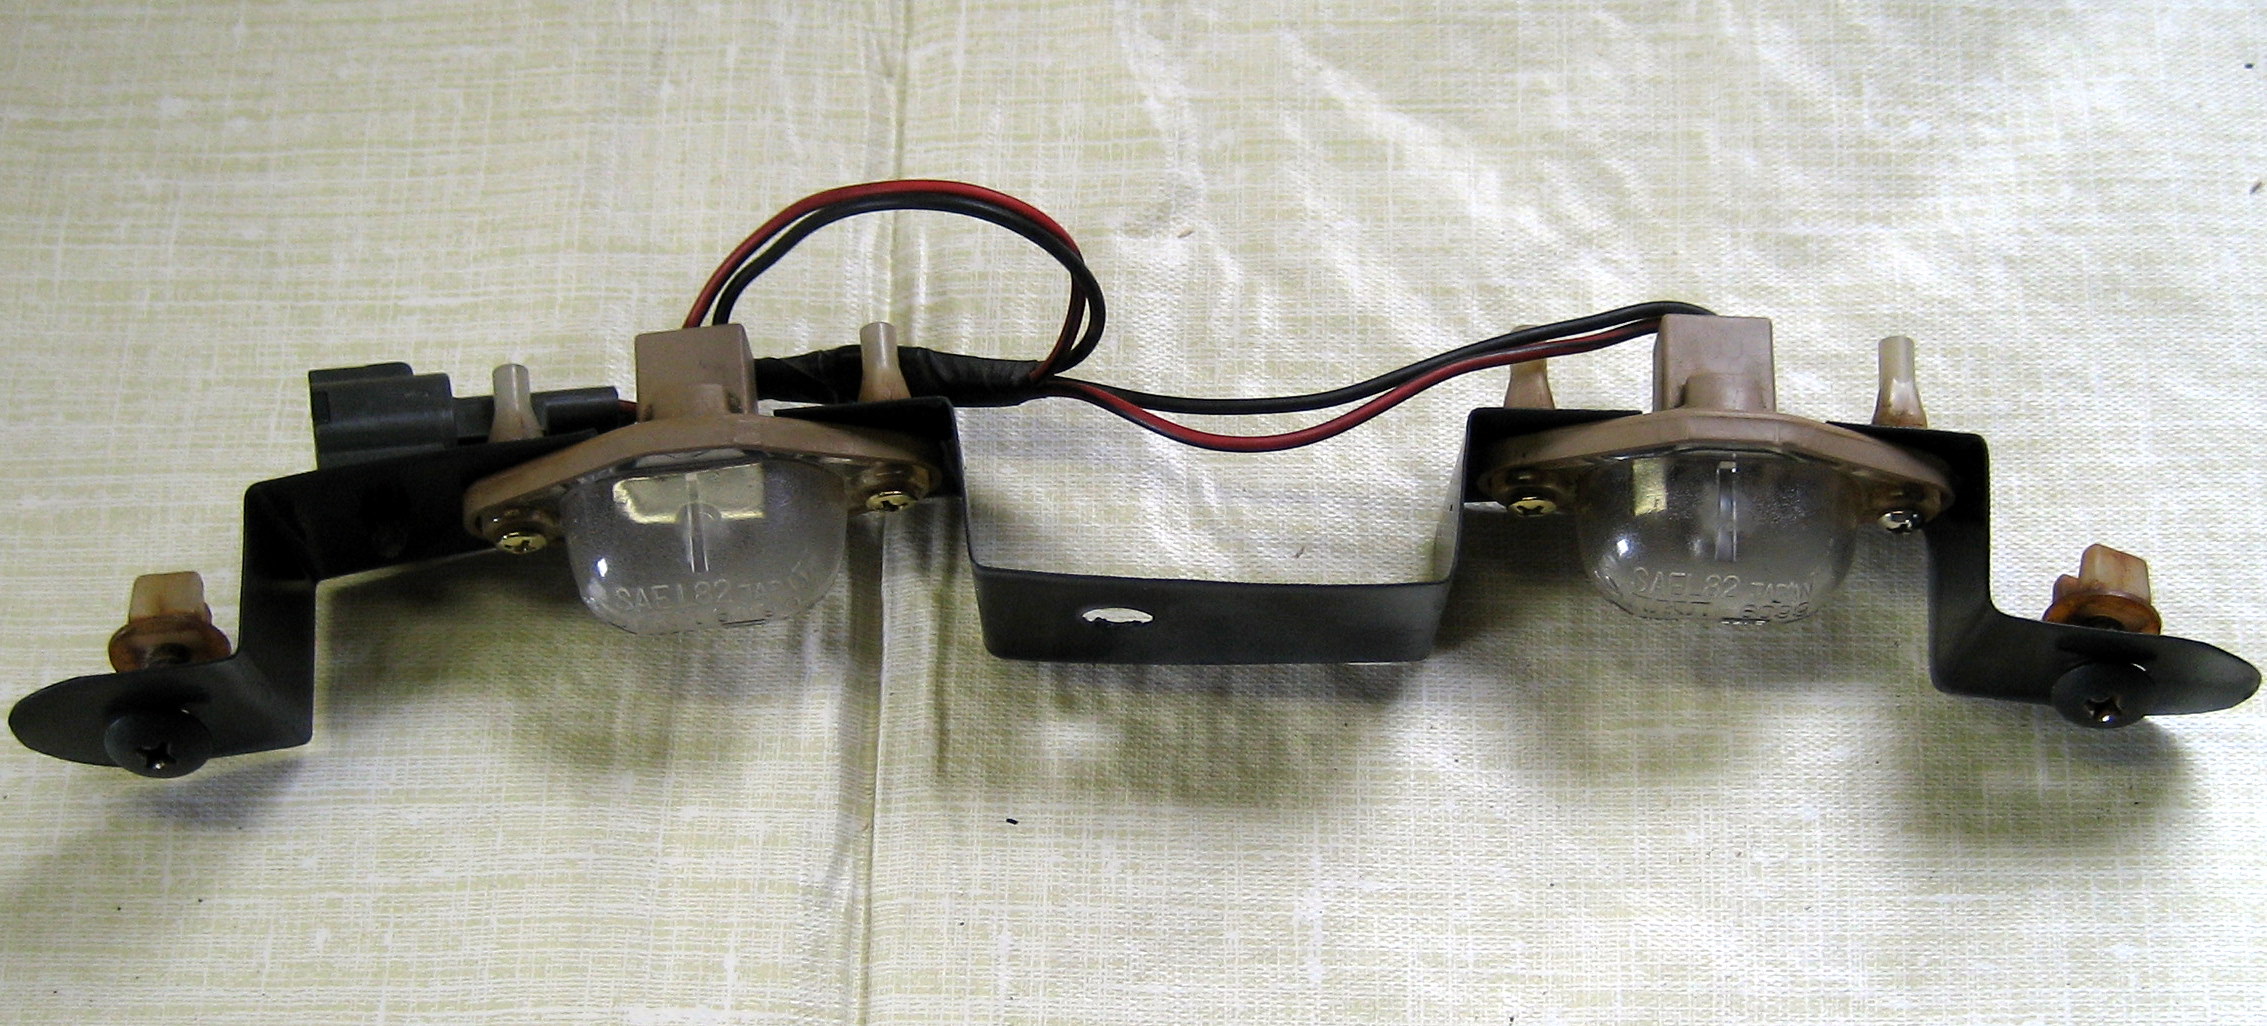
First take out your old bracket or in my case where there was no bracket left so I just unplugged the wiring harness the two lights are on. You will notice the bracket is held in place in three points, left/right and center. The left and right side are screws that are held in place by plastic anchors above the bumper cover, the center is a button type fastener that has expanding tabs so you just pull down on it to release it. Again, save everything to reuse. The light units are held to the bracket by two screws on each unit, total of four, each with yet another plastic anchor. SAVE EVERYTHING.
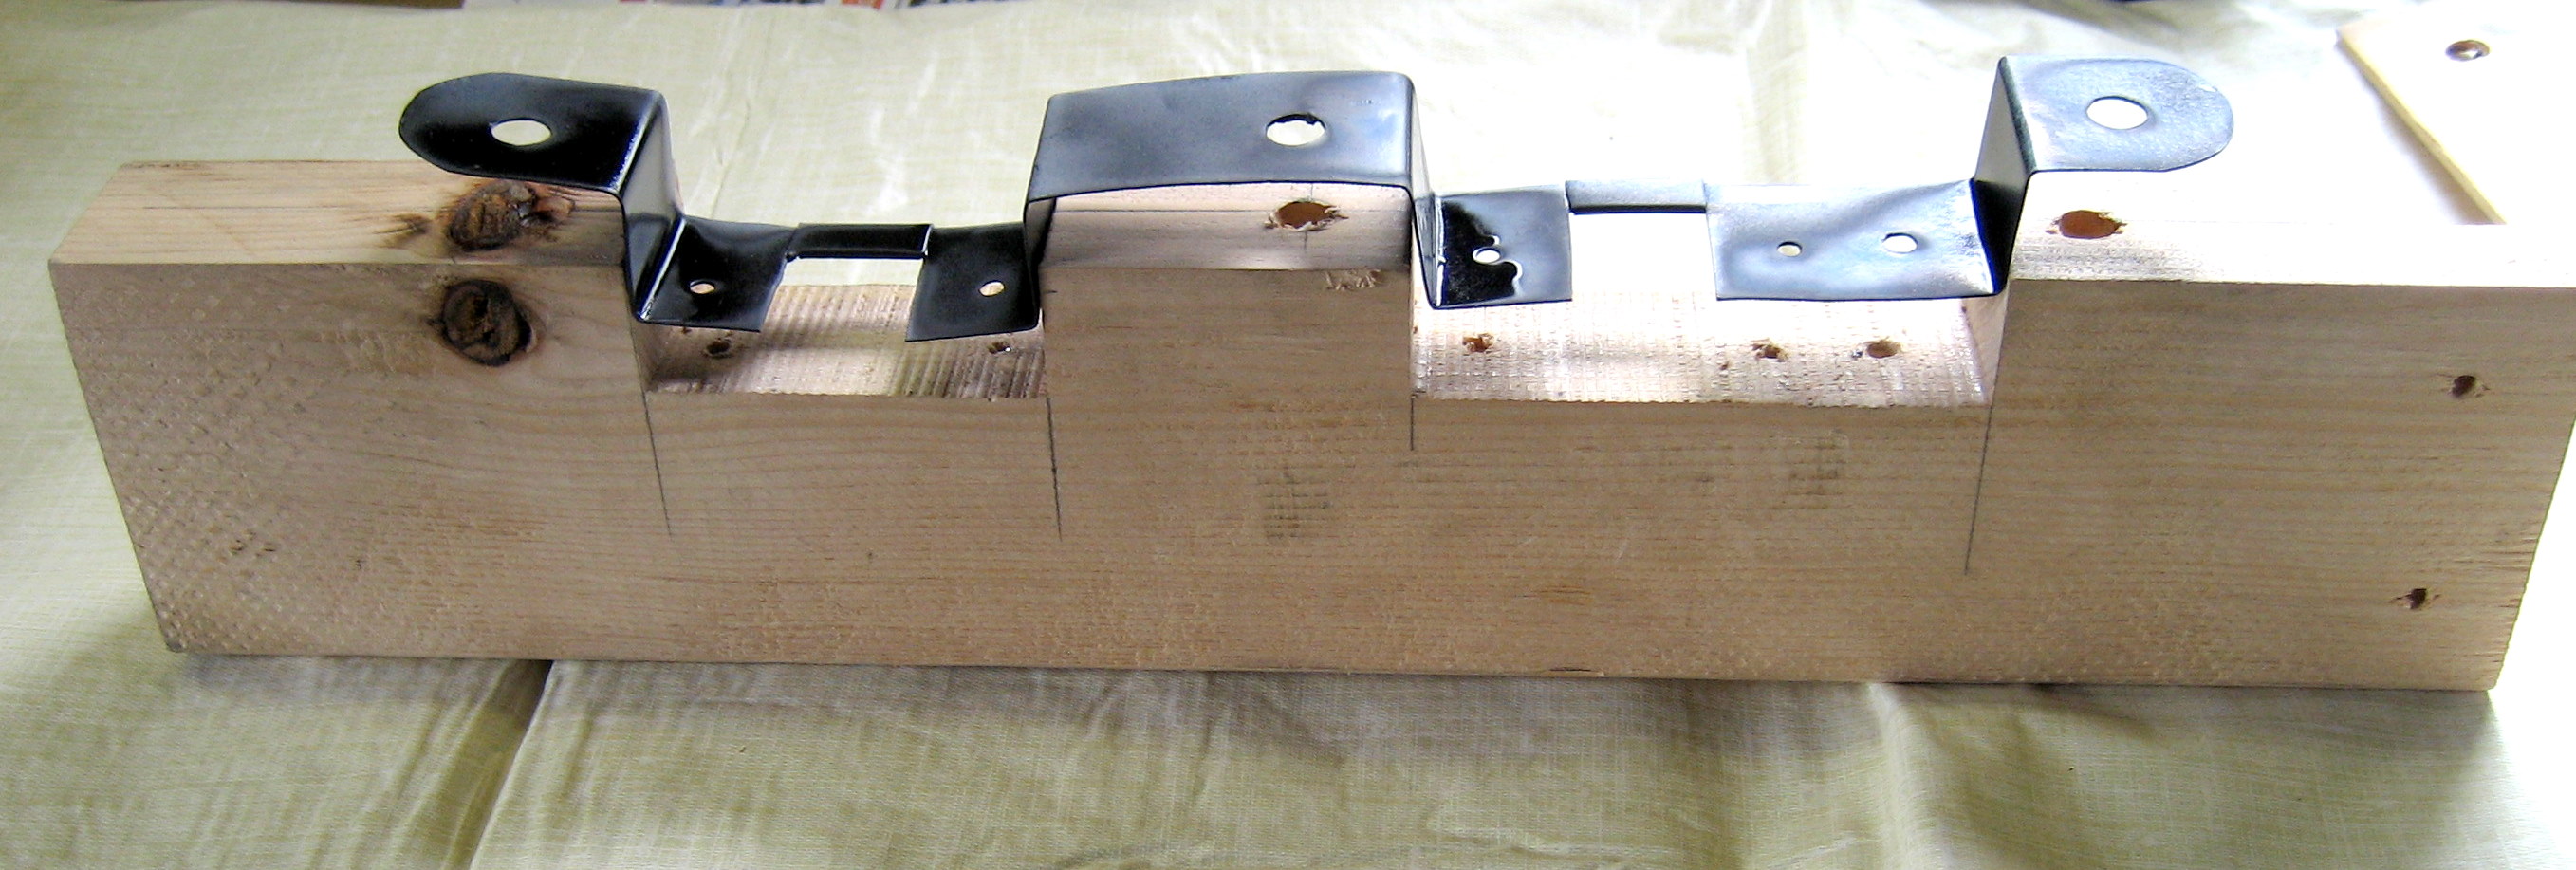
Now my process; I knew it was fastened at three points so the critical dimensions of the bracket were the mounting points. I took a paint stir stick, held it above the bumper cover and traced the three mounting holes. With that, I took some measurements off the light units themselves and started to create drawings. What was also helpful was studying pictures of the actual bracket I got from various locations. I realized the bends in the metal all seem like 90 degree bends, so I created a form out of a 2 x 4 with each of the critical dimensions notched out. The hardest part was making the cutout for the light unit to fit into the bracket. Looking at the OEM part, they created a rounded cutout, not having 7/8th inch drill bit; I just created a notch in the bracket. I was worried about cutting too much material away but once you attach the lights, it strengthens that section.
Anyhow, I have attached some pictures to help visualize my process. The first is a shot of the OEM bracket that gave me the overall shape, the paint stick used to establish the mounting points, the 2 x 4 with the notches I used to form the bracket and then the completed unit. The sheet metal I used was from Home Depot, their SKU is 475998 (Crown Bolt 12 in. x 18 in. 26-Gauge Sheet Metal Zinc Plated-$4.97).
First take out your old bracket or in my case where there was no bracket left so I just unplugged the wiring harness the two lights are on. You will notice the bracket is held in place in three points, left/right and center. The left and right side are screws that are held in place by plastic anchors above the bumper cover, the center is a button type fastener that has expanding tabs so you just pull down on it to release it. Again, save everything to reuse. The light units are held to the bracket by two screws on each unit, total of four, each with yet another plastic anchor. SAVE EVERYTHING.
Now my process; I knew it was fastened at three points so the critical dimensions of the bracket were the mounting points. I took a paint stir stick, held it above the bumper cover and traced the three mounting holes. With that, I took some measurements off the light units themselves and started to create drawings. What was also helpful was studying pictures of the actual bracket I got from various locations. I realized the bends in the metal all seem like 90 degree bends, so I created a form out of a 2 x 4 with each of the critical dimensions notched out. The hardest part was making the cutout for the light unit to fit into the bracket. Looking at the OEM part, they created a rounded cutout, not having 7/8th inch drill bit; I just created a notch in the bracket. I was worried about cutting too much material away but once you attach the lights, it strengthens that section.
Anyhow, I have attached some pictures to help visualize my process. The first is a shot of the OEM bracket that gave me the overall shape, the paint stick used to establish the mounting points, the 2 x 4 with the notches I used to form the bracket and then the completed unit. The sheet metal I used was from Home Depot, their SKU is 475998 (Crown Bolt 12 in. x 18 in. 26-Gauge Sheet Metal Zinc Plated-$4.97).
Last edited by I30TinME; Sep 17, 2011 at 09:45 AM. Reason: delete bad image links


OK, so I try to insert an image on the OP, too small. So I give it another go, still small. So don't dump on me for not trying. Dump on the forum for making so damn hard to include a picture! You want full size images, shoot me a PM with your email address and I will be happy to send them along as an attachment.


Newbie - Just Registered
Joined: Jul 2006
Posts: 1
Great work
You did a really good job. I just had to deal with the same thing to pass inspection. Not only the bracket but the screws were rusted so after a lot of twisting and crushing with pliers, I did not have much to attach even if I had the original bracket (or yours). Three zip ties strategically looped were enough to get me my sticker, but I'll definitely check out your idea later on.
gk0akaiser, as I mentioned, mine was non-existent, all I pulled out were the two lights and the harness. Then I realized all the mounting hardware was still attached to the bumper cover. The left/right mount were screws that were held in place by plastic anchors above the bumper cover, so I was able to get those out and reuse both the plastic anchors and the screws. The center is just a plastic clip which should have just popped out, but as usual, I broke that one. Then the lights themselves are held to the bracket by two screws, again with plastic anchors. I was able to separate the screws from the anchors, but the screws were rusted badly, so I replaced them with brass ones. but was able to reuse the anchors. With all of that, I like your idea of zip ties, quick and easy and got you the inspection.

I find it ridiculous that the dealer wants $43 for the bracket alone which I recently bought. The first time I bought it for the same price, I must have been lucky because I got the whole assembly with lights and harness.

OK, how about this. I made up another bracket to see how long it really took me. So about an hour of my time plus parts/paint. Would anyone be interested in the bracket shipped for 20 bucks? I really would rather just show someone how to build one, but if not, I guess I could do it for you. Any interest? Again, the gauge of the material would be thinner than original, but the lights do strengthen the bracket. Let me know if there is any interest.


Junior Member
Joined: Aug 2011
Posts: 46
I wanted to put LED on the license plate lights and noticed the lights don't even work, and the bracket is completely rusted and has broken apart when I was messing with the lights. I need to either make a new bracket or buy one. I'm thinking of just somehow attaching the lights on the plastic either by screwing it in or some other means. Anyways, can you post a video of pictures of how to make it with the proper dimensions.
Guys, I'm still around but the car isn't, so no "live" video. Now I have attached a diagram of the spacing for the various bends (sorry for the rudimentary sketch). Overall length is 12" and the width is 1.25". You will note the two folds that hold the lights are not the same width as the longer one has an extra hole for the clip that holds the pigtail. Other than that, the holes that attach the bracket to the bumper cover are 10.25 inches apart with the middle hole just that, in the middle. The spacing for the holes that attach the light units to the bracket are 2" apart. Just study the various pictures in this thread and you can figure it out. Again, the attached will give you the basics of the bracket. Let me know if I can answer any other questions. Oh, I will be without email for a few days, so the reply might take a while.
Here's the sketch: https://i.imgur.com/27akW.jpg
Here's the sketch: https://i.imgur.com/27akW.jpg

Thanks for the tips on designing the license plate light bracket. 
I removed my rear bumper for painting today and that rusted bracket crumbled to pieces. I used leftover 16 gauge galvanized sheet metal that I used on my quarters to make this bracket. When I install the bracket on the bumper I'll use nylon nuts & bolts to avoid rust. I installed black nylon nuts & bolts 5 years ago to hold my license plate and they haven't loosened.
I removed my rear bumper for painting today and that rusted bracket crumbled to pieces. I used leftover 16 gauge galvanized sheet metal that I used on my quarters to make this bracket. When I install the bracket on the bumper I'll use nylon nuts & bolts to avoid rust. I installed black nylon nuts & bolts 5 years ago to hold my license plate and they haven't loosened.

Member
Joined: Dec 2013
Posts: 290
OK, how about this. I made up another bracket to see how long it really took me. So about an hour of my time plus parts/paint. Would anyone be interested in the bracket shipped for 20 bucks? I really would rather just show mosomeone how to build one, but if not, I guess I could do it for you. Any interest? Again, the gauge of the material would be thinner than original, but the lights do strengthen the bracket. Let me know if there is any interest.


Member
Joined: Dec 2013
Posts: 290
Thanks very much man! I'm going to start this project next week if I have time. But I may just buy one if I fail or if I just can't find the time. If this wasn't your idea I would buy one to use as a template, make a bunch, then sell them locally and here on the org. As I really could use the small amount of extra money. But I'm not the type of person to steal ideas to make profit, ( I don't cut others grass).
6cyl-97maxima, if you want to make some brackets to sell, go for it. Really, at 20 bucks, it barely covers supplies (metal, paint (I prime and top coat), then packing and shipping. I just did it to help folks out who might not have the time or the means to make their own, which is the reason I posted all of my information.
Again, give it a try and if it doesn't work out, give me shout. Or if you have any questions, let me know. And jholley's idea of using nylon nuts & bolts to avoid rust, is a great idea.
Lastly, if you want to check out my for sale post (http://forums.maxima.org/4th-generat...t-bracket.html), it might give you some further detail.
Enjoy.
Member
Joined: Dec 2013
Posts: 290
6cyl-97maxima, if you want to make some brackets to sell, go for it. Really, at 20 bucks, it barely covers supplies (metal, paint (I prime and uutop coat), then packing and shipping. I just did it to help folks out who might not have the time or the means to make their own, which is the reason I posted all of my information.
Again, give it a try and if it doesn't work out, give me shout. Or if you have any questions, let me know. And jholley's idea of using nylon nuts & bolts to avoid rust, is a great idea.
Lastly, if you want to check out my for sale post (http://forums.maxima.org/4th-generat...t-bracket.html), it might give you some further detail.
Enjoy.
 my psychologist says I need a hoby to keep my anixitey at bay. So I figured this would be a good place to start.
Last edited by 6cyl-97maxima; Feb 5, 2014 at 06:42 AM.
That was the exact reason I started selling them, I had quite a few folks who didn't have the time or tools to make them, so I thought I would give back to the forum members and sell them at cost. Again, I have tried to post all of the basic info needed to create one, but if you have further questions, give me a shout. And as you say, it's better therapy then a shrink and a whole lot less expensive.

Make a request in this thread.
https://maxima.org/forums/4th-genera...t-bracket.html
I30TinME may still have some in stock?
https://maxima.org/forums/4th-genera...t-bracket.html
I30TinME may still have some in stock?

Thread
Thread Starter
Forum
Replies
Last Post
Dennis Twohy
1st & 2nd Generation Maxima (1981-1984 and 1985-1988)
0
Oct 1, 2015 06:01 PM
Maxima30
5th Generation Maxima (2000-2003)
2
Sep 7, 2015 06:13 PM