
How difficult is to to replace the A/C evaporator core?


How difficult is to to replace the A/C evaporator core?
I've never really done much work on A/C systems other than an occasional recharge or refrigerant. I found out a long while back that my evaporator core was leaking but I didn't have it repaired due to the high cost and the fact that I rarely ever drove the car at that time.
Now summer is approaching in the Deep South and I will probably be driving my Maxima much more. How difficult a job is it to replace this unit (for someone reasonably automotively mechanically inclined)? It is OK to replace it with a cheap aftermarket part (or a used one from a salvage yard) or is this one of the things where it's advisable to buy a more expensive OEM part? Are there any other parts that I should go ahead and replace while changing out this part?
Thanks in advance for any help.
I pull mine out every year and clean the coil, since theres no in-cabin filter. Its not hard to do. You'll want to have the AC system evacuated of the refrigerant first. (If theres any left)
Disconnect the refrigerant lines under the hood at the firewall. You'll need 2 wrenches for each fitting.
Remove the glovebox. Theres a plastic part of the dash with a metal cover that the lower portion of the glovebox mounts too. You may have to cut the plastic. You'll see what I mean when you see it. Make sure you dont cut the mounting holes.
You'll see the fan resistor is mounted to the evaporator box. Unplug it and remove the resistor.
Theres 4 10mm bolts that hold the evaporator box to the ventilation/duct system. Remove those.
Then pull the box out and down so you dont bend the lines too bad.
Thats it. Its out.
Now to get to the coil itself theres several phillips screws holding it together, some of which are covered by the wether stripping. Remove all those and you have the coil and expansion valve.
When you get the new coil, make sure you get one for your specific year Maxima since Nissan changed the fitting sizes a few times. As far as the expansion valve...yes you should replace that too. Get an OEM one or a Four Seasons brand. Stay away from the Murray brand as they dont fit that well.

Here are two videos giving very detailed instructions on what was just said from one of our fellow members, pmohr
http://www.youtube.com/watch?v=VuJASXZU1kQ&lr=1
http://www.youtube.com/watch?v=Fd4F4...bLF9BUDy4ZpGE=
he actually has some very well done how to videos on all that is 4th gen maxima
http://www.youtube.com/watch?v=VuJASXZU1kQ&lr=1
http://www.youtube.com/watch?v=Fd4F4...bLF9BUDy4ZpGE=
he actually has some very well done how to videos on all that is 4th gen maxima
That was great, thank you. The video showed that it seems much easier than it sounds. I don't think it will be a problem at all.
Thanks to pmohr for the video too, I don't know how I missed it when I was searching.
Thanks to pmohr for the video too, I don't know how I missed it when I was searching.
Here are two videos giving very detailed instructions on what was just said from one of our fellow members, pmohr
http://www.youtube.com/watch?v=VuJASXZU1kQ&lr=1
http://www.youtube.com/watch?v=Fd4F4...bLF9BUDy4ZpGE=
he actually has some very well done how to videos on all that is 4th gen maxima
http://www.youtube.com/watch?v=VuJASXZU1kQ&lr=1
http://www.youtube.com/watch?v=Fd4F4...bLF9BUDy4ZpGE=
he actually has some very well done how to videos on all that is 4th gen maxima
Because the parts are inexpensive and I'm going to have to open the system I went ahead and ordered the receiver drier/accumulator, O-rings, valve core and cap kit, and an inline filter. I figured if I were going to do this on a car this old, I might as well do it right and do it once.
I have a manifold gauge set but not a vacuum pump. I can buy one like this becasue it's cheap.

http://www.harborfreight.com/air-vac...ors-96677.html
or rent one of these:

http://www.oreillyauto.com/site/c/de...0984&ppt=C0192
Does it make any difference?
Also, will pulling a vacuum on the system to evacuate all the air and moisture also pull out all of the old oil? How will I know if it is all removed so as to know how much to put back in? And finally, does it make any difference at all as far as system performance or longevity what brand of refrigerant I refill it with or are all R134a basically the same? Thanks.
I have a manifold gauge set but not a vacuum pump. I can buy one like this becasue it's cheap.
http://www.harborfreight.com/air-vac...ors-96677.html
or rent one of these:
http://www.oreillyauto.com/site/c/de...0984&ppt=C0192
Does it make any difference?
Also, will pulling a vacuum on the system to evacuate all the air and moisture also pull out all of the old oil? How will I know if it is all removed so as to know how much to put back in? And finally, does it make any difference at all as far as system performance or longevity what brand of refrigerant I refill it with or are all R134a basically the same? Thanks.
Either of those vacuum pumps will work. I use one similar to the second pic you posted, because I do HVAC for a living and I also use it at work.
It'll pull out most of the oil but not all of it unless you flush the system prior to pulling a vacuum. Not really necessary to do unless the system was contaminated with something other than refrigerant, refrigerant oil, or that nasty UV leak detection dye.
As far as new refrigerant and oil...you can get new oil (which usually only gets added if youre replacing the compressor) OR, most cans of refrigerant come with the required type of oil already added in them.
Also when youre evacuating the system you'll want to make sure everything is sealed up nice and tight and pull a vacuum for about an hour. It wont matter if it goes longer, you cant pull too much of a vacuum.
So I received the rest of my parts today. Which raise a couple more questions in my mind to make sure I'm doing everything right so I'll only have to do this once.
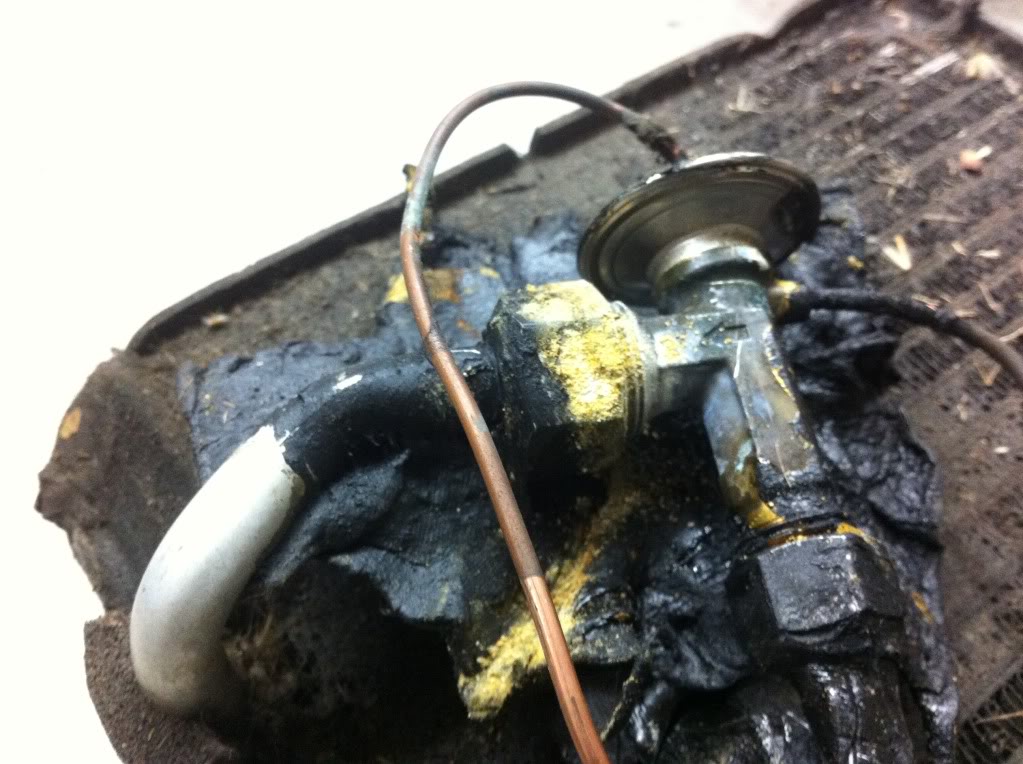
The tar like goop that I cut off that the OEM expansion valve is encased in - do I need to wrap up the replacement in a similar fashion? Since I cut it off in one piece is it OK to reuse the same piece I removed and just tape it on tightly with duct tape or electrical tape? I'm not sure what it is but it has the consistency of butyl sound dampener, it seems like it's insulation perhaps. Is there a specific product that I should use if it needs to be replaced?
In the photos you can see a there is a yellowish gold dust-like residue at the union of the low pressure line and the expansion valve. Is that where it was leaking from?
Yes you can reuse the insulation for the expansion valve. Just wrap some electrical tape around it if it isnt sticky enough. If It needs to be replaced you can use some thin weather stripping. Main thing is the bulb needs to be at an approximate 2 o'clock position on the suction line.
Now as for the yellow build-up...looks like thats where you might have had the leak. The new expansion valve should fix that. Make sure you tighten it good and snug.
Also, that coil is nasty. Tape off any openings in the lines and wash it off with a hose. Ive used Lysol cleaner with bleach to disinfect the coil and then rinsed that off too.
Lastly, be careful with the capillary tube. Its very fragile.
Thanks, I appreciate it.
I'm using all new parts, not reusing the OEM evaporator coil. I reused the insulation and plenty of duct tape to keep it in place. I don't know what the bulb is that you're talking about. The valve can only be installed in one position. The suction line is angled from the bottom of the coil pointing toward about the 2 o'clock position. The "top" of the expansion valve (the hat with one of the copper line coming out the middle that ends in the capillary tube) is pointed toward about 10 and the other copper line comes off at about 1.
I'm using all new parts, not reusing the OEM evaporator coil. I reused the insulation and plenty of duct tape to keep it in place. I don't know what the bulb is that you're talking about. The valve can only be installed in one position. The suction line is angled from the bottom of the coil pointing toward about the 2 o'clock position. The "top" of the expansion valve (the hat with one of the copper line coming out the middle that ends in the capillary tube) is pointed toward about 10 and the other copper line comes off at about 1.
Well it turns out the new evaporator core I bought (Four Seasons) was a POS. The thread on one of the fittings wouldn't accept the OEM hose. I took it to a machine shop and had him chase it with a die but still no luck. It's weird because it looked perfect and the die went right on but it wouldn't mate up with my hose fitting on the car. Anyway I cleaned up the OEM evaporator core really good and it looks to be fine (we'll see soon). I think the leak was an O ring between the evaporator and the expansion valve. I ended up replacing all the O rings and put in a new expansion valve.
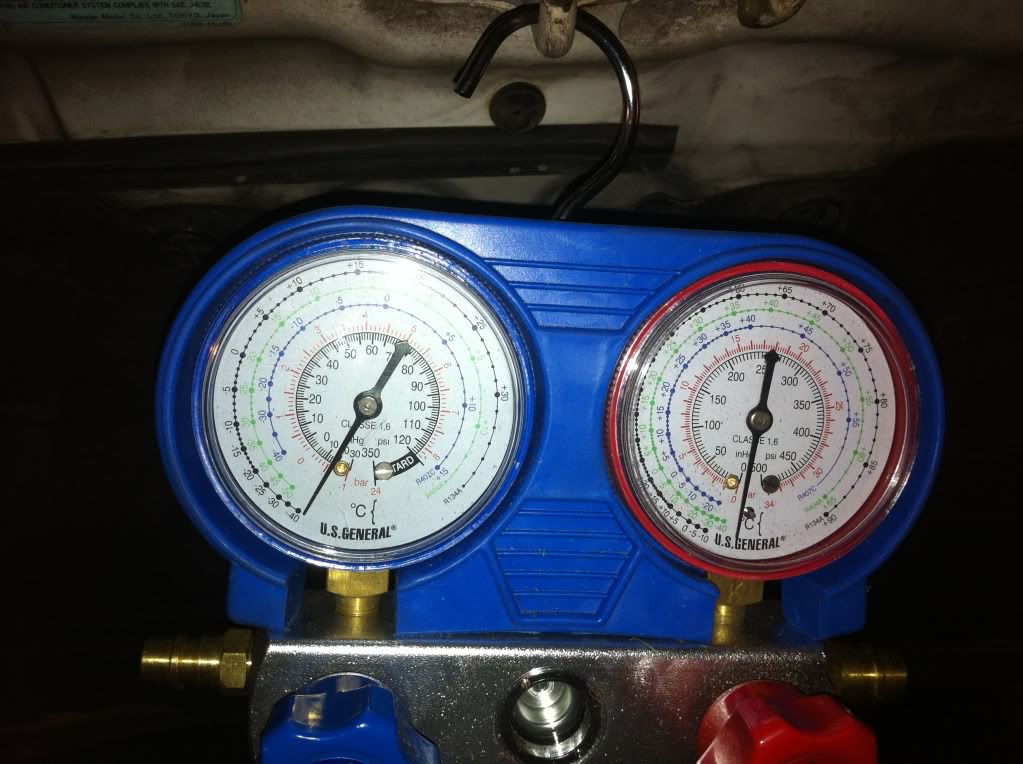
I pulled a vacuum for about 30 or 40 minutes but couldn't get as much vacuum as I thought I should. It is about 65-70 degrees and 78% humidity. After about an hour the vacuum is holding, I'm going to check it again in the morning after about 8 hours to see if it has leaked down any. How does this look? It just about 19 or 20 inches Hg if you can't tell from the angle in the photo.
Also there was a few ounces of water leaking from the pump. Is this condensation from the working of the pump or is it moisture being pulled out of the system?
As long as it holds a vacuum you should be ok. Looking at the pic on my phone it seems like thats as far as the gauges will go. What do you mean by water leaking from the pump? Is it water or oil from the pump?
That's a rivet on the face of the low pressure gauge, not a needle stop. I measures down to -30 inHg but my pump/compressor could only seem to get it to about -20. I'll try it again this evening for about another hour or so to make sure it's completely evacuated.
The pump I have (the cheap red one pictured in post 8) has a small opening in the housing on the bottom. Water leaked out of there while it was pulling the vacuum. Maybe 2-3 oz roughly. The lines have been open for about a week or so before I tightened everything up yesterday to pull the vacuum. Also some water got into the evaporator while I was cleaning it. I blew as much as possible out with compressed air and let it dry for several hours before installing it.
The pump I have (the cheap red one pictured in post 8) has a small opening in the housing on the bottom. Water leaked out of there while it was pulling the vacuum. Maybe 2-3 oz roughly. The lines have been open for about a week or so before I tightened everything up yesterday to pull the vacuum. Also some water got into the evaporator while I was cleaning it. I blew as much as possible out with compressed air and let it dry for several hours before installing it.

Member
Joined: Jan 2009
Posts: 263
20 in of vacuum implies you left enough air in the system to make up about 5% of total volume after it's recharged. That's enough to hurt the performance of the condenser. Ideally you want to pull a deep vacuum that results in your low-pressure gauge pegging out at just under 30 inches of vacuum (there are micron gauges that can tell you whether you've achieved the factory spec of 75 microns or lower, but they're expensive). Those air-operated venturi "pumps" can't get down that low. You need a 2-stage vacuum pump like the one Harbor Freight sells for about $150.
Anyway with all DIY jobs you do the best you can with what you have, and hope for a good result.
Anyway with all DIY jobs you do the best you can with what you have, and hope for a good result.
Again I'd like to thank all the posters who've provided guidance helping me through this job. I got it done.
I borrowed/rented a 2 stage pump from the auto parts store and got it to pull a strong vacuum (28 in Hg or so) for a couple of hours then made sure that it held overnight. I recharged the system (I forgot to write down the pressures like a dummy) and all seemed well. When I got finished charging it the air was blowing strong and cold. However now I find that first thing in the morning when it's cooler outside the air takes just a couple of minutes to get very cold. In the afternoon on my drive home from work after the car has been sitting in the sun all day it takes 15 or 20 minutes for the air to get noticeably cold. But eventually it does get very cold. What's this a symptom of? Still have moisture? Undercharged? Overcharged?
I borrowed/rented a 2 stage pump from the auto parts store and got it to pull a strong vacuum (28 in Hg or so) for a couple of hours then made sure that it held overnight. I recharged the system (I forgot to write down the pressures like a dummy) and all seemed well. When I got finished charging it the air was blowing strong and cold. However now I find that first thing in the morning when it's cooler outside the air takes just a couple of minutes to get very cold. In the afternoon on my drive home from work after the car has been sitting in the sun all day it takes 15 or 20 minutes for the air to get noticeably cold. But eventually it does get very cold. What's this a symptom of? Still have moisture? Undercharged? Overcharged?
Member
Joined: Jan 2009
Posts: 263
When you recharged it, how much refrigerant did you add? The specified charge is 650 grams, which is about two standard-sized cans.
Get one of those $5 dial thermometers at the parts store and stick it in the center vent. See exactly how cold it's getting, and if the temperature cycles up and down, indicating the compressor is cycling on and off due to low pressure. You'll have to hook a gauge set up to it to see exactly what's going on. But it should only take a few minutes at most after a heat soak for the air out of the center vents to feel "noticeably" cold, as in colder than your body temperature. It takes longer for it to get to 40 degrees, if you're in a humid climate. I want to say ten minutes, but I can't really remember. In my car with auto A/C, in mid-afternoon on a hot day, it's 15 minutes before I start feeling comfortable and the fan speed gears down from four blades to two, but I live in a hot and humid place.
When you pay close attention to your A/C performance, your mind can play tricks on you, so get a thermometer. It might be working better than you think.

Thread
Thread Starter
Forum
Replies
Last Post
lowpost99
1st & 2nd Generation Maxima (1981-1984 and 1985-1988)
9
Oct 26, 2025 06:53 PM
Maxima30
5th Generation Maxima (2000-2003)
2
Sep 7, 2015 06:13 PM