
Replacing my passenger side power mirror cowel


Thread Starter
Newbie - Just Registered
Joined: Apr 2012
Posts: 13
From: Wilmington, DE
Replacing my passenger side power mirror cowel
One of the few minor blemishes I have on my new (to me) 1997 Nissan Maxima GLE is a busted passenger side mirror cowl. The power mirror still works, which is a good thing.
I'm thinking of purchasing something like this - Dorman Passenger Side Non-heating corner mount to replace the cowel, while leaving the original moving parts as is. But since I'm going through all this trouble to replace the cowel, maybe I should replace the entire mirror motor assembly and be done with it.
What say ye Maxima owners here? Could I add heated mirrors as a not-to-difficult upgrade (maybe run the wiring off the rear defroster?).
Thanks for the opinions .
Last edited by Omen; Apr 25, 2012 at 10:46 AM.

If the broken part is what I think it is, it can be replaced by itself. It just snaps on and off. Here is something I posted earlier.
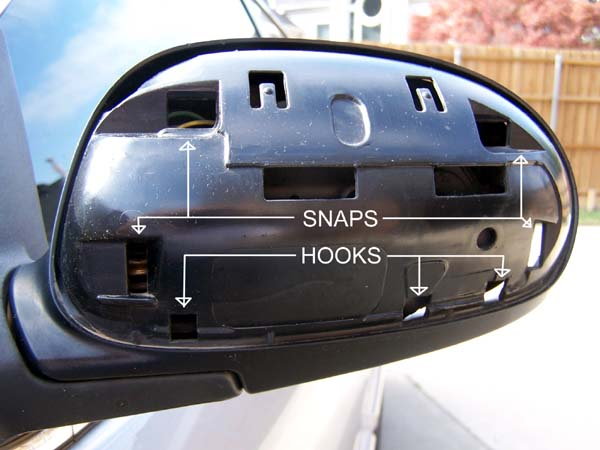
I went out and pried the cover off of my car. I started at the outside top corner (if you can call a rounded slope a corner). I had to use 2 screw drivers, one to pry with and the other to hold the cover out while I repositioned the first screw driver. Finally the corner snapped free and I moved the prying process towards the door.
What I learned is that the bottom edge of the cover has hooks on it, so you do not want to pry from the bottom. I was lucky in this aspect as I started prying from the top. However, I was also unlucky as one of the snaps/clips broke off on me. The cover seems to have gone back on securely in spite of the broken clip, but only time will tell.

What I learned is that the bottom edge of the cover has hooks on it, so you do not want to pry from the bottom. I was lucky in this aspect as I started prying from the top. However, I was also unlucky as one of the snaps/clips broke off on me. The cover seems to have gone back on securely in spite of the broken clip, but only time will tell.
Thread Starter
Newbie - Just Registered
Joined: Apr 2012
Posts: 13
From: Wilmington, DE
http://www.flickr.com/photos/41498098@N05/6967965366/http://www.flickr.com/photos/41498098@N05/6967965366/ by http://www.flickr.com/people/41498098@N05/, on Flickr
http://www.flickr.com/photos/41498098@N05/7114045219/http://www.flickr.com/photos/41498098@N05/7114045219/ by http://www.flickr.com/people/41498098@N05/, on Flickr
it looks like there's 2 pieces involved, the plastic around the mirror itself and the plastic cowl with the "body" color. I could leave it all black, but then I'd need to change the drivers side due to my LCD

Michael


lol youre saying cowl, and im thinking youre talking about the cover on the inside of the door hiding the bolts. the actual mirror has a mirror cover, and mirror housing. the cover is what is pried off in that picture while the housing is the rest of the mirror.
Thread Starter
Newbie - Just Registered
Joined: Apr 2012
Posts: 13
From: Wilmington, DE
Thread Starter
Newbie - Just Registered
Joined: Apr 2012
Posts: 13
From: Wilmington, DE
So, if I got that Doorman accessory (which contains all the mirror parts), then I should be good to go.
How difficult is it to remove the inside door panel? I have a full complement of metric tools and drills, but no specific door removal tools.
Thanks.
Michael
p.s. - I just realized that I should also replace the drivers side mirror for aesthetics sake (the passenger side mirror is all black).
How difficult is it to remove the inside door panel? I have a full complement of metric tools and drills, but no specific door removal tools.
Thanks.
Michael
p.s. - I just realized that I should also replace the drivers side mirror for aesthetics sake (the passenger side mirror is all black).

search your local junkyards, or online for a used set. oem is always going to be better than aftermarket. i found this one on ebay in your color http://www.ebay.com/itm/95-96-97-98-...768f7e&vxp=mtr plus, its oem and cheaper
Last edited by max ride 41; Apr 26, 2012 at 10:43 AM.
To remove the door trim panel, you will need a phillips screwdriver and a flat blade screwdriver to pry with.
Download the FSM, specifically the BT (Body & Trim) section. Page 19 for door trim removal and page 36 for the mirror.
http://boredmder.com/FSMs/Nissan/Maxima/
Download the FSM, specifically the BT (Body & Trim) section. Page 19 for door trim removal and page 36 for the mirror.
http://boredmder.com/FSMs/Nissan/Maxima/
Thread Starter
Newbie - Just Registered
Joined: Apr 2012
Posts: 13
From: Wilmington, DE
search your local junkyards, or online for a used set. oem is always going to be better than aftermarket. i found this one on ebay in your color http://www.ebay.com/itm/95-96-97-98-...768f7e&vxp=mtr plus, its oem and cheaper
Thread Starter
Newbie - Just Registered
Joined: Apr 2012
Posts: 13
From: Wilmington, DE
To remove the door trim panel, you will need a phillips screwdriver and a flat blade screwdriver to pry with.
Download the FSM, specifically the BT (Body & Trim) section. Page 19 for door trim removal and page 36 for the mirror.
http://boredmder.com/FSMs/Nissan/Maxima/
Download the FSM, specifically the BT (Body & Trim) section. Page 19 for door trim removal and page 36 for the mirror.
http://boredmder.com/FSMs/Nissan/Maxima/
Thread Starter
Newbie - Just Registered
Joined: Apr 2012
Posts: 13
From: Wilmington, DE
search your local junkyards, or online for a used set. oem is always going to be better than aftermarket. i found this one on ebay in your color http://www.ebay.com/itm/95-96-97-98-...768f7e&vxp=mtr plus, its oem and cheaper


Newbie - Just Registered
Joined: Dec 2014
Posts: 2
Thanks for the tip on removing just the cover on the back side of the mirror. Mine are not broken but most of the paint is gone and they look yellow. Saved me a bunch of time and money. I can pop these off a scrap yard machine and not have to remove the door panels.

Member
Joined: Sep 2013
Posts: 112
From: Canada
Don't pry without removing the screws or you'll end up breaking the cover.

Thread
Thread Starter
Forum
Replies
Last Post
03VQMAX
5th Generation Classifieds (2000-2003)
15
Dec 7, 2015 04:59 PM
Dennis Twohy
1st & 2nd Generation Maxima (1981-1984 and 1985-1988)
0
Oct 1, 2015 06:01 PM
Maxilano
7th Generation Maxima (2009-2015)
1
Aug 31, 2015 07:33 PM