
OBX Long tube headers v2 headers installed *another review*


OBX Long tube headers v2 headers installed *another review*
Mods, please move this thread if it belongs in the 'All Motor' section; my apologies if so.
Alright, though this product may have been beaten to death, my research prior to purchase never gave me solid consistent information about this product. So here is my install write-up / review:
Vehicle - 96 Maxima Fed. (CAN) (extensive bolt-on N/A mods, 5 spd. swapped)
These are the headers in review. I paid $325 US (great price)

Knowing that these are a very cheap header and not near the quality of Cattman products, I went ahead and purchased them with the expectation for some modification needed.
The product is actually very nice, good quality CNC welds on the collectors, good flanges and flex sections are sturdy. They come with 4 o2 bung holes for Cal spec, just fill in two if you are Fed spec. The packaged gaskets are poor quality, use OEM!!!
The first issue I found was two of the o2 bungs were poorly threaded and needed re-tapping.
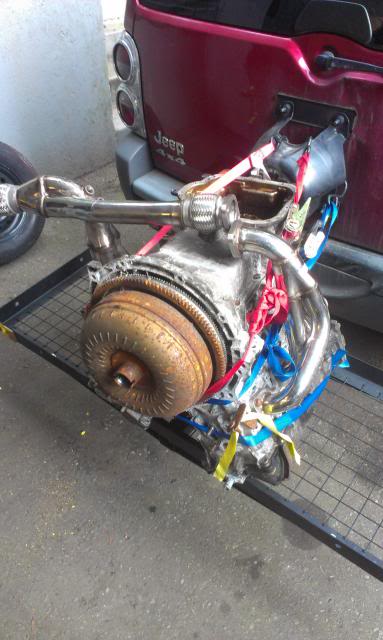
Fitting the pipes in is difficult and the easiest method is to simply remove A LOT of parts: Upper IM, EGR, Crossmember, Rear motor mount + engine bracket, Fans, Heatshields (+ one that covers the steering rack).
Inevitably the Y-Pipe did not meed up. BE PREPARED TO DO SOME BENDING / CUTTING + WELDING.
***This is 'stainless steel' is barely stainless, minimal chromium/nickel in the metal - easy to weld! Simply Flux core w/ a good heating agent (I used CO2). Flux has the necessary bonding agents to adhere to stainless well.
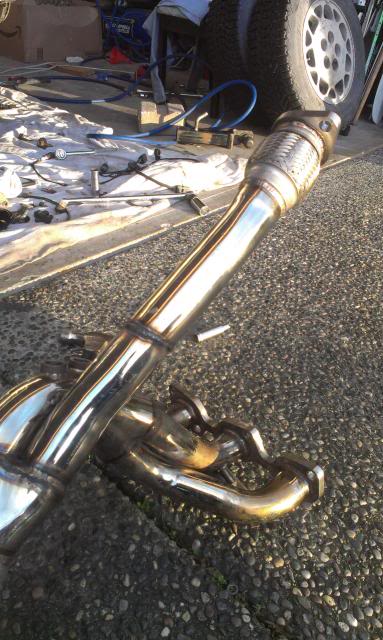
This is as far as I was able to heat and bent the pipe. It was also too long (*note* the flex section is very compressed to absorb the improper pipe length)
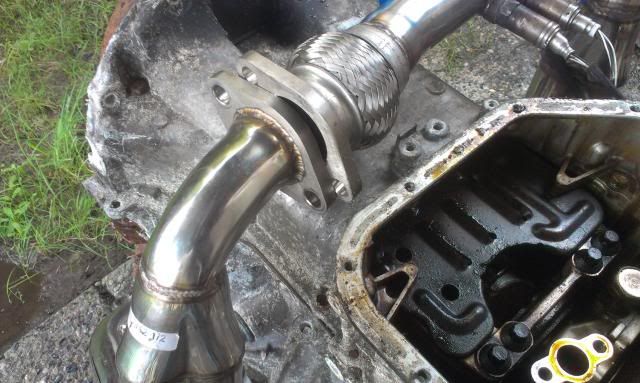
This is how the pipe naturally lined up.
After some measuring and cutting:
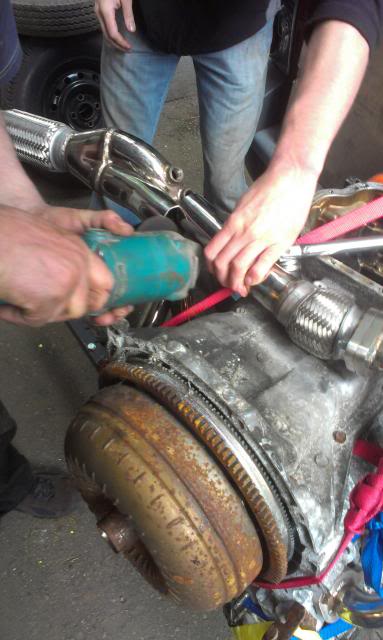
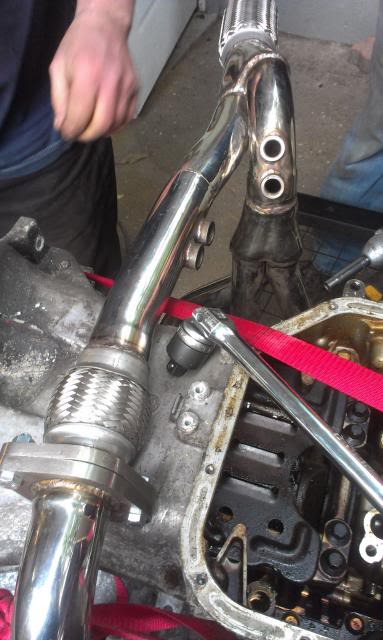
About a 0.5" had to be removed strategically, along with some bending. Count on the flex section to compensate for poor angle alignment of the two flanges.
All done.
The EGR bung had no hope in fitting and it was FAR easier to simply delete the EGR and plug up the holes. + My EGR was so rusted up it had to be cut off...
http://i184.photobucket.com/albums/x...9/IMAG0104.jpg
http://i184.photobucket.com/albums/x...9/IMAG0103.jpg
EGR delete = car still runs fine, no codes if you leave the sensor and solenoid plugged in, still passed emissions with some 'guaranteed to pass' additive and a HOT converter.
Install process:
1. Install front manifold (the one the fits perfectly, lines up)
2. Get rear manifold in place and begin threading studs/nuts into block to hold it on.
3. Use a prybar to line up the Y-pipe flanges and bolt it up tight!
4. slowly tighten the manifold-to-block nuts/studs and the flex-section with absorb any imperfections in the fit.
Remaining notes:
-The front o2 bungs are too far for the wires to meet. Either get a new bung welded closer or extent the wiring.
-One of the rear o2 bungs will leave the sensor protruding as the lowest point under the engine!!!, use the higher one.
-The Y-pipe flanges were warped - Get a straight edge and grind it down so the circle around the pipe meets perfectly (save your gaskets)
-The pipes get HOT - with no heat shielding you are at high risk of causing damage to plastic parts (Rad fans...): SOLUTION = heat wrap the collectors. simple. easy. *Even if you live in a wet climate, if you wrap just the collectors they will stay hot enough to dry out any moisture that may have somehow accumulated on them fast!
-The pipe downstream of the Y is smaller than just about ever aftermarket exhaust (2 1/8"). Unfortunate bottleneck - will look into replacing soon.
http://i184.photobucket.com/albums/x...9/IMAG0107.jpg
OBX Long Tube Headers v2 Conclusion:
After contacting the seller and manufacturer, I was assured that these headers ought to fit with no issues. I heard mixed reviews of fitment and my conclusion is simply TERRIBLE quality control for a product made for such a niche market. Expect the unexpected with these. The flange to the heads lined up correctly.
These are so cheap it way simply be worth the metal and flanges as a starting point. They don't leak and sound decent. I can't yet speak of any performance improvements over an aftermarket Y-pipe.
Buy these with the expectation to mess around with them. I still consider them worthwhile - 300 bucks + 1 full day of work > 1000 for fitting headers.
***That being said I don't imagine everyone has a spare block just sitting around to do fitting and shaping on.
Alright, though this product may have been beaten to death, my research prior to purchase never gave me solid consistent information about this product. So here is my install write-up / review:
Vehicle - 96 Maxima Fed. (CAN) (extensive bolt-on N/A mods, 5 spd. swapped)
These are the headers in review. I paid $325 US (great price)
Knowing that these are a very cheap header and not near the quality of Cattman products, I went ahead and purchased them with the expectation for some modification needed.
The product is actually very nice, good quality CNC welds on the collectors, good flanges and flex sections are sturdy. They come with 4 o2 bung holes for Cal spec, just fill in two if you are Fed spec. The packaged gaskets are poor quality, use OEM!!!
The first issue I found was two of the o2 bungs were poorly threaded and needed re-tapping.
Fitting the pipes in is difficult and the easiest method is to simply remove A LOT of parts: Upper IM, EGR, Crossmember, Rear motor mount + engine bracket, Fans, Heatshields (+ one that covers the steering rack).
Inevitably the Y-Pipe did not meed up. BE PREPARED TO DO SOME BENDING / CUTTING + WELDING.
***This is 'stainless steel' is barely stainless, minimal chromium/nickel in the metal - easy to weld! Simply Flux core w/ a good heating agent (I used CO2). Flux has the necessary bonding agents to adhere to stainless well.
This is as far as I was able to heat and bent the pipe. It was also too long (*note* the flex section is very compressed to absorb the improper pipe length)
This is how the pipe naturally lined up.
After some measuring and cutting:
About a 0.5" had to be removed strategically, along with some bending. Count on the flex section to compensate for poor angle alignment of the two flanges.
All done.
The EGR bung had no hope in fitting and it was FAR easier to simply delete the EGR and plug up the holes. + My EGR was so rusted up it had to be cut off...
http://i184.photobucket.com/albums/x...9/IMAG0104.jpg
http://i184.photobucket.com/albums/x...9/IMAG0103.jpg
EGR delete = car still runs fine, no codes if you leave the sensor and solenoid plugged in, still passed emissions with some 'guaranteed to pass' additive and a HOT converter.
Install process:
1. Install front manifold (the one the fits perfectly, lines up)
2. Get rear manifold in place and begin threading studs/nuts into block to hold it on.
3. Use a prybar to line up the Y-pipe flanges and bolt it up tight!
4. slowly tighten the manifold-to-block nuts/studs and the flex-section with absorb any imperfections in the fit.
Remaining notes:
-The front o2 bungs are too far for the wires to meet. Either get a new bung welded closer or extent the wiring.
-One of the rear o2 bungs will leave the sensor protruding as the lowest point under the engine!!!, use the higher one.
-The Y-pipe flanges were warped - Get a straight edge and grind it down so the circle around the pipe meets perfectly (save your gaskets)
-The pipes get HOT - with no heat shielding you are at high risk of causing damage to plastic parts (Rad fans...): SOLUTION = heat wrap the collectors. simple. easy. *Even if you live in a wet climate, if you wrap just the collectors they will stay hot enough to dry out any moisture that may have somehow accumulated on them fast!
-The pipe downstream of the Y is smaller than just about ever aftermarket exhaust (2 1/8"). Unfortunate bottleneck - will look into replacing soon.
http://i184.photobucket.com/albums/x...9/IMAG0107.jpg
OBX Long Tube Headers v2 Conclusion:
After contacting the seller and manufacturer, I was assured that these headers ought to fit with no issues. I heard mixed reviews of fitment and my conclusion is simply TERRIBLE quality control for a product made for such a niche market. Expect the unexpected with these. The flange to the heads lined up correctly.
These are so cheap it way simply be worth the metal and flanges as a starting point. They don't leak and sound decent. I can't yet speak of any performance improvements over an aftermarket Y-pipe.
Buy these with the expectation to mess around with them. I still consider them worthwhile - 300 bucks + 1 full day of work > 1000 for fitting headers.
***That being said I don't imagine everyone has a spare block just sitting around to do fitting and shaping on.

Member
Joined: Jun 2005
Posts: 281
The OBX headers I purchased did not have the compressed flex section that yours has. I had the luxury of having the engine out when I installed my headers, but had zero problems with everything lining up. The only thing I had to do was to grind a little on the crossmember, as other members have mentioned.

Those are the current 4th gen headers. IMO these headers are not worth the time to make fit. They are marginally better than the "shorty" headers that basically take the place of the factory manifolds and Y.
The current 5th gen headers are far superior, with equal length secondaries.
Attachment 34425
The current 5th gen headers are far superior, with equal length secondaries.
Attachment 34425
Last edited by RA030726; Mar 5, 2026 at 01:23 PM.


You will need two o2 plugs, the set we used did not come with any.
The only other issue with the VQ35 headers on a 4th gen is the lack of an EGR bung, so you will either need to have a bung welded on or just delete the EGR.
Last edited by schmellyfart; Mar 21, 2013 at 12:40 PM.

Thread
Thread Starter
Forum
Replies
Last Post
VQ'ed
5th Generation Maxima (2000-2003)
69
Aug 27, 2020 12:29 PM
kenc15
4th Generation Classifieds (1995-1999)
8
Sep 25, 2015 06:38 AM