
Pointers on removing the intake plenum


Also, as stated in the video, and I can testify to it as well, get your self a pair of long handled 90* needle nose pliers. They're absolutely indispensable.

Also a set of either off-set metric wrenches ...

Or flex head metric wrenches are a must as well unless your care to lengthen this project by about double ...

Last edited by Turbobink; Mar 24, 2015 at 05:29 AM.

Here is a thread with multiple pictures showing all the steps needed
https://maxima.org/forums/4th-genera...im-w-pics.html
This thread is listed in the HowTo's: 4th Generation Maxima sticky thread. It's the 4th thread down in this forum.
https://maxima.org/forums/4th-genera...im-w-pics.html
This thread is listed in the HowTo's: 4th Generation Maxima sticky thread. It's the 4th thread down in this forum.
^^^ It really does seem a bit imposing while you're planning.
However, I just did this and am currently putting things back together.
It's really not that big-a-deal at all.
The appropriate tools do really make the difference though.
A word of caution:
There are a good number of harness brackets and component brackets, and even the OE hose clamps all over the place and in areas where you're going to need to brace yourself, or rest a forearm, or an elbow, or reach past or through.
Be aware of where these things are before you start trying to break a 15+ year old nut and bolts loose.
I can't emphasize enough how badly the jagged and crazy sharp edges of these little bastards can and will damage you if you're careless.

Thread Starter
Junior Member
Joined: Jan 2015
Posts: 75
From: Central ohio
^^^ It really does seem a bit imposing while you're planning.
However, I just did this and am currently putting things back together.
It's really not that big-a-deal at all.
The appropriate tools do really make the difference though.
A word of caution:
There are a good number of harness brackets and component brackets, and even the OE hose clamps all over the place and in areas where you're going to need to brace yourself, or rest a forearm, or an elbow, or reach past or through.
Be aware of where these things are before you start trying to break a 15+ year old nut and bolts loose.
I can't emphasize enough how badly the jagged and crazy sharp edges of these little bastards can and will damage you if you're careless.
However, I just did this and am currently putting things back together.
It's really not that big-a-deal at all.
The appropriate tools do really make the difference though.
A word of caution:
There are a good number of harness brackets and component brackets, and even the OE hose clamps all over the place and in areas where you're going to need to brace yourself, or rest a forearm, or an elbow, or reach past or through.
Be aware of where these things are before you start trying to break a 15+ year old nut and bolts loose.
I can't emphasize enough how badly the jagged and crazy sharp edges of these little bastards can and will damage you if you're careless.
Thread Starter
Junior Member
Joined: Jan 2015
Posts: 75
From: Central ohio
Intake is off and both valve covers, plugs, coils, and the egr system too. Very easy job, took less than 2 hours! Much more friendly than I was expecting it to be! That guide you guys linked in was very helpful so I knew what size sockets to bring and what I needed to remove, much thanks guys!
Thread Starter
Junior Member
Joined: Jan 2015
Posts: 75
From: Central ohio
Now I almost forgot to ask but, how the heck do I pull the engine code off this thing? I just realized that it is OBD1 instead of 2 so my diagnostic suite is useless! I kinda want to check what code it was throwing because I would like to know if I need to change the injectors or coil packs.....it didn't seems like it was misfiring (took it to 6k rpm) as once the rpms got over 1000 the shaking stabilized, leads me to think its just a small vacuum leak that was causing the problem.

Senior Member
Joined: Jan 2011
Posts: 3,037
From: Central AR
What year do you have? There is an OBD2 port under the steering wheel on the driver side -- the usual place. I believe on 95 model the port is on the passenger side near the ECU or behind the ECU panel. I had a 95 and I have two 99s and I've always been able to use OBD2 to reset codes.
Last edited by CS_AR; Mar 29, 2015 at 03:19 PM.
Thread Starter
Junior Member
Joined: Jan 2015
Posts: 75
From: Central ohio
What year do you have? There is an OBD2 port under the steering wheel on the driver side -- the usual place. I believe on 95 model the port is on the passenger side near the ECU or behind the ECU panel. I had a 95 and I have two 99s and I've always been able to use OBD2 to reset codes.


Thread Starter
Junior Member
Joined: Jan 2015
Posts: 75
From: Central ohio
Well I kinda just ended up doing the screwdriver and blinking light way that is mentioned in the forum how to's. I got idle speed control/idle air control valve and the intake air temperature sensor. Can someone please direct me to these two items on the engine? I figure the first is in the TB somewhere or near it and the other is in or near the MAF sensor? Also would a vacuum leak cause the computer to think this is what is wrong? Codes were 0205 and 0401
In this photo:
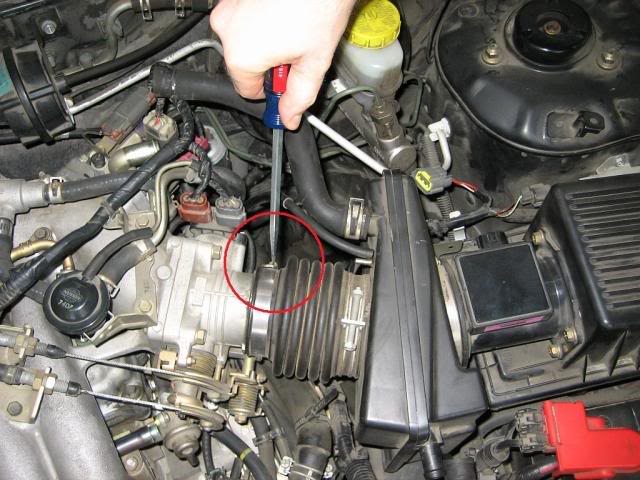
... see the zinc plated pipe just below the disconnected end of that molded rubber hose? That whole assembly is the IAC valve.
If your car is a '95, then I'm thinking that your IAT sensor is inserted/mounted into the rear side of your air filter box lid. If not, then it's inserted/mounted into the side of the plastic intake snorkel that runs from the top of the core support to the air box bottom (but then I'm thinking that setup is in later models).
Thread Starter
Junior Member
Joined: Jan 2015
Posts: 75
From: Central ohio
Well the IAC was carbon filled and the adjuster was set to nearly 0 so hopefully now that everything has been cleaned, once the new gaskets get here and everything is back together all will be well lol!
Oh and I'm going to be using Ultra Black RTV an Ultra Copper in place of the gaskets because I am in florida and do not have time to order even more parts and have them not get here by the time I get back home.
Oh and I'm going to be using Ultra Black RTV an Ultra Copper in place of the gaskets because I am in florida and do not have time to order even more parts and have them not get here by the time I get back home.
Last edited by Striker2237; Mar 30, 2015 at 05:03 PM.
Thread Starter
Junior Member
Joined: Jan 2015
Posts: 75
From: Central ohio
So here is the pictures showing where I am at so far, I pulled the window regulators today and kinda had my first real mess-up. I broke the white clip that attaches to the window and now I'm kinda screwed because I need a new one......oh and how would one go about cleaning the EGR tube? I'm not used to dealing with EGR systems so I would like to know if I can just spray carb cleaner down it and follow it up with a bunch of air.......or will this screw me over?
https://www.facebook.com/photo.php?f...ize=1136%2C852
Now the TB is also off and already cleaned along with the IACV but the one thing that is killing me is the spark plug tube seals on the front valve cover....I cannot for the life of me get the damn things to move! I just managed to tear the hell out of them and bend the metal ring in the 2nd one! I even let them soak in PB blaster all last night and nothing!
https://www.facebook.com/photo.php?f...size=639%2C852
https://www.facebook.com/photo.php?f...ize=1136%2C852
https://www.facebook.com/photo.php?f...size=852%2C639
https://www.facebook.com/photo.php?f...size=852%2C639
https://www.facebook.com/photo.php?f...ize=1136%2C852
https://www.facebook.com/photo.php?f...ize=1136%2C852
Now the TB is also off and already cleaned along with the IACV but the one thing that is killing me is the spark plug tube seals on the front valve cover....I cannot for the life of me get the damn things to move! I just managed to tear the hell out of them and bend the metal ring in the 2nd one! I even let them soak in PB blaster all last night and nothing!
https://www.facebook.com/photo.php?f...size=639%2C852
https://www.facebook.com/photo.php?f...ize=1136%2C852
https://www.facebook.com/photo.php?f...size=852%2C639
https://www.facebook.com/photo.php?f...size=852%2C639
https://www.facebook.com/photo.php?f...ize=1136%2C852
Last edited by Striker2237; Mar 30, 2015 at 08:21 PM.

Junior Member
Joined: Apr 2015
Posts: 69
From: New York
Nice job � way to go with tackling the job yourself! It is pretty simple once you get past themental block.
EGR tube: best way to clean it out is to take it all the wayoff. You will have to cut the tip of oneof the bottom studs off � otherwise you probably can�t get the tube out. I think I left the nut on, and then used ahacksaw blade (just the blade, not the whole saw) with a rag rapped around theside I was holding. I cut it off flushwith the nut and then spun the nut off to clean the threads up. If the nut is already off when you cut, youmight have a hard time getting it back on. If you go at it, you can cut it off in less than 5 minutes, but itrequires some serious elbow grease. Thenremove the tube and clean it. I had abead blaster at my disposal and it cleaned the tube out beautifully. If you don�t you can use a screw driver toget the big chunks and then a small wire bristle brush (round one) to finish itoff. Before you put the tube back onmake sure you also stick a screw driver or something down the exhaust side andget it cleaned out best you can as well.
Spark plug tube seals: I used a heel bar (sometimes called �ladiesslipper�) and popped them out but it wasn�t easy. On one of your pictures you show the metalouter ring bent in. You should be ableto grab that with some pliers (vice grips if you can fit them) and man it offof there. To install the new ones I useda socket and a press. If you don�t havea press a hammer will work but it may be hard to get it in there straight. Also, keep in mind how deep the seals are � Ibelieve you can press them too far, so only go as deep as you need and thenstop. Don�t press them all the way.
Thread Starter
Junior Member
Joined: Jan 2015
Posts: 75
From: Central ohio
Nice job � way to go with tackling the job yourself! It is pretty simple once you get past themental block.
EGR tube: best way to clean it out is to take it all the wayoff. You will have to cut the tip of oneof the bottom studs off � otherwise you probably can�t get the tube out. I think I left the nut on, and then used ahacksaw blade (just the blade, not the whole saw) with a rag rapped around theside I was holding. I cut it off flushwith the nut and then spun the nut off to clean the threads up. If the nut is already off when you cut, youmight have a hard time getting it back on. If you go at it, you can cut it off in less than 5 minutes, but itrequires some serious elbow grease. Thenremove the tube and clean it. I had abead blaster at my disposal and it cleaned the tube out beautifully. If you don�t you can use a screw driver toget the big chunks and then a small wire bristle brush (round one) to finish itoff. Before you put the tube back onmake sure you also stick a screw driver or something down the exhaust side andget it cleaned out best you can as well.
Spark plug tube seals: I used a heel bar (sometimes called �ladiesslipper�) and popped them out but it wasn�t easy. On one of your pictures you show the metalouter ring bent in. You should be ableto grab that with some pliers (vice grips if you can fit them) and man it offof there. To install the new ones I useda socket and a press. If you don�t havea press a hammer will work but it may be hard to get it in there straight. Also, keep in mind how deep the seals are � Ibelieve you can press them too far, so only go as deep as you need and thenstop. Don�t press them all the way.
Thread Starter
Junior Member
Joined: Jan 2015
Posts: 75
From: Central ohio
Well everything is done and back together now, CEL is gone and everything is happy with the exception of when I drop it into gear it still gets a little shaky (like not a fast vibration but a slow strongish one) and RPMs drop from 750-820 down to 650, this happens in both D and R and also when between 1100-1475 RPM when the throttle is in use.
It is however much better than when I test drove it monday so i think I will just call it good enough, pack up, and head back north and pull the axles, arms, struts and check the transmission at home.
Other than that car runs prefectly and completed 3 0-85mph pulls with 6300 RPM shifts with no complaints other than a hard shift from 2-3.
Thanks for all the help and advice guys!

Thread
Thread Starter
Forum
Replies
Last Post