
Radiator Replacement Writeup


Probably not a bad idea. I'm trying to remember how much I lost....it wasn't a lot. Not sure of the exact volume of the ATF compartment in the radiator but I remember just drips coming out...so not more than maybe half a cup, if even that much.

Senior Member
Joined: Aug 2003
Posts: 130
From: Birmingham,AL (Roebuck)
Sorry for bring up an old thread.
I just replaced my radiator and added new coolant and let it run for at least 10 minutes but the fan never came on. However it does come on if I turn on the a/c, so fan is working. Is there anything I need to check as to why the fan does not come on while the car idles
I just replaced my radiator and added new coolant and let it run for at least 10 minutes but the fan never came on. However it does come on if I turn on the a/c, so fan is working. Is there anything I need to check as to why the fan does not come on while the car idles
Just let it idle for about 20 minutes not 10, IMO thats not long enough. Longer you let it idle the more chance it has to circulate. And as it circulates you can keep adding to the top. No need for the fans to come on to know you did it right.
To OP, your right mostly common sense, but great up and good pics with explainations for the one's that might be weary to tackle. Good Job.
NO, no need to race the engine a few times. If the engine doesn't get warm enough the fans won't come on. They are "on-demand" so if your in a cooler climate right now and how enough coolant in the system and the engine didn't get above the prescribed temp to activate the fans then... they won't come on. You know they work, so why worry?

Newbie - Just Registered
Joined: Oct 2006
Posts: 1
Wanna add a few comments since I did this recently:
1. The splash shield bolts may be rusted out and if you try to take them out, they'll break. Since I wanted to avoid this, you can take out the fan first to get to the bottom hoses from the top (like pmohr recommended, but not sure if it was for the same reason). The lower hose clamp may still be a little hard to get to from the top, but from the bottom, just reach into the hole in the splash shield and loosen the clamp with some small locking pliers. Then go up top and remove it. I just didn't wanna take the chance of not being able to re-affix the splash shields!
2. Be prepared for a lot of coolant to come out of the lower hose when you disconnect it!
3. Be prepared for some ATF to come out of the middle hose when disconnected!


Senior Member
Joined: Oct 2003
Posts: 438
From: Mississauga, Ontario
Just my two cents, after draining the rad, I would run a garden hose through the whole system to flush it all out.
Would having the engine on enhance this process, but only up to near boiling point?
Would having the engine on enhance this process, but only up to near boiling point?
Just be careful since the water/hose can get hot.


Been almost 2 months since I replaced mine & my coolant is still that fresh green color, as opposed to the light-brownish color I used to get even after changing coolant.


Senior Member
Joined: Aug 2008
Posts: 897
From: Brandon, FL
Senior Member
Joined: Oct 2003
Posts: 438
From: Mississauga, Ontario

Now I'm more confused.


Being at an exact 50/50 ratio isn't very important, but you want the mix to be relatively close. There's no real way to know exactly what the ratio is when you're putting in water and coolant unless you dry out the entire system, which isn't feasible.
I wouldn't run a garden hose through the new radiator I just installed. A couple gallons of distilled water would be safer. And yes, I did it with the engine on. Install the new radiator, don't connect the upper hose to the radiator, but instead have the upper hose going to a bucket. Start the engine & throw the distilled water in so that it goes through the radiator -> engine (and other stuff) -> and to your bucket. Once you did the "flush" then fill with anti-freeze.
Just be careful since the water/hose can get hot.
Been almost 2 months since I replaced mine & my coolant is still that fresh green color, as opposed to the light-brownish color I used to get even after changing coolant.
Just be careful since the water/hose can get hot.
Been almost 2 months since I replaced mine & my coolant is still that fresh green color, as opposed to the light-brownish color I used to get even after changing coolant.

Junior Member
Joined: Aug 2009
Posts: 68
From: Jacksonville, FL
If you want to be sure of the amount of the water in the system when you add the antifreeze (after you've flushed using the method above), attach the upper rad hose, fill the rad with distilled water, start the car and turn the heat on as high as it will go. Let it run for about 5 minutes the let the engine cool for 10-15 more. Drain the rad by removing the lower plug. At that point, the engine block should be full with water and the rad empty. Fill the rad with pure antifreeze and you should have a 50-50 mix (making sure you're following the procedures to get all the air out). This is much faster than draining and filling the rad with water 6 or 7 times to flush it out.
Senior Member
Joined: Oct 2003
Posts: 438
From: Mississauga, Ontario
About half the overall cooling system capacity is in the engine block, half in the rad. If you've flushed all the antifreeze out so that what's coming out of the hose (using the method outlined above) is just the water, then adding non-diluted antifreeze is the best way to get to the right mix.
If you want to be sure of the amount of the water in the system when you add the antifreeze (after you've flushed using the method above), attach the upper rad hose, fill the rad with distilled water, start the car and turn the heat on as high as it will go. Let it run for about 5 minutes the let the engine cool for 10-15 more. Drain the rad by removing the lower plug. At that point, the engine block should be full with water and the rad empty. Fill the rad with pure antifreeze and you should have a 50-50 mix (making sure you're following the procedures to get all the air out). This is much faster than draining and filling the rad with water 6 or 7 times to flush it out.
If you want to be sure of the amount of the water in the system when you add the antifreeze (after you've flushed using the method above), attach the upper rad hose, fill the rad with distilled water, start the car and turn the heat on as high as it will go. Let it run for about 5 minutes the let the engine cool for 10-15 more. Drain the rad by removing the lower plug. At that point, the engine block should be full with water and the rad empty. Fill the rad with pure antifreeze and you should have a 50-50 mix (making sure you're following the procedures to get all the air out). This is much faster than draining and filling the rad with water 6 or 7 times to flush it out.
Wow, I making a lot out of this. Did this radiator once with a previous non-Maxima, but wasn't so bogged down in details and it all worked out in the end.

Senior Member
Joined: Mar 2001
Posts: 1,142
I did mine in less than an hour. The hardest part was removing the under cover. I had to get new clips for mine because mine all broke due to them being dried up and cracked when I tried to remove them. I drained about 6 liters of my coolant out without removing the bolts on the engine, and I was quite happy with that.
My leaky spot is from that exact location. I think it is caused by the thin plastic in that area, possibly due to a bad mold. Under tremendous friction and pressure caused by the cooling system, that part is the weakest link.
I notice that despite the similiarity, the KOYO rad drain plug is completely different from the OEM plug.
Senior Member
Joined: Oct 2003
Posts: 438
From: Mississauga, Ontario
Hmm, no one uses a flushing T anymore. In the past I used to run the garden hose for 5-10 minutes through that T.
I don't have the hose illustrated by ridinwitha35, so I intend to do this:
Drain the old rad. Then fill it with distilled water. Let it run for 5 minutes, drain the rad again, and maybe repeat this procedure.
Then, the plan is to remove the rad and the hoses with new parts, and add 100% radiator fluid into the new rad.
That should be it.
P.S. I wonder where you can get those replacement clips Lovesick?
Senior Member
Joined: Mar 2001
Posts: 1,142
Hey holymoly, I bought the clips from the Nissan dealer. An Infiniti dealer would have them as well.
Those clips are expensive, around under $2 a pop. Because I broke many of my clips, I bought quite a few. And the clips themselves cost almost as much as a jug of OEM Nissan coolant.
Those clips are expensive, around under $2 a pop. Because I broke many of my clips, I bought quite a few. And the clips themselves cost almost as much as a jug of OEM Nissan coolant.
Junior Member
Joined: Aug 2009
Posts: 68
From: Jacksonville, FL
Hmm, no one uses a flushing T anymore. In the past I used to run the garden hose for 5-10 minutes through that T.
I don't have the hose illustrated by ridinwitha35, so I intend to do this:
Drain the old rad. Then fill it with distilled water. Let it run for 5 minutes, drain the rad again, and maybe repeat this procedure.
Then, the plan is to remove the rad and the hoses with new parts, and add 100% radiator fluid into the new rad.
That should be it.
P.S. I wonder where you can get those replacement clips Lovesick?
I don't have the hose illustrated by ridinwitha35, so I intend to do this:
Drain the old rad. Then fill it with distilled water. Let it run for 5 minutes, drain the rad again, and maybe repeat this procedure.
Then, the plan is to remove the rad and the hoses with new parts, and add 100% radiator fluid into the new rad.
That should be it.
P.S. I wonder where you can get those replacement clips Lovesick?
Before I actually replaced my radiator, I did a "flush" using the drain radiator, fill radiator with distilled water, start engine til fans come on, let engine cool off...repeat. Then I filled with 100% anti-freeze. About a week later, the coolant in the reservoir went from a light green to a tan-ish color (and car was still overheating). In other words, was still getting contaminated from somewhere.
The other method with draining the upper hose to an external bucket with the engine on was definitely faster & more efficient IMO. Clear water coming out of that hose is achieved much faster than repeatedly draining & filling the radiator. Plus I didn't want any crap that may be in the block going into my new radiator.
I don't think the stoichiometric ratio of water/anti-freeze has to be 100% spot on. I personally tried to get as much water out the block that the water pump could push. Questionable how much I actually got out. But I filled with 50/50. Actual ratio is probably 60-70 water to 40-30 anti-freeze.
Last edited by ridinwitha35; Oct 20, 2009 at 12:19 PM.
Senior Member
Joined: Oct 2003
Posts: 438
From: Mississauga, Ontario
Before I actually replaced my radiator, I did a "flush" using the drain radiator, fill radiator with distilled water, start engine til fans come on, let engine cool off...repeat. Then I filled with 100% anti-freeze. About a week later, the coolant in the reservoir went from a light green to a tan-ish color (and car was still overheating). In other words, was still getting contaminated from somewhere.
The other method with draining the upper hose to an external bucket with the engine on was definitely faster & more efficient IMO. Clear water coming out of that hose is achieved much faster than repeatedly draining & filling the radiator. Plus I didn't want any crap that may be in the block going into my new radiator.
I don't think the stoichiometric ratio of water/anti-freeze has to be 100% spot on. I personally tried to get as much water out the block that the water pump could push. Questionable how much I actually got out. But I filled with 50/50. Actual ratio is probably 60-70 water to 40-30 anti-freeze.
The other method with draining the upper hose to an external bucket with the engine on was definitely faster & more efficient IMO. Clear water coming out of that hose is achieved much faster than repeatedly draining & filling the radiator. Plus I didn't want any crap that may be in the block going into my new radiator.
I don't think the stoichiometric ratio of water/anti-freeze has to be 100% spot on. I personally tried to get as much water out the block that the water pump could push. Questionable how much I actually got out. But I filled with 50/50. Actual ratio is probably 60-70 water to 40-30 anti-freeze.
I got that hose from Home Depot where piping stuff is. Nothing fancy. Cheap.
Senior Member
Joined: Oct 2003
Posts: 438
From: Mississauga, Ontario
Start the engine, fill the radiator with distilled water. As the level in the radiator starts to drop, keep filling it with your distilled water. The water will exit from the upper hose on the block into your hose & into the bucket. Stop when you run out of water...
I got that hose from Home Depot where piping stuff is. Nothing fancy. Cheap.
I got that hose from Home Depot where piping stuff is. Nothing fancy. Cheap.
Senior Member
Joined: Oct 2003
Posts: 438
From: Mississauga, Ontario
I cannot locate a one-inch pipe that fits into the rad hose.
The other option is reattach the top rad hose and leave the rad plugged and add the distilled water?
The other option is reattach the top rad hose and leave the rad plugged and add the distilled water?
Last edited by holymoly; Oct 22, 2009 at 10:27 AM.
Senior Member
Joined: Aug 2008
Posts: 897
From: Brandon, FL
Senior Member
Joined: Oct 2003
Posts: 438
From: Mississauga, Ontario
OK, I found an adapter to extend the upper rad hose, and I meant plug the drain of the radiator.
OK, saw that a rag was stuffed into rad opening where the upper read hose was disconnected.
So far so good.
OK, saw that a rag was stuffed into rad opening where the upper read hose was disconnected.
So far so good.
Senior Member
Joined: Aug 2008
Posts: 897
From: Brandon, FL
I unbolted the horn and set it aside when I replaced mine to gain some room (the more room the better). After disconnecting the hose going into the thermostat and pushing it aside, and using a 1/4" rachet, I attached a deep 10mm socket to remove the bolts on the right and the one on top. For the one on the bottom left, I used a small extension with an universal joint and a regular 10mm socket.

Senior Member
Joined: Oct 2003
Posts: 438
From: Mississauga, Ontario
All done except the thermostat. That bottom bolt is a killer.
Here is a picture of my old radiator, the infamous almost 12 year old radiator, the black marks are mainly from my dirty paws. Otherwise it still looks good, and the old fluid was still pristine green.
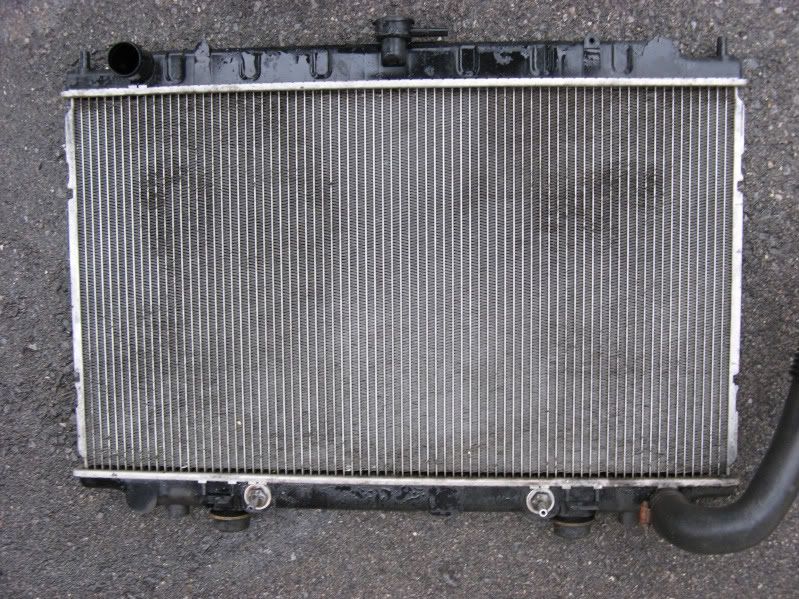
time for a little...

Here is a picture of my old radiator, the infamous almost 12 year old radiator, the black marks are mainly from my dirty paws. Otherwise it still looks good, and the old fluid was still pristine green.
time for a little...
Senior Member
Joined: Aug 2008
Posts: 897
From: Brandon, FL
(Or did you miss those?...)
Senior Member
Joined: Oct 2003
Posts: 438
From: Mississauga, Ontario
 I just slid the rad back in.

