
Radiator Replacement Writeup


Senior Member
Joined: Aug 2008
Posts: 897
From: Brandon, FL
The parts circled in red come off the radiator, exposing two pins that are molded into the radiator, and are what hold your radiator at the bottom. They keep the rad from flapping back and forward at the bottom. You were supposed to reuse those, unless your new radiator came with new ones attached already (mine didn't).
(I took the liberty to use your picture to show what I'm talking about. I hope it's not copyrighted.... )
)
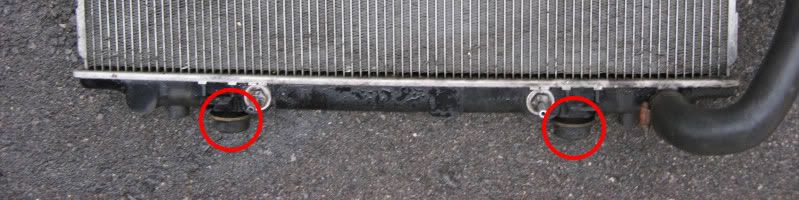
Edit: If you need to install those and already have the radiator in place, just remove the upper brackets, lift up the rad a little bit and slide those in place.
 I just slid the rad back in.
(I took the liberty to use your picture to show what I'm talking about. I hope it's not copyrighted....
)Edit: If you need to install those and already have the radiator in place, just remove the upper brackets, lift up the rad a little bit and slide those in place.
Last edited by Nelsito65; Oct 22, 2009 at 03:34 PM.

Senior Member
Joined: Mar 2001
Posts: 1,142
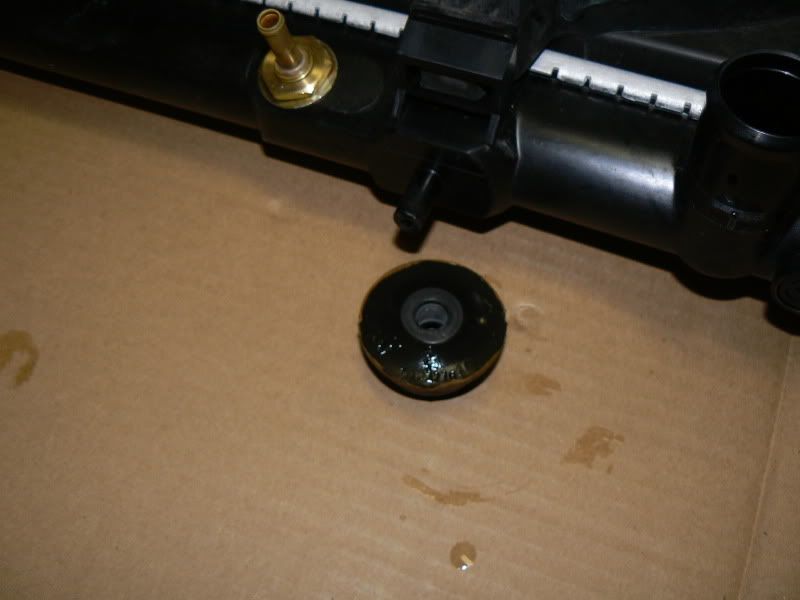
This is what the rubber looks like:
You may need two draining pans for the transmission cooling lines:
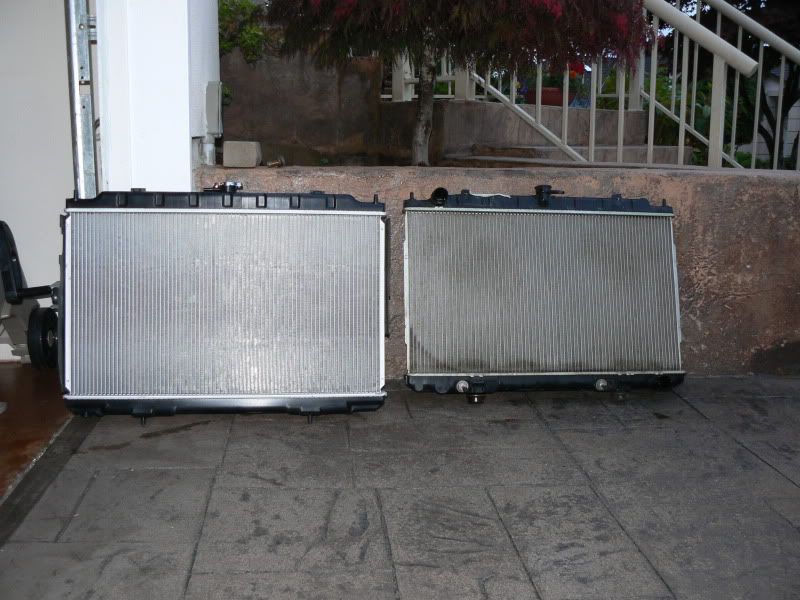
See the difference between the two rads:
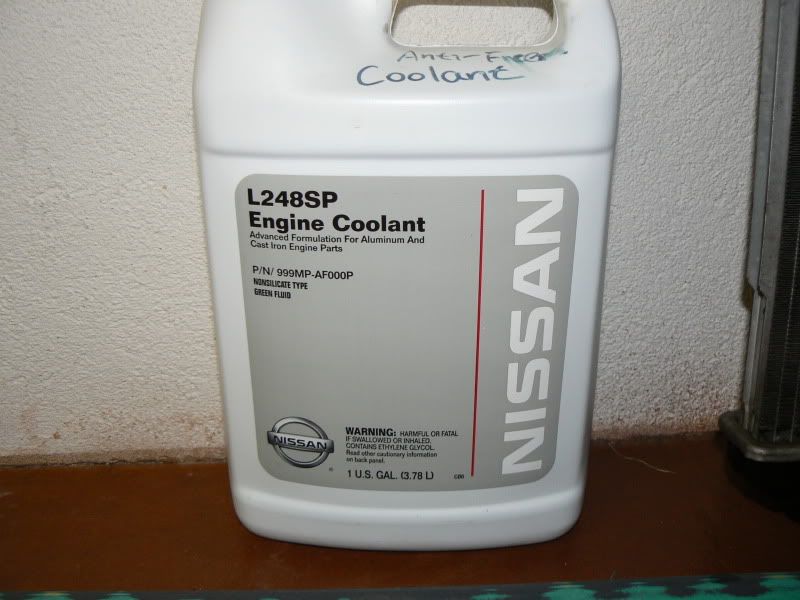
And of course, use silica free OEM coolant to prevent premature waterpump failure:
You may need two draining pans for the transmission cooling lines:
See the difference between the two rads:
And of course, use silica free OEM coolant to prevent premature waterpump failure:

Senior Member
Joined: Oct 2003
Posts: 438
From: Mississauga, Ontario
You are right, I only had those pins. Need to put those two in place.
Thanks.
During the flush, I wasn't able to get the thermostat out.
Would the thermostat still in place restricted the flush in the engine block?
Thanks.
During the flush, I wasn't able to get the thermostat out.
Would the thermostat still in place restricted the flush in the engine block?

Senior Member
Joined: Oct 2003
Posts: 438
From: Mississauga, Ontario
yup, I had to place those in now posthumously. they're in there now.
Last edited by holymoly; Oct 23, 2009 at 07:20 AM.

where did everyone go to get their radiator? I need to replace mine soon, but don't want to get a "cheap-o" version

i keep hearing about "Koyo", are they that much better?
thanks!

Yes I am a grave digging poster but its valuable information.
Why not tint new 50/50 coolant with food coloring and let the upper radiator hose drink that? Since it's been established the 2000-2003 maxima's radiator holds about 4 Quarts coolant, then the engine block must hold the other 4 and a bit quarts.
Once you feed the engine the tinted coolant, switch to the stuff you want to keep in the system until tinted coolant no longer is expelled by the system. Reconnect everything, and top off the coolant in the radiator. Job done.

1. I broke all of the cheap plastic ones off long ago (except for a few) and replaced them with sturdy steel fasteners that take a socket wrench to remove. I recommend this highly
2. If you drain the radiator like I said in step 3 you will have minimal coolant flow when you disconnect the hoses.
3. In the step where I say disconnect hoses I wrote this as well "I used a pair of rubber bands to keep the AT lines folded closed. Otherwise you�ll lose AT fluid."
2. If you drain the radiator like I said in step 3 you will have minimal coolant flow when you disconnect the hoses.
3. In the step where I say disconnect hoses I wrote this as well "I used a pair of rubber bands to keep the AT lines folded closed. Otherwise you�ll lose AT fluid."
Im getting ready to replace my radiator....what are the steel fasteners that you used to keep the splash guards sturdy and where did you get them from....I believe just about all of my plastic clips are broken
thanks!

I'm glad this thread was revived since I recently got radiator fluid splattered on the front engine bay  .
.
Replacing it with a Koyo I purchased in the Group Deal section as soon as it comes in.
So the only thing i'd like to add is the screws that bolt the fans to the radiator are not interchangeable with the new radiator. In the mean time i put zip ties to hold it in place, but i'll be sure to post the right size screws as soon as i find out..unless someone already knows?
Oh, perpare to spend about 30-40 mins on removing your car covers, which if not for those two i would have finished in an hour. :P
.Replacing it with a Koyo I purchased in the Group Deal section as soon as it comes in.
So the only thing i'd like to add is the screws that bolt the fans to the radiator are not interchangeable with the new radiator. In the mean time i put zip ties to hold it in place, but i'll be sure to post the right size screws as soon as i find out..unless someone already knows?
Oh, perpare to spend about 30-40 mins on removing your car covers, which if not for those two i would have finished in an hour. :P
Last edited by edgar5453; Feb 28, 2010 at 04:52 PM.
Just passing this along for everyone's benefit. We got our forum search back and it's simple to use.
When you are looking at the 5th gen forums, over on the right side at the top you'll see SEARCH THIS FORUM.
Click that, type in (PART NAME) replace or swap or change or install. Example Fog light install. And if you want to bump and old thread, please make sure you are ADDING more information or knowledge. Don't want to be reading an old thread for advice and come to find out there was an easier way if you searched!
Last edited by RR5; Mar 10, 2010 at 06:46 PM. Reason: link to tinypic pulled because it won't load for me
Just passing this along for everyone's benefit. We got our forum search back and it's simple to use.

Click that, type in (PART NAME) replace or swap or change or install. Example Fog light install. And if you want to bump and old thread, please make sure you are ADDING more information or knowledge. Don't want to be reading an old thread for advice and come to find out there was an easier way if you searched!
Click that, type in (PART NAME) replace or swap or change or install. Example Fog light install. And if you want to bump and old thread, please make sure you are ADDING more information or knowledge. Don't want to be reading an old thread for advice and come to find out there was an easier way if you searched!

I have 154K on the odo and have only done drain and refills, still on the original radiator. Recently, I noticed dried fluid in the engine bay and I can smell it when I open the hood. Anyhow, would you fellas recommend replacing the thermostat while Im at it? The current thermostat still works fine, but Im assuming that it may go at any time since I do have a lot of miles on the car. Also, I checked out the Spectra radiator @ Rockauto.com. The price difference between the Spectra and Koyo is around $50 (shipping included). Im just wondering if its worth the extra $50. And one more thing, is replacing the radiator cap with a new one recommended? Thanks in advance to answering my questions.

That sounds easy
Ok Im a female but raised by a certified Mechanic (My dad) I was the boy child out of 4 girl since I dont have a brother. I was afraid to try this but thanks to you with the pics I know it will now be easy. I have a 4th gen max and needed the same transplant. I've had the radiator for 3 mos and havent done it so now I will. Thx
What about the (3) by-pass hoses along with the (2) heater hoses? Should I go ahead and replace those as well?
Part #s for the (5) hoses in question (all prices per Dave B.)
14055-31U00 Hose-water $4.28
14056-8J106 Hose-water $6.86
14056-8J100 Hose-water $6.86
92410-5Y700 Hose-heater, out $28.10
924005Y700 Hose-heater,inl $33.64
Part #s for the (5) hoses in question (all prices per Dave B.)
14055-31U00 Hose-water $4.28
14056-8J106 Hose-water $6.86
14056-8J100 Hose-water $6.86
92410-5Y700 Hose-heater, out $28.10
924005Y700 Hose-heater,inl $33.64
If the hoses do not have any leaks, frays, cracks or other visual defects you're good to not replace them. Again it's more for peace of mind knowing the hoses are good.
Personally at 198,000 miles I had no problem not replacing the hoses. Blah now that I type that tomorrow I'll bust a hose.
Personally at 198,000 miles I had no problem not replacing the hoses. Blah now that I type that tomorrow I'll bust a hose.

Ok Im a female but raised by a certified Mechanic (My dad) I was the boy child out of 4 girl since I dont have a brother. I was afraid to try this but thanks to you with the pics I know it will now be easy. I have a 4th gen max and needed the same transplant. I've had the radiator for 3 mos and havent done it so now I will. Thx

Junior Member
Joined: Feb 2008
Posts: 19
From: New England
A friend of mine helped me carry this out last fall, and it went well. This thread helped, as did this diagram.

That's a great write-up, thanks for taking the time to add it!
I just wanted to add that when I did a rad in my old 3rd gen, one thing I liked to do with the new rad was to run the garden hose through it for a few minutes just to make sure what flows out is clear water before installing.
Koyo is a good aftermarket brand. Hopefully my OE rad never fails, but Koyo would be my choice (OEM is too expensive).


Member
Joined: Feb 2003
Posts: 239
First, thanks for this ridiculous write up...will be following diligently this sat. I do have one question, as my rad leaks a little (can smell it), and the temp guage goes way up with AC on and sitting in heat. This morning while the temp was up, and at a light, I looked and saw only one fan was on. Is there an easy way to troubleshoot the fans....like should they both always be on together? I am going to change the rad (now with this writeup), and I would like to solve the fan issue if there is one.
thanks again for this writeup.
thanks again for this writeup.
Senior Member
Joined: Aug 2008
Posts: 897
From: Brandon, FL
First, thanks for this ridiculous write up...will be following diligently this sat. I do have one question, as my rad leaks a little (can smell it), and the temp guage goes way up with AC on and sitting in heat. This morning while the temp was up, and at a light, I looked and saw only one fan was on. Is there an easy way to troubleshoot the fans....like should they both always be on together? I am going to change the rad (now with this writeup), and I would like to solve the fan issue if there is one.
thanks again for this writeup.
thanks again for this writeup.
They are not always supposed to be working at the same time; usually the radiator fan first by itself, then the AC fan, if needed. But they both should be working at the same time if the AC is on.
If you can smell a leak, you should make sure that the radiator is actually leaking to avoid an unnecessary replacement.
Last edited by Nelsito65; Jul 7, 2010 at 06:37 AM.

Newbie - Just Registered
Joined: Feb 2008
Posts: 8

Junior Member
Joined: Apr 2009
Posts: 35
From: Florida
Just changed my radiator with the Koyo group buy. $140 delivered and it came in two days to Florida. I also changed my hoses. Great write-up and pictures! Thanks to C-Young. The only thing I might add, is that if you are changing hoses too, put the lower radiator hose on the engine before you lower the radiator into place. My hands are too big to fit that hose onto the engine after the radiator in in. I just put it on with the clamp loose, put the radiator in, and then put the other end on the radiator. Thanks for the help.

Newbie - Just Registered
Joined: Sep 2010
Posts: 3
From: Miami, Florida
C-Young, I'm not sure that I would have had the confidence to tackle a radiator replacement on my 2002 Maxima SE were it not for your write up. Thank you! The instruction in the Haynes manual isn't nearly as thorough.
The radiator I installed was a Read-Rad 431479 by Vista-Pro that I purchased online from Advance Auto. It fit perfectly. I flushed the cooling system before taking out the old radiator, leaving only water in the rest of the cooling system. After finishing the job, I added 100% Prestone extended life antifreeze and topped it up with a 50/50 Prestone mix.
Since I have 152K miles on the car, so I also replaced the hoses, the radiator cap, and the thermostat. Let me make a few suggestions based on this weekend's experience .
The thermostat replacement was the most challenging part of the job. The two upper bolts are relatively easy to extract and re-install if you screw in the serpentine belt tension pulley adjustment nut. The challenge was the bottom bolt located under the thermostat housing. That took about a half hour to extract and about an hour to reinstall using a combination of long and short sockets, a universal joint, ratchet, and small breaker bar. I dropped the bottom bolt in the engine at one point and never did find it. Fortunately, I had a replacement in my screw can of 'odds and ends that was a quarter inch short but fit.
Based on my troubles, I suggest that you place some silicone on the thermostat housing side of the thermostat gasket to hold it in place while you're installing it. Second, start the bottom bolt first. Getting a torque wrench to fit between the fender and the thermostat housing is out of the question so I tightened them snug with a small 3/8" breaker bar.
The last thing that I would suggest based on this weekend's experience is to remove the fan shroud assembly first, before you remove the radiator. The shroud assembly tends to catch on oxygen sensor wires and one of the automatic transmission lines that's clipped to the bottom. I didn't notice that automatic transmission line when I was struggling to get the fan shroud and the radiator assembly out. Concentrating on getting the fan shroud out alone lessens the number of potential obstacles that could be holding things up.


Newbie - Just Registered
Joined: May 2011
Posts: 8
Okay - how do I remove the air intake snorkle that is blocking the top of the radiator? I cannot remove the radiator without removing that - right? I see 2 screws but they just keep turning. I'm off to a hell of a start.
I want to DIY this but am stopped at the very beggining.
Thanks.
I want to DIY this but am stopped at the very beggining.
Thanks.
Newbie - Just Registered
Joined: May 2011
Posts: 8
Okay - got it - thanks RR5.
I'll pick up a Spectra radiator tomorrow. Seen mixed reviews but it's the only game in town. My biggest concern is that some reviewers are saying that the transmission line connectors are not flanged / flared to keep the lines from slipping off. Do you think that would really be a problem if I secured the clamps securely?
First time doing this. Car is on jacks now and the splash guards hanging from the front pins, (looks like I can get away with just unbolting the 3 bolts on each side + the one clip towards the rear and letting them hang from the pins on the front).
I'll be getting to it tomorrow and hopefully will be worth the time and cost savings that a mechanic would charge, (roughly $500 around here). I think I'll leave the thermostat this time as I've read that is a bit of a bear to get to on the 2001 although 100K is quite a bit of miles. I'll keep fingers crossed.
Feedback greatly appreciated.
Thanks - Van
If you are worried about the hose clamps, pick up some of these.
http://contentinfo.autozone.com/znet...EZ6BK/image/4/
http://contentinfo.autozone.com/znet...EZ6BK/image/4/

Senior Member
Joined: Oct 2009
Posts: 1,222
From: Atlanta
Tip for tranny lines. Use a plug on the tranny line so you do not lose tranny oil and it is not messy.
Find something that you can plug the rubber hose with ahead of time.
Saves you time and clean up, not to mention refilling the tranny with an unknown amount of replacement fluid.
Find something that you can plug the rubber hose with ahead of time.
Saves you time and clean up, not to mention refilling the tranny with an unknown amount of replacement fluid.
Newbie - Just Registered
Joined: May 2011
Posts: 8
All done. Seems to be all set – fans working, seeing no leakage and temp is right on. All went smooth except I over filled a little & made a minor mess. I’ll check the coolant level again when the car is cold and add as necessary.
Just saved around $350!
Thanks again for the great write up and subsequent tips. This site is a lot of help and all you guys are most patient with "amatures" like me
Thanks to all.
VAC
Just saved around $350!
Thanks again for the great write up and subsequent tips. This site is a lot of help and all you guys are most patient with "amatures" like me
Thanks to all.
VAC


Newbie - Just Registered
Joined: Sep 2010
Posts: 5
I replaced mine yesterday and i remember red auto tranny fluid comming out of the middle tranny cooling lines. I don't know if it's the rainy weather causing ****ty shifting or if it's low tranny fluid. Should i be topping off tranny fluid via dipstick hole?

Member
Joined: Oct 2000
Posts: 211
great write up! Thanks for the pictures and instructions.
I took 2 hours to replace mine with a $100 oreilly radiator (murray). The stupid plastic clips took the most time and effort. I partially broke them but was able to re-use.
To prevent losing transmission fluid I put fluid clamps on both lines. They are cheap at Harbor Freight.
I did not replace the hoses. I felt all around them to make sure there were no bulges or soft spots. They seem to be in decent condition for 11 years in the Texas heat.
The reason for the replacement was the seal between the metal and plastic top of the old radiator failed at about 150k miles.