
Custommaxima FSTB


Custommaxima FSTB
Ok, so the FSTB on custommaxima.com is only $35... as opposed to the Stillen at $187... I realize the Stillen FSTB is going to be better quality, but it's a pretty simple structure, so I'm thinking the custommaxima one probably yields similar improvements. Anyone tried the custommaxima FSTB? What does everyone think?


Senior Member
Joined: Jun 2005
Posts: 1,043
From: Toronto, ONT
Ive had my custommaxima.com FSTB for about a year and I think it as worth every penny. I dont know if the one they are currently selling is the same version but mine is a nice, soild bar, and the mounts are pretty solid too...I noticed turn-in and stability during high speed cornering (>70 km/h) was also a lot better with the FSTB
heres a pic:
heres a pic:
im going to fab my own. A lot of the ones now (whether you spend $30 or $200) dont have the thick brackets like they should...aside from the Cattman Ti-bar if you can find it.
I had a CE bar on my 4th gen for 4 years...that was a good bar. Ive seen the new ones CM sells..not the same quality
B
I had a CE bar on my 4th gen for 4 years...that was a good bar. Ive seen the new ones CM sells..not the same quality
B

But if you do fabricate your own, document the process. It would make for good reading. Maybe you'll start a trend.


Um... Racingline Performance.
But if you do fabricate your own, document the process. It would make for good reading. Maybe you'll start a trend.
But if you do fabricate your own, document the process. It would make for good reading. Maybe you'll start a trend.
 for Racingline. I've had mine for years.
Um... Racingline Performance.
But if you do fabricate your own, document the process. It would make for good reading. Maybe you'll start a trend.
But if you do fabricate your own, document the process. It would make for good reading. Maybe you'll start a trend.
I wouldnt be fabbing my own if i couldnt do it for free. of course its going to be all steel. so weight will be an issue but again for free itll be a fun experiment
B

the length of the bar
that height of the stacks (for lack of a better word) on the brackets
that angle of the stacks
the angle of the bar at the ends that sit in the brackets
the distance between the bottom of the bar and whatever sits underneath it
the thickness of the bar and brackets
the width between the stacks on the brackets
that should be about it.
B
Dammit, Jim, I'm a doctor, not a mechanical engineer!

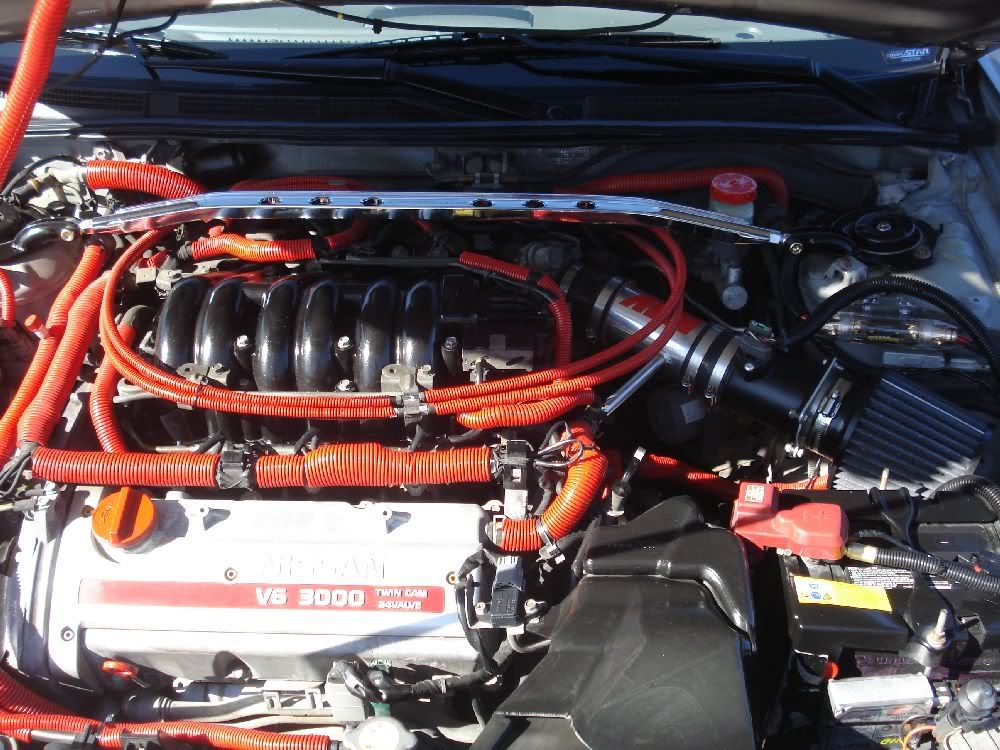
The thing immediately under the bar is the upper intake manifold. More specifically, it's where the upper IM and the intake plenum meet. That gap varies from FSTB to FSTB, and it can also vary depending on your engine mount bushings. Clearance is a common concern, particularly with phenolic spacers. Although really, it's rarely an issue.
[edit] Here's a thought: buy a really cheap FSTB off ebay, and use that as the baseline for fabrication of a more sturdy design.
Last edited by Rochester; Mar 11, 2010 at 06:35 AM.
Holy crap. I can't do all that. I can take some simple measurements, and some close-up pictures... but "angle of the bar"?
Dammit, Jim, I'm a doctor, not a mechanical engineer!
The thing immediately under the bar is the upper intake manifold. More specifically, it's where the upper IM and the intake plenum meet. That gap varies from FSTB to FSTB, and it can also vary depending on your engine mount bushings. Clearance is a common concern, particularly with phenolic spacers. Although really, it's rarely an issue.
[edit] Here's a thought: buy a really cheap FSTB off ebay, and use that as the baseline for fabrication of a more sturdy design.
B
Do you know whose engine bay the other picture is? Check out the intake and snorkel. Pretty sweet system.
Sorry to get off topic.
I don't know what that is. (Could that be an Altima SE?) It's got the 5.5 engine cover, but everything else is not quite right. The radiator brackets are different, there's some kind of material around the strut towers, the battery is sideways, and that snorkel is nothing I've ever seen before.
I don't know what that is. (Could that be an Altima SE?) It's got the 5.5 engine cover, but everything else is not quite right. The radiator brackets are different, there's some kind of material around the strut towers, the battery is sideways, and that snorkel is nothing I've ever seen before.

 :
:I just noticed the snorkel and intake and thought it looks like a decent CAI setup.


do you think the fact that the bar is bolted in to the brackets is a key component or just simply done that way for ease of install?
i would think one welded piece would be stronger and allow for more resistance...thoughts?
B
i would think one welded piece would be stronger and allow for more resistance...thoughts?
B
I've thought about that as well. As long as you tighten the bolt enough that it wont slip under load, its just as good as welding. But what the required torque is to achieve that is anyone's guess.
would everyone agree that the angle of the end of the bar appears to be between 15-25 degrees?
B

Senior Member
Joined: Oct 2009
Posts: 1,222
From: Atlanta
However I can not tell if one is really outperforming the other. You would think that it will. Robustly designed means tha factor of safety is higher, means it will do the job guaranteed. Whether the one being sold by CustomMaxima or Fleabay is doing the job...it might well be.
Senior Member
Joined: Oct 2009
Posts: 1,222
From: Atlanta
Comparing CustomMaxima and Fleabay FSTB, there's not much difference. One uses a flat stock and the other a billet (round) bar.
The forces on a strut bar can be downward and upward. More on upward when you are turning. The whole body is leaning on the strut. This upward force is being transferred via the FSTB link to the other tower, making it rigid and one piece. Hence better handling. JM2C.
The forces on a strut bar can be downward and upward. More on upward when you are turning. The whole body is leaning on the strut. This upward force is being transferred via the FSTB link to the other tower, making it rigid and one piece. Hence better handling. JM2C.
B
Senior Member
Joined: Oct 2009
Posts: 1,222
From: Atlanta
You have 2 parts. The frame-link and the strut brace. The frame has to attach to the brace. This is by bolts and should have a way to adjust, length wise, you will see a bolt for adjustment.
The brace connection is welded. That's what I meant. Do not make a brace that is all welded.
The brace connection is welded. That's what I meant. Do not make a brace that is all welded.