
What do you do to make your engine look pretty? :)


Before I replace the rad, I was looking all over the place for an all aluminum rad, and couldn't find one.
It's something I would definitely do sooner or later, but just the new fans I wanted are like 400-500$ so at some point I had to move on.
It's something I would definitely do sooner or later, but just the new fans I wanted are like 400-500$ so at some point I had to move on.

I just found a local powdercoating shop that will bead-blast my FSTB brackets and powdercoat them in "Black Chrome", which is this awesome gun-metal color... for only $25!
My polished titanium strut nuts will be showing up next week. Together with these reborn brackets, my strut towers should look amazing.
I'm very psyched for this. Pictures late next week.
My polished titanium strut nuts will be showing up next week. Together with these reborn brackets, my strut towers should look amazing.
I'm very psyched for this. Pictures late next week.
Here's my engine bay after about an hour this morning (sorry for the picture quality, a blackberry can only do so well):
Don't mind the engine cover, its going to be sanded down, taped perfectly and redone with the V6 3.5 in black. If anyone happens to have a spare Nissan emblem that goes on the engine cover, let me know!
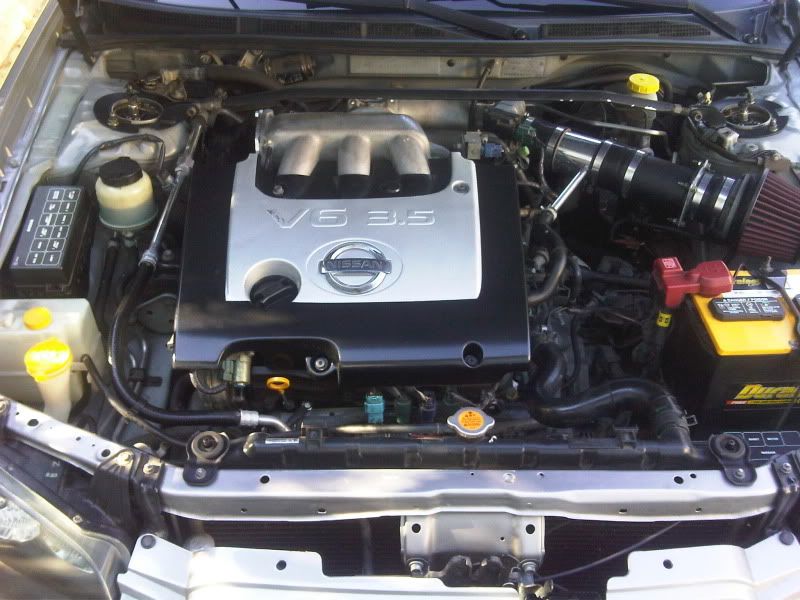
All I did today was clean the area with some de-greaser, turn the MAF around so you can't see the connector, clean all the caps, paint the radiator support things and polish the AC line and mid-pipe.
Last edited by QnzMax; Sep 18, 2010 at 03:00 PM.
If I remember correctly, I paid $20 for it new. Part #14048-5Y710
Bay looks good, QnzMax. I'm working on my AC pipe today, too... grinding down and repainting the retention bracket bolted to the side of the strut tower.
Guys... Meguiars Metal Polish works wonders on things like the main AC pipe, the Intake Manifold, the Throttle Body, the AC return line, the VIAS delete block plate, the brake master cylinder, etc.
You don't necessarily have to sand down the IM in order to get it polished clean. It will still have that rough surface, but after Meguiars Metal Polish and some elbow grease, it will positively gleam. I swear it.

You don't necessarily have to sand down the IM in order to get it polished clean. It will still have that rough surface, but after Meguiars Metal Polish and some elbow grease, it will positively gleam. I swear it.
Last edited by Rochester; Sep 18, 2010 at 03:20 PM.

I just found a local powdercoating shop that will bead-blast my FSTB brackets and powdercoat them in "Black Chrome", which is this awesome gun-metal color... for only $25!
My polished titanium strut nuts will be showing up next week. Together with these reborn brackets, my strut towers should look amazing.
I'm very psyched for this. Pictures late next week.
My polished titanium strut nuts will be showing up next week. Together with these reborn brackets, my strut towers should look amazing.
I'm very psyched for this. Pictures late next week.
The emblem can be purchased at your dealership's parts department. However, take note that it's parted out for the Altima... it's not in their system for the Maxima.
If I remember correctly, I paid $20 for it new. Part #14048-5Y710
Bay looks good, QnzMax. I'm working on my AC pipe today, too... grinding down and repainting the retention bracket bolted to the side of the strut tower.
If I remember correctly, I paid $20 for it new. Part #14048-5Y710
Bay looks good, QnzMax. I'm working on my AC pipe today, too... grinding down and repainting the retention bracket bolted to the side of the strut tower.
By the beginning of October I want to have it gleaming. Nothing a few hours of elbow grease won't cure.
Guys... Meguiars Metal Polish works wonders on things like the main AC pipe, the Intake Manifold, the Throttle Body, the AC return line, the VIAS delete block plate, etc.
You don't necessarily have to sand down the IM in order to get it polished clean. It will still have that rough surface, but after Meguiars Metal Polish and some elbow grease, it will positively gleam. I swear it.
You don't necessarily have to sand down the IM in order to get it polished clean. It will still have that rough surface, but after Meguiars Metal Polish and some elbow grease, it will positively gleam. I swear it.
Last edited by QnzMax; Sep 18, 2010 at 02:54 PM.
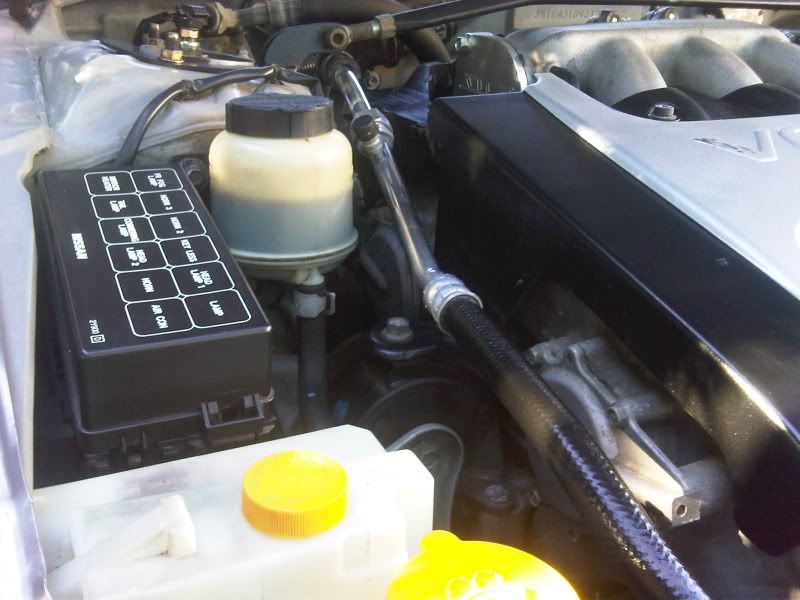
In addition to painting the AC bracket, I spent some time on the battery area today. The tray was filled with dirt (and rust). I cleaned it up best I could, cleaned the plastic tray liner, and polished the tie-down posts.
And then I had an idea about the battery itself, thinking that the large white "This is a battery" stickers were kind of dumb. So I took them off, cleaned up the housing, and finally found a home for my HAWK and Unorthodox Racing stickers.
Before:

...and after:

And then I had an idea about the battery itself, thinking that the large white "This is a battery" stickers were kind of dumb. So I took them off, cleaned up the housing, and finally found a home for my HAWK and Unorthodox Racing stickers.
Before:
...and after:
I used Mothers Aluminum polish on the AC pipe and the mid-pipe and it worked well. I'm sure the Meguiars metal polish works better though. I'll have to pick some up and give it a shot on the IM. I tried the Mothers on it and it didn't come out very well, just a slight shine.
 Ug.)
Ug.)But honestly, Mequires does a nice job on it. And if you don't mind the bumpy surface, I think this is totally acceptable.


to get the same effect you can just dip the upper in some drano and water. it will act like an acid and remove the outer layer of aluminum. Don't leave it in too long or you won't have an IM left. LOL.


I didn't think I could get happy with my IM without doing what jowo9 did, which was to remove it, sand and polish. (Remember the OP? Good grief, I've whored the heck out of this thread. Ug.)
But honestly, Mequires does a nice job on it. And if you don't mind the bumpy surface, I think this is totally acceptable.
Ug.)But honestly, Mequires does a nice job on it. And if you don't mind the bumpy surface, I think this is totally acceptable.
 yeah I like my polished IM
 but that looks good too!!


Check the company website: www.coolflex.com
It was a bit expensive but now I know why.
It was a bit expensive but now I know why.

I didn't think I could get happy with my IM without doing what jowo9 did, which was to remove it, sand and polish. (Remember the OP? Good grief, I've whored the heck out of this thread. Ug.)
But honestly, Mequires does a nice job on it. And if you don't mind the bumpy surface, I think this is totally acceptable.
Ug.)But honestly, Mequires does a nice job on it. And if you don't mind the bumpy surface, I think this is totally acceptable.

What did you polish that with? Just some paper towels?
It was a good opportunity to do some clean-up, too. I reconditioned the rubber spacers with silicone and armor all. Then I ground down the washer/spacers, primed and painted w/engine primer/paint. And the bolts themselves were ground down on the wire wheel. Although I might replace them with some new SS parts. IDK.
Blue shop towels, actually... but yes, simple paper towels and Mequires Metal Polish. I recommend wearing disposable gloves when messing with Metal Polish. You can pick up a 50ct box at any drug store.
Last edited by Rochester; Sep 19, 2010 at 05:06 PM.
I work in a pharmacy so I always have a ton of latex gloves that I don't have to pay for
 .
.
Theses still have a little more work to go... SO far they have been stripped of the crap nissan e-coat, then degreased with por 15 marine clean, soaked in por 15's metal ready to zinc coat them. Then 2 coats of por 15 rust proof "paint" They need to cure and I will paint again with the por 15 hardnose paint. Ne effen way are these going to rust again. LOL

Upper coolant pipe which holds the o2's, lower coolant pipe, oil cooler pipe passenger side and oil cooler pipe rear.
Upper coolant pipe which holds the o2's, lower coolant pipe, oil cooler pipe passenger side and oil cooler pipe rear.
I was just thinking of getting the new pipes, having them blasted, then prime and top-coat with engine paint. You know, simple stuff. What you did... damn, those are going to outlive the rest of your car, Ray. Some archeologist is going to dig up those pipes and wonder what kind of car they belonged to.
Impressive thoroughness, that's for sure. PM me when you install the 2 main water pipes. I'm curious how easy that is.
Impressive thoroughness, that's for sure. PM me when you install the 2 main water pipes. I'm curious how easy that is.
Last edited by Rochester; Sep 20, 2010 at 06:41 PM.
For sure, I'll post more pics when they are done and installed with the new hose.
Also giving the same treatment to the lower oil pan and the engine crossmember. No pics yet though
Also giving the same treatment to the lower oil pan and the engine crossmember. No pics yet though
Last edited by knight_yyz; Sep 21, 2010 at 01:44 AM.


The plan is still to keep the car until Spring 2012. That hasn't changed.


I received a box of nuts & bolts today from DressUpBolts.com.
There are 4 readily accessible "fender bolts" in our car, bolting the front fenders to the frame. They're kind of inconspicuous because they're painted the same color as the car. (That would be the two bolts in back in this photo.)
But they look much better replaced with stainless steel buttoncaps and stainless steel, rubber-backed washers:
Last edited by Rochester; Sep 25, 2010 at 07:37 PM.
Your guys' engine bays make me jealous..
But at the same time, they've inspired me to get off my dead butt and make something of mine.
Only pics I have right now:


I'll get more when I find my camera...
But at the same time, they've inspired me to get off my dead butt and make something of mine.
Only pics I have right now:
I'll get more when I find my camera...
Here's a pretty good before/after example.
This was my Racingling FSTB bracket, like maybe half a year ago. The bracket was chipped with flaking paint, and the nuts were rusty.

And here is my FSTB bracket tonight. The bracket was powdercoated, and the nuts are polished titanium.

I have to say, I'm pretty content with the way this turned out. I'm feeling like I want to find something else to powdercoat.
Here's the passenger side:

This was my Racingling FSTB bracket, like maybe half a year ago. The bracket was chipped with flaking paint, and the nuts were rusty.
And here is my FSTB bracket tonight. The bracket was powdercoated, and the nuts are polished titanium.
I have to say, I'm pretty content with the way this turned out.
I'm feeling like I want to find something else to powdercoat.Here's the passenger side:


Thanks, Bryan!
I've got the itch to powdercoat my Radiator tie-downs and the PS Reservoir bracket in "black chrome", but I also need to drive my car. That, and I'm starting to get burned out on this engine bay project.
And I see winter coming down the road.
 It's almost as if months of conversation and photos never happened.
I've got the itch to powdercoat my Radiator tie-downs and the PS Reservoir bracket in "black chrome", but I also need to drive my car. That, and I'm starting to get burned out on this engine bay project.
And I see winter coming down the road.
It's almost as if months of conversation and photos never happened.
I received some Password-JDM Fender Washers in the mail today. Basically, they're Stainless Steel, M6x20mm, countersunk allenheads with an aluminum, anodized collar. The word "Password-JDM" is etched across the top in English and Japanese... which kind of sucks, and won't come off. But otherwise, they're pretty cool.
I've been using 4 of them in red, 2 for each headlight tie-down, seen here:

I got to thinking they might look good when used for the engine cover, so I moved them around.
Turns out I liked the bolts, just not the red. So these I bought in black.

When looked at up close, they have a nice, edgy detail. Very clean (logo notwithstanding). It's a slightly raised, flushed look against the cover.

And then when you step back, it blends instead of popping out at you like the red collars would. It's far more subtle. I think I like the look.

I've been using 4 of them in red, 2 for each headlight tie-down, seen here:
I got to thinking they might look good when used for the engine cover, so I moved them around.
Turns out I liked the bolts, just not the red. So these I bought in black.
When looked at up close, they have a nice, edgy detail. Very clean (logo notwithstanding). It's a slightly raised, flushed look against the cover.
And then when you step back, it blends instead of popping out at you like the red collars would. It's far more subtle. I think I like the look.
Still lots of things I want to do with the engine bay and clean-up... but I'm pretty happy with where it's going, considering 8 years of winter driving.
I figure, when next Spring comes around, cleaning the engine bay should be as easy as a shop-rag, some armor all, and and a bottle of detailing polish.

I figure, when next Spring comes around, cleaning the engine bay should be as easy as a shop-rag, some armor all, and and a bottle of detailing polish.
Last edited by Rochester; Oct 1, 2010 at 05:22 PM.
Just realized that these Password-JDM fender washers actually do look good in red on the engine cover... when the ones on the headlights are black. It was the all-red look that was distracting. So I swapped my bolt collars.
Also just figured out that 20mm countersunks are measured from the flat top of the bolt, and not the tapered edge. So if anyone gets these things for your engine cover, think about replacing the bolts with 25mm versions. Check the web for retailers. There's chrome, and polished titanium...


Also just figured out that 20mm countersunks are measured from the flat top of the bolt, and not the tapered edge. So if anyone gets these things for your engine cover, think about replacing the bolts with 25mm versions. Check the web for retailers. There's chrome, and polished titanium...
Last edited by Rochester; Oct 1, 2010 at 05:28 PM.