LED Gauges ~ Hi Res Photos and Vid
 03-22-2011, 11:54 AM
#41

Thanks man.
I'm still working out the specifics. From my reading it seems 5.5 clusters have needles that are sandable, which means their colour can be changed.
Also, the 5.5 SE light's tint cannot be removed, meaning Cool Blue and White/Blue are the only realistic options, without changing gauge faces.
So far I have little information on GXE, etc. for all years.
I would love some information, or pictures of everyone's stock gauges for reference (day and night). This way I can compile a list of options for each model/year for customers to choose from, and for you guys to view.
I STILL need a Nighttime shot of the stock 2000/2001 SE gauges, can someone please grab that for me?
 03-22-2011, 12:09 PM
#42
Senior Member
Thread Starter
iTrader: (4)
Join Date: Jul 2006
Location: Ontario, Canada
Posts: 5,548

From the 2002/2003 SE gauges? I had read that it was actually a plastic piece, not just a coating?
PM sent.
03-22-2011, 06:23 PM
#43
 03-22-2011, 07:58 PM
#44
Senior Member
Thread Starter
iTrader: (4)
Join Date: Jul 2006
Location: Ontario, Canada
Posts: 5,548
Is is also correct that all GLE/GXE gauges are white (no blue tint)?
I think it's time to go to the wreckers and buy some gauges if I can't get the answers. I have to clear up available colour schemes.
03-24-2011, 06:48 PM
#45
Member

Join Date: Mar 2011
Location: SoCal
Posts: 242
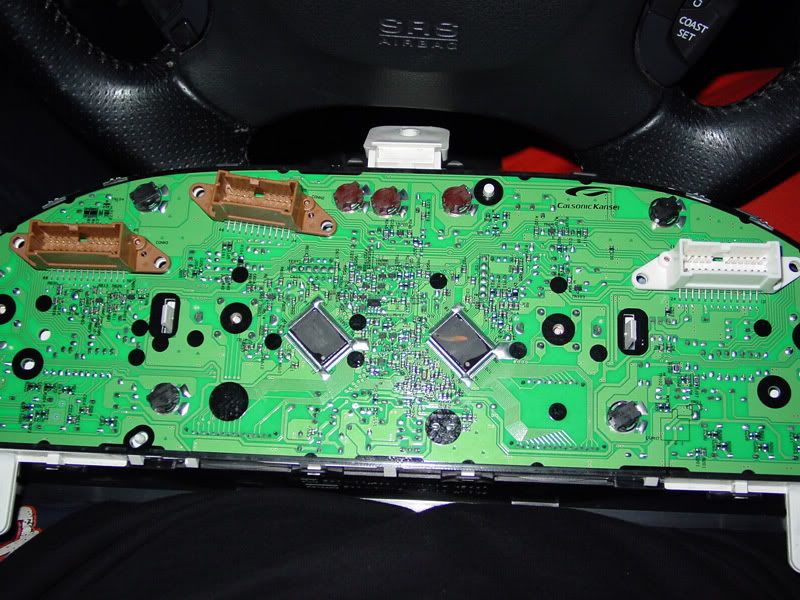
Alright guys, I'm confused here. I was under the assumption that I could easily remove my cluster and replace the four stock bulbs with LEDs for a slight improvement. However, once I got in there I find that those four bulbs are not accessible.
Compared to the photos earlier in this thread, I don't have the same four wedge bulbs visible. I have two lower ones (backlighting for info panels) and two uppers only. Is this a '02+ thing? I was really hoping to NOT have to remove needles just to change the bulbs
Pics of mine:
Pics of what I expected, posted earlier in thread.
Last edited by SeedyROM; 03-24-2011 at 07:01 PM.
 03-24-2011, 09:22 PM
#47
Senior Member
Thread Starter
iTrader: (4)
Join Date: Jul 2006
Location: Ontario, Canada
Posts: 5,548
Alright guys, I'm confused here. I was under the assumption that I could easily remove my cluster and replace the four stock bulbs with LEDs for a slight improvement. However, once I got in there I find that those four bulbs are not accessible.
Compared to the photos earlier in this thread, I don't have the same four wedge bulbs visible. I have two lower ones (backlighting for info panels) and two uppers only. Is this a '02+ thing? I was really hoping to NOT have to remove needles just to change the bulbs
Pics of mine:
Pics of what I expected, posted earlier in thread.
He hehehehe.
Thanks SO much for posting this tonight, what a coincidence!!
I just popped apart a customers 2001 AE gauges, and found exactly what you're looking at. I was shocked, TOTALLY different setup.
I'm working on it right now. To keep things short bro, I apologize for leading you on the wrong path, I don't think many of the gauges were made this way, it seems like Nissan changed the style from my style, to the one you have, and back again. Good to know when I'm pursuing this business, it COMPLETELY changes how you want to illuminate the gauge.
I am very excited with this new challenge I've been presented though, I imagine it's similar to the I30/I35 work I'll have to do.
Seedy, the whole board, gauges, etc are soldered together, they're not easily removable like most clusters.
And you only have 2 illumination bulbs, they are the ones up top with the black housing. Those are the ONLY ones for the illumination of the gauges, pulling apart the board won't give you access to more, there aren't any more.
Installing plug and play LED's will cause serious hotspots in your application, have you tried it yet? Pop two of those bad boys in there and snap some pictures, I want to see it

I'll PM you some ideas after you try that, and after I try a few things tomorrow.
Last edited by TunerMaxima3000; 03-26-2011 at 10:02 AM.
03-24-2011, 09:47 PM
#48
Member
Join Date: Mar 2011
Location: SoCal
Posts: 242
No worries Tuner, you were extremely helpful and at the end of the day I just have $20 in bulbs I'll find another use for. I'm just glad I was able to get some pics and document this for anyone else diving in. Such a strange change within a model series!
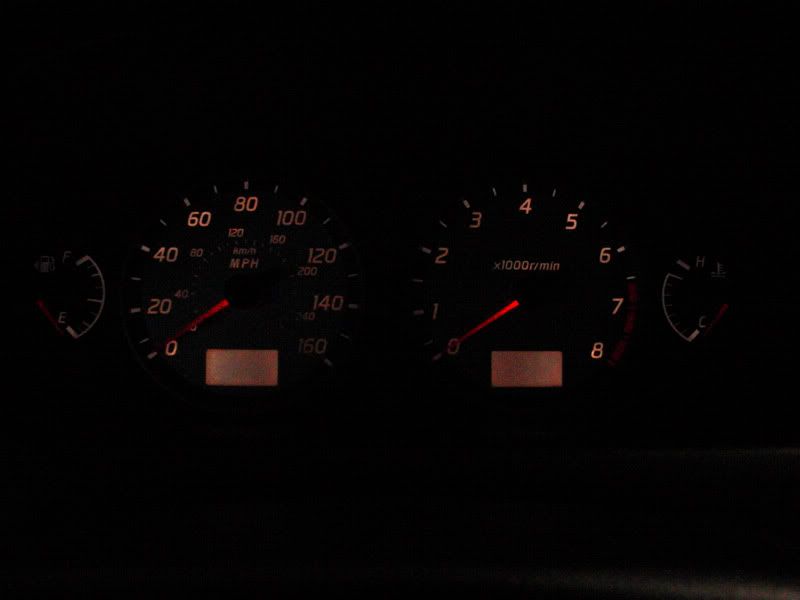
Anyway, you're dead on about hotspots. I tried, for the hell of it, to plug in just the ones I had access to and it was terrible. It's really a shame too because the difference was really quite good (much brighter), just very limited in coverage. It looks like I'll just sit tight and wait for a better solution as you and others work on it.
Here's a pic I took to show what you probably saw. 2XLED on the left, 2XStock on the right. Doesn't even come close!
03-24-2011, 09:56 PM
#49
Senior Member
Thread Starter
iTrader: (4)
Join Date: Jul 2006
Location: Ontario, Canada
Posts: 5,548
No worries Tuner, you were extremely helpful and at the end of the day I just have $20 in bulbs I'll find another use for. I'm just glad I was able to get some pics and document this for anyone else diving in. Such a strange change within a model series!
Anyway, you're dead on about hotspots. I tried, for the hell of it, to plug in just the ones I had access to and it was terrible. It's really a shame too because the difference was really quite good (much brighter), just very limited in coverage. It looks like I'll just sit tight and wait for a better solution as you and others work on it.
Here's a pic I took to show what you probably saw. 2XLED on the left, 2XStock on the right. Doesn't even come close!
The T5 will fit your ashtray/center console light (under your ACC), it will fit in your key ring lighting as well. That should take care of two of them.
 03-25-2011, 12:16 AM
#52
Member
Join Date: Mar 2011
Location: SoCal
Posts: 242
Yeah that's what I expected to see, thanks for posting though. Where did you get the LED's from though? That's pretty weak IMO, the cheap Ebay ones I bought look nicer than that, those are Single SMD's from Vleds or Superbright right?
The T5 will fit your ashtray/center console light (under your ACC), it will fit in your key ring lighting as well. That should take care of two of them.
The T5 will fit your ashtray/center console light (under your ACC), it will fit in your key ring lighting as well. That should take care of two of them.
Good call on the other areas, I'll pop them in tomorrow. I'll also send you a PM about the cluster.
03-25-2011, 02:15 AM
#53
Senior Member
Thread Starter
iTrader: (4)
Join Date: Jul 2006
Location: Ontario, Canada
Posts: 5,548
You know what you must do
P.S. I liked your old SIG pic much better Tun3r.
Those are the Superbrightled.com ones. Maybe their set isn't up to snuff. Link here: http://www.superbrightleds.com/cgi-b...%2F74-xHP.html
Good call on the other areas, I'll pop them in tomorrow. I'll also send you a PM about the cluster.
Good call on the other areas, I'll pop them in tomorrow. I'll also send you a PM about the cluster.

Either way, I'd like to see some pictures of them installed in the other locations. They may be cheap SMD's that don't have a high intensity wide viewing angle (50% after 30-40 Degrees is standard for decent Wide angle types, those look more like 30% after 40 Degrees). It will be easier to judge that when I see one in the 'ashtray/center console' location under the ACC.
PM replied.
04-16-2011, 08:45 PM
#54
Member
Join Date: Mar 2011
Location: SoCal
Posts: 242
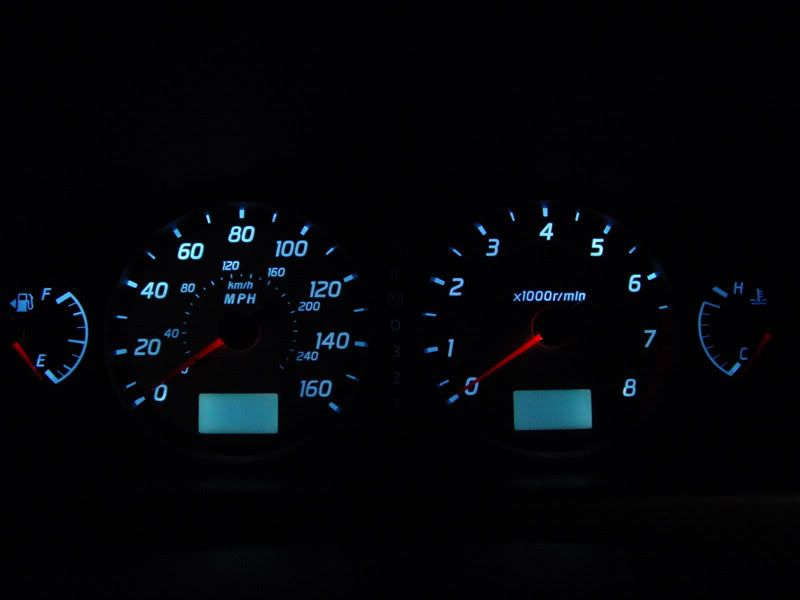
ATTN 5.5 (02+) owners, I have some good news! It looks like if you get the right LEDs from SuperBrightLEDs.com you can actually get a worthy improvement as a "drop-in" solution! I created a new thread with all the details which can be found here:
http://forums.maxima.org/5th-generat...one-works.html
Big thanks to TunerMaxima3000 for all his support and help on this. If I had a '00 I'd probably go for one of his custom LED setups but since he doesn't currently work on the '02s with our nasty cluster, this is a very cheap $15 possible solution.
Here's a quick before/after for those of you following this thread. Before with 100% stock '02 cluster.
After with 74-xHP3 LEDs from SuperBrightLEDs.com (four of them)
Please direct any questions/concerns to my main thread as I may not check this one.
04-16-2011, 11:22 PM
#55
Senior Member
Thread Starter
iTrader: (4)
Join Date: Jul 2006
Location: Ontario, Canada
Posts: 5,548
^Still think the bottom two don't illuminate the gauges at all. I think they only illuminate the LCD screens. I would still install them, because the illuminate the screen nicely, but it's good to note whether they actually impact the Gauge illumination.
P.S. I do work on the 5.5 gauges now. I have a cheaper option for you guys, brighter than above, I'm currently working on a strategy to eliminate/reduce the hotspots that come with it though.
Hate to post ***** this pic, but it's the only one I have right now, been too busy to get at hotspot removal. Should be done soon.
5.5 Style SE:

EDIT 22/04/2011: Finally got my hands on a GLE. Canadian Model but you guys will get the idea. Pics are with a point and shoot, for some reason they came out blue looking in the pics. They're acually quite white. There's also No Hotspots visible to the human eye, but the point and shoot pics up one over by 6000 RPM.
BEFORE:

AFTER:

P.S. I do work on the 5.5 gauges now. I have a cheaper option for you guys, brighter than above, I'm currently working on a strategy to eliminate/reduce the hotspots that come with it though.
Hate to post ***** this pic, but it's the only one I have right now, been too busy to get at hotspot removal. Should be done soon.
5.5 Style SE:
EDIT 22/04/2011: Finally got my hands on a GLE. Canadian Model but you guys will get the idea. Pics are with a point and shoot, for some reason they came out blue looking in the pics. They're acually quite white. There's also No Hotspots visible to the human eye, but the point and shoot pics up one over by 6000 RPM.
BEFORE:
AFTER:
Last edited by TunerMaxima3000; 04-22-2011 at 09:08 AM.
04-16-2011, 11:52 PM
#56
Member
Join Date: Mar 2011
Location: SoCal
Posts: 242
Oh wow, didn't realize you were doing 5.5s now! I'm glad to hear you're working out the issues and moving forward on it. No doubt your method is the ideal way if possible. Looking forward to seeing more!
I mentioned it my thread too but you're right, only the top two "bulbs" light the gauges. The bottom two just do the square odo/trip meters.
I mentioned it my thread too but you're right, only the top two "bulbs" light the gauges. The bottom two just do the square odo/trip meters.
04-17-2011, 05:49 AM
#57
Senior Member
Thread Starter
iTrader: (4)
Join Date: Jul 2006
Location: Ontario, Canada
Posts: 5,548
Right on man. I'm happy to see some more guys joining that have the confidence to delve into some more modifications that most shy away from. There's always a way, just need to have the determination to find it  If I believed everything I read on the forum that 'wasn't possible', I wouldn't be where I am with mods. Keep up the good work.
P.S. The Right half of the gauges (temp, etc) is actually designed just a little differently, I have no idea why because they should be identical, I think it might be the 'red zone' on the Tach, but whatever the reason, it always seems to be dimmer on that side, it's very hard to get away from, even on a full LED modded gauge cluster.
If I believed everything I read on the forum that 'wasn't possible', I wouldn't be where I am with mods. Keep up the good work.P.S. The Right half of the gauges (temp, etc) is actually designed just a little differently, I have no idea why because they should be identical, I think it might be the 'red zone' on the Tach, but whatever the reason, it always seems to be dimmer on that side, it's very hard to get away from, even on a full LED modded gauge cluster.


 05-15-2011, 04:48 PM
#60
Senior Member

Join Date: Dec 2005
Location: Leicester, Ma
Posts: 1,124
Tuner, was reading thru this thread and at one point you state that nissan went from the type of cluster you usually work on (with all the bulbs) to the 02 cluster (with only 4- 2 uppers and 2 lowers). Does that mean an 03 GLE has the other cluster with all the lights or the newer type like the 02 with just 2 up top and 2 at the bottom.
Reason asking is i am very handy at soldering and such and instead of buying the SBL i would just get an assortment of resistors and LEDS.
Was thinking on buying 3 or 5mm directional LEDS
http://cgi.ebay.com/100-x-5mm-White-...item3ca601dba5
and making my own led cluster. What im wondering is since the 2 upper ones are the only illuminaters (im assuming)
Thoughts
PS one thing not sure if you have done and if you have what has your experience been with this> I take the rounded end of the LED and shave it down to be flat so the directionality of it isnt as bright straight ahead. It gives it a dispersion effect. Thinking this may lessen the hot spoting and illuminate the whole cluster more equally.
Last edited by jeff5347; 05-15-2011 at 04:55 PM.
05-15-2011, 06:54 PM
#61
Senior Member
Thread Starter
iTrader: (4)
Join Date: Jul 2006
Location: Ontario, Canada
Posts: 5,548
Tuner, was reading thru this thread and at one point you state that nissan went from the type of cluster you usually work on (with all the bulbs) to the 02 cluster (with only 4- 2 uppers and 2 lowers). Does that mean an 03 GLE has the other cluster with all the lights or the newer type like the 02 with just 2 up top and 2 at the bottom.
Reason asking is i am very handy at soldering and such and instead of buying the SBL i would just get an assortment of resistors and LEDS.
Was thinking on buying 3 or 5mm directional LEDS
http://cgi.ebay.com/100-x-5mm-White-...item3ca601dba5
and making my own led cluster. What im wondering is since the 2 upper ones are the only illuminaters (im assuming)
Thoughts
PS one thing not sure if you have done and if you have what has your experience been with this> I take the rounded end of the LED and shave it down to be flat so the directionality of it isnt as bright straight ahead. It gives it a dispersion effect. Thinking this may lessen the hot spoting and illuminate the whole cluster more equally.
Reason asking is i am very handy at soldering and such and instead of buying the SBL i would just get an assortment of resistors and LEDS.
Was thinking on buying 3 or 5mm directional LEDS
http://cgi.ebay.com/100-x-5mm-White-...item3ca601dba5
and making my own led cluster. What im wondering is since the 2 upper ones are the only illuminaters (im assuming)
Thoughts
PS one thing not sure if you have done and if you have what has your experience been with this> I take the rounded end of the LED and shave it down to be flat so the directionality of it isnt as bright straight ahead. It gives it a dispersion effect. Thinking this may lessen the hot spoting and illuminate the whole cluster more equally.
~I laugh at that Ebay seller, we all know where he gets the LED's from, it seems to net him some sales from 'patriot' types though, even though it's a load of crap
~As far as the custom LED cluster, you will have to remove the needles and gauge faces to get in behind to do a full custom job on your cluster. It's not a simple task, but of course, it's do-able. If you are going to go this route, I would actually suggest getting some SMD's and some blank circuit board, then you can install that inbehind the gauges. SMD's have a much brighter and wider light dispersion, as such they will do a better job in there, you'll also need less.
~Yes I've done all kinds of custom methods to LED's to get different effects out of them, that one is no different. They make LED's like that now though, not like the old days, so I just get those ones, saves a lot of time and messing around. Search for 'flat top' LEDs.
05-16-2011, 01:42 AM
#62
or you can look for straw hat led's, they have about 140* dispersion
And removing the needles is not a problem as long as you put the gauge in "diagnosis mode" before and after the removal
And removing the needles is not a problem as long as you put the gauge in "diagnosis mode" before and after the removal
Last edited by knight_yyz; 05-16-2011 at 01:45 AM.
05-16-2011, 04:44 AM
#63
Senior Member
Join Date: Dec 2005
Location: Leicester, Ma
Posts: 1,124
knight i was looking at all the cluster light mods and saw yours. You removed the bulbs and put an led in each spot. So 4 all together. Do you still run that setup?
Also was wondering the specs on the leds you used:
Forward voltage, forward Ma (current).
Oh also wondering what wattage the leds were and the luminosity
Also with the led in the bulb spot is there enough for 2 leds to fit in each hole or is it only big enough for one bulb each?
Last edited by jeff5347; 05-16-2011 at 04:48 AM.
05-16-2011, 07:30 PM
#64
Senior Member
Thread Starter
iTrader: (4)
Join Date: Jul 2006
Location: Ontario, Canada
Posts: 5,548
There are half decent ones offered from bestshop2008k (I think that's the seller's name didn't double check). They are far from the best LED's I've seen though.
I still recommend SMD's if you're taking it all apart anways, I'm quite sure Ray agrees with that as well. Have you finished your Gauges yet man?
And yes, if you can get it into calibration mode no problems, just follow the steps precisely.
-Matt
Last edited by TunerMaxima3000; 05-16-2011 at 07:34 PM.
05-17-2011, 05:24 AM
#65
Senior Member
Join Date: Dec 2005
Location: Leicester, Ma
Posts: 1,124
curious on this so when i start working on mine. When i get i calibration moe i just remember where the gauges are say
MPH @ 21
RPM @ 3300
Gas @ 3/4 full
Heat @ 1/4
So do you just pull them off ( how do you pull them off) and when you are all done place the needle where it read when you took it apart?
No problem doing it but trying to see how you go about it.
Edit: also wondering. Once you have finished and are done with cal mode or your done installing everything, do you just turn the ign on and it will go back to normal driving mode or whatever you call it?
Last edited by jeff5347; 05-17-2011 at 05:27 AM.
05-17-2011, 06:04 AM
#66
Senior Member
Join Date: Dec 2005
Location: Leicester, Ma
Posts: 1,124
Ok so this is what i was thinking on doing.
This is our cluster apart.
What i was thinking with the clear acrylic that disperses the light is to drill holes and attach the leds inside each hole to illuminate the dash fully. Below in the dash the red spots are where i would put each led.

Not sure if i would be able to get behind the needles to illuminate them but i think having an led behind each numbered line and spaced evenly on the gas and temp gauge would evenly disperse the light. I would run flat top leds so they disperse the light even more and reduce hot spotting.
Once i find the leds i want i will run my calculations on how many leds in a series and what resistor to run on each circuit. I would them all off to a common - and + where knight shows they are on the plugs on the cluster.
So essentially right now im thinking it would be 30 leds total unless i want to try/ figure something different and then would have 10 resistors. 3 leds and a resistor in each circuit. Each of the 3 resistors would be daisy chained then a resistor. Each one would have a + and - wire so essentially 10 - wires and 10 + wires. I would connect the neg wires to the common ground that knight shows and the + wires as well to the + spot. So this is my plan. Know to order leds and figure the resitors needed and order those
 05-17-2011, 05:36 PM
#68
Senior Member
Thread Starter
iTrader: (4)
Join Date: Jul 2006
Location: Ontario, Canada
Posts: 5,548
As to your post Jeff, I'll get back to you on it hope you're not in a rush, I had a wheel bearing calf out so I'm a little swamped right now. I have some tips for you though.
05-18-2011, 07:07 PM
#70
Senior Member
Thread Starter
iTrader: (4)
Join Date: Jul 2006
Location: Ontario, Canada
Posts: 5,548

Yellow circles are around LED's that will likely hot-spot because they are too close to each other.
Red circles are kind of WTF? Why are you putting them there, are those indicator locations or something, what am I missing there?
As far as installation, I would recommend you use perforated blank board, and just cut it to size (circular/half moon for each gauge). Then you can install it under the gauges.
If you want to get fancy, you can try cutting into the plastic that carries the light through the gauge face, but you should be doing it with something very precise, otherwise you will block more light than you will put in. Drilling all the way through won't work, that will just cause a bunch of little hotspots.
05-19-2011, 04:22 AM
#71
Senior Member
Join Date: Dec 2005
Location: Leicester, Ma
Posts: 1,124
The red circled ones are not really anything. meaning i didnt want the leds right under the LCD so they wouldnt hot spot. Figured go below to light that area. I do have the Perf board so i can do that. I was curious how much space is behind the display meaning is there enough room for the leds. I figure if worse comes to worse i will just put the leds in the stock bulb location
05-19-2011, 04:38 AM
#72
Senior Member
Join Date: Dec 2005
Location: Leicester, Ma
Posts: 1,124
Tuner , just curious. Do you think i am going about this with over kill on all the leds on each number. I wan t the gauge to look nice and bright and more up to date but you know what they say, keep it simple stupid. DO i have to much going on and dont need all that i have to make it brighter and better. Any other ideas on led placement and making it simple but effective?
 05-19-2011, 05:00 AM
#74
Senior Member
Join Date: Dec 2005
Location: Leicester, Ma
Posts: 1,124
^^^ havent taken it apart but assuming just plugs. I think the cable is for older models and the cable would be a mechanical speedo.
Tuner. Some ?s. YOu stated on page one to Speedy that they went from individual lighting then to the 4 bulb setup then back. I have the 03 GLE so im curious how the back of mine looks. ALso wondering on the TCS light. I always turn mine on so i would like it to illum white....but im thinking it has a orange filter to ake it orange. Have any ideas on ridding the orange to get white or blue? Also how many leds are on your set up from the video on the first post. Thinking the 30 i have/had planned may invite planes to land.
Also the gear indicator. It illums blue but the gear your in reads green. How did you accomplish that with out any bleed or just in general.
Im sure once i get it out today or tomorrow im gonna have more questions to make my work a little easier.
05-20-2011, 08:37 AM
#77
Senior Member
Join Date: Dec 2005
Location: Leicester, Ma
Posts: 1,124
Okay someone help me here. How in the world do you remove the needles from the temp, gas, speedo and rpm. From trying to get them out it seems like you need to use a ton of force and i dont want to f them up so i held off for now. I went in to diag mode to get their pos so thats good...
Other thing i was thinking, if i get the cover off i want to change the leds behind the TCS light and the gear indicator. From what i see the leds are green for the gear ind and orange for the TCS light.
Other thing i was thinking, if i get the cover off i want to change the leds behind the TCS light and the gear indicator. From what i see the leds are green for the gear ind and orange for the TCS light.
05-20-2011, 09:59 AM
#78
Senior Member
Thread Starter
iTrader: (4)
Join Date: Jul 2006
Location: Ontario, Canada
Posts: 5,548
With LEDs......
Okay someone help me here. How in the world do you remove the needles from the temp, gas, speedo and rpm. From trying to get them out it seems like you need to use a ton of force and i dont want to f them up so i held off for now. I went in to diag mode to get their pos so thats good...
A flathead screwdriver won't take it off evenly, it will pinch and you can damage the gauge shaft. If you can't find a small one, try a standard Interior clip tool like the one pictured below, with the thinnest end you can find.

And if you don't want to get the tool you can just use two small flathead screwdrivers, just be very careful, pry evenly, and don't scratch the gauge face. Using a high quality business card or piece of a cigarette pack under the screwdriver is a nice little trick you can try in an attempt to save the gauge face from damage
Last edited by TunerMaxima3000; 05-20-2011 at 10:03 AM.
05-20-2011, 11:09 AM
#79
Senior Member
Join Date: Dec 2005
Location: Leicester, Ma
Posts: 1,124
Do you mean to say you always turn it OFF? The light in the dash only comes on when it's turned off. The 2003 uses LED's for all indicator lights, all you have to do is swap it out for a different colour LED. Mark which LED it is before you take it apart.
If you're ready to remove them, the best way is with a small interior clip tool. It looks like a snakes tounge, with a bend so you can pry slightly.
A flathead screwdriver won't take it off evenly, it will pinch and you can damage the gauge shaft. If you can't find a small one, try a standard Interior clip tool like the one pictured below, with the thinnest end you can find.
And if you don't want to get the tool you can just use two small flathead screwdrivers, just be very careful, pry evenly, and don't scratch the gauge face. Using a high quality business card or piece of a cigarette pack under the screwdriver is a nice little trick you can try in an attempt to save the gauge face from damage
Yea i meant to say i always turn the TCS off so the light comes on. Orange is not my color of choice.
Ok i dont have that tool but ill try the business card and 2 screwdriver approach. Once i get these off and all done, when installing the needles, do they go on easier than taking them off
?