
CoryXavier Bop plate install how 2


CoryXavier Bop plate install how 2
Thanks to all who have brought my product. below are steps to install the bop plate.

tools needed:
flat head screw driver
rachet
extension
10mm socket
1/2 wrench
12mm gear rachet wrench ( very important you buy this if you dont have it )
ultra grey rtv gasket maker
zip tie
CoryXavier BOP kit ( hardware included )
step 1
remove engine cover

step 2
using 10mm socket , extension and rachet remove bolt holding wire harnes

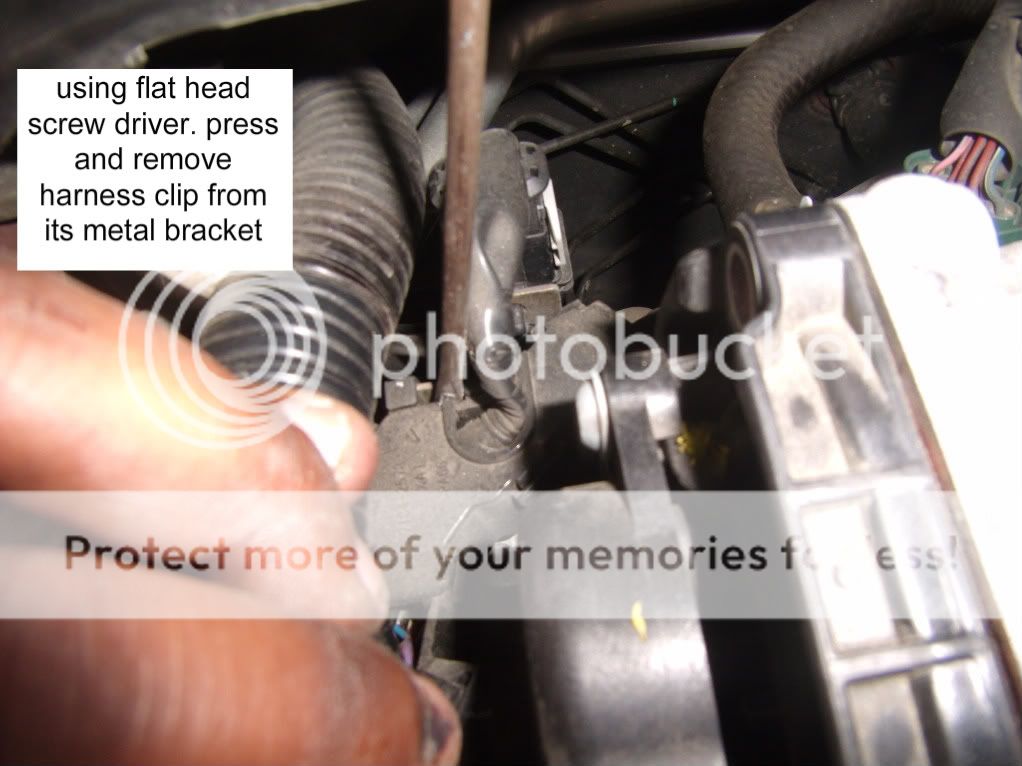
step 3
using flat head screw driver press clip holding the harness to the metal bracket. be carefully not to break this while doing this. if so it doesnt effect the way the harness is positioned. just a fyi
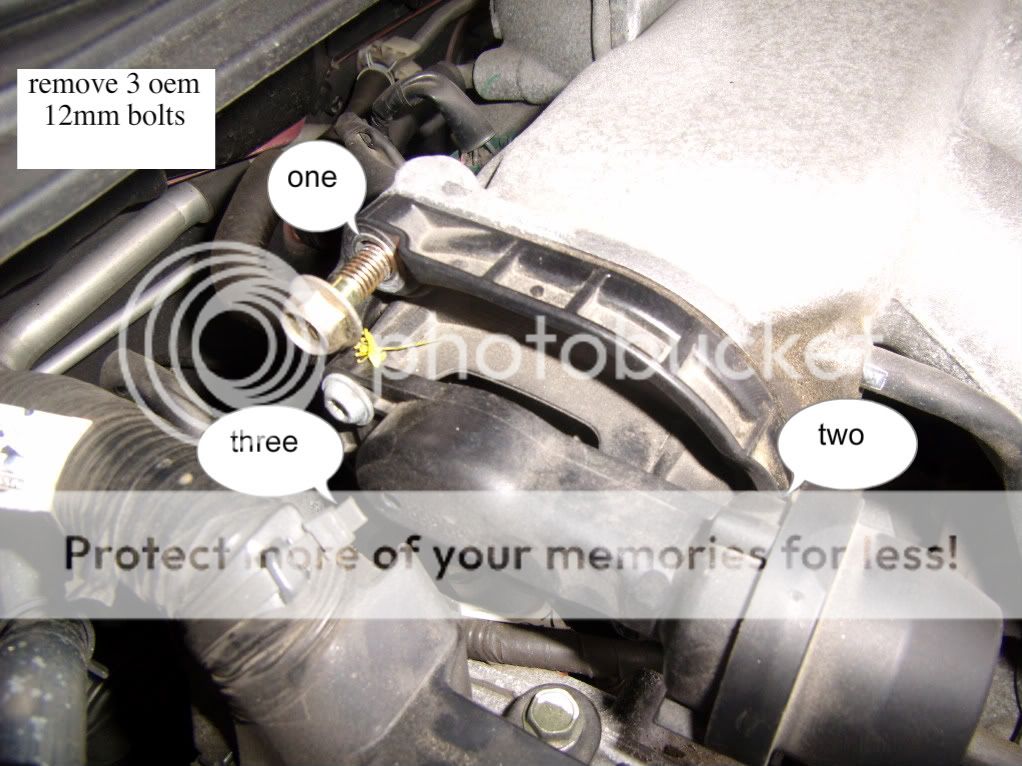
step 4
remove the 12mm o.e.m bolts holding the V.I.A.S using a 12mm rachet gear wrench. bolt number 3 will be the hardest to remove. please use gloves and have patience for this bolt
step 5
remove V.I.A.S from manifold

step 6
remove air line from V.I.A.S and zip tie to air line still connected to the manifold.

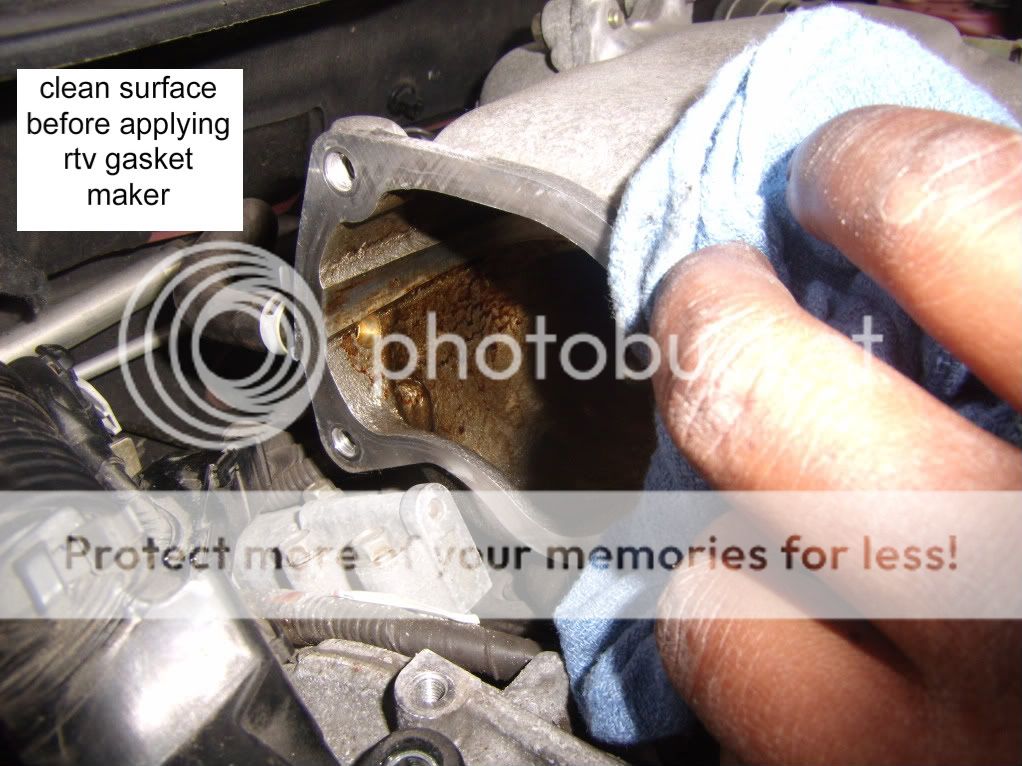
step 7
clean oil from V.I.A.S area to ensure rtv gasket maker has a clean surface for sealing
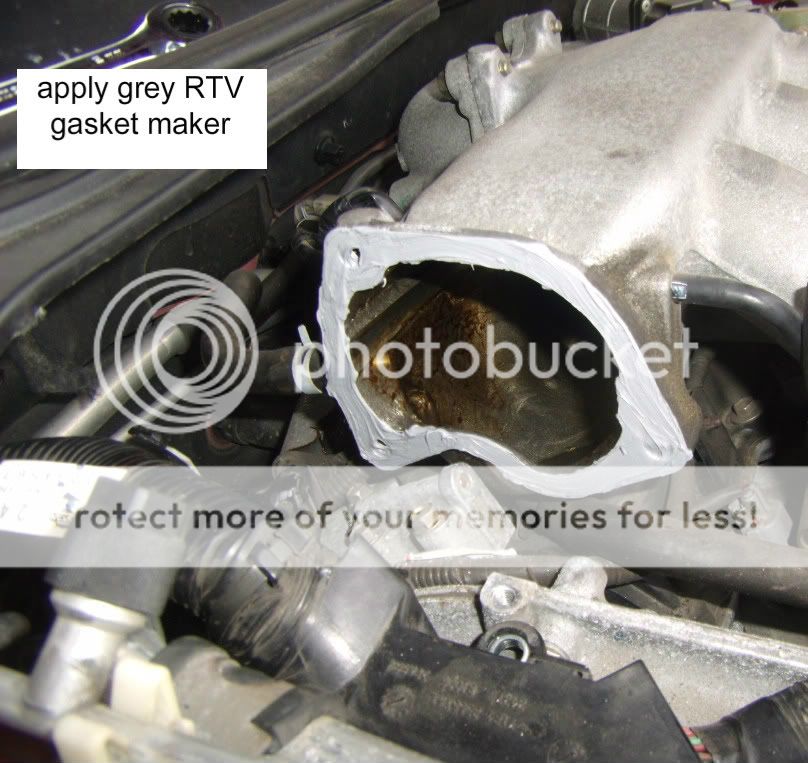
step 8
apply rtv gasket maker to mainfold area of where the V.I.A.S was removed. best way is to apply by finger to ensure a leveled amount
step 9
install Bop plate
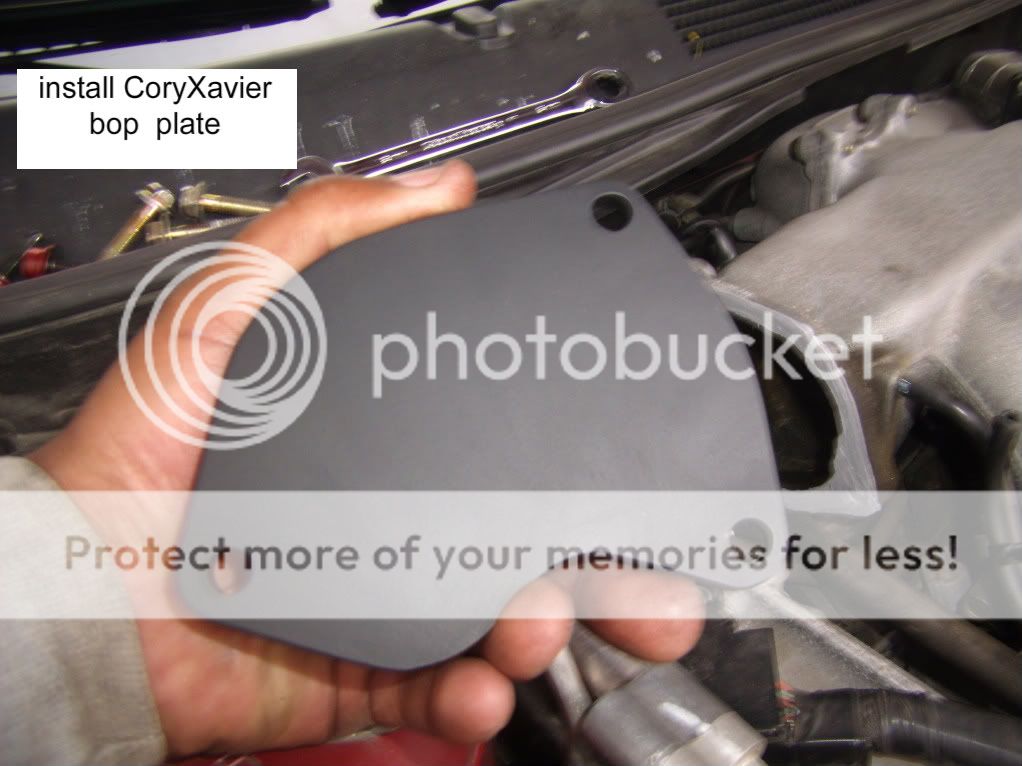
step 10
using the bolts that came with the kit install the bop plate.

step 11
hand tighten bolts and wipe off any excess gasket maker that may have been pressed out

reverse steps
3
2
1
enjoy the new hps from this mod.
now the legals
Lawyers made me do it
I CORYXAVIER MAKE NO WARRANTY, EXPRESS OR IMPLIED, INCLUDING BUT NOT LIMITED TO ANY WARRANTY OF MERCHANTIBILITY OR FITNESS FOR ANY PARTICULAR PURPOSE WITH RESPECT TO THE MARKETING AND SALE OF THE CONTENT. UNDER NO CIRCUMSTANCES SHALL CORYXAVIER BE LIABLE FOR ANY INDIRECT, INCIDENTAL OR CONSEQUENTIAL DAMAGES (INCLUDING LOST PROFITS) INCURRED IN CONNECTION WITH THE USE OF THE INFORMATION OR PRODUCT STATED ABOVE. NEITHER CORYXAVIER NOR PARTNERS SHALL BE LIABLE FOR DAMAGES CAUSED OR ALLEGEDLY CAUSED BY FAILURE OF PERFORMANCE ERROR, OMISSION, INTERRUPTION, DELETION, DEFECT, DELAY IN OPERATION OR TRANSMISSION OR COMMUNICATIONS LINE FAILURE INVOLVING THE CONTENT.
tools needed:
flat head screw driver
rachet
extension
10mm socket
1/2 wrench
12mm gear rachet wrench ( very important you buy this if you dont have it )
ultra grey rtv gasket maker
zip tie
CoryXavier BOP kit ( hardware included )
step 1
remove engine cover
step 2
using 10mm socket , extension and rachet remove bolt holding wire harnes
step 3
using flat head screw driver press clip holding the harness to the metal bracket. be carefully not to break this while doing this. if so it doesnt effect the way the harness is positioned. just a fyi
step 4
remove the 12mm o.e.m bolts holding the V.I.A.S using a 12mm rachet gear wrench. bolt number 3 will be the hardest to remove. please use gloves and have patience for this bolt
step 5
remove V.I.A.S from manifold
step 6
remove air line from V.I.A.S and zip tie to air line still connected to the manifold.
step 7
clean oil from V.I.A.S area to ensure rtv gasket maker has a clean surface for sealing
step 8
apply rtv gasket maker to mainfold area of where the V.I.A.S was removed. best way is to apply by finger to ensure a leveled amount
step 9
install Bop plate
step 10
using the bolts that came with the kit install the bop plate.
step 11
hand tighten bolts and wipe off any excess gasket maker that may have been pressed out
reverse steps
3
2
1
enjoy the new hps from this mod.
now the legals
Lawyers made me do it
I CORYXAVIER MAKE NO WARRANTY, EXPRESS OR IMPLIED, INCLUDING BUT NOT LIMITED TO ANY WARRANTY OF MERCHANTIBILITY OR FITNESS FOR ANY PARTICULAR PURPOSE WITH RESPECT TO THE MARKETING AND SALE OF THE CONTENT. UNDER NO CIRCUMSTANCES SHALL CORYXAVIER BE LIABLE FOR ANY INDIRECT, INCIDENTAL OR CONSEQUENTIAL DAMAGES (INCLUDING LOST PROFITS) INCURRED IN CONNECTION WITH THE USE OF THE INFORMATION OR PRODUCT STATED ABOVE. NEITHER CORYXAVIER NOR PARTNERS SHALL BE LIABLE FOR DAMAGES CAUSED OR ALLEGEDLY CAUSED BY FAILURE OF PERFORMANCE ERROR, OMISSION, INTERRUPTION, DELETION, DEFECT, DELAY IN OPERATION OR TRANSMISSION OR COMMUNICATIONS LINE FAILURE INVOLVING THE CONTENT.
Dude...that's a sh*tload of RTV. You have enough there to make four or five gaskets.
Also, for the sake of cleanliness, why not use an OEM VIAS gasket from Nissan? I doubt it costs very much, couldn't be much more than the RTV.
Also, for the sake of cleanliness, why not use an OEM VIAS gasket from Nissan? I doubt it costs very much, couldn't be much more than the RTV.

The late A34 model (as seen in this tutorial) also uses a plastic valve. All the more reason to chop/hack it. 
5.5 gens use a metal (Al) valve, as we all know as well as a metal reusable gasket.
5.5 gens use a metal (Al) valve, as we all know as well as a metal reusable gasket.
Last edited by NmexMAX; May 17, 2011 at 10:21 AM.


You & your bolts, cripes.
For the 5.5 gen it's 3 bolts, that's it, nothing more or less..


IMO Id rather re-use the stock 12mm and put a washer on than use 1/2" head bolts. Im kinda picky but i hate when i look in and engine bay and see a mix of different bolts. If the car uses metric sized bolts, than only metric sized bolts should be used lol.


its made out of 1/4 aluminum. and painted in 500 degree engine enamel black
the stock bolts will not work when installing the bop plate thats why i include the shorter bolts and the bolts thread used are metric its the head thats standard 1/2"
if washers are a concern its 33 cents for them. its doesnt impact the bop plate at any rate
the stock bolts will not work when installing the bop plate thats why i include the shorter bolts and the bolts thread used are metric its the head thats standard 1/2"
if washers are a concern its 33 cents for them. its doesnt impact the bop plate at any rate
Last edited by NmexMAX; May 18, 2011 at 10:49 AM.
 My bad!


Thread
Thread Starter
Forum
Replies
Last Post
-ReLLiK-
4th Generation Classifieds (1995-1999)
0
Sep 8, 2015 12:02 PM