
Maxima HID Retrofit Build


10/21/12 Update;
So, got the Koito Sealant on Friday and started the process taking the driver side apart again for the 3rd time . This Koito sealant is a royal pain in the **** to shape BUT I would never go back and use any other sealant. It is what sealant should behave, pliable when heated to almost liquid, but hardened when cold. I have to re-heated it several times to shape it thin. This sealant is actually easier to handle since they are not sticky like the regular butyl. I love this stuff, eventhough they cost twice as much and takes 3 times longer to apply. It comes in a brick size block.

Clamped overnight, put electrical tape around the turn signal area to really make sure it is tight, and with additonal vent on the bottom ( deleted the side since it interferes with the front bumper).
Put them in the car saturday morning, started the spray routine again, and drove around heavy rain (on/off) also. So, So far so good.
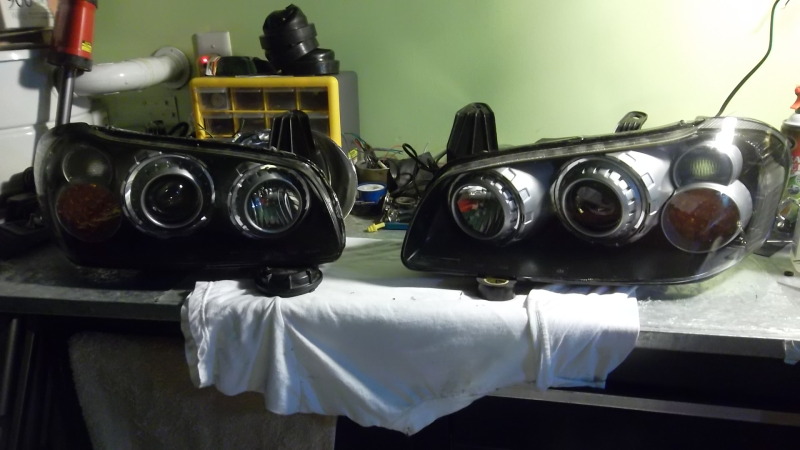
Here is the comparison, driver side with Koito Sealant. Passenger side still with butyl tape.


Started to tear down the passenger side Saturday afternoon and went thru the old sealant and applied the Koito and clamped over night. Installed the passenger side Sunday afternoon. Sprayed with water a little and no condensation, OK feeling kinda good. Went to airport to pick up relative, drove the car about 40 minutes in slight drizzle rain ( on/off), got home and BAM there it was again , on the passenger side only though, the same exactl spot and amount as before Koito Seal. I was pissed at this point.
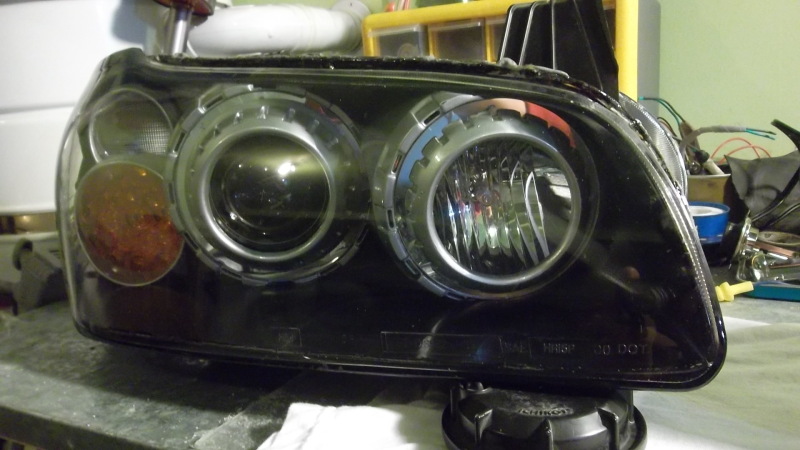
So, I sat there in the garage staring at it for a good 15 minutes kinda scrathing my head. New seals, put more "flowable" silicone around the curves, sockets were tight, headlight seam looked tight, what the hell is going here. Then I realized, oh I forgot to put additonal vent... Just for **** and gigles, I checked the original vent that came with the light. "U" shape rubber hose looked good, but then I looked at the hole and kinda looked suspicous. The hole was BLOCKED, the hole wasn't a thru hole, it was solid plastic. oh man.....I was about to take this light to the shooting range and blow it to pieces.
Original

Drilled vent hole

Dried the condensation with heater and heat gun and shop vac it for a minute or so to make sure the moisture are out. Put the bulbs back and mounted in the car again. Just curios if they have blind hole on the driver side and yes it wasn't thru hole also. Drilled it again and put them back in the car.
Drove the car around the block to get the warm air to circulate and sprayed the light with water ( about 2-5 minutes only) and so far so good. We'll see tomorrow and the next day when the rain is here.


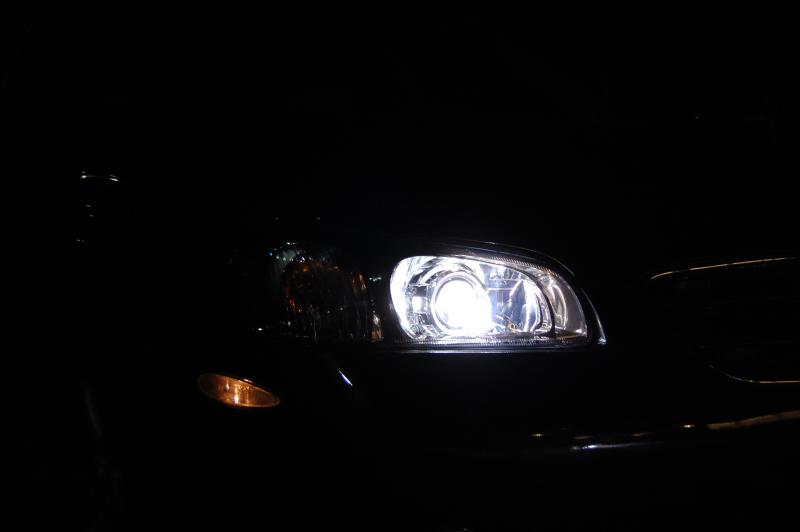
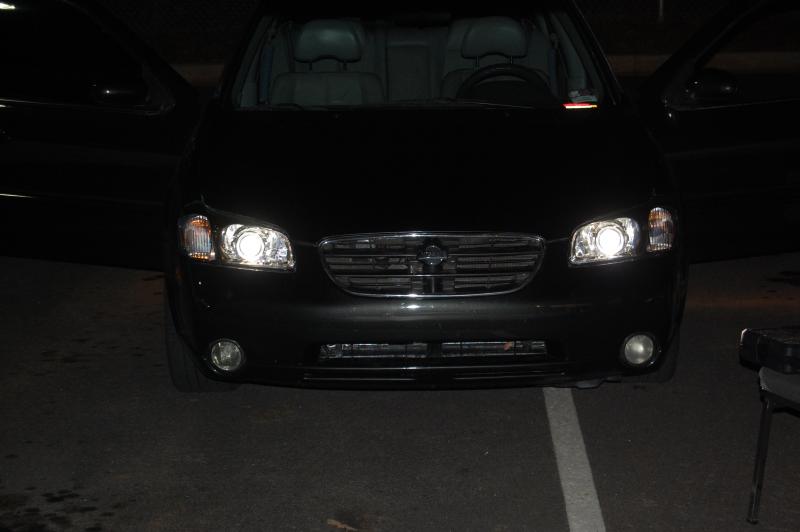
Road shots


So, got the Koito Sealant on Friday and started the process taking the driver side apart again for the 3rd time
. This Koito sealant is a royal pain in the **** to shape BUT I would never go back and use any other sealant. It is what sealant should behave, pliable when heated to almost liquid, but hardened when cold. I have to re-heated it several times to shape it thin. This sealant is actually easier to handle since they are not sticky like the regular butyl. I love this stuff, eventhough they cost twice as much and takes 3 times longer to apply. It comes in a brick size block.Clamped overnight, put electrical tape around the turn signal area to really make sure it is tight, and with additonal vent on the bottom ( deleted the side since it interferes with the front bumper).
Put them in the car saturday morning, started the spray routine again, and drove around heavy rain (on/off) also. So, So far so good.
Here is the comparison, driver side with Koito Sealant. Passenger side still with butyl tape.
Started to tear down the passenger side Saturday afternoon and went thru the old sealant and applied the Koito and clamped over night. Installed the passenger side Sunday afternoon. Sprayed with water a little and no condensation, OK feeling kinda good. Went to airport to pick up relative, drove the car about 40 minutes in slight drizzle rain ( on/off), got home and BAM there it was again
, on the passenger side only though, the same exactl spot and amount as before Koito Seal. I was pissed at this point.So, I sat there in the garage staring at it for a good 15 minutes kinda scrathing my head. New seals, put more "flowable" silicone around the curves, sockets were tight, headlight seam looked tight, what the hell is going here. Then I realized, oh I forgot to put additonal vent..
. Just for **** and gigles, I checked the original vent that came with the light. "U" shape rubber hose looked good, but then I looked at the hole and kinda looked suspicous. The hole was BLOCKED, the hole wasn't a thru hole, it was solid plastic. oh man.....I was about to take this light to the shooting range and blow it to pieces. Original
Drilled vent hole
Dried the condensation with heater and heat gun and shop vac it for a minute or so to make sure the moisture are out. Put the bulbs back and mounted in the car again. Just curios if they have blind hole on the driver side and yes it wasn't thru hole also. Drilled it again and put them back in the car.
Drove the car around the block to get the warm air to circulate and sprayed the light with water ( about 2-5 minutes only) and so far so good. We'll see tomorrow and the next day when the rain is here.
Road shots
Last edited by Genes1s; Oct 21, 2012 at 09:33 PM.
10/22/12
Went to work in heavy rain this morining and it was fine. Car parked on the street with rain all the day, it was fine. Went home tonight from work in heavy stop and go traffic and heavy rain, condensation came back, the same damm spot on both headlights, I guess all of those thing I did didn't really make it go away.
The foggin was 95% gone, other than a little bit on the corner lights, after the car sits for 40 minutes. I'm clueless. More vents???
10/24/12
I didn't do anything to it since Monday and the fogging never came back since. I've driven it in rain, cold, sprayed with garden hose for 30 minutes, and even took it to brushless car wash this afternoon.
Maybe the fogging was due to the moist air that were inside the headlights from being in the garage for quite sometimes, maybe the system is now equalized itself which I will never understand how the Physics works. If this doesn't fog again when it rains next time, I'll ship it to the owner.
Last update 10/27/12
No heavy rain since last Monday. Yesterday wasn't raininig so I wanted to know if I can make the fogging to show up again, sure enough the fogigng came back after I sprayed them with garden hose directly on the lens for 15 minutes non stop while the engine is running hot ( got it on video ). It was at the same spot and amounts as it was before. Once I shut down the engine and light, the fogging went away after 30 minutes. If it were moisture inside, like actual water drop, the fogging would stay or come back when the engine compartment temperature is hot, but this isn't the case
Today has been raining all day, I drove around for a good 1.5 hours in rain to do errand with lights on/off and not a slight hint of fogging.


I fought this condensation for a week now and I'm not sure what the solution is to remove the fogging completely. I don't think it's a leak issue meaning water getting inside rather an air flow/heat transfer issue. Putting more vents is also option but I'm not sure it would help. I have added one more vent and drilled the exisitng clogged vent and it didn't help. Putting desicant packs as a good measure is also an option, but you have to take them out and replace it once in awhile since they become saturated and loose the ability to absorb moisture.
So, I work out a deal with the owner and these lights will be shipped to him Monday.
I'm going to continue to study about this issue with my own light/used similar ebay lights so that I have more time to do more experiment. Hopefully, I can fix this issue permanently espeecially on Ebay lights so that it would never have ANY type of fogging no matter what.
No heavy rain since last Monday. Yesterday wasn't raininig so I wanted to know if I can make the fogging to show up again, sure enough the fogigng came back after I sprayed them with garden hose directly on the lens for 15 minutes non stop while the engine is running hot ( got it on video ). It was at the same spot and amounts as it was before. Once I shut down the engine and light, the fogging went away after 30 minutes. If it were moisture inside, like actual water drop, the fogging would stay or come back when the engine compartment temperature is hot, but this isn't the case
Today has been raining all day, I drove around for a good 1.5 hours in rain to do errand with lights on/off and not a slight hint of fogging.
I fought this condensation for a week now and I'm not sure what the solution is to remove the fogging completely. I don't think it's a leak issue meaning water getting inside rather an air flow/heat transfer issue. Putting more vents is also option but I'm not sure it would help. I have added one more vent and drilled the exisitng clogged vent and it didn't help. Putting desicant packs as a good measure is also an option, but you have to take them out and replace it once in awhile since they become saturated and loose the ability to absorb moisture.
So, I work out a deal with the owner and these lights will be shipped to him Monday.
I'm going to continue to study about this issue with my own light/used similar ebay lights so that I have more time to do more experiment. Hopefully, I can fix this issue permanently espeecially on Ebay lights so that it would never have ANY type of fogging no matter what.


I did a retro for someone here about a year ago with the same brand ebay lights with FX-R 1.0, and he hasn't have condensation problem at all, which makes me wonder if they changed the design or have manufacturing defect along the way.
During my research, early 04-05 TSX headlights have massive problem with this type of condensation (low miles) that they put a big glob of desicant pack inside headlights. Early TL have the same issue also.
10/28/12 Quad retrofit update
The Quad retro is no more. Took the RX8 Hybrid projectors since someone was going to buy only to back out last minutes, so feeling kinda lazy to put them back in and have smashed Acura TSX headlights laying around about to go to trash can . Cut the high beam reflector and Sika-ed it to the bezel, so now I have TSX high beam reflector, uses H1 halogen bulb, for my high beam.

I actually like the look of this better than the quad, weird. Re-seal with KOITO sealant and ready for torture. I'm still wondering why some headlights are fogged easier than others.
The Quad retro is no more. Took the RX8 Hybrid projectors since someone was going to buy only to back out last minutes, so feeling kinda lazy to put them back in and have smashed Acura TSX headlights laying around about to go to trash can . Cut the high beam reflector and Sika-ed it to the bezel, so now I have TSX high beam reflector, uses H1 halogen bulb, for my high beam.
I actually like the look of this better than the quad, weird. Re-seal with KOITO sealant and ready for torture. I'm still wondering why some headlights are fogged easier than others.


Tonight was dry and cold, so took few pics.
No more quad no more OEM bulbs, just G37 Bi-X, STI-R clear lens, 5000K Morimoto Bulbs, and 50W Morimoto Ballasts.


No more quad no more OEM bulbs, just G37 Bi-X, STI-R clear lens, 5000K Morimoto Bulbs, and 50W Morimoto Ballasts.
Last edited by Genes1s; Nov 10, 2012 at 09:40 PM.


New toys....
I've been working on getting few power tools setup for my garage to make the retrofitting a little easier. One of the aspiration that I have was to be able to test the headlight for water ingression. More sealant doesn't always mean water tight, it also looks messy and hard to clean. Too little sealant could also be a problem. Enough sealant where the joint looks clean yet water tight is what I'm after, just like OEM I guess. Different sealant also behaves differently. Water tight headlight doesn't mean a condensation free headlight, but at least I know that water leak isn't the factor. I've been thinking about several ways of doing it. Pressurizing or pulling vacuum of the headlight were the 2 options. I could just easily hook up a shop vac to the headlight and dunk in the water, pull the vacuum, and look for water traveling inside. This is not ideal since it will be messy and the fact that I can't really control the vacuum pressure without modifying the plumbing. So, I went to pressurizing method. The problem with this is that I need to make sure the air is clean and dry. Well, that is what I have been working on for several weeks now, Piecing together air drying system and getting compressor small enough to do the job while minimizing noise. Pressuring the headlight also allows me to focus on small section of the seam, so it is cleaner and easier to do with soapy water.
So, here is my new setup.
This SENCO compressor is awesome, it's very quite that I can actually still have conversation and listen to music. I bought a bigger one several days back for the same price, and it was so loud and had too much vibration that I get rid of it the next day.
Air from compressor enter to a SpeedAire 5 micron filter which will remove corrosive, moisture, pipe scale, dirt protecting the precision parts in the regulator


It then goes to SpeedAire air regulator where pressure is regulated as needed. It would then go to .01 Micron Motor Giuard Coalescing filter where oil aerosols and microscopic particles down to .01 micron absolute are removed from the air.

lastly, air enters the Motor Guard desiccant dryer which is dispersed through a 50 micron element. The element distributes air evenly through the desiccant bed. The desiccant absorbs the water vapor from the air producing very dry air.

I took my spare headlights (OEM 5th gen) and did test.
Spray some soapy water in the turn signal socket and bubble showing up.

Next, I made a .030" hole on the top and covered it with glue un-evenly.

Sprayed some soapy water and pressurized it. First there was no buble at 20 psi, when it started to show up at 30 psi. Don't want to increase too much pressure since it might damage the seal. In the beginning I tried with 40 psi before any holes were made, and the headlight seam was OK, but the back dust cap popped.

Another common area that is prone for leaking is the turn signal seam. This time it was all good.

This stage air drying system is also good for spray gun for painting application, which will allow me to do custom paint on the bezel/shrouds with more preccision.
My next project is actually restoring old bike for my son birthday next year. I'm going to use this air drying system to paint and hopefully have the bigger compressor to do the sanding, blasting, and using air tools.
So, here is my new setup.
This SENCO compressor is awesome, it's very quite that I can actually still have conversation and listen to music. I bought a bigger one several days back for the same price, and it was so loud and had too much vibration that I get rid of it the next day.
Air from compressor enter to a SpeedAire 5 micron filter which will remove corrosive, moisture, pipe scale, dirt protecting the precision parts in the regulator
It then goes to SpeedAire air regulator where pressure is regulated as needed. It would then go to .01 Micron Motor Giuard Coalescing filter where oil aerosols and microscopic particles down to .01 micron absolute are removed from the air.
lastly, air enters the Motor Guard desiccant dryer which is dispersed through a 50 micron element. The element distributes air evenly through the desiccant bed. The desiccant absorbs the water vapor from the air producing very dry air.
I took my spare headlights (OEM 5th gen) and did test.
Spray some soapy water in the turn signal socket and bubble showing up.
Next, I made a .030" hole on the top and covered it with glue un-evenly.
Sprayed some soapy water and pressurized it. First there was no buble at 20 psi, when it started to show up at 30 psi. Don't want to increase too much pressure since it might damage the seal. In the beginning I tried with 40 psi before any holes were made, and the headlight seam was OK, but the back dust cap popped.
Another common area that is prone for leaking is the turn signal seam. This time it was all good.
This stage air drying system is also good for spray gun for painting application, which will allow me to do custom paint on the bezel/shrouds with more preccision.
My next project is actually restoring old bike for my son birthday next year. I'm going to use this air drying system to paint and hopefully have the bigger compressor to do the sanding, blasting, and using air tools.
Last edited by Genes1s; Nov 17, 2012 at 09:08 PM.
 MSU2000, I can't thank you enough for the retrofits that you have done for me. The work is top notch and your communication you had with me was great.
 As for the fogging, I honestly don't go back out and look after driving around in the rain :P. Here are some well over due pictures of your work on my car.
I am extremely happy with the retros, just wish i could get brighter bulbs but you already warned me not to and I will listen

I might get my hands on a 2000 lexus and you already know I will be shooting you a message or an E-mail about putting retros in those. Picture time!
Last edited by SR20Power; Jan 14, 2013 at 08:50 PM.
Attachment 3243
Attachment 3244
Attachment 3245
Attachment 3247MSU2000, I can't thank you enough for the retrofits that you have done for me. The work is top notch and your communication you had with me was great.
As for the fogging, I honestly don't go back out and look after driving around in the rain :P. Here are some well over due pictures of your work on my car.
I am extremely happy with the retros, just wish i could get brighter bulbs but you already warned me not to and I will listen
I might get my hands on a 2000 lexus and you already know I will be shooting you a message or an E-mail about putting retros in those. Picture time!
Thanks
A couple of retros I did the past months.
2012 CRV TL Bi-X.


2002 Odyssey Van G37 Coupe Bi-X. OEM Headlights, OEM Koito D2S Bulbs, OEM E55 Shrouds + E46-R Extension, OEM 3rd Gen Matsu Ballasts, Morimoto Relay
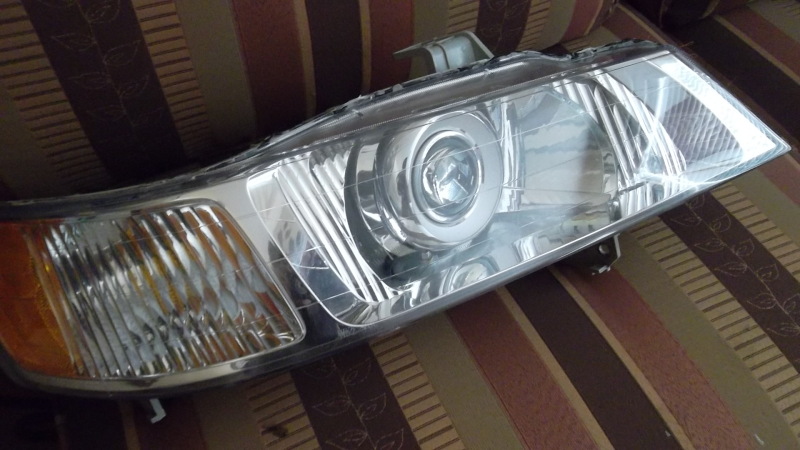

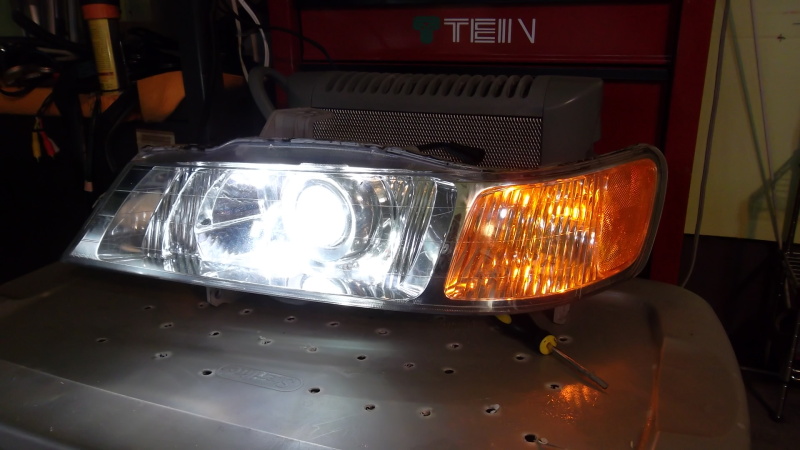


Wall Shots


2012 CRV TL Bi-X.
2002 Odyssey Van G37 Coupe Bi-X. OEM Headlights, OEM Koito D2S Bulbs, OEM E55 Shrouds + E46-R Extension, OEM 3rd Gen Matsu Ballasts, Morimoto Relay
Wall Shots
Last edited by Genes1s; Jan 21, 2013 at 08:22 PM.

It's not 100%. I can guarantee that the seal is tight and do a test to predict how much condensation and how fast it would evaporate, but to make 100% free condensation in ANY conditions, I'm not there yet. OEM manufacturers struggle with this also and it's not as simple as people think. It's actually pretty complex problem since we can't discount physics. Both CRVs and Odyssey went thru the condensation and seal test and so far, no fogging.
Last edited by Genes1s; Jan 21, 2013 at 12:45 PM.

I got a some oem 5.5 lights that i'd be willing to donate. They probably won't have any or a really messed up lens. And was the starting retro I did. However, everything else is in tact from what i know. The plastic caps on the adjustment screws broke off; so something would need to be figured out there. But if you handle the shipping costs, consider them yours 
I got a some oem 5.5 lights that i'd be willing to donate. They probably won't have any or a really messed up lens. And was the starting retro I did. However, everything else is in tact from what i know. The plastic caps on the adjustment screws broke off; so something would need to be figured out there. But if you handle the shipping costs, consider them yours
Thanks, we'll work it out. I'm supposed to ship my current headlights for someone here already and I've been dragging my feet for awhile since I'm way to busy with things. I'll work on my milling machine and get them up and running the way I wanted then I'll be ready to jump on the 5.5th gen. It's going to use custom bracket like I the Quad retro since that is the cleanest way to do retrofit IMO. We'll keep in touch.

Hey MSU2000, your current work is great!
I'm actually going to rebuild my setup with some new projectors. Last Spring, I purchased the last generation FX-R projectors, and within a month, the FX-R 3.0 came out. I wasn't too happy, but I decided to keep them and deal with my purchase. I waited a few months to do the retro, but I should have tested everything in the first place. Ever since I got them up and working, I never really liked the output. The cutoff seems to be tweaked and after multiple tear downs and tweaking, I could never get the cutoff I had with my first retro (Moncef has these currently).
Now, here is my question. I've always done fancy projector installs with fancy custom bolting and/or brackets, but I've been looking more into the simple epoxy method. What are your thoughts? My method of bolts and brackets seems to take way too long and becomes a pain when adjusting for a level cutoff, so I'm looking for a better route. I will be purchasing new 5th gen housings and FX-R 3.0 projectors, so I don't really want to start slopping on the epoxy and end up making a mistake with the aiming.
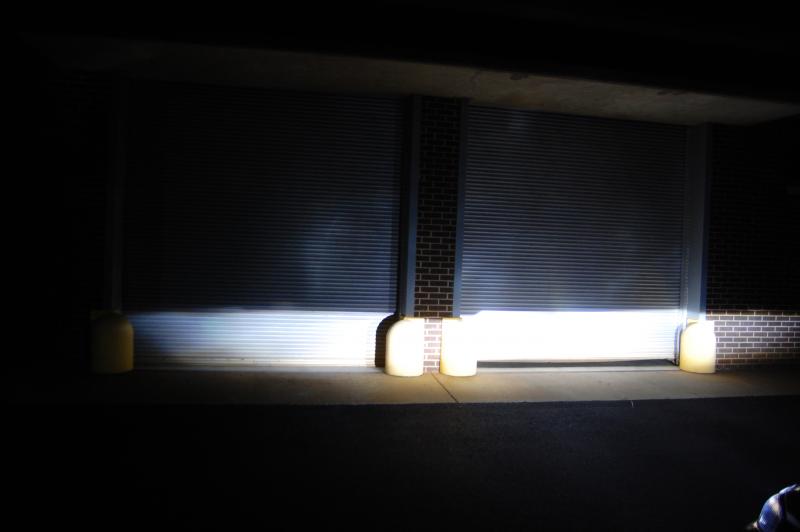
Rainy seasin is here and the forecast for the next week isn't looking good. Time to use neighbor's garage door for beam allignment.
Both sides (80' or so)

Passenger side

Different angle.
Both sides

Passenger Side

Driver Side

Locked down the projector and added few JBs for extra rigidity.

Shrouds trimmed and mounted.


Checked fitting on the car.


Applied fresh butyl tape and sealed


Wait for overnight and put them on the car for few days before ship
Both sides (80' or so)
Passenger side
Different angle.
Both sides
Passenger Side
Driver Side
Locked down the projector and added few JBs for extra rigidity.
Shrouds trimmed and mounted.
Checked fitting on the car.
Applied fresh butyl tape and sealed
Wait for overnight and put them on the car for few days before ship
Looks fantastic. Do you have some more pictures of the shrouds? You did an extremely clean job trimming them, and it looks way better than the last 2 trimming jobs I've done. Also, any tips on the mounting of the projector with the reflector? How much of the reflector bowl did you cut for fitment, and did you have to trim the front silver/AE trim bezel to make room for the projector and shroud?
On the Mini H1 retro above, I cut a little on the front bezel since the shroud is sticking a little. If you bury the projector deep, you should't have too. I did 4 sets of FX-R on 5th gen and none them need front bezel trimming. When you mount your projector, test fit the shroud also, if the shroud edge is at the same line as the front reflector line then you need to either trim the shroud or the bezel. Make sure you have enough room to adjust also.
Here is FX-R 1.1 close up mouting brackets and reflector trimming
http://forums.maxima.org/8296049-post173.html
Choose your shroud wisely also, shroud that has big diameter up front like Apollo need more clearance. Shroud like G37-R, E46-R has shallower front radius that it doesn't need that much clearance.
You should have no problem with FX-R 3.0 as this is as big as the old FX-Rs or even smaller. You probably got FX-R 2.0 which were a recall IMO. There is away to make the cut off straight. I had 2 pairs, sold one pair, and made a retro with the other pair and sold it also.
Here is the FX-R 2.0 on 5th gen,
http://forums.maxima.org/8294889-post158.html
After tweaking and final install.
http://forums.maxima.org/8304853-post192.html
http://forums.maxima.org/8307946-post194.html
I have the a pair of 1st gen (1.1) FX-R in mint condition if you interested, these are hard to come now. FX-R3.0 are good projector also, but not going to be as sharp as 1.0/1.1 but better beam distribution and less streaky.

Senior Member
Joined: Oct 2009
Posts: 1,432
Just Curious what is the point in the Retro fit? is it just for the looks or does it really put off more light? I personally think my Original 01 Headlights looks nicer then these.
And why not just buy headlights from a 02/03?
I plan on running HID's but didnt expect to go thru as much as some of you..i just wanted to buy hid kit and install them lol.. same for fog lights. Somebody school me im new to 5th gens lol.
And why not just buy headlights from a 02/03?
I plan on running HID's but didnt expect to go thru as much as some of you..i just wanted to buy hid kit and install them lol.. same for fog lights. Somebody school me im new to 5th gens lol.
And why not just buy headlights from a 02/03?
I plan on running HID's but didnt expect to go thru as much as some of you..i just wanted to buy hid kit and install them lol.. same for fog lights. Somebody school me im new to 5th gens lol.
I plan on running HID's but didnt expect to go thru as much as some of you..i just wanted to buy hid kit and install them lol.. same for fog lights. Somebody school me im new to 5th gens lol.
The HID bulb produces 3200 lumen ( OEM standard anyway). Your stock halogen bulb produces between 1200-1500 lumen. So, when you put 3200 lumen HID bulb into 1400 lumen halogen setup, the light goes EVERYWHERE. The halogen reflector isn't designed to project the intense light that the HID bulb creates. This would then create glare that will annoy the incoming driver plus your own eye due to splotchy beam pattern.
If you look at cars that come with HID stock, they either have projector or more efficient reflector design. Even with HID in reflector design, half of the HID bulb surface is coated to prevent light from leaking. If you look at car that come with HID reflector, they only lit up the top half of the headlight, you'll see dark area on the bottom half. That is done for a purpose, if the bottom half of the light is lit up, the chance is that it will blind you since the bottom of the reflector project the light upward.
Doing HID in the fog light reflector housing is even worse. The fog light is closer to the ground that all the light is reflected back to you and you'll strain your eyes quickly. Is it cool, maybe, but not functional at all.
Save up and order Morimoto HID projector if you're on budget. For less than $200 you can have very good aftermarket projector that rival some OEM ones and enhance the ability to see at night. retroftting isn't that hard, but takes patience, time, and lots of effort but it's totally worth it
If you are not ready, invest on a good halogen bulb from PIAA or Phillips/GE and run relay so that you can have more stable voltage feeding the bulb.
OEM G37 coupe HID system on my 2002 Odyssey van. If I can achieve this with PnP or ANY other system, I would go back, but the science and engineering behind the HID projector speaks for it self.
Senior Member
Joined: Oct 2009
Posts: 1,432
Ok, Now it makes since and yes i love how the Tl's headlights are! without blinding ppl....So if i wanted to go HID best thing is to order 02,03 headlights and wire them up right? Thats what i really wanna do since they look much better then 01s...the projectors ill wait on, not sure if i really like the style looks too ricer to me i like to keep a OEM look.
Ok, Now it makes since and yes i love how the Tl's headlights are! without blinding ppl....So if i wanted to go HID best thing is to order 02,03 headlights and wire them up right? Thats what i really wanna do since they look much better then 01s...the projectors ill wait on, not sure if i really like the style looks too ricer to me i like to keep a OEM look.
If you ever decide to sell your stock 5thg en headlight, let me know how much.
Time to move on......
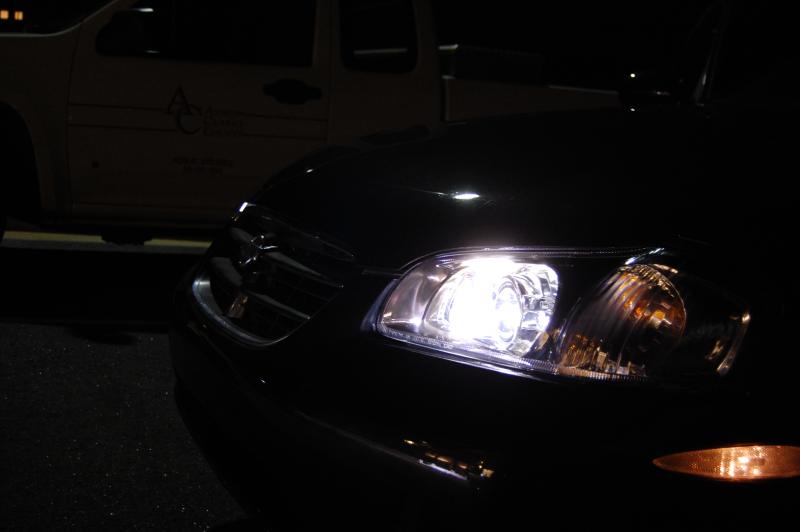
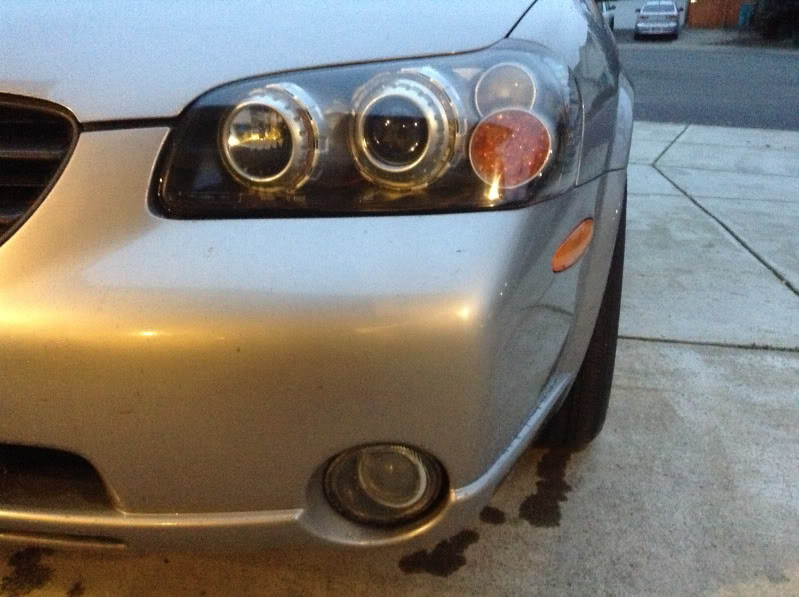
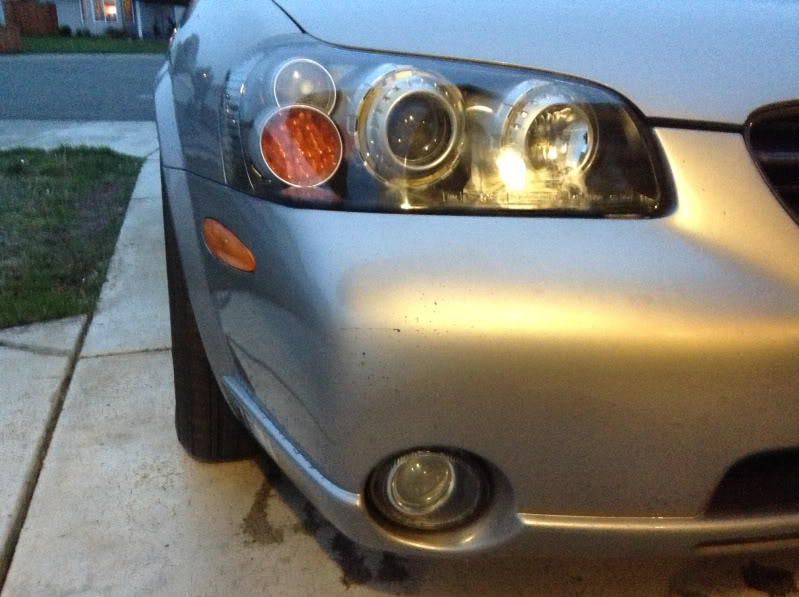
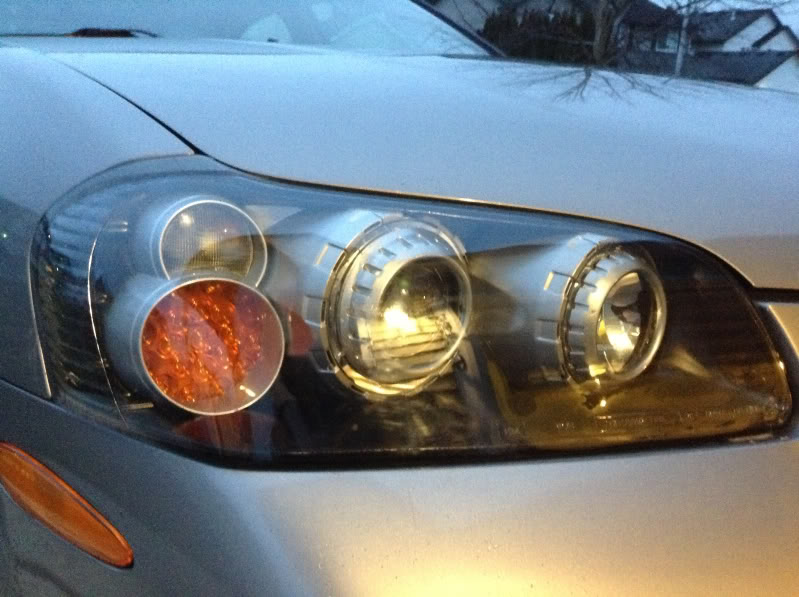
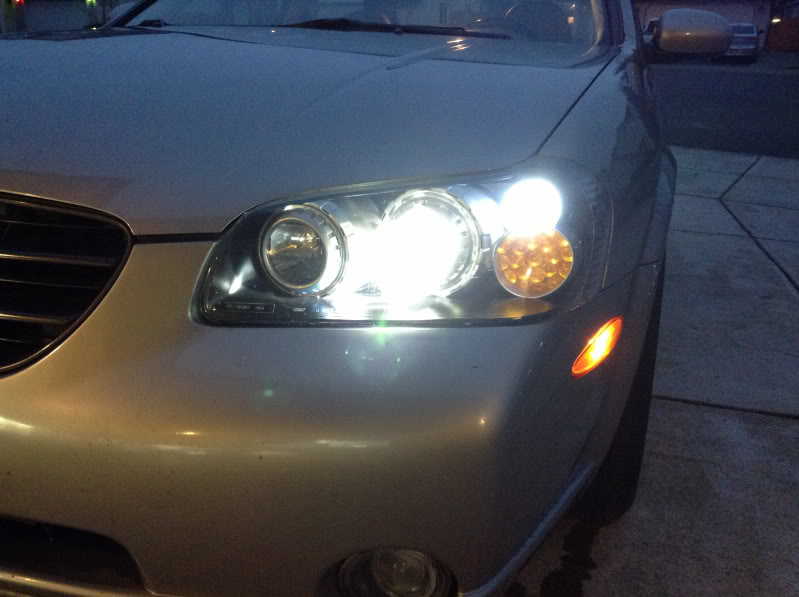
It's been almost a year since I've done this retro. Loved the output still,but I'm ready to make something else. This is the longest retrofit I've kept. Since then, I have replaced the RX-8 hybrid with TSX high beam reflector using Halogen H1bulb. Low beam is still the G37 OEM 3" with STI-R clear lens. The high beam reflector aiming was a little high ( shining the tree ) but you can barely notice the output anyway since the G37 high beam overpowers them. This could also be wired for your DRL if you want to.
Headlights Lenses are not in new condition,but still in very good shape with no yellowing. All tabs are functional with the side alignment pins being repaired since. Surprisingly the EBAY parking led still works. No problem with LED turn signal at all. Occasional slight fogging on the passenger side high beam corner is expected if you sit in traffic with heavy rain, but it should go away eventually. Drive side has never ever fogged.
Here are few pics few taken few minutes ago after car wash.


I want to go back to 5th gen housing and do TL in there plus I need to fund other project. I'm thinking of selling the headlights complete with bulbs and ballasts. Probably will go to For Sale section once I'm done with the TL retro (beginning of March). TL with OEM ZKW lens, boosted Denso, and DL50 bulbs....wooohooooo
Headlights Lenses are not in new condition,but still in very good shape with no yellowing. All tabs are functional with the side alignment pins being repaired since. Surprisingly the EBAY parking led still works. No problem with LED turn signal at all. Occasional slight fogging on the passenger side high beam corner is expected if you sit in traffic with heavy rain, but it should go away eventually. Drive side has never ever fogged.
Here are few pics few taken few minutes ago after car wash.
I want to go back to 5th gen housing and do TL in there plus I need to fund other project. I'm thinking of selling the headlights complete with bulbs and ballasts. Probably will go to For Sale section once I'm done with the TL retro (beginning of March). TL with OEM ZKW lens, boosted Denso, and DL50 bulbs....wooohooooo
Last edited by Genes1s; Feb 26, 2013 at 06:59 PM.