When you click on links to various merchants on this site and make a purchase, this can result in this site earning a commission. Affiliate programs and affiliations include, but are not limited to, the eBay Partner Network.
Dear esteemed community. I will be doing a valve cover job on a 2002 Nissan Maxima. I've taken the Plenum off before so that should not be a problem. I do however have a few other questions.
1. Regarding the spark plug tube seal. Can it be replaced or do I need to get a new valve cover? Here is where there is confusion. There is a part number for it ES72481. It is listed and is available from Advanced Auto as well as being listed with Felpro and a few other websites. However when you read the reviews on Amazon they say it is the wrong part number.
Then if you look at some YouTube videos some of them claim that this cannot be replaced and you need a new valve cover.
So this is where the confusion is. So the bottom line is can you replace the spark plug tube seal or do you need to get a brand-new valve cover?
2. My second question has to do with the valve cover gasket. A friend of mine who is a mechanic said that he would not use any kind of RTV since it doesn't come that way from the factory (provided the mating surfaces are good).
Watching a YouTube video at the 4:32 mark the gentleman mentions putting RTV in the corners to prevent leaking.
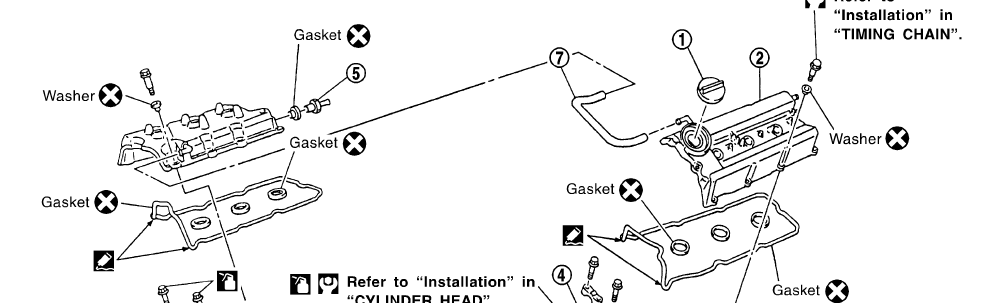
i remember seeing a writeup for the tube seals on the 3.5 but it involved drilling a hole in the cover to pop the old one out and replace. if it were me i don't think i would go through the effort, but i would buy a new cover instead
assuming the 3.5 is the same as 3.0 w/ respect to RTV you will need some just for the corners near the timing cover side. the FSM says to put it there. you should see the old rtv when you take the cover off, i would remove the old before adding the new
and for a successful triple post, people had recommended getting 04+ covers as replacement, (used to be) cheaper and (i think) are improved design. they might still be cheaper but have gone up in price. for more info:
i remember seeing a writeup for the tube seals on the 3.5 but it involved drilling a hole in the cover to pop the old one out and replace. if it were me i don't think i would go through the effort, but i would buy a new cover instead
assuming the 3.5 is the same as 3.0 w/ respect to RTV you will need some just for the corners near the timing cover side. the FSM says to put it there. you should see the old rtv when you take the cover off, i would remove the old before adding the new
I really appreciate you taking the time to posting all of the information as well as the diagram. I have a whole fabricating shop along with all sorts of metalworking tools so taking the tube seals out should not be that intimidating however based on the posts that you have shared it seems like the 04 valve covers are just a better design so maybe it's worth getting that.
Any recommendation for cheap place to get genuine Nissan valve covers?
Any recommendations for the best RTV for this particular job?
Our valve covers, especially the back, are prone to cracking and leaking. If you're going to pull the plenum, might as well install a new 6th gen cover (better design than ours) and be done with it. The front cover is much easier to access. I've used black Permatex RTV in the past for different valve covers without issue.
Probably going to do the same job over the summer when changing the spark plugs. Let me know if you find a cheap retailer. Most places have them for $100+ when factoring in shipping. Pretty pricey for a big hunk of plastic if you ask me.
Last edited by mclasser; Feb 24, 2016 at 01:00 PM.
You don't need to torque the valve covers. Just slightly tighten them in sequence. For example, tighten the first bolt but not too tight, then move on to the second, etc. Then starting again from the first bolt and tighten it a little more, then to the other bolts. Then once you get to the first bolt when you get resistance, your good.
^^ That's a good description as most people don't have a torque wrench that will measure those low values. I would equate it to screwing a cap back on a water bottle. Snug but don't push it.
^^ That's a good description as most people don't have a torque wrench that will measure those low values. I would equate it to screwing a cap back on a water bottle. Snug but don't push it.
I just use a 1/4 mini-ratchet and tighten till I have to start muscling it. Unless you really work it over you can't do much damage with a 1/4. It usually slips off when you really get on it.
I believe the plenum bolts are tightened from the inside to the outer ones.
The spark plugs are easy just tighten them till you feel the crush washer collapse. They'll be easy the whole way then tighten quickly. Give another push and you'll feel it crush.
I honestly never use a torque wrench for anything other than head bolts or main bearings.
You can put the RTV on both sides. Just be easy with it. Most of it will squeeze out anyway.
He doesn't have to take off the lower intake manifold to change plugs. We're talking about the Plenum. Proper torque for the plenum bolts is 13-15 FT-LB.
Originally Posted by manilakid3
I've never torqued spark plugs in my life. There's no reason to. Choke up on your ratchet and once you feel a little resistance, stop.
I wouldn't recommend this technique. It's important to go about 1/2 turn past the initial resistance to crush the washer.
I really appreciate everyone's help and suggestions. It's definitely made this job easier to research. So thank you.
Having said that I'd like to try to give back based on something I do know well which is mechanical engineering and fabrication. Here is the thing about torque settings. Some applications it is critical to achieve proper torque settings for a numerous amounts of reasons but one of them is actual fastener strength. By under torqueing something strength is compromised from the fastener. Under torqueing is also one of the main culprits for things working themselves loose not things like vibration.
Now I understand that not everybody wants to spend $400 on a torque wrench to be able to tighten something in in/lbs so there are ways to tighten up on a ratchet and guesstimate by hand. I know I personally wouldn't spend that kind of money for one particular fastener and I would just wing it. But to skip an accurate torque reading when you have access to the tools is just asking for problems down the road Even if the chance is slim. So my advice is that if you have access to a torque wrench use it every time ( as a side note, I also don't always follow my own advice so do as I say not as I do) .
Anyway on a more serious note I really would like to thank everyone that chimed in it's been very time-saving and helpful.
I really appreciate everyone's help and suggestions. It's definitely made this job easier to research. So thank you.
Having said that I'd like to try to give back based on something I do know well which is mechanical engineering and fabrication. Here is the thing about torque settings. Some applications it is critical to achieve proper torque settings for a numerous amounts of reasons but one of them is actual fastener strength. By under torqueing something strength is compromised from the fastener. Under torqueing is also one of the main culprits for things working themselves loose not things like vibration.
Exactly, When soft gaskets aren't properly compressed they don't give the "push back" to keep everything tight. If metal to metal connections aren't torqued all the stress goes to the fasteners instead of being spread across the surface area of the parts.
As someone who fixes cars I see a lot of over torquing when I work on cars that have been to other shops. I see gaskets smashed, housings cracked, bolts snapped and threads stripped. I'm the one they call to repair stripped threads and extract broken bolts so I see a fair amount of it.
Originally Posted by ZerotoSixty
Now I understand that not everybody wants to spend $400 on a torque wrench to be able to tighten something in in/lbs so there are ways to tighten up on a ratchet and guesstimate by hand. I know I personally wouldn't spend that kind of money for one particular fastener and I would just wing it. But to skip an accurate torque reading when you have access to the tools is just asking for problems down the road Even if the chance is slim. So my advice is that if you have access to a torque wrench use it every time ( as a side note, I also don't always follow my own advice so do as I say not as I do) .
Yup, after years of working on cars it becomes second nature for most fasteners outside the engine or tranny. It's easy to forget that this is hard won experience that not everyone has. That's why I try to stress it when giving advice online. You never know who's reading it or who will read it in the future.
Originally Posted by ZerotoSixty
Anyway on a more serious note I really would like to thank everyone that chimed in it's been very time-saving and helpful.
That's what it's all about.
Last edited by Derrick2k2SE; Feb 26, 2016 at 08:03 AM.
don't be like me, add the silicone i've changed front and rear gaskets without adding and RTV, and now i have a slight drip right over my alternator plug. but because the weather was getting cold i just wanted to finish it up. but new valve cover are a must since i've noticed a crack on my rear valve cover.
I have one last question on the RTV. I looked at the Nissan service manual and it looks like it indicates the RTV to be applied to the actual gasket corners. So my question is do you apply the RTV onto the gasket or the aluminum head that it mounts to? They both make contact with one another so I am assuming it probably won't make much of a difference either way but just wanted clarification.
Here is a quick update. Did the job and now have a flashing check engine light, which my understanding is a misfire. Also leaking oil hence the smoke. Have to take the whole thing apart and see what the issue is.
Having said that the taking apart process was fairly straightforward and only took about 30 minutes. Any suggestions welcome.
Improper spark plug
Insufficient compression
Incorrect fuel pressure
The injector circuit is open or shorted
Injectors
Intake air leak
The ignition secondary circuit is open
or shorted
Lack of fuel
Drive plate or flywheel
Heated oxygen sensor 1
Incorrect PCV hose connection
My guess for the misfire is that you left a vacuum line off or one was split while you were working on it. Check along the belt side by the VAIC. There's one line right there that opens right next to the runner for cylinder #1. It could also be that the coil didn't seat on the sparkplug or the coil isn't plugged in.
The oil leak should be obvious when you start taking it back apart. Probably let the gasket get out of line and pinched it in or out of the VC. It could also be that a piece of the old gasket is still in the groove in the VC or you didn't clean the surfaces well.
I really appreciate you trying to help out. Believe it or not it's none of them. The problem is solved. The oil leak was not an oil leak but was just oil burning off. Now the reason I was having a misfire was because I lightly coat the spark plugs with synthetic motor oil when I put them in. I remember specifically getting too much oil on that one particular spark plug. Believe it or not that's all it took for it not to fire. Problem seems to be solved.


 I will be doing a valve cover job on a 2002 Nissan Maxima. I've taken the Plenum off before so that should not be a problem. I do however have a few other questions.