
RLM bumper mods

Thread Starter

Joined: Nov 2004
Posts: 7,353
From: Upland CA
RLM bumper mods
I have the original bumper with the Stillen lip on my car. After years of bottoming out, its taken its toll on the bumper and I need to replace it. My friend Jsmith was selling his RLM bumper so I bought it with the fogs. I was going to use the foglight holes for brake ducts for racing. The RLM bumper has ducts next to the foglight holes which will work great for brake ducts and I can still use the fogs, so I get the best of both worlds.
Before I even picked up the bumper, I started thinking of ways to customize it to my taste. I like the RLM bumper as is, but I just wanted to make it a little different. I narrowed it down to 3 modifications.
1. I always liked a splitter on my car but the last one got destroyed by a truck tire in the road. If I mold a splitter into the bumper, I think it would give it a more finished look.
2. The RLM bumper does not have a provision for the underbelly tray. My idea is to integrate an undertray to the bumper by molding it in, or maybe bolting it on so its removable. That would smooth the airflow under the car, keep dirt out of engine compartment and possible give better gas mileage.
3. I like the idea of the turning light that stays on when you signal, but the 04-06 turning lights look primitive to me. Apparently Nissan thought so too and built them in to the headlight unit after 06. Since that is impractical for us 04-06 guys, I thought an LED light unit that's molded in somewhere on the bumper would be a nice alternative.
Any thoughts or suggestions on these topics?

Senior Member
Joined: Apr 2008
Posts: 795
From: Queens, NY
sounds like a good plan, especially the underbelly side. If you don't replace that a lot of dirt is gonna get stuck to your engine compartment. I'm in to see a photochop mock up of what it would look like!

Thread Starter
Joined: Nov 2004
Posts: 7,353
From: Upland CA
Thread Starter
Joined: Nov 2004
Posts: 7,353
From: Upland CA
I have found pics of the rlm bumper but if everyone could send them here or PM me with lots of pics, that would be helpful for me to figure out a splitter design or maybe u guys can photoshop some ideas for me. Im thinking something kind of mild but Im open to ideas and suggestions

LOL they years do take their toll on the rides. For us it's almost what maintenance is do, not "which mod will I add next". For those of us that have had our cars for 5+ years we've done the main things we wanted to but it is always fun to get back into the modding mode. Good luck with your projects. I know you provide some nice pics as you progress.
Thread Starter
Joined: Nov 2004
Posts: 7,353
From: Upland CA
I found an old splitter that I had that got torn off the car. Its in rough shape but it gives you and idea of what it would look like. Im thinking of molding it to the bumper and the bolting an underside panel to the bumper to smooth the airflow.


Great!, im glad it worked out for you, and sorry for not selling you my front bumper like we talked about, but I really needed to get rid of the whole kit since I couldn't use it any more.
So far I think you got the right idea and its starting to look really good!
So far I think you got the right idea and its starting to look really good!
Thread Starter
Joined: Nov 2004
Posts: 7,353
From: Upland CA
I worked on some of the fiberglass cracks today. Also I located LEDs that Im going to use for the corner lights. They are 10 white LEDs and I will mold them in to the sides right above the lower seam that is 2 inches above the bottom of the bumper. Im also going to tint them so they blend in when they are not on.
Thread Starter
Joined: Nov 2004
Posts: 7,353
From: Upland CA
I also decided to add a piece of fiberglass to the area in the top center of the bumper which makes room for a stock grill but when you use an aftermarket grill, the bumper styrofoam is exposed. This is going to require quite a bit of work but should yield a cleaner look.
Last edited by DeusExMaxima; Aug 15, 2010 at 10:19 AM.

Senior Member
Joined: May 2006
Posts: 2,460
From: Bremerton, WA
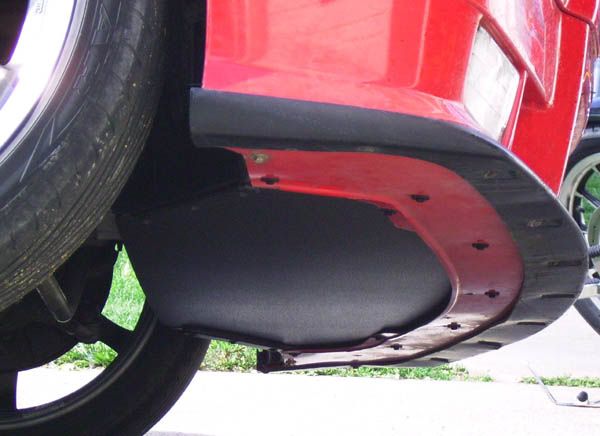
good luck with this kit. It didn't quite fit right when I had it put on my car. you might want to make the left and right side where they attach to your wheel well bigger. I have a slight bulge on my pass side because the kit was a bit wider than is should have been. also I had to use a dremel to make the circles for the fog lights bigger. I used the side turn marker lights as fogs and rewired them. They look pretty good as you can see from my pic.
Thread Starter
Joined: Nov 2004
Posts: 7,353
From: Upland CA
good luck with this kit. It didn't quite fit right when I had it put on my car. you might want to make the left and right side where they attach to your wheel well bigger. I have a slight bulge on my pass side because the kit was a bit wider than is should have been. also I had to use a dremel to make the circles for the fog lights bigger. I used the side turn marker lights as fogs and rewired them. They look pretty good as you can see from my pic.
Here are some pics showing teh filled in area of the top part of the bumper:
Before:

After:

Underneath same area:

Turning lamps Im going to use:

The position of the turning lamps on bumper:

The lamps will be more flush. Im going to build a bracket to mount them from undeerneath and the surface of the lamps should be fairly flush with surface of bumper. I plan to smoke the lamp lense to blend in with the black color of the bumper.
I also repaired one of the four grill tabs using a piece of cardboard filled with resin and attached to bumper
Last edited by DeusExMaxima; Aug 15, 2010 at 04:19 PM.
Senior Member
Joined: May 2006
Posts: 2,460
From: Bremerton, WA
since this is fiberglass, I recommend if it is not a perfect fit, that you have it installed and then painted. If they paint it and then put it on, the paint will spider. make sure you check out those screw holes on the edges. I have to get mine redone, because these things I didn't look at till after I got the car back and it was already painted.

Sup mark??? Long time no talk. Your project seems interesting actually and pretty cool... BUT it actually won't work too well for you, and i'll tell you why.
I have the "modified" version of the RLM and what I noticed is that the front clearance is less than the sides of that bumper. Adding that piece to the bottom will actually make it harder for you, on top of how low it is already. Unless you are not planning on going up or down any ramps, driveways, etc.. I wouldn't add that piece honestly.
I'd install the bumper first and mount it on the car, then "test fit" the add-on piece to very an idea of the clearance you have to drive with.
It does, however, look awsome and give it a different look.
Thread Starter
Joined: Nov 2004
Posts: 7,353
From: Upland CA
Yes the filled in area is on top. I am planning to add a splitter underneath but it adds only like 3/8" and this bumper was shaved bv Jsmith so it isnt as low as urs Deadbolt.
Update: I have sanded the bumper completely down to primer. I just have to touch up some spots and make holes in the sides for the corner lights.
Update: I have sanded the bumper completely down to primer. I just have to touch up some spots and make holes in the sides for the corner lights.
i wanted to re-install my corner lights with this bumper but gave up.
for the underbelly... after thinking of many ways to make my own, I ended up installing a corrugated plastic "ramp" behind it up to the rad. When I finally installed my own mesh grille I decided to re-install the oem shield under the rad and simply zip-tied the front to the tow hooks and center beam of the rad. it sits right above my plastic that directs air into the rad since I folded the plastic.
hope this makes sense... though it has crossed my mind to mold the bumper to mimic my plastic connecting it to the rad.
for the holes next to the fogs, I simply blocked them off with the same plastic behind mesh. Just like I did for the main grille. Therefore you cant see the brackets and wires plus it make the car more aerodynamic. The air below hits the rad or goes under the car. at main grille level it is forced in the the stock intake at higher pressure and as cold as possible. otherwise it flows over the car.
tubing the incoming air for brake ducts would be amazing.
Thread Starter
Joined: Nov 2004
Posts: 7,353
From: Upland CA
i wanted to re-install my corner lights with this bumper but gave up.
for the underbelly... after thinking of many ways to make my own, I ended up installing a corrugated plastic "ramp" behind it up to the rad. When I finally installed my own mesh grille I decided to re-install the oem shield under the rad and simply zip-tied the front to the tow hooks and center beam of the rad. it sits right above my plastic that directs air into the rad since I folded the plastic.
hope this makes sense... though it has crossed my mind to mold the bumper to mimic my plastic connecting it to the rad.
for the holes next to the fogs, I simply blocked them off with the same plastic behind mesh. Just like I did for the main grille. Therefore you cant see the brackets and wires plus it make the car more aerodynamic. The air below hits the rad or goes under the car. at main grille level it is forced in the the stock intake at higher pressure and as cold as possible. otherwise it flows over the car.
tubing the incoming air for brake ducts would be amazing.
for the underbelly... after thinking of many ways to make my own, I ended up installing a corrugated plastic "ramp" behind it up to the rad. When I finally installed my own mesh grille I decided to re-install the oem shield under the rad and simply zip-tied the front to the tow hooks and center beam of the rad. it sits right above my plastic that directs air into the rad since I folded the plastic.
hope this makes sense... though it has crossed my mind to mold the bumper to mimic my plastic connecting it to the rad.
for the holes next to the fogs, I simply blocked them off with the same plastic behind mesh. Just like I did for the main grille. Therefore you cant see the brackets and wires plus it make the car more aerodynamic. The air below hits the rad or goes under the car. at main grille level it is forced in the the stock intake at higher pressure and as cold as possible. otherwise it flows over the car.
tubing the incoming air for brake ducts would be amazing.
Id like to see pics of your underside belly pan if you have any. Also do you have pics you can either post or send me of your car. I want to see what the LED corner lights look like on a black buimper and I can MS Paint them to your pic.
I like your block off idea for the ducts next to the radiator. At some point, Id like to run brake ducts, but for now, Ill block them off behind the mesh I get.

Thread Starter
Joined: Nov 2004
Posts: 7,353
From: Upland CA
I dont think this bumper in the pic was shaved so it looks lower than mine. The splitter will actually protect the bumper in case of a scrape on the bottom. Its easy to make in case it breaks and it gives the car a more aggressive look.
Thread Starter
Joined: Nov 2004
Posts: 7,353
From: Upland CA
Here is a pic of my idea which is splitter under the bumper and an undertray on top of the underside of bumper. So the bumper is sandwiched between teh splitter and the undertray and they can each be removed.
Thread Starter
Joined: Nov 2004
Posts: 7,353
From: Upland CA
Ok here are updated pics of the RLM bumper. The bumper has been primed black to show any minor flaws so htey can be removed. Note that the upper middle area which is normally cut out for the stock grill has been filled:


And here is a pic with LED corner lights turned on:

And here is a pic with LED corner lights turned on:

Thread Starter
Joined: Nov 2004
Posts: 7,353
From: Upland CA
Thanks Bad. I am also working on my splitter. I have an interesting idea for it but I plan to make it so it fits into the under part of the bumper with no gaps.
Damn Deus coming along and FYI, I had a lot of the bottom cut off of this one being that it was my second one, I also had them remold the underside after they cut it. I still did scrape a bit but I am on coils and probably an inch or so lower than Deus will be.
Looking forward to seeing it dialed in!!!
Looking forward to seeing it dialed in!!!

Thread Starter
Joined: Nov 2004
Posts: 7,353
From: Upland CA
Thanks guys. Did a trial fit of bumper after priming it. Ill need to modify the side holes since it seems "sucked in" by a fraction of an inch, more so on the passenger side. I also need to do minor work to fix surface imperfections.
I am particularly pleased with the part that is filled in on the top center of the bumper which is notched to accommodate the OEM grill.
I scrape on almost every dip in the road. It just looks so dam good so Il ladjust my driving habits.
Any thoughts on having my car painted matte black. I really really like the matte black primer on the bumper. Anyway, pics here:
Nice man, oh and yes you do have to drive completely different with any of the aftermarket bumpers. I can give you lessons, I've been doing in this car for 6 years!!! lol Glad to see the second incarnation of my bumper!
And to your flat black question, DO IT please....
And to your flat black question, DO IT please....
Thread Starter
Joined: Nov 2004
Posts: 7,353
From: Upland CA
Nice man, oh and yes you do have to drive completely different with any of the aftermarket bumpers. I can give you lessons, I've been doing in this car for 6 years!!! lol Glad to see the second incarnation of my bumper!
And to your flat black question, DO IT please....
And to your flat black question, DO IT please....

Senior Member
Joined: May 2006
Posts: 2,460
From: Bremerton, WA
I have a black car and would never do the flat black. I have to wash the car like every three days just because I love the clean deep black look. If I where you, I would let it get real dusty and see if you can tolerate the car like that. If so than flat black would work for you. If not, don't do it. Bumper is definitely a different beast. busted up mine in the first week. scraped a couple times already, other than that the bumper looks the best.
Thread Starter
Joined: Nov 2004
Posts: 7,353
From: Upland CA
I have a black car and would never do the flat black. I have to wash the car like every three days just because I love the clean deep black look. If I where you, I would let it get real dusty and see if you can tolerate the car like that. If so than flat black would work for you. If not, don't do it. Bumper is definitely a different beast. busted up mine in the first week. scraped a couple times already, other than that the bumper looks the best.
The splitter should protect the bumper to an extent but Im really trying to be careful where I drive. No steep driveways of any kind. Ill just drive my recently-resurrected VW Vanagon if I have to navigate anything steep.
Thread Starter
Joined: Nov 2004
Posts: 7,353
From: Upland CA
A little off topic in my own thread, BUT here is a video of some matte black cars:
http://www.youtube.com/watch?v=-o9q8...eature=related
Matte is different than flat in that there is a little bit of shine. It does not look like primer. In the video, look particularly at the sedans like the Bentley and IS-F because the Lambos and such look good no matter what the color.
http://www.youtube.com/watch?v=-o9q8...eature=related
Matte is different than flat in that there is a little bit of shine. It does not look like primer. In the video, look particularly at the sedans like the Bentley and IS-F because the Lambos and such look good no matter what the color.