Nissan Maxima Spark Plug replacement DIY
#1
Nissan Maxima Spark Plug replacement DIY
After speaking with Greg through emails, he was very happy and allowed me to create a PDF version of spark plug replacement DIY procedure that he wrote and published on internet for Nissan maxima a while back ago. He was more than happy to have this procedure available to as many folks as possible to save expensive dealers bills. This DIY procedure he wrote was for 2002-2003 Nissan Maxima but can be very useful to replace spark plugs in 6th generation maxima as well. I thought this PDF version is easy to print and save in computer for many folks out there. Please use this at your own risk. Please feel free to leave any feedback.
Download Link
Download Link
#2
After speaking with Greg through emails, he was very happy and allowed me to create a PDF version of spark plug replacement DIY procedure that he wrote and published on internet for Nissan maxima a while back ago. He was more than happy to have this procedure available to as many folks as possible to save expensive dealers bills. This DIY procedure he wrote was for 2002-2003 Nissan Maxima but can be very useful to replace spark plugs in 6th generation maxima as well. I thought this PDF version is easy to print and save in computer for many folks out there. Please use this at your own risk. Please feel free to leave any feedback.
Download Link
Download Link
I used the same DIY and followed it to the T. No issues. Worked great.
#4
#6
i thought i saw this before. should be the org somewhere since also here:
http://my6thgen.org/showthread.php?t=267
http://my6thgen.org/showthread.php?t=267
#8
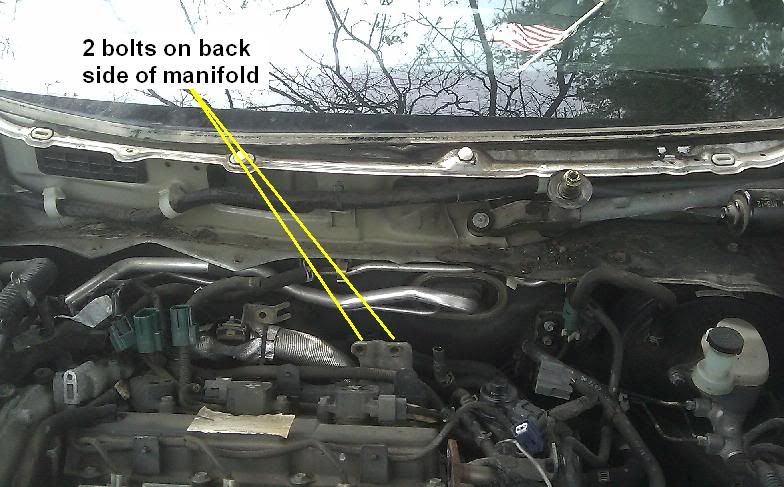
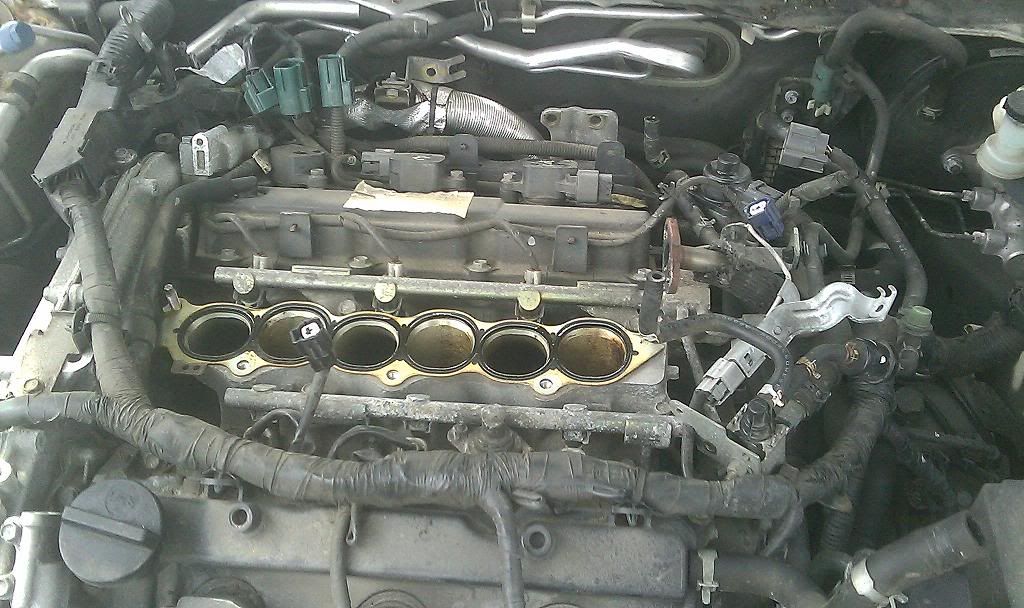
I replaced spark plugs in my car and everything went perfect. It took about 4 hours to complete this job. It took 4 hours because there is no way I was able to remove those 2 bolts on back side of manifold until after I removed the plastic panel in front of windshield. May be I was lack of advanced tools to remove them. The manifold gasket was in good shape as you can see in pic 2 however I replaced it according to service manual. Replaced the PCV valve as well. EGR gasket was in good shape so I end-up using the same one. Car is running better with more power and nope this is definitely not a psychological effect. This DIY procedure is not exactly the same for 6th gen maxima but pretty close enough. I did this when car was reading 121k miles and original plugs were not that bad. May be because I always burnt 93 octane from day one, mobil 1 synthetic from 36k miles, and performed seafoam treatment several times. Now all I need is to wash the motor really good.


Last edited by KevMaster; 04-10-2011 at 04:50 PM.
#9
for the newbies just don't do it unless you are real good at working on cars. its time consuming and takes a great deal of vigilance in all the steps you take. I've had that sinking feeling where you lose your place and don't know how to get it back together long ago when i first started to fiddle in mechanics, and for someone who isn't good at working on cars this may do it for them. If you are like me and want to learn and get good at wrenching, start small and work your way up. spark plugs are an intermediate project to take on. if you think you can do it then go for it, but try taking notes, yes, like your in class, of the progress, what goes to what, how many bolts and screws you take off, what sizes bolts go to what part, and you should be golden. take it slow and think through it. the max is do-able for the beginner. I've swapped out plugs on cars a WHOLE LOT harder then the maxima (my dads porsche boxster) that i would never recommend to anyone other then someone who gets paid $$$ for it. half way though i wanted to quit!!
#11
for the newbies just don't do it unless you are real good at working on cars. its time consuming and takes a great deal of vigilance in all the steps you take. I've had that sinking feeling where you lose your place and don't know how to get it back together long ago when i first started to fiddle in mechanics, and for someone who isn't good at working on cars this may do it for them. If you are like me and want to learn and get good at wrenching, start small and work your way up. spark plugs are an intermediate project to take on. if you think you can do it then go for it, but try taking notes, yes, like your in class, of the progress, what goes to what, how many bolts and screws you take off, what sizes bolts go to what part, and you should be golden. take it slow and think through it. the max is do-able for the beginner. I've swapped out plugs on cars a WHOLE LOT harder then the maxima (my dads porsche boxster) that i would never recommend to anyone other then someone who gets paid $$$ for it. half way though i wanted to quit!!
#12
The first paragraph in this DIY clearly stats that "To do this requires skill beyond the average Sunday mechanic, since there are many vacuum, electrical and coolant lines that have to come off in order to perform the job."
I am not sure why to mention that again and again.
I don't know how exactly to segregate complete newbies from pros but if you have ever worked on your brakes and stuff then you can do this. Otherwise stay away from this.
Pretty simple!!!
I am not sure why to mention that again and again.
I don't know how exactly to segregate complete newbies from pros but if you have ever worked on your brakes and stuff then you can do this. Otherwise stay away from this.
Pretty simple!!!
#13
Joined: May 2005
Posts: 10,202
From: Displaced New Yorker in Southern, MD
Not too hard, when I first did it I used my digital camera and took lots of pictures to make sure I put things back in correctly. Using a lint free towel, absolutely cover the cylinder heads, you do not want ANYTHING falling inside or your real nightmare will begin!!! 
I can do this in my sleep now and last; those considering NWP spacers, this is a great time to do it also!!! Once spacers are in you might as well just remove the back support bracket because the holes will no longer align anyway!!!

I can do this in my sleep now and last; those considering NWP spacers, this is a great time to do it also!!! Once spacers are in you might as well just remove the back support bracket because the holes will no longer align anyway!!!
#14
Not too hard, when I first did it I used my digital camera and took lots of pictures to make sure I put things back in correctly. Using a lint free towel, absolutely cover the cylinder heads, you do not want ANYTHING falling inside or your real nightmare will begin!!! 
I can do this in my sleep now and last; those considering NWP spacers, this is a great time to do it also!!! Once spacers are in you might as well just remove the back support bracket because the holes will no longer align anyway!!!

I can do this in my sleep now and last; those considering NWP spacers, this is a great time to do it also!!! Once spacers are in you might as well just remove the back support bracket because the holes will no longer align anyway!!!

#16
#17
Not too hard, when I first did it I used my digital camera and took lots of pictures to make sure I put things back in correctly. Using a lint free towel, absolutely cover the cylinder heads, you do not want ANYTHING falling inside or your real nightmare will begin!!! 
I can do this in my sleep now and last; those considering NWP spacers, this is a great time to do it also!!! Once spacers are in you might as well just remove the back support bracket because the holes will no longer align anyway!!!

I can do this in my sleep now and last; those considering NWP spacers, this is a great time to do it also!!! Once spacers are in you might as well just remove the back support bracket because the holes will no longer align anyway!!!
 Out of blue I thought about replacing spark plugs and in 10 minutes I started working on it. It was not like I was preparing this job mentally for weeks. This shouldn't be hard as one might be thinking. Good idea of keeping camera around. All I had was cell phone so I only snapped few pictures using cell phone.
#18
Complete DIY ---- Look Here ->> http://diyorg.com/viewtopic.php?f=34&t=74
#19
Complete DIY ---- Look Here ->> http://diyorg.com/viewtopic.php?f=34&t=74

I guess now it's about time to create one DIY for 6th gen maxima.
#23
haha brain fart on my part. put rags in all areas where dirt/crap could cause damage and threw an extra rag over the tb. put the manifold back on and the cai, but forgot about the rag. start it up and would not idle plus ses. take it apart and there is a rag clogging up the tb. live and learn haah
#25
#27
#31

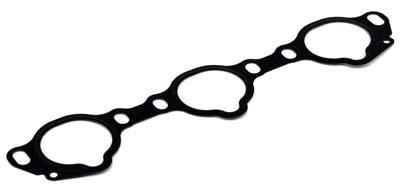
You have to ask for manifold gasket adaptor and that is the right one and cost about $28.
Anyway, I found my gasket was absolutely in good shape but I replaced it with new one because 1) I had the right gasket 2) Nissan suggest to replace
#33
My car had 59,000 miles when I changed my plugs...gasket was fine, so I re-used it. But I had one on hand just in case....about $27 from Auto Zone...no problem to return it since I saved the receipt and never opened the packaging.
Victor-Reinz P/N MS19260
Victor-Reinz P/N MS19260
Last edited by 67 Lamnas; 05-07-2011 at 05:57 PM.
#34
Just did it today, changed plugs and PCV valve. I noticed no difference. Idle is smooth, acceleration is nice, but honestly, I think it was like that before... Maybe idle was just a bit rougher before.
Reused same gasket, was perfectly fine....
Cleaned and waxed the car, and cleaned the engine bay. Looks real nice, never cleaned the engine in 3 years.
Reused same gasket, was perfectly fine....
Cleaned and waxed the car, and cleaned the engine bay. Looks real nice, never cleaned the engine in 3 years.

#35
Not a hard job. I do all basic work on my cars and did the job mostly without direction. Only problem I had were the two bolts on the back of the intake. Japanese cars are not made for fat white arms lol. I think if you can hold a wrench and know lefty loosey righty tighty you can handle this job.
#36
Why did you change your plugs with such low mileage, they last up to 100 to 110k miles.
#37
#39
6th Gen Plugs Changed at 150K km
This job wasn't that difficult with basic tools, just tedius. Risk I saw, is more to do with forgetting something during re-assembly and having to tear it down again, so double check everything :-).
A few tips on the 6th Gen when following the DIY guide for the 03. I highly recommend pulling the windshield wiper tray and frame off, to get at manifold backside. Another difference is the EGR tube (I think) which comes into manifold next to TB. Remove nuts on manifold side, then right side bolt at other end, and only loosen (it is hard to get at) the left side. This allows you to swing pipe away from manifold, so you can lift IM straight up.
I pushed on the TB butterfly to get a better look at the soot. Then read I may have to recalibrate since its fly by wire. Not sure I need to do this, but I did get a Check Engine Light on condition (hasn't reset yet) and wondered if its because I played with the TB. Any comments on this, how to resent CEL, appreciated.
Now to plugs. BTW, car was running great before I changed the plugs. I noticed 3 of the 6 plugs were worn to .08 inch gap, twice the spec gap at .04. I'm amazed it ran like that. I put anti seize on the plugs and dielectric grease on contacts, out of habit.
I didn't have torque specs for plugs or other fasteners, but my default has been with alloy, to keep it to 20-25 ft lbs. Thats snug with a rachet, not muscled tight. The right way is to torque everything to spec, of course.
Lots of dirt around coil tops, so cleaned, and lots of compressed air before removing the plug.
Learned quite alot about the upper engine, took me about 6 hours, was very carefull.
Car is smoother through the rev band, so it is feeling like it is pulling stronger. I'm also seeing more torque steer on WOT in 2nd gear above 4K rpm :-) ...remembering thats how it used to drive when newer. BTW, I have the 6 speed stick.
Thanks to the DIY guide, all the comments, gave me confidence to do it myself...saved about $500 in labour (our rates are $120/hr in Ottawa Canada)


