

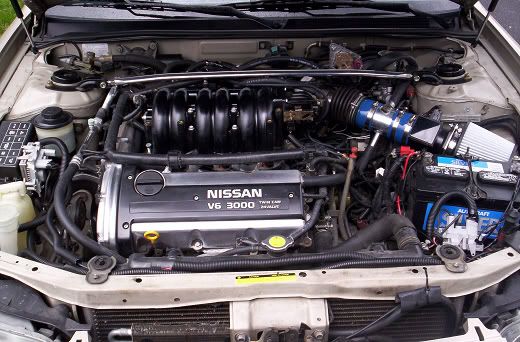
got vq30de-k 2day, where do i start on removing 00vi parts?


hose labeling
Not sure if this a good enough photo. But can someone photoshop this photo and identify hoses for me ? again, maybe the photo is useless.

i appreciate any and all help, as you can see, i dont have any experience in this at all. I have the 5th gen lower installed, and working on the fuel rail. Also need to swap over the rear valve cover and coils.
thanks for the help, i could use very dummy like instructions as specific as possible.
ceasar

Originally Posted by Ceasars Chariot
Splicing and wiring

unsure where to splice or wire these four wires into ? is this the correct procedure ?
unsure where to splice or wire these four wires into ? is this the correct procedure ?
This might be the front three but its the same idea.

Originally Posted by Ceasars Chariot
what are these things and where do they go ?

That is an important ground, so make sure it gets a good ground. I had it on the valve cover it it ended up being a bad ground so I just grounded the valve cover to the timing chain cover. You can just extend that wire straight to the timing chaing cover and find a bolt.
As for the FPR, you will be fine w/ putting the 4th gen one on the 5the gen rail.
thanks jeeve, here is just a progression photo, the 5th gen lower is in, and finishing up on the fuel rail. 4th gen rear valve cover is off and will be putting the 5th rear valve cover back on next, then the 5th gen coils and doing the injector wiring.
the big ones so far is those darn hoses, and how what is the best way to remove all the egr stuff since i will be blocking it off. 1:30 pm here so time to hit the sack. does anyone understand what im asking on the IACV adapter plate ? (post # 158)

the big ones so far is those darn hoses, and how what is the best way to remove all the egr stuff since i will be blocking it off. 1:30 pm here so time to hit the sack. does anyone understand what im asking on the IACV adapter plate ? (post # 158)

As far as the injector wires go... your going to make sure you match solid wire to solid wire. This is your ground. All wires that have a solid color with a strip is your power wire. Yes the wire colors are differnt, but if you follow solid for solid and strip for stip than your good.
On the back of the IACV there should be a metal cup with 3 screws. Take those 3 screws off. You will still have a piece of the IACV protruding out. Don't worry about that. That's why you have a whole on the adapter plate.
The hose outlet from the adapter plate needs to go somewhere on the manifold. It needs it own nipple. Don't attach it to the brake booster/PCV. This is your by-pass hose on cold start ups so the IACV can allow air to pass to the intake manifold while the throttle plate is closed. The top part of the IACV will need an ambient air hose. Most likely connecting to you intake mid-pipe. This will be a 3/4" hose.
Try to see if you can get a location for those ground wires. I think some people managed. I simply cut/splice/extended those ground wires be an additional 4"-6". There are some ground wire that have different gauge wire. Use the appropriate size. I used 18 awg and 14 awg.
The 4th gen or 5th gen FPR works on the DEK fuel rail.
I'm not sure about that EGR stuff. Only a few have removed it.
You should label the vacuum lines. The most import vacuum lines are the one's for your MAP sensor and absolute pressure sensor. You should trace back the vacuum lines to these sensors for clarification. Since your removing the EGR....I wouldn't know how important it would be to keep a vacuum for all the other EGR stuff.
Look at this thread for vacuum lines too.
http://forums.maxima.org/showthread.php?t=499342&page=2
You could also use the "U" shaped hose from the back of the 4th gen IM to bypass your coolant lines. Trace your coolant lines all the way toward the MAP sensor. There you will find both inlet and outlet. Connect that hose there.

Originally Posted by Ceasars Chariot
Second, have some questions on IACV, i believe we understand how to mount it, but what hose goes into the nipple of the iacv adapter plate ?
Also my IACV adapter plate does not mount up to the IACV because of the round part that has the black arrow pointing to it? is that piece supposed to be removed ? what do you do here ?

also in photo above what is that black round thing that has a place for a phillips head screw driver to turn it ?
Also my IACV adapter plate does not mount up to the IACV because of the round part that has the black arrow pointing to it? is that piece supposed to be removed ? what do you do here ?
also in photo above what is that black round thing that has a place for a phillips head screw driver to turn it ?
the black screw is for adjusting your idle.
and what speed racer said, just remove that brass "cup" that has the 3 screws holding it in so your IACV adapter plate will mount correctly
Originally Posted by Ceasars Chariot
Second, have some questions on IACV, i believe we understand how to mount it, but what hose goes into the nipple of the iacv adapter plate ?
Also my IACV adapter plate does not mount up to the IACV because of the round part that has the black arrow pointing to it? is that piece supposed to be removed ? what do you do here ?
also in photo above what is that black round thing that has a place for a phillips head screw driver to turn it ?
Also my IACV adapter plate does not mount up to the IACV because of the round part that has the black arrow pointing to it? is that piece supposed to be removed ? what do you do here ?
also in photo above what is that black round thing that has a place for a phillips head screw driver to turn it ?
Originally Posted by Ceasars Chariot
what are these things and where do they go ?

Originally Posted by Ceasars Chariot
Not sure if this a good enough photo. But can someone photoshop this photo and identify hoses for me ? again, maybe the photo is useless.
i appreciate any and all help, as you can see, i dont have any experience in this at all. I have the 5th gen lower installed, and working on the fuel rail. Also need to swap over the rear valve cover and coils.
thanks for the help, i could use very dummy like instructions as specific as possible.
ceasar
95 FED SPEC diagram
found something that might help..

Originally Posted by Ceasars Chariot
Curt was trying to explain something to me and I wanted to post up a photo and see if I am understanding this.
Run a hose from the IACV adapter plate nipple to the Upper Intake manifold brake vaccuum boost nipple ?

am I way off on this ?
Run a hose from the IACV adapter plate nipple to the Upper Intake manifold brake vaccuum boost nipple ?
am I way off on this ?
Take it under the TB and go to a line on the manifold by the TB.
Take that Copper peice off, clean it all good and install that plate to the IACV.
-matt
i dont recall seeing a gasket between the 5th gen upper and lower intake manifold, just one connected to the 5th gen upper. does this sound right.
on the 4th gen there was a gasket sitting ontop of the 4th gen lower, which with all the parts sitting around made me feel like i had lost something. again on the 5th gen UIM and LIM the gasket sticks up in the UIM correct ? thats all i see.
on the 4th gen there was a gasket sitting ontop of the 4th gen lower, which with all the parts sitting around made me feel like i had lost something. again on the 5th gen UIM and LIM the gasket sticks up in the UIM correct ? thats all i see.
sweet, hey speed thanks for all your help, should be back at it next week. got what i needed for my 97

dan thanks for the pm today, hope to get some diagrams off you soon !
dan thanks for the pm today, hope to get some diagrams off you soon !
just curious ceasars, why you opted to use the 4th gen iacv instead of the 5th gen iacv. i've heard of the 5th gen iacv working if you modify our harness a little bit.
how many people are running the 00vi swap with the 5th gen iacv and how many people have tried, but didn't get it to work?
i still haven't started my swap yet so that's why i'm wondering.
how many people are running the 00vi swap with the 5th gen iacv and how many people have tried, but didn't get it to work?
i still haven't started my swap yet so that's why i'm wondering.

I also tried using the 5th gen..didnt make a diference as to when I didnt have one at all. Right now i do not have iacv hooked up. im idling fine right at 1k. I havent tried messing with it to get it down to 7ish because I just finished my dek swap the other day. I got one with 120 actual miles on it! I do plan on getting the iacv adapter from stephen to use the 4th gen one tho.
aznsap - honestly, just trying to follow how other people did theirs, i really dont know.
OOVI Diagram

1. In photo the front bracket and hoses are removed, so I take it, none of this is used. So I remove the front bracket with hoses on my UIM and trash it?
2. Im using a frankencar midpipe presently, will I be able to make this work with 5th Gen UIM? Wondering if space is an issue, guess i will find out soon enough, might have to run longer hoses ? Any thoughts ?
3. At this stage will I be hooking up anything to the VIAS box ? If so what?
4. Any thoughts on using the rear UIM mounting brackets ? I hear you dont have to use them. Any thoughts from experience on this ?
5. Did anyones UIM come with a factory block off plate ? See photo below, wondering if this will have a place to bolt into on the engine somewhere ?

OOVI Diagram
1. In photo the front bracket and hoses are removed, so I take it, none of this is used. So I remove the front bracket with hoses on my UIM and trash it?
2. Im using a frankencar midpipe presently, will I be able to make this work with 5th Gen UIM? Wondering if space is an issue, guess i will find out soon enough, might have to run longer hoses ? Any thoughts ?
3. At this stage will I be hooking up anything to the VIAS box ? If so what?
4. Any thoughts on using the rear UIM mounting brackets ? I hear you dont have to use them. Any thoughts from experience on this ?
5. Did anyones UIM come with a factory block off plate ? See photo below, wondering if this will have a place to bolt into on the engine somewhere ?
Originally Posted by Ceasars Chariot
aznsap - honestly, just trying to follow how other people did theirs, i really dont know.
OOVI Diagram
1. In photo the front bracket and hoses are removed, so I take it, none of this is used. So I remove the front bracket with hoses on my UIM and trash it?
OOVI Diagram
1. In photo the front bracket and hoses are removed, so I take it, none of this is used. So I remove the front bracket with hoses on my UIM and trash it?
Originally Posted by Ceasars Chariot
2. Im using a frankencar midpipe presently, will I be able to make this work with 5th Gen UIM? Wondering if space is an issue, guess i will find out soon enough, might have to run longer hoses ? Any thoughts ?
Originally Posted by Ceasars Chariot
3. At this stage will I be hooking up anything to the VIAS box ? If so what?
Originally Posted by Ceasars Chariot
4. Any thoughts on using the rear UIM mounting brackets ? I hear you dont have to use them. Any thoughts from experience on this ?
pat thats a very clean install, very nice. care to talk about your iacv mounting position compared to where stephen max mounted his, i guess you would say in the VIAS box area ?
Originally Posted by Ceasars Chariot
pat thats a very clean install, very nice. care to talk about your iacv mounting position compared to where stephen max mounted his, i guess you would say in the VIAS box area ?
Originally Posted by Ceasars Chariot
one more question, when replacing the 3 rear coils does it matter what order they are in ? i labeled mine just in case ??
Progress Photo: Ok, 5th gen LIM in, 5th Gen fuel rail is in, 5th Gen injectors spliced and wired, rear valve cover and rear coils in place. we fitted the UIM on and it goes on sweet. Will start back on it in a few days. EGR is out, plugged up the hole in the extractors/headers, and have block off plate ready on the UIM. Also pulled cruise control out.
In photo below want to ask once more. On the front of the VIAS box, the two gold nipples in front. Do I leave those open, or do they hook to anything, or do I plug them ?

In photo below want to ask once more. On the front of the VIAS box, the two gold nipples in front. Do I leave those open, or do they hook to anything, or do I plug them ?

I believe you can plug them both. On mine, I have the left one with a vacuum line to it so my VI is always stuck "open" because I have not yet been able to activate the VI, I think if you leave it the way it is now, your VI will always be open... I am no pro so hopefully someone else will chime in about that.
pat in this photo, (#5 on your website UIM diagram), we were talking about cutting the nipple off and drill/tapping a new 1/2" nipple.
Question 1 Do you think it would be better to come through the side. in the direction arrow #1 is pointing, and just plugging up that small nipple red arrow #2 for the IACV hose ? Pros, cons ?
Questions 2 # 3 this is for the EVAP, will this one also have to be bigger ?

Question 1 Do you think it would be better to come through the side. in the direction arrow #1 is pointing, and just plugging up that small nipple red arrow #2 for the IACV hose ? Pros, cons ?
Questions 2 # 3 this is for the EVAP, will this one also have to be bigger ?
Originally Posted by glenmoormax
I believe you can plug them both. On mine, I have the left one with a vacuum line to it so my VI is always stuck "open" because I have not yet been able to activate the VI, I think if you leave it the way it is now, your VI will always be open... I am no pro so hopefully someone else will chime in about that.
At present and dont know why mine looks like this ?

1. is just a hose that was already on it
2. is just a hose coming off the right side nipple and connected into whatever that nipple is. might have just connected it for no reason while we were working on getting the UIM fitted.
3. what hooks up to this one ?
But yeah, someone let me know how i need those nipples setup until I get the EU installed.
thanks c
I know for a fact that if you hook up the vacuum line on the left one, it will keep your VI open... the other I am not to sure about, but its plugged on my friends, and mine has vacuum to it.
Originally Posted by glenmoormax
I believe you can plug them both.
Originally Posted by Ceasars Chariot
pat in this photo, (#5 on your website UIM diagram), we were talking about cutting the nipple off and drill/tapping a new 1/2" nipple.
Question 1 Do you think it would be better to come through the side. in the direction arrow #1 is pointing, and just plugging up that small nipple red arrow #2 for the IACV hose ? Pros, cons ?
Questions 2 # 3 this is for the EVAP, will this one also have to be bigger ?
Question 1 Do you think it would be better to come through the side. in the direction arrow #1 is pointing, and just plugging up that small nipple red arrow #2 for the IACV hose ? Pros, cons ?
Questions 2 # 3 this is for the EVAP, will this one also have to be bigger ?
2. You will also need a larger nipple for this, I failed to mention that to you last night. It needs to be a 3/8".
Originally Posted by Ceasars Chariot
yeah not sure aye ? the left nipple has something to do with the UIM activating, and the right one was to control the LIM swirl valves?
At present and dont know why mine looks like this ?
1. is just a hose that was already on it
2. is just a hose coming off the right side nipple and connected into whatever that nipple is. might have just connected it for no reason while we were working on getting the UIM fitted.
3. what hooks up to this one ?
But yeah, someone let me know how i need those nipples setup until I get the EU installed.
thanks c
2. I don't have a hose on it at all b/c that's supposed to activate the LIM butterfly.
3. You need to connect your FPR vacuum hose to that. The other side goes into your UIM.

So #1 should be attached to the resonator box? Or mid-pipe if you have an aftermarket intake?
Any other nipples need to be replaced? I was thinking of replacing them all with metal ones...any thoughts?
Any other nipples need to be replaced? I was thinking of replacing them all with metal ones...any thoughts?
#1 does not need to be connected to anything, but if you are planning on connecting it, than you should connect it somewhere with ambient air like the midpipe of the intake.


Why not just use that ?? They are prone to breaking but if you are carefull with them and just connect the hose to it, then it wont break. Alot of them break during shipping. Just leave it alone
-matt
-matt

