
3rd gen VQ35DE Full ECU Swap Progress Thread
 04-12-2009 | 11:39 AM
#481

Oh I see. Yea you're right, I was assuming off by degree of alignment, not in the way you explained.
Hopefully debuloz or the machinists can work something out. It really doesnt seem like too big a deal
Hopefully debuloz or the machinists can work something out. It really doesnt seem like too big a deal
04-13-2009 | 07:50 AM
#482
Thread Starter
NWP Engineering.com
iTrader: (128)
Joined: Jul 2001
Posts: 14,066
From: Walstonburg, NC
Oh it's definitely a VERY big deal. The camshaft will not physically install on the stock intake sprockets. I think it's possible for me to make them fit by modifying the camshafts, but I am going to wait until I hear back from Deluboz.
04-13-2009 | 09:08 AM
#483

If possible, that would be less dramatic than shipping cams around the country. Of course you want the vendor to make good on your purchase, but....
 04-13-2009 | 11:09 AM
#484
Thread Starter
NWP Engineering.com
iTrader: (128)
Joined: Jul 2001
Posts: 14,066
From: Walstonburg, NC
Yes, I should be able to get a machinist to extend the 2mm diameter alignment hole on the intake camshaft. I don't know what slot you are talking about in the gears. I am only having issues with the intake sprockets/cams. The exhaust gears have a slot, but the intake sprockets have a tiny alignment pin.
I am not going to be shipping the cams anywhere though. Were you referring to me sending them back to the vendor? These cams are no longer being produced. So we simply can't swap them for non-defective cams. Deluboz responded to my email and just as I expected, their customer service is some of the best you can find, other than NWP Engineering's customer service.
 I don't want to go into any details, but I just wanted to say that I speak highly of their customer service. And anybody who has dealt with NWP Engineering before knows that I know the true meaning of "customer service"!
So the plan right now is to hit up one of my local machinists to get him to extend the alignment hole on these intake cams. It will not increase the diameter of the hole, but just extend it so the pin will fit in tightly.
04-13-2009 | 11:25 AM
#485
http://forums.maxima.org/6978403-post480.html
Yes, I should be able to get a machinist to extend the 2mm diameter alignment hole on the intake camshaft. I don't know what slot you are talking about in the gears. I am only having issues with the intake sprockets/cams. The exhaust gears have a slot, but the intake sprockets have a tiny alignment pin.
So the plan right now is to hit up one of my local machinists to get him to extend the alignment hole on these intake cams. It will not increase the diameter of the hole, but just extend it so the pin will fit in tightly.
04-13-2009 | 11:43 AM
#486
Thread Starter
NWP Engineering.com
iTrader: (128)
Joined: Jul 2001
Posts: 14,066
From: Walstonburg, NC
I'll post pics when I get this done though.
04-13-2009 | 02:38 PM
#487
YES! this is what I would have done lol. Dude didnt I tell you that when I did the actual build for my engine, I didnt use adapters for my int cams, I drilled my sprockets! Saved me some $ there and it was easy as long as you are super sure the spot is right before you drill lol. Drilling sprockets is MUCH safer than drilling a cam billet. Screw up on a sproket, get another and do it again. Screw up on your cam... you just lost a few hundred dollars.
EDIT-
NEVERMIND!!!! What I said applies to doing this with 3.0 timing equipment.
You are right, you have no other way to do it BUT to re-drill the alignment hole on the cam itself. Sorry for the confusion :shinner:
Last edited by 95BLKMAX; 04-13-2009 at 02:40 PM.
04-13-2009 | 02:41 PM
#488
Thread Starter
NWP Engineering.com
iTrader: (128)
Joined: Jul 2001
Posts: 14,066
From: Walstonburg, NC
umm..
YES! this is what I would have done lol. Dude didnt I tell you that when I did the actual build for my engine, I didnt use adapters for my int cams, I drilled my sprockets! Saved me some $ there and it was easy as long as you are super sure the spot is right before you drill lol. Drilling sprockets is MUCH safer than drilling a cam billet. Screw up on a sproket, get another and do it again. Screw up on your cam... you just lost a few hundred dollars.
EDIT-
NEVERMIND!!!! What I said applies to doing this with 3.0 timing equipment.
You are right, you have no other way to do it BUT to re-drill the alignment hole on the cam itself. Sorry for the confusion :shinner:
Remember that I am a FULL ECU swap.
Edit: Your editing skills are very fast.
 04-16-2009 | 01:12 PM
#490
Thread Starter
NWP Engineering.com
iTrader: (128)
Joined: Jul 2001
Posts: 14,066
From: Walstonburg, NC
I recently removed the front jack point on the 3rd gen to make room for the 4th gen crossmember. I am in the process of making some mounting brackets that I can weld on my frame so I can easily bolt up the crossmember. I will be sure to post pics of those when they are complete within the next week or so.

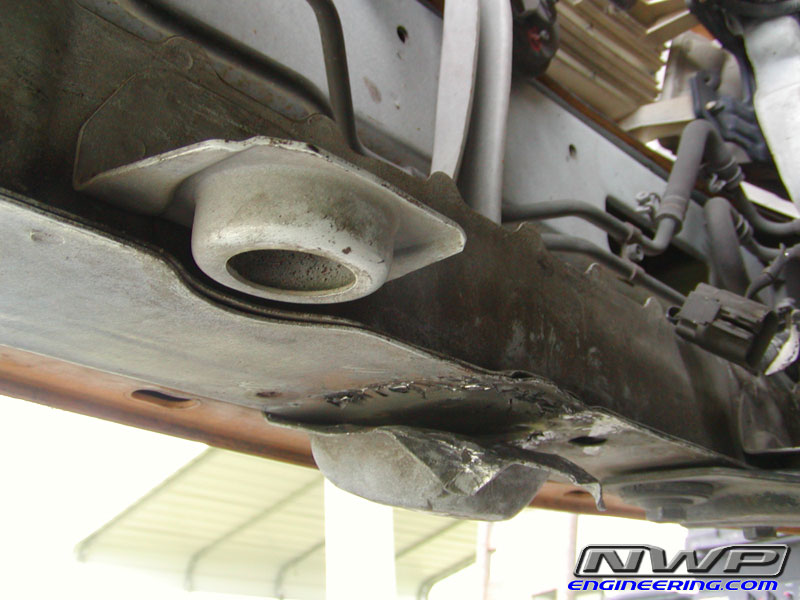
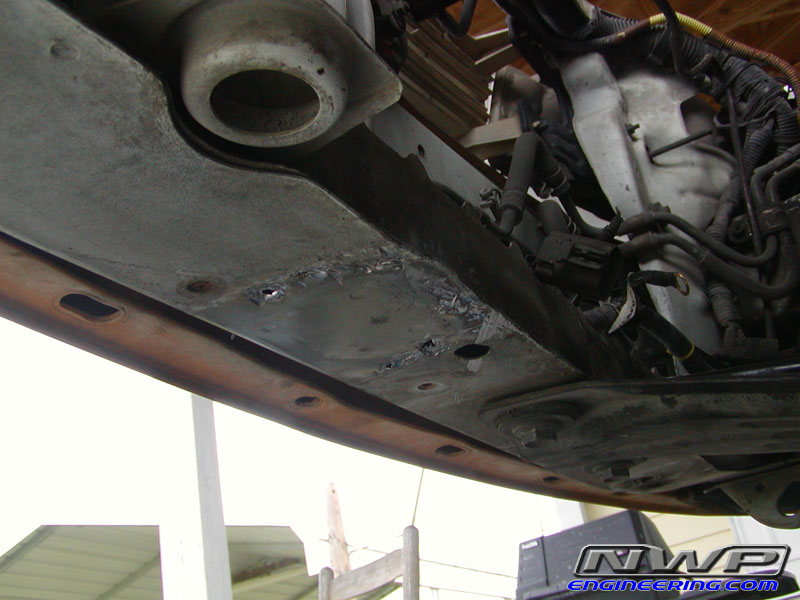
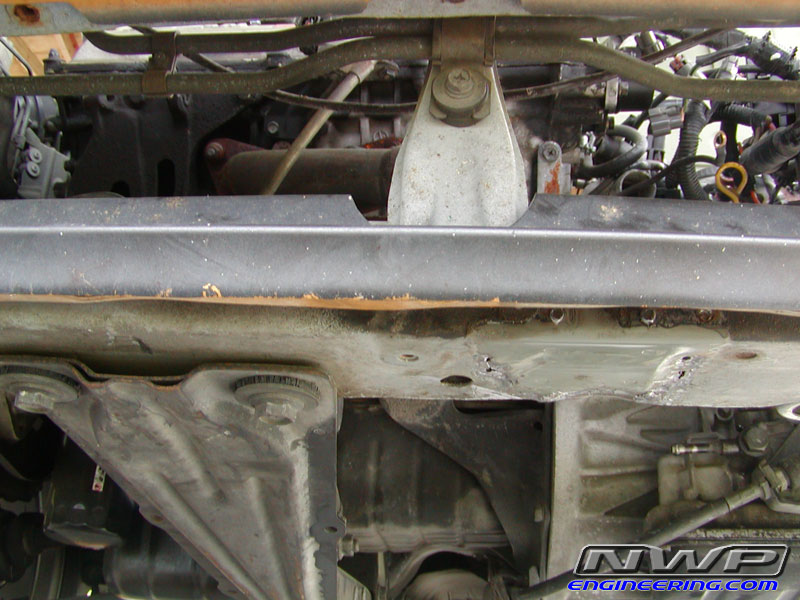
One more pic:
http://www.nwpengineering.com/forum/...-Removal-4.jpg
One more pic:
http://www.nwpengineering.com/forum/...-Removal-4.jpg

 04-16-2009 | 01:19 PM
#493
Thread Starter
NWP Engineering.com
iTrader: (128)
Joined: Jul 2001
Posts: 14,066
From: Walstonburg, NC
And as you may have read already, I had some issues with the camshafts I got. The intake sprockets would not install due to the alignment hole on the cams being slightly in the wrong position, by about 25-30 thou.
I had one of my local machinists extend this hole for me and now the sprockets fit perfectly on the camshafts. I have now bolted the camshafts to the heads while the heads are still on the bench. Most of my valve clearances are just slightly out of spec on the tight side. They are only .001-.002" out of spec. I really don't want to have to buy a crap load of new lifters. Those can get very expensive at almost $20 a pop. I may decide to have a tiny bit removed from the valve stems to get the valve lash in spec. If anybody has any tips or suggestions, please feel free to post.
BEFORE:
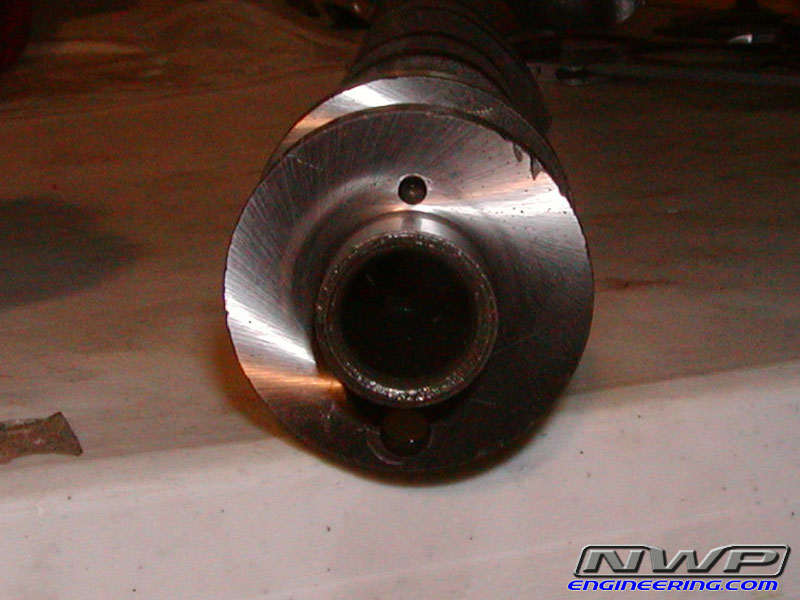
AFTER:
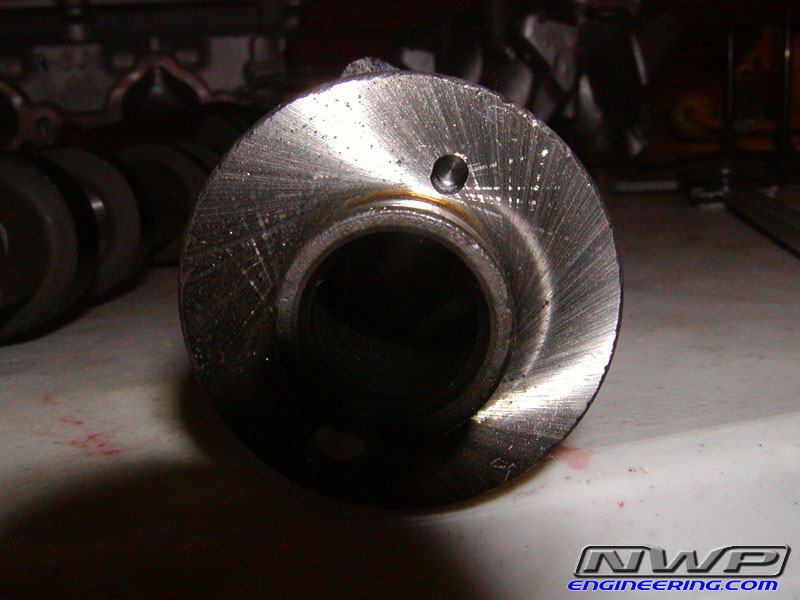
I had one of my local machinists extend this hole for me and now the sprockets fit perfectly on the camshafts. I have now bolted the camshafts to the heads while the heads are still on the bench. Most of my valve clearances are just slightly out of spec on the tight side. They are only .001-.002" out of spec. I really don't want to have to buy a crap load of new lifters. Those can get very expensive at almost $20 a pop. I may decide to have a tiny bit removed from the valve stems to get the valve lash in spec. If anybody has any tips or suggestions, please feel free to post.
BEFORE:
AFTER:
04-16-2009 | 01:21 PM
#494
Thread Starter
NWP Engineering.com
iTrader: (128)
Joined: Jul 2001
Posts: 14,066
From: Walstonburg, NC
I am going to do that on my friend's lift all in one day. In the meantime, I am prepping my 3rd gen to minimize the amount of work we will have to do to swap engines. And I'm just trying to get this VQ35 back together so I can finally get it in the car.
04-16-2009 | 07:44 PM
#495

I recently removed the front jack point on the 3rd gen to make room for the 4th gen crossmember. I am in the process of making some mounting brackets that I can weld on my frame so I can easily bolt up the crossmember. I will be sure to post pics of those when they are complete within the next week or so.
One more pic:
http://www.nwpengineering.com/forum/...-Removal-4.jpg
One more pic:
http://www.nwpengineering.com/forum/...-Removal-4.jpg
 04-17-2009 | 06:34 AM
#498
Thread Starter
NWP Engineering.com
iTrader: (128)
Joined: Jul 2001
Posts: 14,066
From: Walstonburg, NC
Having an uncovered car sit under an open carport for 7 months will wreak havoc on a paint job. The tiniest little paint chips on my car are showing rust now.  There is a paint job in my near future most likely.
Also, I removed the stock engine control harness from my Maxima last night. So my dash is completely ripped apart to access the firewall. I tried my best to remove the harness without removing the heater core components, but there was no way. Too cramped. Now I have to do a little studying of the VE FSM so I know what wires I need to run to make the stock TCM work.
Jim, got any ideas? I was thinking of just cutting the TCM connector off this harness and running all the wires myself to the appropriate connectors. I don't think there's that many of them. Inhibitor switch, speed sensor, revolution sensor, etc. I think that would require less of my time than cutting and pruning this stock harness just like I did with the VQ35 dash harness, which took several weeks.
There is a paint job in my near future most likely.Also, I removed the stock engine control harness from my Maxima last night. So my dash is completely ripped apart to access the firewall. I tried my best to remove the harness without removing the heater core components, but there was no way. Too cramped. Now I have to do a little studying of the VE FSM so I know what wires I need to run to make the stock TCM work.
Jim, got any ideas? I was thinking of just cutting the TCM connector off this harness and running all the wires myself to the appropriate connectors. I don't think there's that many of them. Inhibitor switch, speed sensor, revolution sensor, etc. I think that would require less of my time than cutting and pruning this stock harness just like I did with the VQ35 dash harness, which took several weeks.
04-17-2009 | 08:00 AM
#499

Jim, got any ideas? I was thinking of just cutting the TCM connector off this harness and running all the wires myself to the appropriate connectors. I don't think there's that many of them. Inhibitor switch, speed sensor, revolution sensor, etc. I think that would require less of my time than cutting and pruning this stock harness just like I did with the VQ35 dash harness, which took several weeks.
04-17-2009 | 08:17 AM
#500
Thread Starter
NWP Engineering.com
iTrader: (128)
Joined: Jul 2001
Posts: 14,066
From: Walstonburg, NC
Did you ever run your stock TCM with the 3.5 engine?
04-17-2009 | 09:17 AM
#501
Yes I did for a short period and it works fine without any connection to the ECU except for the tach and of course the speed signal which comes directly from the trans.
04-17-2009 | 09:21 AM
#502
Thread Starter
NWP Engineering.com
iTrader: (128)
Joined: Jul 2001
Posts: 14,066
From: Walstonburg, NC
Yeah. How did you wire that up since the TCM wiring is part of your 4th gen engine control harness? Did you run custom wires to the inhibitor switch and any other sensors the tranny has on it? Or did you prune your 4th gen engine control harness and use all the TCM connections including the TCM connector?
04-17-2009 | 09:24 AM
#503
Yeah. How did you wire that up since the TCM wiring is part of your 4th gen engine control harness? Did you run custom wires to the inhibitor switch and any other sensors the tranny has on it? Or did you prune your 4th gen engine control harness and use all the TCM connections including the TCM connector?
PS Of course you can see that the 5.5 gen engine harness includes the trans wiring and I just left it because I thought one day I might put in a 5.5 gen trans. That was until I remembered how it was when I had my 5.5 gen. 1st and 2nd shifts weren't too bad but the 3-4 is horrendous. I'll stick with the 4th gen auto.
Last edited by Jime; 04-17-2009 at 09:28 AM.
 04-17-2009 | 10:02 AM
#505
Thread Starter
NWP Engineering.com
iTrader: (128)
Joined: Jul 2001
Posts: 14,066
From: Walstonburg, NC
PS Of course you can see that the 5.5 gen engine harness includes the trans wiring and I just left it because I thought one day I might put in a 5.5 gen trans. That was until I remembered how it was when I had my 5.5 gen. 1st and 2nd shifts weren't too bad but the 3-4 is horrendous. I'll stick with the 4th gen auto.
Most of my valve clearances are just slightly out of spec on the tight side. They are only .001-.002" out of spec. I really don't want to have to buy a crap load of new lifters. Those can get very expensive at almost $20 a pop. I may decide to have a tiny bit removed from the valve stems to get the valve lash in spec. If anybody has any tips or suggestions, please feel free to post.
04-17-2009 | 11:07 AM
#506
 04-17-2009 | 11:27 AM
#507
04-17-2009 | 11:29 AM
#508
 04-17-2009 | 11:32 AM
#509
Yup, it does go through the firewall the same place but the wiring is totally separate. Maybe its a Canadian thing like the VLSD.
04-17-2009 | 11:34 AM
#510
04-17-2009 | 11:59 AM
#511
Thread Starter
NWP Engineering.com
iTrader: (128)
Joined: Jul 2001
Posts: 14,066
From: Walstonburg, NC
Yeah that is odd. I am use to all the engine control wires (TCM and ECM) being formed in the same grommet that fits on the firewall.
So Jime, you have two bundles of wires going through a lose grommet on the firewall? It's not a permanent type grommet like you would find on the 5.5 gen harness, right?
So Jime, you have two bundles of wires going through a lose grommet on the firewall? It's not a permanent type grommet like you would find on the 5.5 gen harness, right?
04-17-2009 | 03:59 PM
#512
Thread Starter
NWP Engineering.com
iTrader: (128)
Joined: Jul 2001
Posts: 14,066
From: Walstonburg, NC
I just finished logging all the valve clearances much more accurately. The LH head intake side is BARELY in spec or only .0005" under the in-spec range (.010"-.013"). The exhaust side is as much as .001" under the in-spec range (.011"-.015") or is just barely in spec. Everything is on the tight side.
The RH head exhaust side is as much as .001" under the in-spec range (.011"-.015"). The intake side is a little funky though. Most are .010" but cylinder #3 is .006" and .008". So I did some quick calculating and switch the two buckets. Now cylinder #3 is .003" and .010". Atleast one of them is in spec.
So, since my local machinist has a valve stem grinding machine, I am going to take two intake valves (one from Cyl #3 and one from #5) and have him remove .007" from one and only .002" from the other. Then, everything will be in spec and on the tight side.
It may not be until Monday when I will be able to have my heads ready to put on the block. So I guess I will take advantage of this awesome weather and do wiring and soldering on my 3rd gen this weekend!
04-18-2009 | 01:27 AM
#513
I was thinking of just cutting the TCM connector off this harness and running all the wires myself to the appropriate connectors. I don't think there's that many of them. Inhibitor switch, speed sensor, revolution sensor, etc. I think that would require less of my time than cutting and pruning this stock harness just like I did with the VQ35 dash harness, which took several weeks.
04-18-2009 | 05:15 AM
#514
Aaron and pmohr I went out again today and had another look at my trans wiring and finally figured out what I did. It was 3 years ago so I'm a little foggy.
pmohr you are correct on the wiring being integrated with the engine harness. When I removed the 4th gen engine harness I separated the wiring for the trans and taped it up and ran it separately. It wasn't until I took a second look that I saw my taping job. Sorry for the misinformation, comes with age.
04-18-2009 | 10:12 AM
#515
Thread Starter
NWP Engineering.com
iTrader: (128)
Joined: Jul 2001
Posts: 14,066
From: Walstonburg, NC
Its not necessary to use the CAN system. Its salso not necessary to connect the TCM to the ECU except for the tach. None of the trans to ECU connections are remotely the same in type or in number.
Aaron and pmohr I went out again today and had another look at my trans wiring and finally figured out what I did. It was 3 years ago so I'm a little foggy.
pmohr you are correct on the wiring being integrated with the engine harness. When I removed the 4th gen engine harness I separated the wiring for the trans and taped it up and ran it separately. It wasn't until I took a second look that I saw my taping job. Sorry for the misinformation, comes with age.
04-18-2009 | 02:05 PM
#516
Joined: Oct 2005
Posts: 4,572
From: Middleboro/Carver, Ma
Nice, finally starting to see the "meat" of the project (re: crossmember etc)
I really don't want to have to buy a crap load of new lifters. Those can get very expensive at almost $20 a pop. If anybody has any tips or suggestions, please feel free to post.
Sounds like you have it all worked out via swapping and cutting valves, but if you end up needing any shims let me know, I've got a list of all the sizes I have if you want a copy of it.
04-19-2009 | 07:26 AM
#518
04-20-2009 | 02:53 PM
#519
Thread Starter
NWP Engineering.com
iTrader: (128)
Joined: Jul 2001
Posts: 14,066
From: Walstonburg, NC
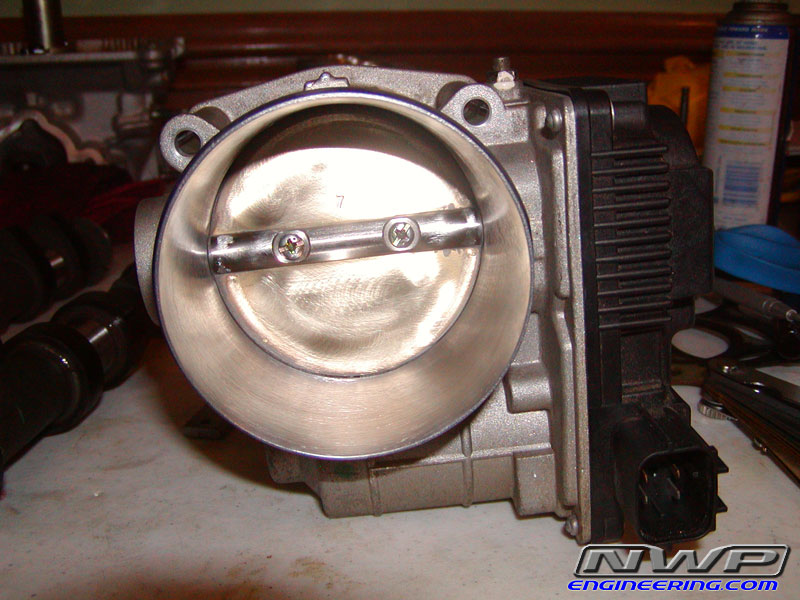
I have this style fuel pressure regulator on my VE. Can anybody think of a way to use this on the 3.5 engine? All I really need is an adapter fitting that bolts on the regulator that has a barbed hose fitting. But I haven't been able to find anybody that makes it.
If it's easier to buy a universal fuel pressure regulator, does anybody have any recommendations?

If it's easier to buy a universal fuel pressure regulator, does anybody have any recommendations?
04-20-2009 | 03:06 PM
#520
I have this style fuel pressure regulator on my VE. Can anybody think of a way to use this on the 3.5 engine? All I really need is an adapter fitting that bolts on the regulator that has a barbed hose fitting. But I haven't been able to find anybody that makes it.
If it's easier to buy a universal fuel pressure regulator, does anybody have any recommendations?
If it's easier to buy a universal fuel pressure regulator, does anybody have any recommendations?
It looks to be just about the same, and I suppose you could mount in place of the damper on the other side of the rail.
The only problem I can see in that is the front bank may not get as much fuel as it needs, considering the crossover point in the VQ35 fuel rail is at the rear, instead of at the front like the VQ30's.
Where do you plan on mounting the FPR to the rail?
As far as universal AFPRs, the only one I've had my hands on that I can remember is the Aeromotive (like this: http://www.suprastore.com/aefuprre.html). When I was working at AAM, that's all we used for the return style fuel systems for the VQ35, and never had a problem with them.
Last edited by pmohr; 04-20-2009 at 03:11 PM.