When you click on links to various merchants on this site and make a purchase, this can result in this site earning a commission. Affiliate programs and affiliations include, but are not limited to, the eBay Partner Network.
Quick, dirty, and somewhat cheap "HR" swap into 2002
Sorry about the really old swap thread, it will arise at some point.
Anyway, quick and dirty 2013 JX35 engine swap. edit: Now, it does have 4" intake and ~550cc injectors!
Darren has, of course, done a fantastic job. I won't rehash, really. I did a couple things differently that aren't as nice WARNING: I'm an idiot with power tools. I claim know-how of nothing except rigging.
Miles are unknown on the motor. I'm gonna say....very low miles It blew oil vapor out of the crank case for a couple thousand miles, so it's safe to say she was basically brand new.
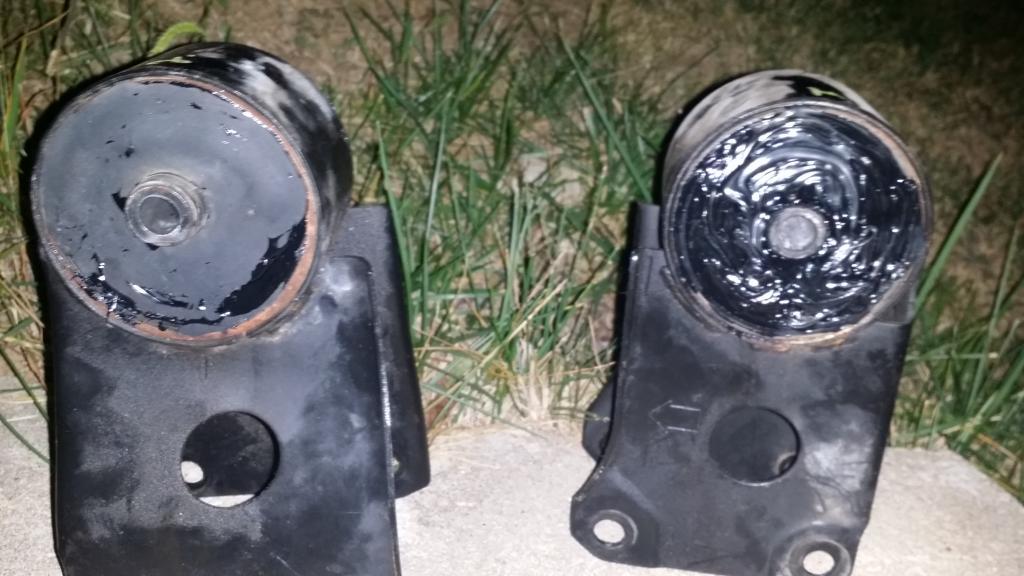
I cleaned and window welded the old mounts. I forgot to take pics, but you know how cracked up and falling apart they are at this age. I used the 3M tube and shot it into any cracks then filled up the vacant spots and added a layer on the outsides. Obviously, burning/cutting them up and filling is the best way. I'm cheap and lazy.
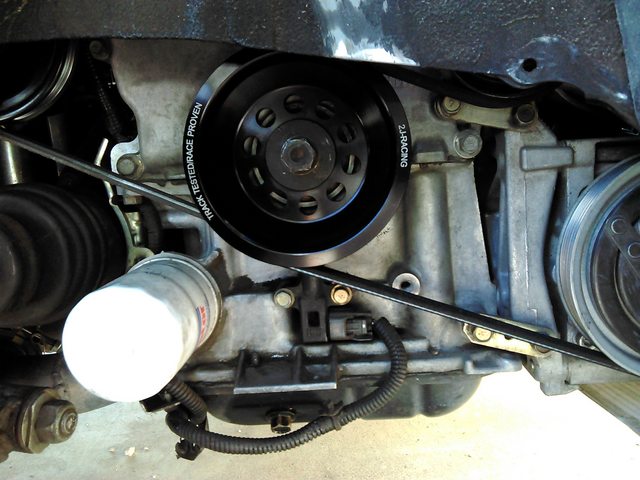
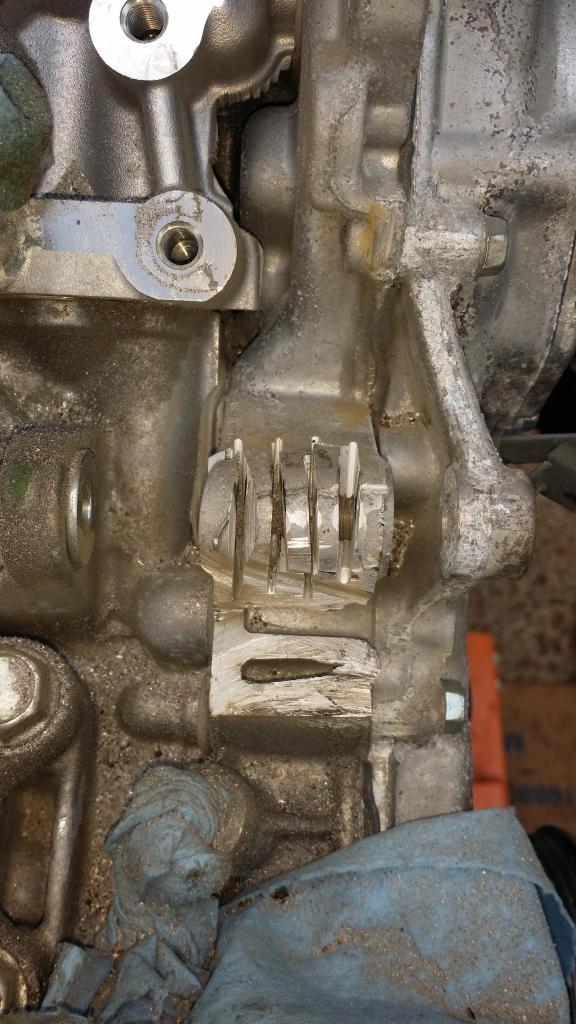
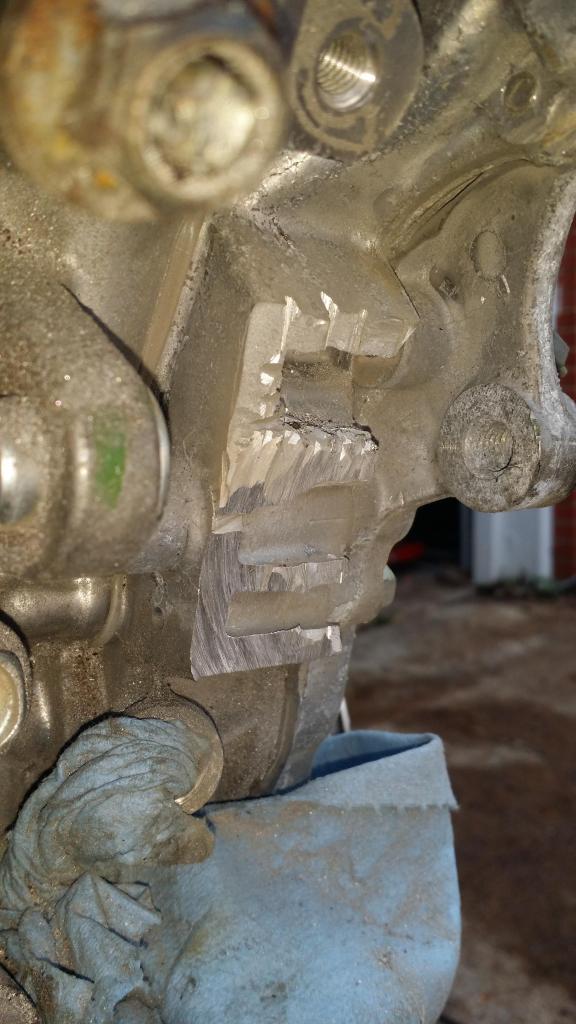
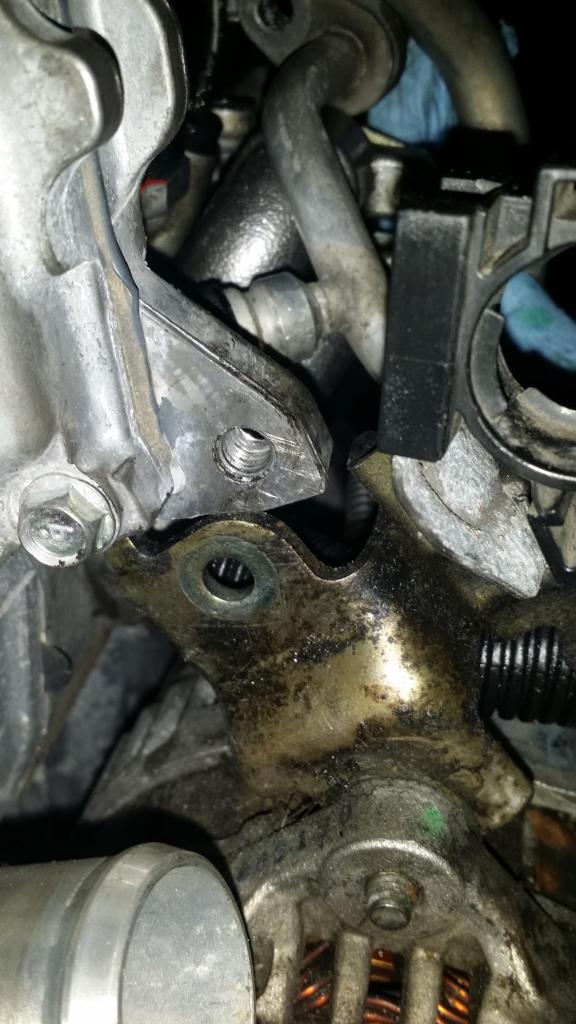
I opted for a 4" grinder with a cutting wheel to do the PS modding (Darren used hack saw, iirc). You can lop off most the bottom ear, then cut slits in both of them and break out the pieces with a chisel. Test fit the pump and you'll see where it hits the block. Grind off a little more there and you can really make it easy to get the belt off. Grinder makes a lot of mess. Make sure the motor is sealed up good enough (I washed it with a hose afterwards).
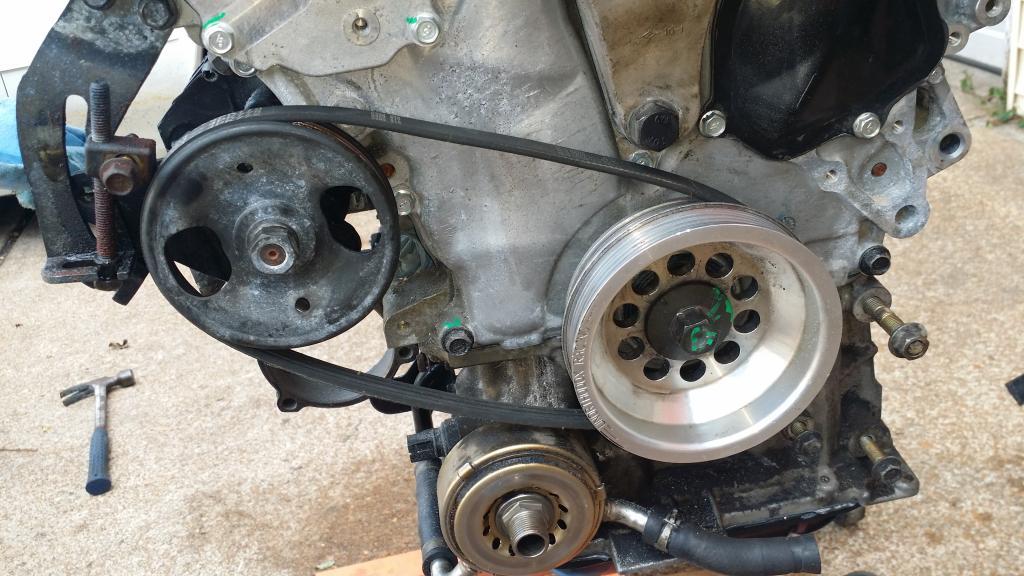
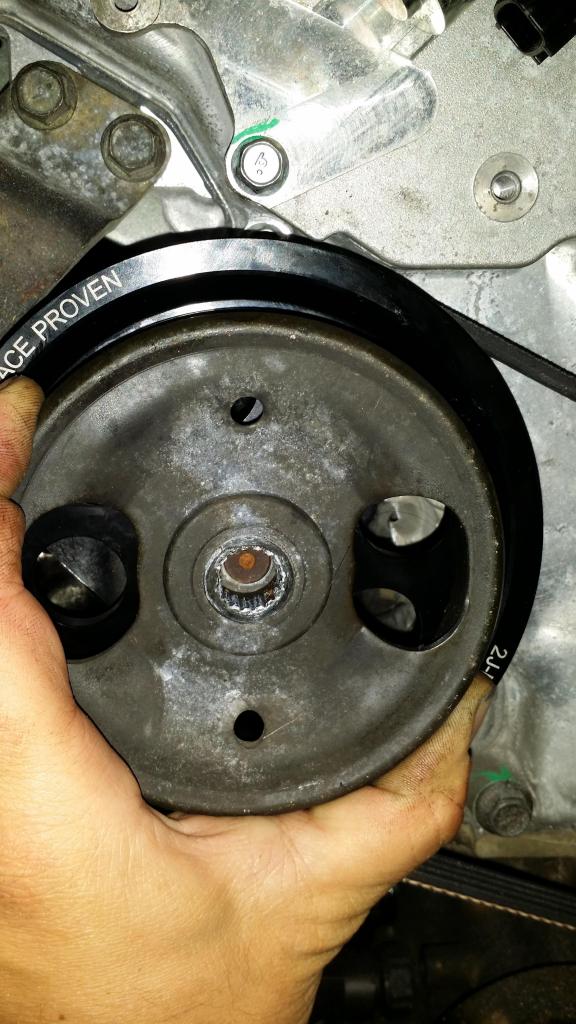
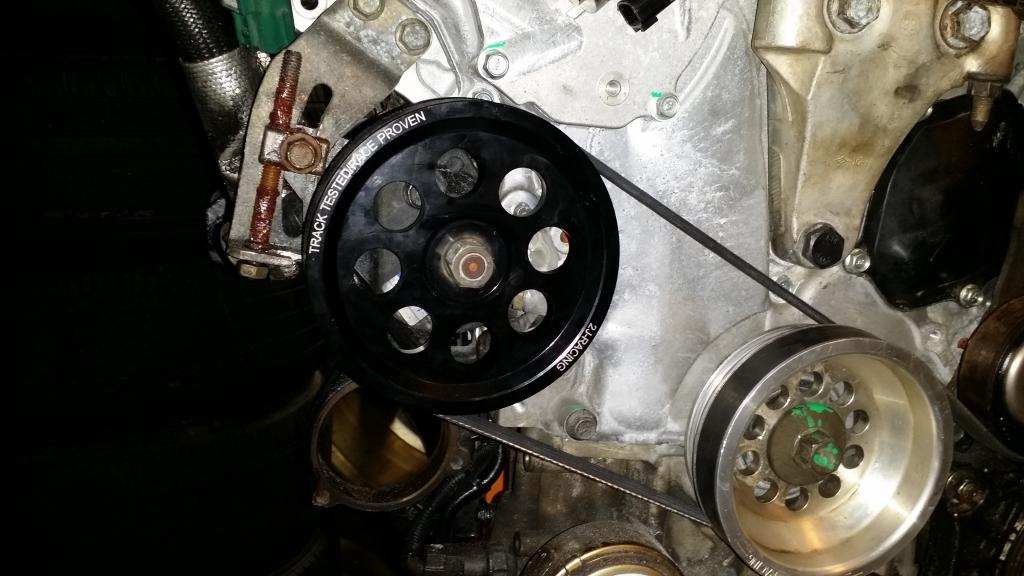
UD PS pulley is in the mail. So, ignore this stupid, ugly thing.
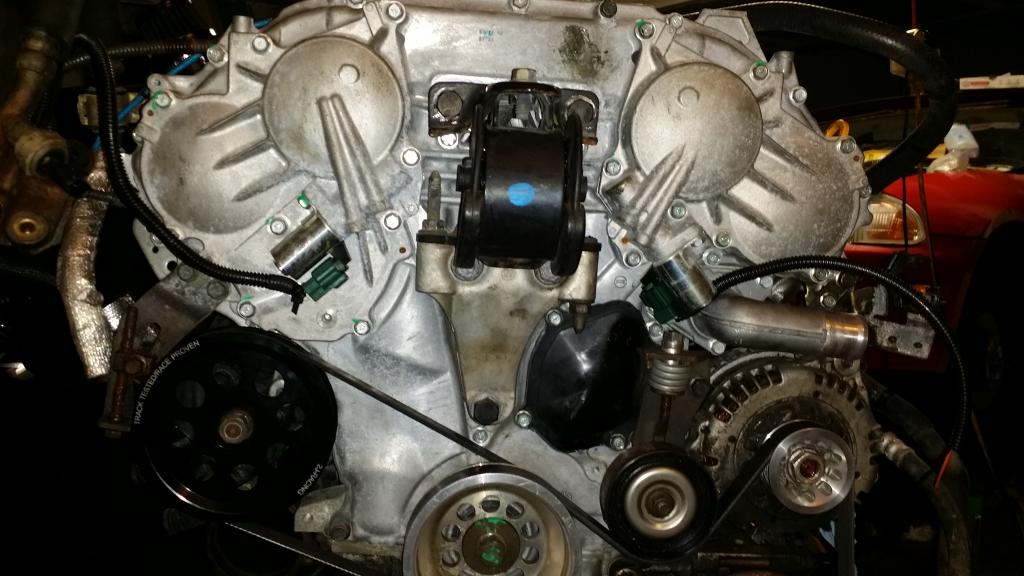
DOUBLE CORRECTION Pulleys looked aligned originally, but it's clearly misaligned. I thought alternator was off compared to the AC/crank pulley, but i was wrong. The compressor is like 4mm off from the crank/alternator on this particular engine (no one elses is like this apparently). It makes the belt squeal when it heats up b/c it's rubbing on the alty pulley AND rubbing sideways accross tensioner pulley (tried to align the atly between crank and compressor, didn't work). I resorted to using tiny washers (in retrospect, making a half moon would work) to shim the tensioner pulley to the appropriate angle towards the alty pulley and aligned it with the compressor. I have no idea why my engine is different, but this worked. The belt runs "straight" across the tensioner pulley. I believe Daren just had to shim the alty with a couple washers.
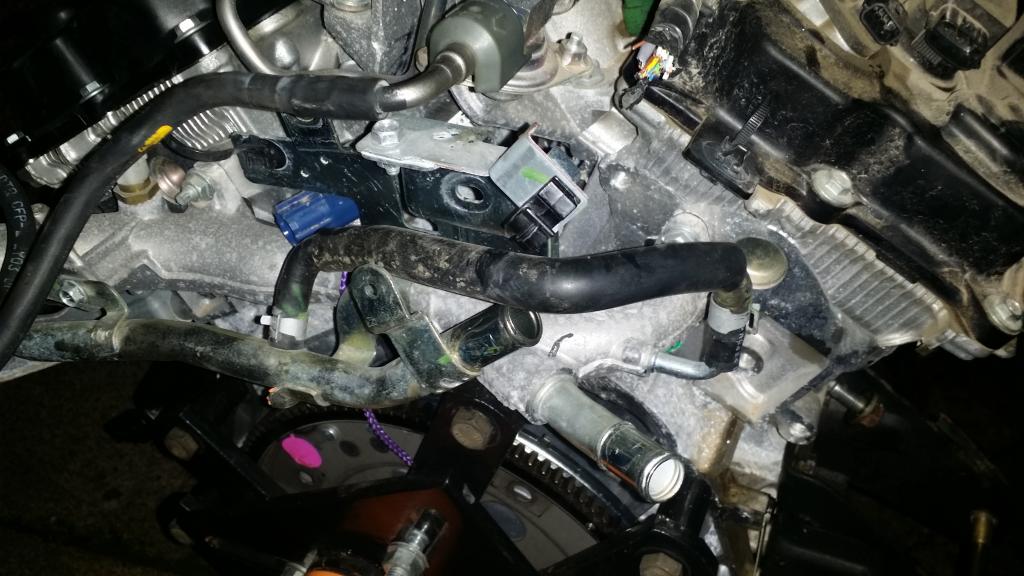
I didn't have the luxury of the new bracket, so I took a junk piece of metal and made my own connecting to the old bracket. Here's what it looks like before molesting scrap metal.
Being the lazy *** that I am, I decided to leave the new coolant pipes up top (connector mounts/brackets be damned). The hose already on them works great to bypass the TB coolant asshatery from Nissan.
For the lower pipes, I kept the originals - Por 15'd them and kept the oil cooler thingy, which works out great for the MASSIVE pl-14619 filter. I recommend replacing the oil cooler hoses. Also, replace the oil cooler O ring (it will leak later).
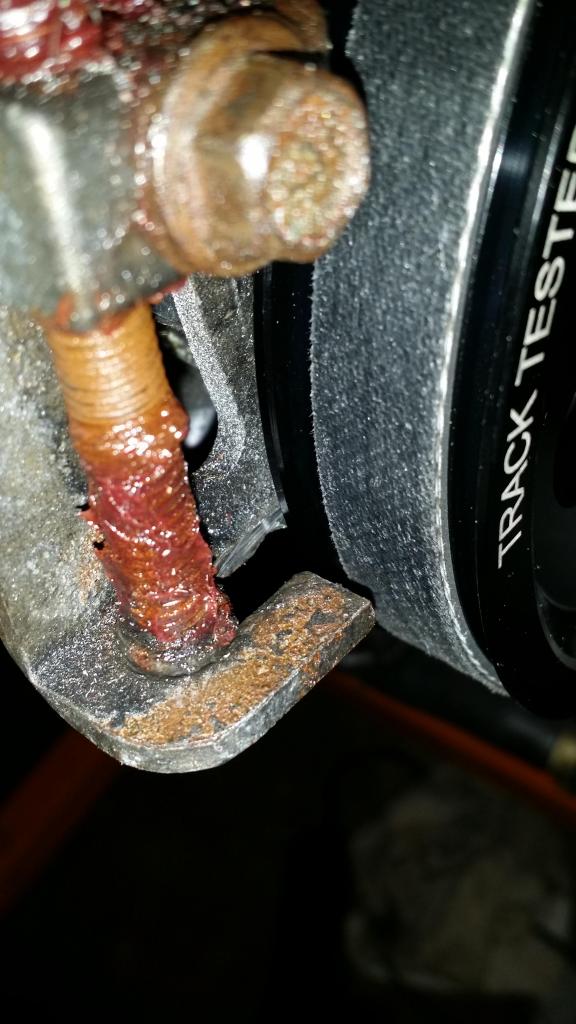
I went kinda crazy on the tensioner. I stacked four 3/4" lock washers and trimmed the top of the tensioner nut off to gain more clearance. I did it before fully testing LOL. I don't think it was necessary.... It looks like I needed more washers than Darren, since I have an UDP. I also ground down the back of the pulley bolt some b/c I couldn't freely slide it up and down.
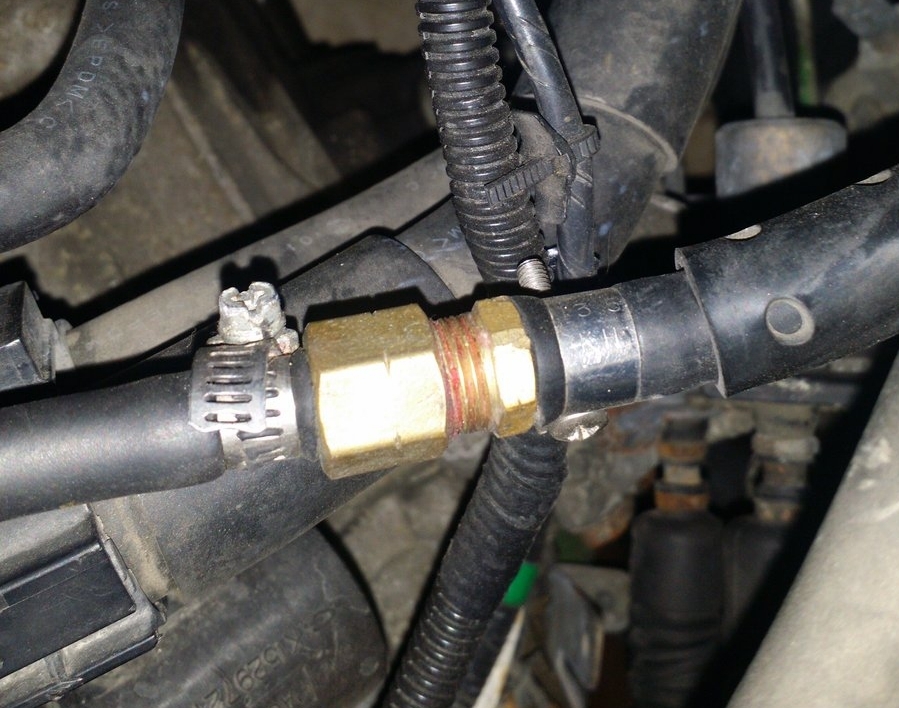
The new nylon hose is smaller, so I used two different adapters and screwed them together (with permanent thread lock lol). I couldn't find a barbed coupler with different diameters at the ****ty hardware stores.
I am using a 7th gen IM and TB on this engine. I want to retain as much power as possible. No EVT will be the only difference. Three pullies being lightweight/UDP should easily offset the loss of EVT.
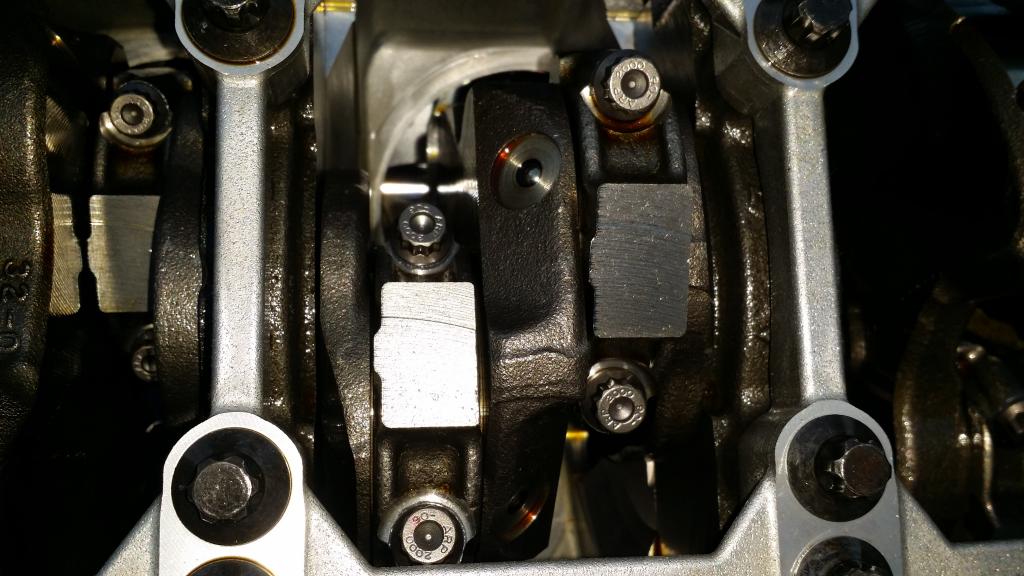
Is it me or are arp bolts kinda sexy?
retarding cam wheels didn't work, lovely
edit: Fixed after Darren sent me a pic.
Last edited by Child_uv_KoRn; May 29, 2016 at 10:23 PM.
Just got to work. Nice dude! BTW id the ARP rod bolts come standard and are you using Haltech?
We wish they came stock. Apparently, a much cheaper replacement are the bolts from the real HR motor.
I do not have a haltech or BBMAF, yet. But (assuming NDSII works), I will be using a TS F-spec ecu and see how it does for now.
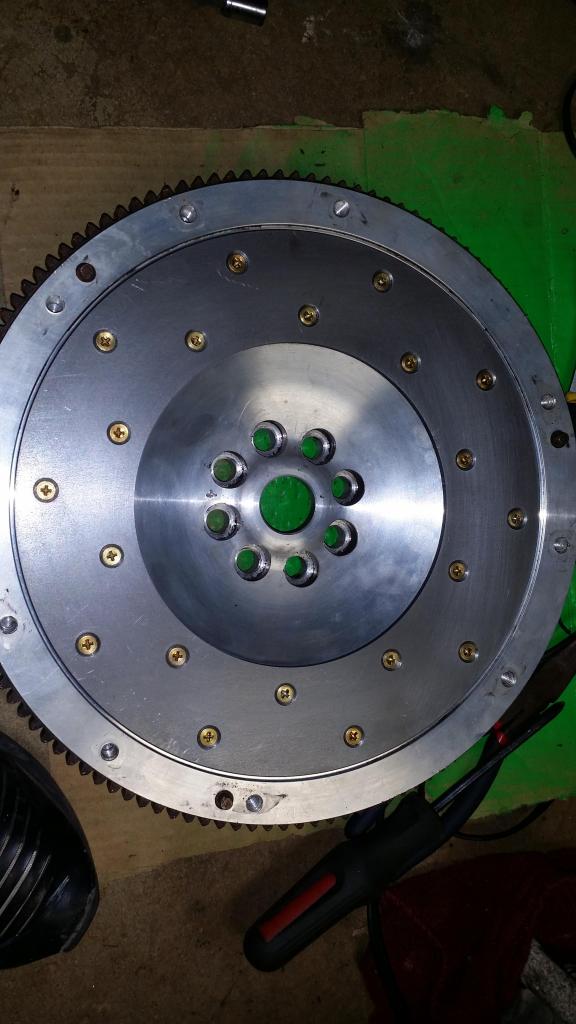
Initial mods are OBX headers, 3" test pipe, 3" cattman catback, fidanza flywheel and 6th gen BBK (might lose my pulley advantage with those fat *** rotors LOL).
It has all options minus nav and compass. Edit: I scored a compass mirror from an I35.
Last edited by Child_uv_KoRn; Oct 22, 2014 at 09:22 PM.
Let me know if you need any additional tuning parts (widebands, piggyback tuners, injectors). You may end up maxing the stock injectors once you install the BBMAF.
Let me know if you need any additional tuning parts (widebands, piggyback tuners, injectors). You may end up maxing the stock injectors once you install the BBMAF.
Yeah, I know I'm going to need the 380s. I have a set of 550s....but I think that's overkill.
I found with the BBMAF even using 470cc injectors requires you to add fuel through the piggyback you are managing, even after scaling the MAF to be larger. Just depends on the car really.
I had a customer 5.5 that had a 4" intake, spacers SSIM and then gutted precats and 3" CBE, using 470cc's we used the Q45 MAF setting and after 5,000 RPM we were adding like 14% fuel on top of that just to get the A/F in the 12s
But they had to be far from their max duty cycle. That does sound ridiculous, though.
QR25DE pulley looks identical. Part number is only one digit off from ours when I was perusing the auto parts sites. Only thing that's different is that there are 4 cut outs instead of two and it's 5.08" in diameter vs our 4.41". I will need a longer belt.
It's expensive without a group buy, but **** it. Steel pulleys are DUMB. The ******** want to increase fuel efficiency? Quit using bricks as pulleys. Instead, they'll tell you to run ****ty 20 weight oil, then have the nerve to make tiny oil passages, so that it won't run right on 30 weight.
Interesting, I was looking at using SR20 aluminum pulley, myself.
I saw those and think they're basically the same, too. Unfortunately, I'm impatient and am certain the QR25 will work.
The thing to do is probably get a whole set, so you get the alternator and PS. Use the others as fancy paper weights.
Last edited by Child_uv_KoRn; Oct 1, 2014 at 10:11 PM.
But they had to be far from their max duty cycle. That does sound ridiculous, though.
I'll need to check the IDC with Cipher on them, I'm sure someone has IDC logs of a similar setup.
**If you're using an AFC of some kind, it moreso has to do with your theoretical pulsewidth and what its doing to reflect fueling/timing on the ECU you have in place. If you're adding too much fuel to keep the a/f constant at WOT then your TP goes up, and the stock ECU is reading a different load cell with less ignition timing.
If you use bigger injectors, and have to subtract fuel through the AFC you could stand to get a little more timing out of it. Fuel mileage, idle quality and driveability is unchanged as long as you have a quality injector, you are just able to get more power is all.
If you have UTEC, Haltech, e-Manage Ultimate or something then its not relevant.
I underestimated how much larger this pulley would be since it's underdriving LOL. This thing must be 6" The sentras stock pulley causes cavitation at high rpm, so it's even more oversized. It's not that big of a deal, I just cut off that little arm on the bracket.
What I did forget is that they don't use a two belt system, so it has two more ribs. 32" belt works perfect and alignment is with the belt in the middle.
So, yeah, SR20 pulley is definitely a better idea for the non-rigging crew
You'll notice a piece missing haha. The pulley is 5.5".
USE THIS OPPORTUNITY TO REPLACE POWER STEERING HOSE AS IT'S JUST ONE LESS THING TO REPLACE LATER
Last edited by Child_uv_KoRn; Feb 25, 2016 at 07:23 AM.
Yeah I was planning on a whole set, found a few for around $55 which is pretty reasonable to me.
That pulley is massive! Any idea how much weight you shaved off with that pulley?
I'm not sure. They say it weighs 11 oz. I don't know what ours weighs. It's not night and day as this thing is big and heavy duty. They seriously went overboard for a PS pulley. I think their goal wasn't so much power gain as it was to increase steering responsiveness when racing. IIRC, they claim it saves about 5 hp on the QR (it varies depending on steering use of course). I don't know what that translates to for us since they are different sizes/weights.
They definitely make quality stuff. I'm satisfied with it. I wish it were lighter, but it's so well made that I can't complain. It could be a crank pulley LOL.
I would grab the SR20 set if I had to do it over, though. Oh, well. My experiences are your gain
I saw they also make a VQ crank pulley. It's more expensive than the cheapos, but a little cheaper than UR. Edit: Their crank pulley has been on sale for a long time, now. It's very nice!
Last edited by Child_uv_KoRn; Feb 18, 2016 at 03:16 AM.
quick and dirty recap (can I do anything right lol) of what is not in my thread:
These are needed from old engine -
Water pump access cover
Crank Pulley
flywheel
Motor mount brackets Front, Rear, and passenger
Axle mount
Upper and lower oil pan
oil pickup tube
Oil dipstick
oil cooler and related pieces (not thermostat), you can fit the monster purolator pure one with it pl-14619
Swap pass motor mount - You need longer bolts for the two top ones (I don't remember, just measure and figure it out, simple ****). I don't recall what the bottom one needs to be.
Need to buy the cam signal inverter from Darren (or build it, but I'm lazy) and power it by tapping into the 5V at the power steering pressure sensor. http://www.nisformance.com/Default.asp
Need the TB adapter harness or pigtail.
Install the VIAS. I think Darren used one of the solenoids off the new engine, idk. I just used the original VIAS system (split to both valves of course) to make sure it worked. Or you could just plug in the solenoid and rig the valves open.
Need real tuning solution to extract all those ponies and fix AFR.
Need 4" intake for moar powah (which will need bigger injectors or more pressure)!
Others with 5.7 swap please chime in. It would be a help to make my thread more productive for the new guys!
Last edited by Child_uv_KoRn; May 26, 2016 at 06:33 PM.
Rear exhaust studs are not that bad to get to, but I can see how rust makes it take all day to install headers LOL. I'd spray that **** down for a week if I were going to install them on a fresh car. You can fit 1/2 socket wrench from the bottom and get to every nut.
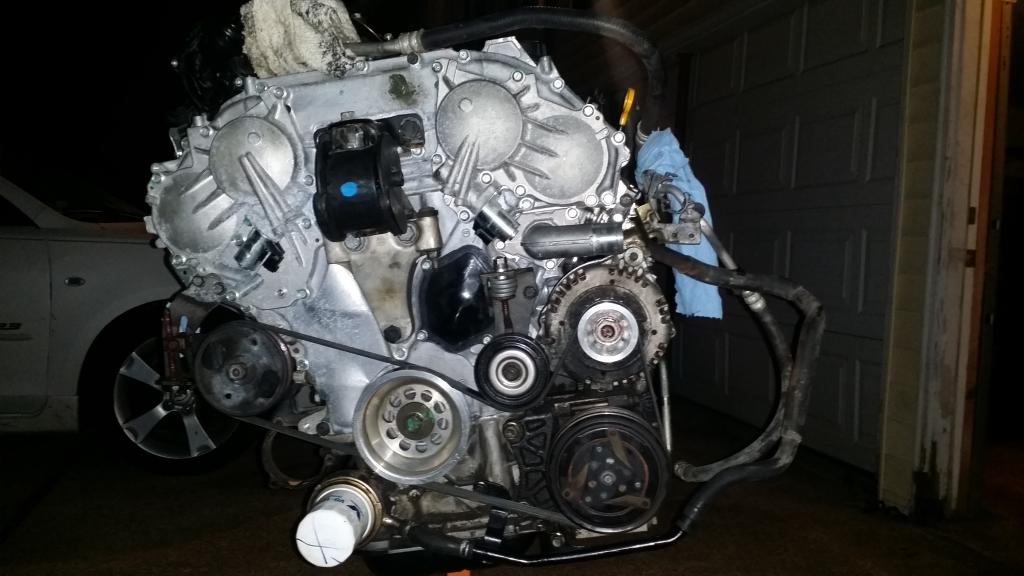
Engine and tranny are in.
Last edited by Child_uv_KoRn; Oct 5, 2014 at 07:41 PM.
No, but it's not too pretty. Rust is starting in the rear, spoiler needs repainted, roof messed up from someone trying to break into it, and has many other small paint issues. But, it's black, so it can be touched up. Bought it for 700 and it came with the obx headers and megan test pipe/catback. The black interior is good. It's just going to be a beater DD.
Originally Posted by CMax03
There gotta be a way to reuse the 09+/HR accessories....So it goes togther like OEM not cutting, chopping, chiseling, nor rigging involved!
There is. When I looked at the pics of accessories they look the same to me. Darren says they're different, most notably, the AC compressor. But I believe my (un)professional rigging skills could make it work easily. I just couldn't get a hold of a complete motor before winter.
Last edited by Child_uv_KoRn; Oct 8, 2014 at 08:33 AM.
I was on the thread and nothing was showing *shrugs*
I did revert to the old coolant pipes before I threw the engine in b/c I thought about the sensors. I forgot that I will only have 2 sensors clipped on it, so that was dumb and a waste of time. But, I'm not redoing it, again.
Last edited by Child_uv_KoRn; Mar 17, 2018 at 11:21 PM.
It runs, *****es. Fired up 1st try no problem. Had to shim starter a little bit for the fidanza. I think it still grinds a little (probably need to do it more on the side).
Tranny is filled with Red Line and catback is on, but it's hitting the brace behind the test pipe heavily. I have to extert a good amount of force to push it off. Something is wrong - cheap chinese crap is what's wrong lol
Last edited by Child_uv_KoRn; Feb 18, 2016 at 03:19 AM.
it is possible to bleed the stock lines.. aka macaroni clutch line piping as i call that stock mess..
have to bleed the upper line first, then bleed the lower. (it makes it 10000x easier to use a vacuum pump.. pushing up/down on the pedal you're going to be there all day, since a lot of fluid to bleed through all that line length)
there's that clutch line distribution unit in the middle. the piece where the MC line goes into a block, then splits to large line Upper bleeder (driver's strut tower) and to the smaller lower bleeder (clutch slave cyl).
most people get the one piece SS line. you actually CAN use a ss brake line (maxima front/back, non-300zx) and reuse (have to re-bend) the line from the MC to that distribution block to make a single path clutch line.
NOTE: you will need a "line-wrench" flare-nut wrench to not round off the clutch line 'nut'
I'd convert it to single path before trying to re-bleed it. You have only one pathway for fluid, there's less line length involved and less fluid to bleed thru.
pm me if you need more info.. I can walk you thru it easily.
...
have to bleed the upper line first, then bleed the lower. (it makes it 10000x easier to use a vacuum pump.. pushing up/down on the pedal you're going to be there all day, since a lot of fluid to bleed through all that line length)
there's that clutch line distribution unit in the middle. the piece where the MC line goes into a block, then splits to large line Upper bleeder (driver's strut tower) and to the smaller lower bleeder (clutch slave cyl).
.....
I don't understand why alot of people on the org, even those who have the FSM, make this mistake. The bleed procedure is the other way around. You have to push the bubbles up and out. That's what the bubbles want to do naturally.
Bleed the slave cylinder first, then the that other valve sitting on top the shock tower.
The FSM directions are somewhat convoluted, but they say the same thing.
End of rant.
Last edited by dwapenyi; Oct 19, 2014 at 08:33 AM.
I don't understand why alot of people on the org, even those who have the FSM, make this mistake. The bleed procedure is the other way around. You have to push the bubbles up and out. That's what the bubbles want to do naturally.
Bleed the slave cylinder first, then the that other valve sitting on top the shock tower.
The FSM directions are somewhat convoluted, but they say the same thing.
End of rant.
It's not like it matters since it can't be done by hand lol. Design failure. Idiots were too worried about ****ty automatics.
Screw these SS lines. NiCopp brake line is where it's at. Picking up a piece tomorrow and will snake it to the rubber hose. It costs about 13 bucks for 51". I'm not sure exactly how much I need and didn't want to run short, so I got more than 3 ft. It's so flexible that I can coil up excess easily and neatly.


 It blew oil vapor out of the crank case for a couple thousand miles, so it's safe to say she was basically brand new.
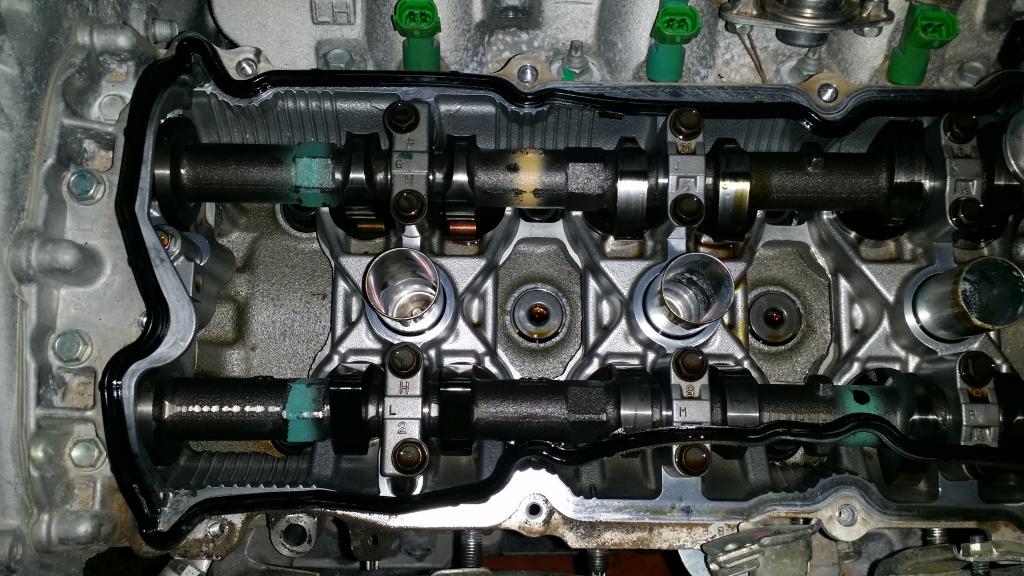


 I got mine during their black friday sale last year for around $65